What's new
Van's Air Force

Don't miss anything! Register now for full access to the definitive RV support community.

Fuel caps - what could possibly go wrong?

chrispratt

Well Known Member
Shame on me, but I never thought about maintenance on the fuel caps until a couple of weeks ago. After all, what can go wrong with a fuel cap?

During pre-flight I went to open the cap and the handle came off in my hand. Hmmm, not good. And me who has a spare for just about everything, but not an extra fuel cap. Fortunately, a friend had a loaner for me, so the day was not a complete bust.

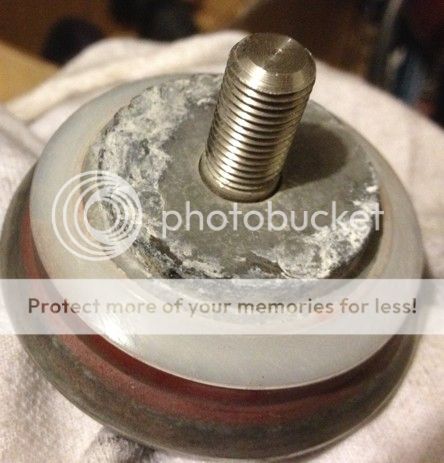
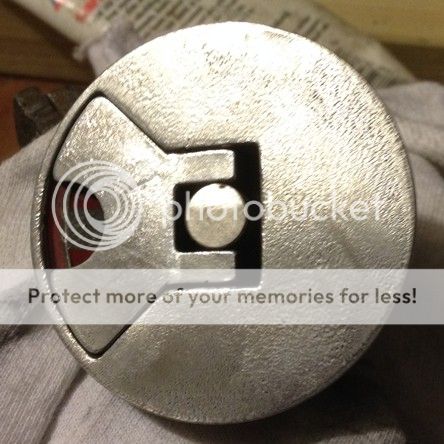
After looking closely at the cap (Van's standard issue Usher), I realized the handle is kept in place by a roll pin. Thankfully Van has replacements for these in the parts catalog so I now have an ample supply. While taking the cap apart to replace the pin, I was surprised to see an ugly buildup of white powdery material all over the interior of the cap halves, probably oxidation from fuel-air interaction. Cleaned everything, replaced both O-rings (put some Fuel Lube/EZTurn on them), new pin, adjusted the tension and it's like new. Since one broke, I figured I'd better do the same treatment to the other cap as a preventive measure.

At annual, fuel caps will now be on the inspection list. Oh, I 'll be carrying an extra cap in my road kit, too. This event would have been a real bummer if it had happened away from home.

For reference, the aircraft and caps had four years of use, 335 hours at the time.

Chris
 
Last edited:
Lubrication helps

Put squirt of LPS (or other good lubricant) on the roll pin (and around the shaft, etc) every once in a while, really helps reduce the amount of force necessary to get a good seal, thus reducing the chance you'll gall (and eventually break) that roll pin.

YMMV
 
I replaced the roll pin in my caps with a 1/16" drill blank piece. It is solid and takes a lot more force to break. The fuel lube has been on all the cap parts since before the airplane flew. The fuel lube is necessary on the center shaft and O-Ring to keep the caps from leaking.
 
The new caps have a solid pin (at least mine did, bought 18 months ago). I recommend replacing the rolled pin with a solid one to minimize this potential problem. (and I carry a spare as well along with my spare fuel drain).

greg
 
The 1/16 tension pins are a standard hardware store item. I carry a few in my airplane toolbag, and I give away one or two at Oshkosh every year for people with this same problem.
 
The 1/16 tension pins are a standard hardware store item. I carry a few in my airplane toolbag, and I give away one or two at Oshkosh every year for people with this same problem.

A piece of 1/16" stainless welding rod also makes a fine pin. I carry a 6" length of rod in the tool kit and have had one occasion to use a piece of it.
 
Yep

I had one shear as well. Fortunately, I had some clear packing tape and taped over the cap to get home. After taking the cap apart and discovering the shear, I replaced the pin with drill bit stock. I now carry an extra cap with me. Of course, I haven't broke one since.

You can also adjust the tension on the cap with the nut on the bottom. Takes some tweaking to get a solid fit and latch correctly without being over tight.
 
You guys are scaring me

I'm 1100 mles away from home and my caps are tight, I calculate I have to fuel up twice for the trip home...Will my caps hold out?...:)

Frank
 
What makes the cap tight is the big "O" ring is dry and can't roll as the lever is pushed down. Fuel lube is the best for this if you are not in cold country. At your next stop, see if you can find some sort of lube and lube the "O" ring up.
 
Last edited:
Anyone know who makes the caps? I need to get a lever piece, as when the pin broke it also messed up the lever.

Russ
HRII
 
For the last 18 years I have been wetting the large O ring with gas before closing the cap. I do this either with my finger dipped in the fuel or with the last few dribbling drops out of the fueling nozzle. If you seat the cap before the fuel dries, the lever will close smooth as butter with minimal resistance.

Martin Sutter
building and flying RV's since 1988
 
While we're writing about fuel caps....I have two I would like to sell, new o-rings and spares, painted red.
Want $40.00 for the pair, shipping extra.

Glenn Wilkinson
[email protected]

best to e-mail...I'm bad about not noticing private messages most times.
 
I just sent Dan the forms that Usher sent me. All the individual parts are available through them. The form also has great service and maintenance info as well as adjustment info. I suggested to dan that he put it in the download section.

Thanks for the help.

Russ
HRII
 
I just sent Dan the forms that Usher sent me. All the individual parts are available through them. The form also has great service and maintenance info as well as adjustment info. I suggested to dan that he put it in the download section.

Thanks for the help.

Russ
HRII

Who is Dan? Can I get a copy of those forms?
[email protected]
 
Usher fuel cap adjustment

I have new (engraved) Usher fuel caps for my 7A. How do I adjust the tension so they latch (caps are too "fat" right now)? I see from earlier posts to place the "ears' in a vise and hope the pin does not break when moving the jam nut. I read in another post to heat up the plastic on the jam nut..... Looking for suggestions. :confused: Thank you!
 
Oops

Sorry - I did not state my question very well last night (tired I guess). I read the Usher tech sheet that states to loosen the jam nut #90 and then rotate threaded washer #83A to adjust tension. I am trying to figure out the best way to loosen the jam nut without harming the fuel cap. Do I put the latch "ears" in a vice so I can loosen the nut, or?? Thank you!
 
Just my opinion, but I think if you just hold the cap firmly (maybe with a glove) in one hand, you should be able to loosen the "jam" nut, then rotate the cap a bit until you get it adjusted to your satisfaction. Try it a few times in the tank until you get it right, then re-tighten the jam nut.

Or am I missing something. :confused:

EDIT: PS: No need to heat anything!!
 
Last edited:
Use a vise

I have new (engraved) Usher fuel caps for my 7A. How do I adjust the tension so they latch (caps are too "fat" right now)? I see from earlier posts to place the "ears' in a vise and hope the pin does not break when moving the jam nut. I read in another post to heat up the plastic on the jam nut..... Looking for suggestions. :confused: Thank you!

To loosen that nut, open the cap lever, squeeze the lever ears tight between some wood in a vice, Carefully unloosen the nut. Adjust the lower plate. Tighten nut. I also carry a couple spare replacement hinge pins by cutting 3/4 long sections from the smooth portion of a 1/16 drill bit.
 
Hey, great thread! I thought I was doomed to carrying around a can opener to check my fuel unless I buy the fancy deluxe cap inserts. New O-rings, pins and fuelube are on the shopping list... and VAF dues pay for themselves again. :D
 
Adjustment

To loosen that nut, open the cap lever, squeeze the lever ears tight between some wood in a vice, Carefully unloosen the nut. Adjust the lower plate. Tighten nut. I also carry a couple spare replacement hinge pins by cutting 3/4 long sections from the smooth portion of a 1/16 drill bit.

Would not put the ears in a vice... If the nut is very tight(mine was), the ears will break, ask me how I know! Think it might be better to find a way to tightly hold the cap itself.
 
Careful is key word..

Would not put the ears in a vice... If the nut is very tight(mine was), the ears will break, ask me how I know! Think it might be better to find a way to tightly hold the cap itself.

I've done two that way with no problem. 3/4 pine between the ears and vise metal was key for me. Perhaps a spray of penetrating oil might have helped. Definitely do not jerk it.
 
Ditto

The threads are in the lower flange below the large o-ring. If you clamp the ears, the torque is limited to the strength of the shear pin. Hold the bottom flange to un-torque. Ask me how I know! :D
Would not put the ears in a vice... If the nut is very tight(mine was), the ears will break, ask me how I know! Think it might be better to find a way to tightly hold the cap itself.
 
Got the nut loose!

I tried holding the bottom flange itself with my gloved hand (I needed a stronger hand, because that did not work). The vice I had at my hanger was small, would not open up enough for the flange, so, I put the ears in the vice (soft jaws) and also held on the flange with my hand and the nut broke loose. :) "Lady Luck" was with me - the pin did not break. Once loose - the nut was easy to move by holding the cap with my hand. My new engraved caps are installed. I purchased them from Bill at RVengraving. Bill had some health problems and was slow delivering (he called me and explained his situation, I told him no problem, I was not in a hurry). Bill is back to work now and he did a super job. Thank you VAF members for your advice!
 
Adjustment

Do not put the "ears" in a vice. Make sure the latch is closed, hold it your hand with a glove or cloth. Use an open end wrench and loosen the nut. If you've never worked on one before take it completely apart by removing the nut and then twisting the lower 1/2 completely off the threaded shaft. Clean all the parts and lubricate with fuel lube or something similar. As someone else said make sure to lubricate the shaft and small O-ring also. It takes a little effort to get them to fit well. You should NOT have to force the lever down or up with much effort. If it's really hard to move or you feel it needs to be that tight to prevent leaks it's not adjusted correctly.

Gary
 
There has been a number of different configurations of Usher's fuel cap over the years. The early ones just required turning the nut to make the adjustment. The later ones require loosening the nut and turning the bottom plate.

At one point caps were made with a plastic glide at the base of the latch to help it open and close more easily. It did not work. After a while the plastic gets deformed to where the latch will no longer fully close and it will be hard to open and close. These caps can be upgraded with the later version stainless plate.

Bottom line.... If you are working on an older RV, you need to figure out what version cap you have.....
 
Fuel caps guide

My "older" RV-4 has neither the plastic nor the metal guide under the latch. The latch presses down directly on the small o-ring. Can the new metal guide be installed on these caps?
 
one more note.....yuch!

here's my cap when removed to cleanup and inspect.
hmmmm, perhaps 9 years is too long?
IMG_2517_zpsr8lz7kp2.jpg


a little wire wheel, buff and the cap looks better than with chipped paint. ( go easy on the wire wheel apparently!)
IMG_2518_zps30u60l46.jpg
 
Last edited:
here's my cap when removed to cleanup and inspect.
hmmmm, perhaps 9 years is too long?
IMG_2517_zpsr8lz7kp2.jpg


a little wire wheel, buff and the cap looks better than with chipped paint. ( go easy on the wire wheel apparently!)
IMG_2518_zps30u60l46.jpg

A better choice is a flat plate and some wet/dry sandpaper with a little water.

If you work your way up to 600 grit, when finished it almost looks polished.
 
My "older" RV-4 has neither the plastic nor the metal guide under the latch. The latch presses down directly on the small o-ring. Can the new metal guide be installed on these caps?

I don't think so, but I am pretty sure newer caps will work in the old flanges so I think you could upgrade.

The best place to go for info regarding the fuel caps is the manufacturer.

www.usherprecision.com

They will be able to tell you what the compatibility between different vintages is.
 
Back
Top