What's new
Van's Air Force

Don't miss anything! Register now for full access to the definitive RV support community.

RV10 engine build

Nashpdman

Active Member
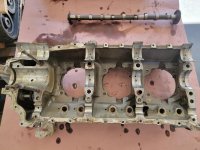
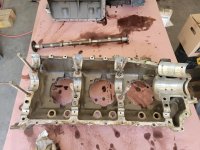
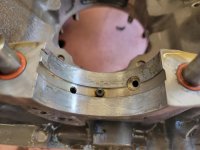
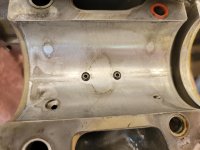
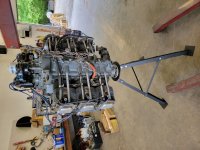
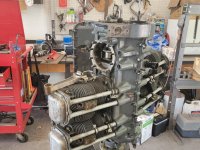
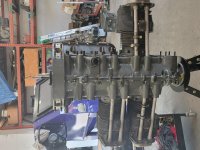
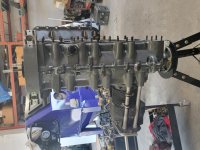
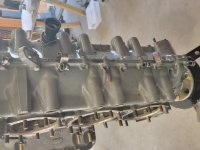
I bought a IO-540-J4A5 narrow deck engine for my RV10 project. The engine was turbo charged (8.5:1 compression) in it former application but will run normally aspirated in the 10. The engine was a prop strike, (light strike if that's possible) so it must be torn down and inspected per the AD. The engine had 808hrs on it SMOH. This is the first aircraft engine I've worked on. I've built lots of automotive & diesel engines.

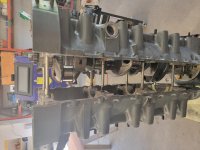
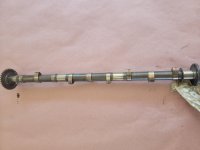
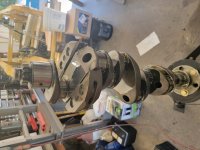
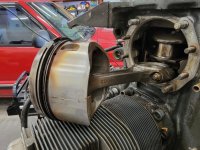
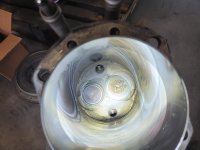
First impressions, these things are built like a tank, heavy like a diesel. Heavy rods, huge pistons, impressive! I see why they are capable of running at high H.P. demands for long periods. It appears I lucked up (mater of opinion) and got chromed cylinders. I like that the rings wear vs. the cylinders.

Everything will go out to be checked and inspected. I intend to go back with the standard, new rings, mains & rod bearings, and anything required by the AD. I will not be servicing any of the other rotating accessory as I will be using the EFI II system with an automotive alternator.

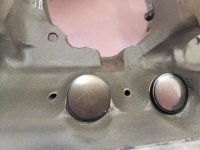
Questions that I've found different answers on. 1. Re-use the through bolts or replace? 2. Re-use the cylinder hold down nuts? 3. Go ahead and replace the pistons? (they're relatively cheap) 4. Chrome cylinders, how to prepare them for the new rings?

Please don't flame the new guy... I'm learning here and just looking for advice.

Thanks!
Mike
 

Attachments

  • 20220506_122113.jpg
    20220506_122113.jpg
    552.5 KB · Views: 315
  • 20220506_144710.jpg
    20220506_144710.jpg
    534.3 KB · Views: 331
  • 20220506_132743.jpg
    20220506_132743.jpg
    280.7 KB · Views: 320
Just an opinion...

You are correct - these engines are pretty robust and overall, pretty simple.

That being said, you and your passengers are depending on this one engine to get you safely and reliably to and from your destination. If it were me, I would send the engine to one of the well known engine shops and have it inspected, assembled and test run.

Given that you are going to be electrically dependent, I would rethink the use of an automotive alternator. I think a better choice would be one (preferably two) B&C externally regulated alternators.

Of course, this is experimental aviation and you can choose how you mitigate your risks.
 
Find a Good Mentor…

You’re correct that these engines are pretty simple, but there are lots of little tips and tricks that aren’t in the manual, are often things you just wouldn’t think of, and aren’t quite like non-aero engines. If I had a nickel for every time the Lycoming school instructors said “now the trick here is….” I’d be able to buy a cup of Starbuck’s coffee…..

So….if you’ve never built up a Lycoming before, I’d suggest finding a mentor, someone that has done ti more than once. Doing in a vacuum, by yourself, leaves a good chance that you’ll do something (or fail to do something) that will give you an engine that leaks, or has some other problem. I’d start with an A&P you trust, or your local EAA chapter.

Paul

I agree with this sentiment. Find yourself a mentor, send the parts out, and once you get 'em back, go over everything with a fine tooth comb with your mentor. If he's happy, ask him to watch over your shoulder while you build the engine. At the end of the project, a day or two's pay for that experienced guy's time will seem like a minor expense.
 
Definitely new threw bolts. I broke 6 of the 8 bolts off on a cylinder once. 2 bigger threw bolts and all 4 studs broke. Cylinder was really shaking around. Made lots of bad noises and oil was everywhere. I know of one other that did the same
 
I have reused cyl hold down nuts. If they pass a visual inspection, I don't believe they are a required or even recommended replacement. Let Divco or whoever is overhauling your case decide on the through bolts. They will inspect them and decide if replacement is necessary. Sometimes they need to ream the holes in the case to a larger bore and that will require an oversize through bolt. They are not torque to yield bolts and interval replacement is not required. I think divco replaced three of them on my 540. Not cheap.

Given that it is going out to a shop, I would just have the case and crank overhauled. About 1K for the case and half that for the crank. Probably not that much more than an inspection and the case will likely have cracking at the web and fretting at the joint if it didn't have sleeves installed. Then you have a fresh lower end that will likely last your life time and deal with the cylinders if/when necessary.

Larry
 
Last edited:
Agree here.

I got a freshly overhauled case from DIVCO as part of the engine core I purchased. The crank passed inspection and we started the build with a box of yellow-tagged parts, a new cam and six new cylinder assemblies. It was rewarding and confidence-building having an A&P with lots of 540's under his belt literally over my shoulder guiding me through each step of the assembly process, and worth it. Including core, inspections and reman of the case, the A&P's time and the new parts, I have about $25k in my engine (2019 prices) and quite happy with the return on investment versus new.

I would not recommend attempting this on your own when getting good help is so easy and relatively minor added expense.
 
"Given that you are going to be electrically dependent, I would rethink the use of an automotive alternator. I think a better choice would be one (preferably two) B&C externally regulated alternators."

My plan is to have a main automotive alternator and a backup B&C shaft type alternator. I won't have any driven accessory so there will be slot open for it. Plane will have A/C.

"So….if you’ve never built up a Lycoming before, I’d suggest finding a mentor, someone that has done it more than once. Doing in a vacuum, by yourself, leaves a good chance that you’ll do something (or fail to do something) that will give you an engine that leaks, or has some other problem. I’d start with an A&P you trust, or your local EAA chapter."

Absolutely! I will seek the guidance the experienced! Like most of aviation, everyone is very helpful!

"I agree with this sentiment. Find yourself a mentor, send the parts out, and once you get 'em back, go over everything with a fine tooth comb with your mentor. If he's happy, ask him to watch over your shoulder while you build the engine. At the end of the project, a day or two's pay for that experienced guy's time will seem like a minor expense."

Agreed! I will gladly pay to have a second set of experienced eyes. But, I want to build it. It's kind of a pride thing, I wanna be able to say I did that...I grew up with a depression-era grandfather who always taught the old adage "teach me to fish". The next one I build will be easier.

"Definitely new threw bolts. I broke 6 of the 8 bolts off on a cylinder once. 2 bigger threw bolts and all 4 studs broke. Cylinder was really shaking around. Made lots of bad noises and oil was everywhere. I know of one other that did the same."

Wow! That's certainly food for thought! I'll lean on the machine shop for their inspection and recommendations. New bolts would make me feel better!

"I have reused cyl hold down nuts. If they pass a visual inspection, I don't believe they are a required or even recommended replacement."
"I would just have the case and crank overhauled."

Understood. I'll take all items with me to the machine shop for cleaning & inspection. Great advice on the "overhaul", especially if the cost is similar.


Thanks for the advice! I am soooo looking forward to the learning curve and experience of building this engine!! I live to build!! Thanks for the warnings too! I have no preconceived notions of the danger associated with this endeavor. I will learn, educate myself, and seek out those with knowledge during the process. LOVE Vansairforce, put up a post and get ideas and thoughts that would have never occurred to you otherwise!
 
I've built my own engine several times, and I applaud your venture in this. Aside from all the mystery and fear surrounding "aircraft engines", a Lycoming 540 is essentially an expensive, high quality lawn mower engine.

They're pretty simple to build, but do have a few key points I've documented in other threads, with key points being that you should have your components OH'd by reputable vendors to certified standards...IMO. Also it requires adhering to torque specs and assembly instructions - so get a copy of the Lycoming OH manual and read it until you understand it.

The hardest part in the build is putting the crankshaft into the case and joining both halves - significantly the checks and torques that go along with that, so that's a good time to have expert help. Other than that, it's just assembling, using proper torque and understanding how fasteners work.

Don't let the fears of others dissuade you from pursuing your dreams. Just be smart about it.

Also, there is a bunch of Service Bulletins, Instructions and Notices, all freely available for download from Lycoming - you need to get all of them and read them. Much like playing golf, building a good engine is done in the preparation and planning.

As for fasteners, Mandatory Service Bulletin 240W clearly states to replace all stressed bolts and fasteners at OH. Anything that has been torqued, especially cylinder hold down bolts, rod bolts and crankcase through bolts - have been stretched. As an experimental builder, you are not required to adhere to service bulletins, but common sense says it's a smart thing to do.

Lastly, don't skimp or cut corners on your engine - save money somewhere else on the airplane. You wouldn't bargain shop for heart surgeon, so don't get cheap on the heart of your airplane either.
 
"Given that you are going to be electrically dependent, I would rethink the use of an automotive alternator. I think a better choice would be one (preferably two) B&C externally regulated alternators."

My plan is to have a main automotive alternator and a backup B&C shaft type alternator. I won't have any driven accessory so there will be slot open for it. Plane will have A/C.

I completely agree. I purchased a B&C LX60 for my main and their BC410-H for my gear driven backup. Two batteries and two alternators to keep that "heart" beating.

Separately, I have a brand new set of superior pistons and valve covers in the box; I'll make you a killer deal...
 
I've built my own engine several times, and I applaud your venture in this. Aside from all the mystery and fear surrounding "aircraft engines", a Lycoming 540 is essentially an expensive, high quality lawn mower engine.

They're pretty simple to build, but do have a few key points I've documented in other threads, with key points being that you should have your components OH'd by reputable vendors to certified standards...IMO. Also it requires adhering to torque specs and assembly instructions - so get a copy of the Lycoming OH manual and read it until you understand it.

The hardest part in the build is putting the crankshaft into the case and joining both halves - significantly the checks and torques that go along with that, so that's a good time to have expert help. Other than that, it's just assembling, using proper torque and understanding how fasteners work.

Don't let the fears of others dissuade you from pursuing your dreams. Just be smart about it.

Also, there is a bunch of Service Bulletins, Instructions and Notices, all freely available for download from Lycoming - you need to get all of them and read them. Much like playing golf, building a good engine is done in the preparation and planning.

As for fasteners, Mandatory Service Bulletin 240W clearly states to replace all stressed bolts and fasteners at OH. Anything that has been torqued, especially cylinder hold down bolts, rod bolts and crankcase through bolts - have been stretched. As an experimental builder, you are not required to adhere to service bulletins, but common sense says it's a smart thing to do.

Lastly, don't skimp or cut corners on your engine - save money somewhere else on the airplane. You wouldn't bargain shop for heart surgeon, so don't get cheap on the heart of your airplane either.

Your "lawn mower" engine is spot on, these things are simple! I guess that's why we're still using them. Simple, reliable, heavy. I'll convert the fear aspect into respect and give due diligence. I have the OH manual downloaded and reading it now. What's the best place or method to find the "Service Bulletins, Instructions and Notices"? I'm direct on the fasteners. And no skimping on the engine/parts/machine work. Thanks for the advice!
 
I completely agree. I purchased a B&C LX60 for my main and their BC410-H for my gear driven backup. Two batteries and two alternators to keep that "heart" beating.

Separately, I have a brand new set of superior pistons and valve covers in the box; I'll make you a killer deal...

Pistons you say? See the pics, these are what's in the engine now. Not sure I need the valve covers.
 

Attachments

  • 20220506_144810.jpg
    20220506_144810.jpg
    243.5 KB · Views: 117
  • 20220506_135417.jpg
    20220506_135417.jpg
    434.3 KB · Views: 110
Anything that has been torqued, especially cylinder hold down bolts, rod bolts and crankcase through bolts - have been stretched....

Can you clarify? Of course they have been stretched. Are you stating beyond their elastic limit? If so, please elaborate.

Fasteners in this type of app fail due to under torque -> cycles. That should be the OP's larger related concern here.
 
As for fasteners, Mandatory Service Bulletin 240W clearly states to replace all stressed bolts and fasteners at OH. Anything that has been torqued, especially cylinder hold down bolts, rod bolts and crankcase through bolts - have been stretched. As an experimental builder, you are not required to adhere to service bulletins, but common sense says it's a smart thing to do.

First, a lycoming does not have cyl hold down bolts. There are studs in the case and nuts are used to hold the cylinders on. No one replaces these at overhaul, nor does Lyc require it. Also, all bolts stretch when torqued and when done properly, this stretching does not reduce their rated load capacity, nor does a bolt that has been torqued more than once have a lower rating than a new one. Every engine that I have ever built has had the connecting rod bolts and main cap bolts/studs torqued at least twice - once for clearance measurement and then final assembly. The exception is specialized "torque to yield" bolts that are sometimes used for main caps, rods or head bolts. Those must be discarded after torquing, as they don't fully rebound after stretching and therefore cannot effectively be re-torqued. There are no torque to yield bolts on a Lyc engine.

If lycoming was concerned and wanted the through bolts replaced at overhaul, it would be on the mandatory list, along with the 40 other items.

Larry
 
Last edited:
Can you clarify? Of course they have been stretched. Are you stating beyond their elastic limit? If so, please elaborate.

Fasteners in this type of app fail due to under torque -> cycles. That should be the OP's larger related concern here.

I encourage you to read SB 240W; it's a good resource for what should be replaced at repair or overhaul. Elaboration below.

First, a lycoming does not have cyl hold down bolts. There are studs in the case and nuts are used to hold the cylinders on.

True, Lycoming crankcases have studs and nuts that "hold" the cylinder to the case. Although technically studs, the thru studs are commonly referred to as "thru bolts"; sorry to confuse you, however, they are all threaded fasteners, and that is what is at issue here.

No one replaces these at overhaul, nor does Lyc require it.

It sounds like you and others don't replace all fasteners at OH, but to say "no one replaces" is a big stretch. If you buy an overhauled engine from Lycoming, it will have all new fasteners. I encourage you to call them at 1-570-323-6181 to discuss this with them. I am aware of two reputable shops near me (Ly-Con and Victor) and neither reuse fasteners at OH. SB 240W does state to replace all "Stressed bolts and fasteners, such as:". The "such as:" indicates an example list, and is not inclusive. If you don't believe your thru studs and crankcase nuts have been stressed, so be it - it's your engine, but I would say they are stressed and should not reused. They are only holding the engine together...YMMV

I certainly replace all fasteners at OH; I don't see the point of saving what amounted to about $800 dollars on my last build, for what is a 50K+ critical investment.

Also, all bolts stretch when torqued and when done properly, this stretching does not reduce their rated load capacity, nor does a bolt that has been torqued more than once have a lower rating than a new one.
Larry

It is accurate that all bolts (and studs, as you previously made a point of) stretch when torqued, but it is not accurate that their full strength is not reduced. Each time a fastener is fully torqued, it stretches and some plastic deformation occurs - from tensile stretching, but there is also frictional abrasion of the threading itself. This is generally measured in micrometers, or 10,000's of an inch, but it is happening.

The purpose for the torque is to place pre-load on the fastener, which ensures the fastened joint is retained during the cyclic stresses, both thermal and mechanical, that the engine encounters while in operation. If you measure a stud, torque it to its peak yield strength, remove it and then measure it again with a high accuracy micrometer, you will find it has developed some permanent stretch. Over the life of an engine, this torque induced stress, combined with cyclic stress leads to metal fatigue, which can become significant. This is why replacing connecting rod bolts, which receive a tremendous amount of cycling stress - likely the most of any engine fastener, are high on the list to be replaced.

BTW, visually inspecting a fastener may indicate damaged threads, but it is not a viable indicator for stretch. Even more so, cyclic fatigue is the major concern, not the total stretch - and that's impossible to inspect visually without the destructive evaluation.

Reusing a fastener for another OH cycle exposes it to even greater fatigue. Continued fatigue does weaken the fastener and it becomes nearer its yield strength each cycle. You might get away with reusing the fastener, but each time you torque it, it will weaken and eventually fail due to exceeding yield strength. At the very least, the threading will have more than desired wear.

Another issue with fastener reuse is corrosion protection. Once used, the cadmium plating on a lycoming specified fastener will have that plating ablated. There are some folks that will measure and determine that a fastener is reusable, and then send them to one of several vendors that re-plate fasteners. My preference is to simply recycle the old ones and buy new fasteners for my engine.

Mike, none of this should distract you from performing your own engine build. However, I highly recommend you gather all of the fasteners from your core engine and place them in a nice container for reference, and future recycling, but take the IPC, along with the spreadsheet I sent you, then go to J & J Airparts and have fun.
 
Last edited:
Could launch into a long rebuttal but there's no need. There's enough word play applied in the previous post that will let most informed individuals make up their minds.

I will supply a couple of hints. If you torque any fastener so that's it's stressed to it's "peak yield strength", you've done it wrong. Any operational stress would take the material into its plastic region -> strain increases, stress decreases. Game over. Likewise, attempting to purposely strain harden a fastener to achieve desired properties via installation in these related applications would be an asinine recipe for disaster.
 
Last edited:
Im rebuilding a Cummins 5.9 right now, made of cast iron and people will spend $850 just for ARP cylinder head studs to hold the head on. Now Im not drag racing and trying to keep my engine build to less than $4000 so I wont be spending top $ on ARP studs.

But, air cooled alloy engines go through a very different heat/cool cycle and the long bolts/studs used are far more critical than the fasteners in my water cooled cummins diesel. Its also quite difficult to properly inspect fasteners for the onset of fatigue. Sometimes the length can be accurately measured and rejected based on elongation alone, but not always.

So I agree with Rongawer that one should bear in mind the replacement value of the engine as a complete unit before skimping on new fasteners. In that context $800 for new fasteners is like a set of snow tires on my vehicle in winter, cheap insurance.

If you read the Jabiru engine overhaul manual, they have a procedure to determine if case fretting has occurred (attributable through loss of fastener tension over time due to fatigue). One basically measures crankshaft rotational drag as is, then re-torques the case fasteners and re-measures the drag. If the difference is greater than some amount then this is evidence of case fretting and requires the case to be re-faced and line bored to get it back into spec.
 
Cleaning question

Is it approved or accepted to media blast the outside of the cylinders? I want to prep them for alondine and paint. I assume "walnut" shell would be the appropriate media?
 
If you go to Airventure you can attend two Lycoming demonstrations (by Lycoming employees): 1. How to take apart a Lycoming engine, and 2. How to assemble a Lycoming engine.

These demonstrations fill up FAST, and require you pre-register for them. They are VERY, VERY good introductions to the process, and they show you a number of the tricks they use.

Kitplanes also had a 4-part series by Paul Dye about his experience rebuilding a Lycoming.
https://www.kitplanes.com/following-the-diy-approach-to-engine-overhaul-one-step-at-a-time/
https://www.kitplanes.com/overhauling-your-own-lycoming/
https://www.kitplanes.com/the-art-of-assembly/
https://www.kitplanes.com/final-steps-to-flight/

https://www.kitplanes.com/paul-dye-notes-from-lycoming-class/

https://www.kitplanes.com/parts-off-parts-on/

I built my AeroVee (VW) engine 8 years ago. I really like knowing that I know that engine inside and out, and if I need to fix it, I can. I had a prop strike 6 years ago. I got a new crank, new bearings, and a new prop hub (and prop). I took the engine apart in 2 evenings, and put it together in 2 evenings. It's flown without a hiccup since. Once you know the engine, it's not that difficult, though the Lycoming is more sensitive to proper assembly and torque than the VW.

So I plan to buy a run out engine when it's time, and rebuild it myself (with the assistance of a mentor). I'll send everything out that needs to be sent out and machined, and get new parts where required, but I really like the thought of building the engine myself, and not leaving it to someone else.
 
Is it approved or accepted to media blast the outside of the cylinders? I want to prep them for alondine and paint. I assume "walnut" shell would be the appropriate media?

You could do that, however aircraft paint stripper will do a great job with little effort. Might take a couple coats if the cylinders have been heavily painted, but works well with a pressure washer and no metal removed.
 
all the earlier suggestions to let someone else build it reminds me of the time I was re-building a "mud job" shower pan. Lots of folks are telling you to not do it....but they don't 'know' you or your capabilities.

At the time of my shower project I had never done any tile work, and was asking similar how to questions to yours about this engine.
Without exception everyone told me to hire a pro.... but none of these people know me

I used to be like you, do everything repair/mechanical as a DIY....to learn and I guess for pride. I've always had a pretty good mechanical aptitude, research most things thoroughly and give it tons of thought..And especially then when I was younger did pretty much anything and everything DIY. Used to feel strongly that anyone paid to do the job will never do things with the "care" that I would give it. (hence the reason for re-doing the shower!)

I did do the shower pan myself, and safe bet it turned out much better than any pro job would have been....better in terms of never going to leak..... but then a pro job done right wouldn't leak either, so what I did was overkill!

Mine was not better in terms of the looks though. It was ok, but there were things in the structure beneath the tile that I had not considered and so while most of the tile looked good there was a very ugly 'defect' on the wall to shower pan transition.

It was also not better in terms of time.... no doubt.

I was and am glad I did it, but I've also come to realize that many times it's better to do what I'm pro level with, and let other pros do the things that I'm not pro level with...and even still I can learn from them while things get done usually better and much faster.

But my point is this...none of us really know you, know your abilities, your experiences, etc... so it's kinda hard for us to say with any certainty that you'd be better off hiring it out to a pro shop.
 
More disassembly pics

More pics, just because. Everything so far looks great, no visible damage that I have found. Cylinder (chrome) appear to be in good shape. I'm still of the opinion, these engines are simple. The gear system on the rear is much like a Kubota diesel. Poor design on the cylinder hold-down nuts (narrow deck) those are aggravating! I'll be splitting the case this week and getting everything sent off for inspection.

In the pic of the rear gear shafts, neither was safety wired, should they have been, the bolts are drilled.

Thanks!
Mike
 

Attachments

  • 20220521_121253.jpg
    20220521_121253.jpg
    484.2 KB · Views: 166
  • 20220521_125321.jpg
    20220521_125321.jpg
    419.1 KB · Views: 118
  • 20220521_132947.jpg
    20220521_132947.jpg
    358.2 KB · Views: 104
  • 20220521_143215.jpg
    20220521_143215.jpg
    307.2 KB · Views: 138
  • 20220521_150412[19587].jpg
    20220521_150412[19587].jpg
    394 KB · Views: 162
  • 20220521_152154.jpg
    20220521_152154.jpg
    363 KB · Views: 128
More pics, just because. Everything so far looks great, no visible damage that I have found. Cylinder (chrome) appear to be in good shape. I'm still of the opinion, these engines are simple. The gear system on the rear is much like a Kubota diesel. Poor design on the cylinder hold-down nuts (narrow deck) those are aggravating! I'll be splitting the case this week and getting everything sent off for inspection.

In the pic of the rear gear shafts, neither was safety wired, should they have been, the bolts are drilled.

Thanks!
Mike

Looks like you're having fun and on the way to a rebuild!

BTW, the gear shafts have lock plates in lieu of safety wire, which is Lycoming PN 71646, alternate part AEL71646 (i.e. less expensive). It's perfectly acceptable to use the lock plates and is what is shown in the TIO-540 IPC. The drilled head bolts are what is in the IO-540-D4B5 IPC.

Maybe the previous builder was intending to do the "belt and suspenders" approach and do both, but then realized the lock plates are easier to bend than to do lock wire in that location. However, either method, lock plate or safety wire, is fine for your application.
 
What Ron said. On some Lycoming engines they are now showing safety wire in the parts manual instead of the lockplates. I have always wondered why Lycoming got away from the lockplates in favor of safety wire. Wonder if some tangs have broken off or if it was just a cost saving thing.
 
Built a valve spring compressor today

Built a compressor today. Tried to leave plenty of space around the stem to get the keepers out, I think I succeeded. Seems to work well. I didn't have time to make anything for the cylinder to sit on to keep the valves in place yet so I could completely test it.
 

Attachments

  • 20220527_162154.jpg
    20220527_162154.jpg
    310.1 KB · Views: 144
  • 20220527_162215.jpg
    20220527_162215.jpg
    329.3 KB · Views: 103
  • 20220527_162236.jpg
    20220527_162236.jpg
    379.6 KB · Views: 127
  • 20220527_162257.jpg
    20220527_162257.jpg
    336.5 KB · Views: 126
More build pics

Split the case today. Visually everything looked good IMO. What do y'all think about the case, fretting or just stains? I'm sending it Divco for overhaul but though I'd see what the thoughts were.
 

Attachments

  • 20220531_151337.jpg
    20220531_151337.jpg
    334.9 KB · Views: 105
  • 20220531_151355.jpg
    20220531_151355.jpg
    357.1 KB · Views: 110
  • 20220531_152637.jpg
    20220531_152637.jpg
    276.1 KB · Views: 113
  • 20220531_153457.jpg
    20220531_153457.jpg
    313.1 KB · Views: 142
  • 20220531_160118.jpg
    20220531_160118.jpg
    425.6 KB · Views: 133
  • 20220531_160147.jpg
    20220531_160147.jpg
    536.9 KB · Views: 126
  • 20220531_160149.jpg
    20220531_160149.jpg
    409.6 KB · Views: 102
  • 20220531_160212.jpg
    20220531_160212.jpg
    260 KB · Views: 94
  • 20220531_160221.jpg
    20220531_160221.jpg
    272.1 KB · Views: 106
  • 20220531_160228.jpg
    20220531_160228.jpg
    313.1 KB · Views: 111
Electrically dependent engine

With an electrical dependent engine, you need to have a robust set-up. Take the time to come up with a schematic that is simple yet has a back-up to keep the fan turning. A primary and essential bus structure probably needed. +1 for a back-up pad mounted alternator. An automotive alternator for the primary bus might be ok. B&C does make nice alternators and external voltage regulators. Good luck with the project. Great group of people here on VAF.
 
Does Divco offer the O-ring case mod? I would also use this opportunity to throw the chrome cylinders away, or make lamps out of them and see about Lycon CNC ported new cylinders. I don’t know anyone who has had good luck with chrome..
 
Split the case today. Visually everything looked good IMO. What do y'all think about the case, fretting or just stains? I'm sending it Divco for overhaul but though I'd see what the thoughts were.

Fretting is pretty common and difficult to spot; Less so if the case already has a couple dowels in it. Divco will shave the case halves a few thou and then line bore the crank journals. This is pretty standard for case overhauls. I believe they will also machine the case for two dowels if they are not there already, to prevent future fretting.

EDIT: looks like yours has dowels. The big issue on the 540 is cracking around the crank journal webs. Divco told me that almost half of the 540 cases that come in have at least one crack in the webs. They use magnetic particle testing to find them and then weld them.

Detailed inspection and clearance measurement of everything is critical on these. ON my 540 case, there was not enough clearance on the prop gov drive gear components and had to take 5 thou off a spacer to make it right. Guessing that Divco found an issue and welded/re-machined in that area and missed the spec'ed clearance. Possible their tolerance specs were incorrect.

Larry
 
Last edited:
Talked to Divco today, they were a great help and great source of information. They allowed me to send them some pictures, apparently this case already has the o-ring mod. He said it was good that you could see the honing marks in the journals. May end up not need a complete overhaul if it measures out correctly. It only has 808hrs SMO. It'll be worth sending out there just to get it cleaned up for paint!

"I would also use this opportunity to throw the chrome cylinders away"
Really, not that I wouldn't like some of the Lycon CNC ported cylinders though. I've read chrome use more oil, but the tradeoff was no corrosion, ring wear vs. cylinder wear, and longer break-in. Am I thinking wrong, I intend on reusing them? They appear to be in very good shape.
 
Last edited:
"I would also use this opportunity to throw the chrome cylinders away"
Really, not that I wouldn't like some of the Lycon CNC ported cylinders though. I've read chrome use more oil, but the tradeoff was no corrosion, ring wear vs. cylinder wear, and longer break-in. Am I thinking wrong, I intend on reusing them? They appear to be in very good shape.

I agree with sending you're case in for OH even with low hours and good appearance; DIVCO will boil the case out and inspect all of your passages and clearances, along with performing any service bulletins and replacing hardware that should be redone at OH. It's worth it to me just for the peace of mind.

As for chrome cylinders, I've had them and gotten good life out of them. However, the cost of sending cylinders out for overhauling versus buying a new when viewed over the life of the engine makes new cylinders a pretty good value. But if you're going to do your own inspection and reassembly, there's not wrong with sticking with chrome.

Do be careful when honing to only remove the minimum amount of material.
 
Hi,

For J4A5 engine, what i have on my airplane

Don't forget to make upgrade for AN fuel pump when update is done, you should have it on the dataplate RG17980 /M for modified...

Also you have to make lycoming SB342G bulletin for injection tubing, and i would recommend to change the injection tubing... see my post in same section about crack i got in flight with my airplane...

thanks for your post in forum

Louis
 
Opinion please. Building the narrow deck IO-540. Do you replace the cylinder hold down (nuts) fasteners? I'd like to hear from the folks that have built multiple engines. Have you experienced any failures reusing the old fasteners? Thanks in advance!
 
Narrow deck cylinder nuts

I have asked several folks and the consensus is that the nuts are fine to clean up and re-use. They are only available from Lycoming and the cost is $1800 to replace them. I will reuse mine.
 
Opinion please. Building the narrow deck IO-540. Do you replace the cylinder hold down (nuts) fasteners? I'd like to hear from the folks that have built multiple engines. Have you experienced any failures reusing the old fasteners? Thanks in advance!

I have rebuilt 2 ND engines and on both re-used the barrel nuts. One has 850 hours and the other 275. On the 540, a couple of the nuts had wear in the cam area and replaced them with used nuts from a reseller. By Lyc prices, you would think they are made from Platinum.

Larry
 
Last edited:
Back
Top