What's new
Van's Air Force

Don't miss anything! Register now for full access to the definitive RV support community.

Shop layout and design

Gahannaflyer

Active Member
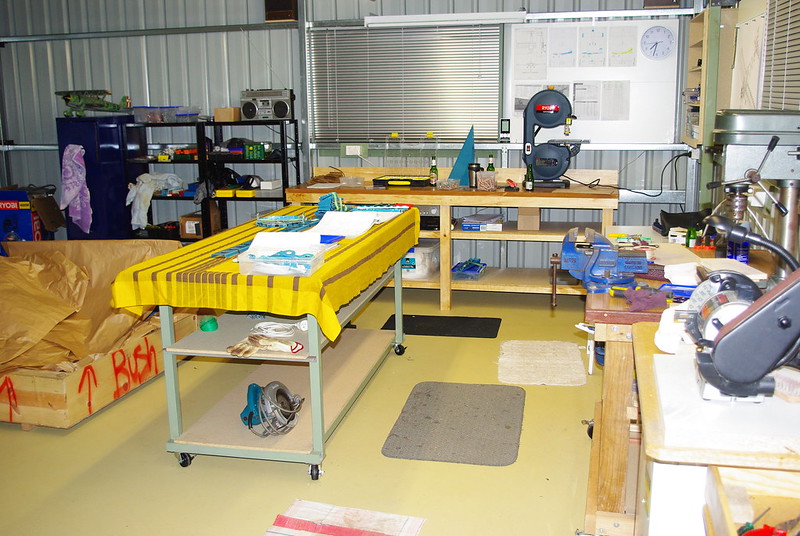
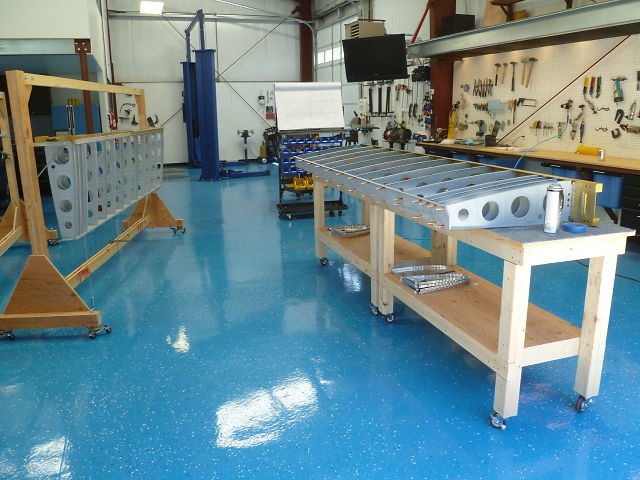
Just looking for some ideas and advice. I am in the process of setting up my shop. I am going to build in a 2 car garage and have spent way too much time and money making it a very livable man cave for which to build an RV14. I have run new electrical, new lighting, insulated, heated, painted, and everything except the benches, tables, etc. My first part of the kit (wings) arrive in a few weeks.

Does anyone have pics or drawings of their shop layout including the size and height of the benches, how many, any jigs, and anything else that you might think I will need. I have a very understanding (and lovely) wife that will almost let me get away with anything for this project.

Thanks for any thoughts!

Steve
 
If you put the benches and floor tools on wheels, the layout will find itself as you go along.
 
Second that. I'm building a wholly different airplane, an RV-3B, and find that the empennage needs a different shop layout than the wings, ditto the fuselage, etc.

Make things movable. It'll be easier because you'll move them around anyway.

Dave
 
Yup "wheels".

I have the luxury of a large shop - some would say huge. I started with fixed benches. Now, most everything has wheels.

I reconfigure different areas based on the milestone of the project (or projects).

Even the fixed benches are on wheels. Why? Because at least twice a year something comes along and I need space for a week of two. In those cases, even the fixed equipment gets their casters unlocked and everything moves.
 
Need someplace to store parts and assemblies as you go. Long 24" wide shelves suspended from overhead are really useful. Mine are welded 3/4" angle frames suspended through the ceiling on all-thread rod. Ply panels (1/2") fill the frames.

One HD fixed bench bolted to the wall is good, with everything else movable as noted. The fixed bench gets the big bench vice.

Stand upright, arms at your sides, and raise your forearms like you're halfway through a curl. Measure from the floor to the underside of your elbow. Make your bench tops that high.

Run metal compressed air piping around the perimeter of the ceiling, with moisture traps on the drops. Take your working air from the last drop. It will be nice and dry because the it had plenty of chance to cool and condense out all the water.
 
here are a few pictures of my shop (24 by 24 garage). Ignore the mess--it is a working mess. All benches are 34" high.

two EAA benches with rolling/locking wheels. 6' long by 2' wide. THe wheels are nice because they allow you to level the benches. Currently they are connected together to hold the spar. Can be separated:

http://i1335.photobucket.com/albums/w663/Kenneth_Stockman/Photo1-4_zps9205f0a9.jpg

Permanent bench with C frame and folding leafs for dimpling. total length of about 16'.

http://i1335.photobucket.com/albums/w663/Kenneth_Stockman/Photo4-2_zpsab9fadbf.jpg

Leafs extended
http://i1335.photobucket.com/albums/w663/Kenneth_Stockman/Photo5-2_zps35425f32.jpg

you can see how they are connected here:
http://i1335.photobucket.com/albums/w663/Kenneth_Stockman/Photo2-2_zps96be192d.jpg

4 by 4 table which has a outlet strip in center. Currently has grinding wheel, drill press, vice, and sander. Will add band saw if needed. You can see in teh vice that I have a rotozip in it. I am using the rotozip with a metal wheel to cut things at this point.

http://i1335.photobucket.com/albums/w663/Kenneth_Stockman/Photo6-1_zps4ebc3f4a.jpg
storage:

http://i1335.photobucket.com/albums/w663/Kenneth_Stockman/Photo7-1_zps52d1b329.jpg

you can see my priming booth on a recent post.

Cheers
Ken
 
One example...

Two car garage. Painted floor, fixed bench at rear, all other benches on lockable nylon casters, good lighting (3 wall fluros, 6 suspended from roof), band saw, vice, sander/scotchbrite wheel and drill press on fixed bench, 4 double power outlets around the walls, belt driven compressor out of sight in top right corner, beer fridge under sander bench. This layout has worked very well. Everything is within easy reach, and benches and project can be moved around as required.

9626799047_349487e402_c.jpg
 
Last edited:
Shop Layout

Wow!

These pics tell a thousand words. I now have a greatly bolstered idea on how to proceed on the setup.

I am thinking a long bench for the wings might be in order. Should these be about 12' long? Should I make a paint booth? Some say to just use a rattle can. I should probably just use a bunch of drop cords for the power tools.

This week I will be building the benches and epoxying the floor. I will be going to Harbor Freight to get a pile of casters. I have a big box of special tools coming next week from Cleaveland.

Thanks for the advice. Any more pics will be fantastic!

Steve
 
Maybe?

I was able to scratch out a 2-1/2 car garage and am using all of the space. If you can, consider a 2-1/2 or 3 car garage. You can't have a large enough garage or enough tools - right?

He who dies with the most tools DOES win!:cool:
 
I am thinking a long bench for the wings might be in order. Should these be about 12' long?

Too long. 8' is plenty, shorter is probably OK. I have a 4 x 8 brute of a table that is accessible from all sides (in addition to std depth counters around the walls). If your shop is big enough for that plus some room for wing jigs, I would recommend the "freely movable" table.

Should I make a paint booth?
Depends. For primer, I used screen wire laid on an open trash can outside the shop. 99% is small parts. Every once in a while I used a cardboard box as a booth.

Some say to just use a rattle can.
I used an air brush. Gives small quantity capability and freedom to use whatever coating you desire. The few "big" jobs (like the fiberglass) I did with a "touch up" gun.
 
go with T5 lights. I have four 4 bulb 48". in my 24 by 24 garage. It is amazing how much light they throw off. You can get the fixtures at HD for $99 each. Get bulbs online.

When my daughter came back from a walk one night when it was dark out, she said it looked like I was inside a lantern.

I even have them on during the day even if I have both doors to garage open.
 
I built the EAA tables with a few mods. I adjusted the height of the lower shelf area so that I could sit at the table and comfortably rest my feet on the lower shelf. I also cut and installed the top with a 2 inch overhang on 2 sides, one end and one side, for clamping. I left 2 sides flush with the 2x4 frame so I can easily bolt 2 tables together either end to end or side to side if I need that dimension in a work surface. I then bought low pile outdoor carpet and stapled it to the top. Most of the big stores like home depot, etc will sell these precut rolls of carpet and they are cheap so I don't feel bad when I have to replace them
 
I did an overhang as well. I am not sure how I would have counter sunk the holes on the spar. As you can see in my pictures, I have the spar clamped there right now. I have the overhang all the way around and just use two piece of wood and some screws to hold the tables together.
 
I will be going to Harbor Freight to get a pile of casters.
Steve

Pick up a few of these while you're at it. The removable trays are great. If you need a worktop for a bench, consider using a door. It's nice and flat, good size and not expensive.

5395885958_e18735b6b9_z.jpg
 
Last edited:
Shop layOut and design

Thanks guys!

I did as you advised and made the benches like you said with the overhang on two sides and the height of my elbows. Most of them are on casters. The lights I got were the HO 4 ft and it is like high noon in Tijuana. I have the plastic small parts carriers already. I have plenty of shelves already put up.

Maybe I am over thinking the whole build process. But I am sure that I will spend a whole lot of time in there the next couple years and I like to be as efficient and comfortable as possible.

I just got my confirmation in the mail today as to a ship date of my first kit. It's three weeks later than I was originally told. But, I can use that time to prepare even more. Plus my wife has come up with a few more "honey do" items after I thought I had all of them done. I suppose that if she is not happy, no one is happy.

Thanks for the advice!
Steve
 
Neighbor

Hey Steve,
I live out in Blacklick so if you ever want to get together let me know. My -8 has been flying for a couple of years now, but if you want my wing cradle and floor mounted wing stands you are welcome to them. The stands might needs some minor modification for the -14.

Congrats on getting started. Good to have another fellow builder/RV'er in the area.

Brent
 
Wish I thought of this sooner...

Tools are all in the open, no searching through drawers. I roll it over to the project at hand. I spent about 2000 hours building my plane. I'm sure half of that time was spent looking for tools!

 
Smokey-

Your organization scares me. I wish that I could be that organized, but alas I am not. It is amazing how quickly a tool disappears into my shop, only to find out that I put it down in some odd place in the shop.

Ken
 
Ron: Wonderful solution, did you custom make your entire cart or can the basic "airframe" for it be purchased somewhere?


Lee...
 
Ron: Wonderful solution, did you custom make your entire cart or can the basic "airframe" for it be purchased somewhere?


Lee...

It's a stainless steel cart that was cast off during a doctor's office renovation. You can get similar steel carts at Harbor Freight and other places.
 
Workshop

Three things for a workshop

1) Organize all parts so you can lay your hands on them in 30 seconds. Keep a list of parts and where they are by part number. This can be done in an Excel spreadsheet, sorted and printed out.
2) Organize your tools so you can lay your hands on them in 10 seconds.
3) Keep your workspace uncluttered and place you enjoy entering and spending time.

Everything else IMO is secondary.

Dave Syvertson
 
A buddy of mine who runs an auto repair shop has a similar mechanic's cart for his tools, with places to put nearly everything. It's got some screwdrivers and pry bars in the holes, and a massive pile of jumbled tools in the center tray where he roots through looking for what he needs. I'm just afraid mine would turn into that. :(

Still, though.... I'd LOVE to be that organized. Looks like a good winter project. I have enough tools that they don't all fit into my regular tool chest, so maybe a rolling cart with all of the most frequently used would be a good idea, leaving the tool chest drawers for the stuff I don't need as often.
 
This thread is perfect for those suffering from CDO...

which is of course OCD, but properly alphebetized:D
 
Not only organized but a quick way to determine if all tools used have been returned prior to next steps in building or a flight etc.
 
Tools are all in the open, no searching through drawers. I roll it over to the project at hand. I spent about 2000 hours building my plane. I'm sure half of that time was spent looking for tools!


I so need to put something like that together! Good stuff Ron!
 
I really like that roll around. I have something similar for my automotive tools, but I never made the connection to get one for the aviation tools. That is such a great idea.

For those just getting started here is a pic that illustrates what I think have been my greatest time savers so far:
1. Having two wing stands (left).
2. Roll around rivet and cleco caddy with plans holder (center).
3. Two EAA tables bolted end to end (right).
4. Have all or at least most of your tools readily visible (far right).
5. Everything on wheels.

P1000705.JPG
 
saves time x2!

No doubt lots of you industrial guys have heard of kaizen and similar programs....finding small, more efficient ways to do things. Funny how we do this at work, but not for ourselves eh?

I once calculated that me & the fine folks I worked with often walked across the shop to get a special $1 pencil. After adopting a tool belt that held the 8 things I used most often, I calculated what those little walks added up to.

2 weeks per year.

yup, roughly 80 hours of lost time, ( or $8,000 at typical shop rates).:eek:

tool belts, pouches, carts, bins, power cords and air hoses 'n stuff hanging from the ceiling etc. etc.
You'll be flying sooner, with less frustration.
( excuse me, but I have to go clean my garage, can't find a thing in there!!!:mad:)
 
Tools are all in the open, no searching through drawers. I roll it over to the project at hand. I spent about 2000 hours building my plane. I'm sure half of that time was spent looking for tools!


Photoshop. Not real. We are building RV12, have every tool imaginable but very often couldn't find what we need. Today we modified metric 11 to 12 by grinding :D
 
Harbour Freight Tools

Harbour Freight Tools has some stuff you'd rather not buy, but they do have some very fine stuff, and their poly plastic rolling tool carts are one.
The smaller one holds (on top) 3 of those tool trays I keep clecos and such in, and below is a shelf where I can put a couple of tool boxes. It's rated to 500 pounds.
If you slightly bump your plane, NO SCRATCH!! I've got 3 of 'em.
http://www.harborfreight.com/catalogsearch/result?q=tool+cart
 
Last edited:
Two wing stands is the way if you have space

For those just getting started here is a pic that illustrates what I think have been my greatest time savers so far:
1. Having two wing stands.

Joe's sick (read = I'm insanely jealous of the space he has) shop has lots of space for two rolling wing stands. I only have space for one .. here's mine:

33om81y.jpg


Works great, but I need to "flip" the wings regularly as I work on them. My 14 year old daughter is super helpful for the flip, as is the Missus. If you have room for a stand per wing, do it!

The wheels make it really easy to reposition the rig.
 
Wing stand

Joe's sick (read = I'm insanely jealous of the space he has) shop has lots of space for two rolling wing stands. I only have space for one .. here's mine:

33om81y.jpg


Works great, but I need to "flip" the wings regularly as I work on them. My 14 year old daughter is super helpful for the flip, as is the Missus. If you have room for a stand per wing, do it!

The wheels make it really easy to reposition the rig.

The wing stand looks like a great idea! Did you dream that up? Do you have some more pics of it? Does it do what you wanted it to?

Thanks,
Steve
 
Wing stand...

The wing stand looks like a great idea! Did you dream that up? Do you have some more pics of it? Does it do what you wanted it to?

Thanks,
Steve

Hey Steve,

I "dreamed it up" after reading about 10,000 posts here on VAF. I took what I could from the threads and bent it to my own factory constraints. It works pretty well .. though I spent a few hours today replacing the arms; they were too short. With the clecos in place, I couldn't fit the leading edge; they bumped into the 2x4 cross beam (doh!).

Here are some photos; I'll be happy to scan the drawings if you like.

2qlg0v4.jpg


24v1d9w.jpg
 
Last edited:
Wing stand...

The wing stand looks like a great idea! Did you dream that up? Do you have some more pics of it? Does it do what you wanted it to?

Thanks,
Steve

Hey Steve,

I "dreamed it up" after reading about 10,000 posts here on VAF. I took what I could from the threads and bent it to my own factory constraints. It works pretty well .. though I spent a few hours today replacing the arms; they were too short. With the clecos in place, I couldn't fit the leading edge; they bumped into the 2x4 cross beam (doh!).

I don't have too many new photos now, but I'll be happy to scan the drawings and take a few more photos. Standby!
 
Last edited:
Since someone mentioned Kaizen in this freakishly wide-screen thread (I sure wish pictures linked here would scale down to reasonable sizes), I was wondering...

I want to organize my shop better. It's a freakin' mess. I spend WAY too much time hunting for a tool I just had in my hand, or wondering where the heck I put one I had yesterday. Even digging a screwdriver out of the drawer piled with dozens of them sometimes takes too long. I'm not buying any pre-made tool drawer organizers because they aren't made for MY tool drawers. So today I get an Aircraft Spruce email advertising their tool drawer foam blanks -- really nice, but way expensive at nearly sixty bucks per drawer. No thanks.

So being the cheapskate I am, I go looking on line and I find this: FastCap Kaizen Foam. The stuff is in layers (supposedly easily separated) so you can make all kinds of recesses including multi-layer cutouts, comes in black and white, several thicknesses and is cheap -- under $15 for a 2' x 4' sheet of all but the thickest material. Sure, I'd rather have blue/red or some other color, but I'm not that picky.

Any PIREPs? Has anyone else used this stuff? I think I'm going to order a couple of sheets and try it out.
 
Back
Top