What's new
Van's Air Force

Don't miss anything! Register now for full access to the definitive RV support community.

KMD 150 internal Battery

RV7AV8R

Well Known Member
My Bendix/King KMD 150's display said it's internal battery was dead. I didn't know it had one, but sure enough there is a AA size lithium battery in there. Looks to be soldered in place. The manual says to replace every 10 years, mine is 7 years old. The manual doesn't say weather it is a 3 volt or 1.5 volt lithium battery... I hope the cell itself says the voltage, anyone know?

Lithiums are normally 3 volt, I don't know how they make 1.5 volt lithium batteries, but they do.
 
OK, here's what I found. The internal battery is a 3.7 v lithium AA soldered to a pcb. Of course, it is the inner most pcb so you have to disassembly the whole thing to get to it, about a 3-4 hr job. Lets hope they do last 10 years like the manual suggests because it is a PIA to replace. The engineer that designed this should replace them for free since there is plenty of room in the device to put the battery in a more easily accessed position (which I did). My dead battery was down to 68 millivolts so it tells me somethng must have shorted it out. There were some tiny al metal bits inside the gps of unknown origin. I will put it back in the airplane today and see if it works or if I have worse problems. The new battery is holding voltage. I love my KMD 150 GPS, BTW. I also have and use a 396 which I like too.

I found out lithiums range from 3.7 to 1.5 volts depending on the plate materials used.
 
It worked fine when I put it back in the airplane. I must be the first to have this happen.
 
kmd 150 internal battery

I guess you're not the first. I replaced mine in November when it was about 5 years and 4 months old. I forget what bendix King wanted to replace it. It was expensive, as I recall, and there is the shipping and waiting. John Crabtree and I did it after getting a replacement battery from Batteries Plus. It is major disassembly of the unit but not impossible if you go slow and have someone used to working on electronics like I did.
 
Next person to do this could they take some detailed photo's and add a description of each step.
I guess it would be possible to post such a report and photo's here but DR would decide.
This would be very helpful to the electronically challenged (me) as can see what you are getting into before start the process.
John
 
I put longer lead wires on a new $3.95 3 volt lithium AA battery also from a battery store and mounted the new battery just inside the bottom cover. So if it doesn't last 10 years at least it will be real easy to replace.
 
KMD-150 Battery Replacement (Long)

My KMD-150 started giving me a low battery warning a few weeks ago. I didn?t even know it had an internal battery. It began to forget its current location and took five minutes or more to relocate its position.

HXsgBPr.jpg


[After some research I found that you could return it to the factory for battery replacement?to England I heard. Or maybe an avionics shop would replace it. I found a web page that talked about doing it yourself, but the details were sketchy and no photos.

I decided to try it myself. After all I built the whole darn airplane?what could be so hard? The following is what I learned along the way in case you would like to do the same. Be warned, however, that if you decide to do this you are on your own. You could destroy your unit, void the warranty, make your dog bite you?you get the idea. Don?t send me hate mail if the worst happens!

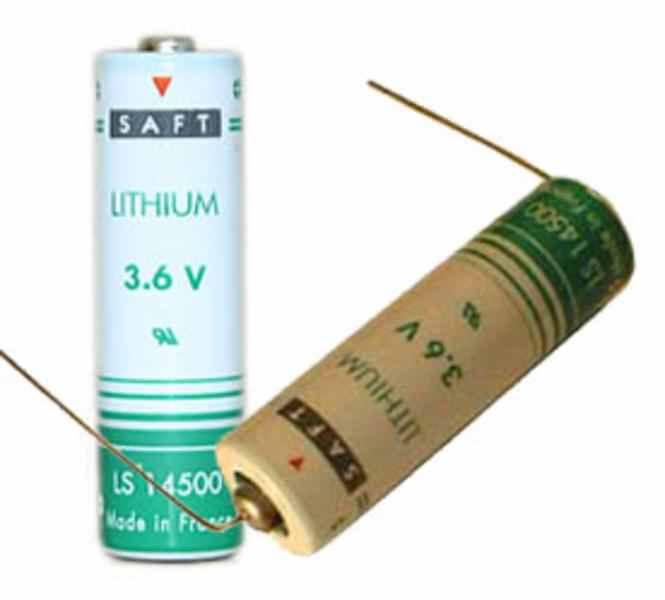
First, order the battery and have it on hand before you start. I purchased the battery from Battery Giant. It is a 3.6 volt AA lithium battery with axial leads. The battery model number is LS14500C-AX. The ?AX? indicates axial wire leads. You must have the wire leads. None of the other variations will work. The price is around $6.00 plus shipping.

oKoCmGq.jpg


Now for the other things you will need: small Phillips head screwdrivers, small allen wrenches, pencil tip soldering iron, fine electronics solder, a small crescent wrench, a short piece of small shrink tubing, and a small tube of blue Loctite. A good light to see what you are doing also helps.

Start by placing the unit on a soft towel or foam pad. Remove the data card if you haven?t done so already. Find three or four small containers to put screws in as you remove them. It wouldn?t hurt to label the containers ?front?, ?sides?, and ?back?. This will help you remember where they go on reassembly.

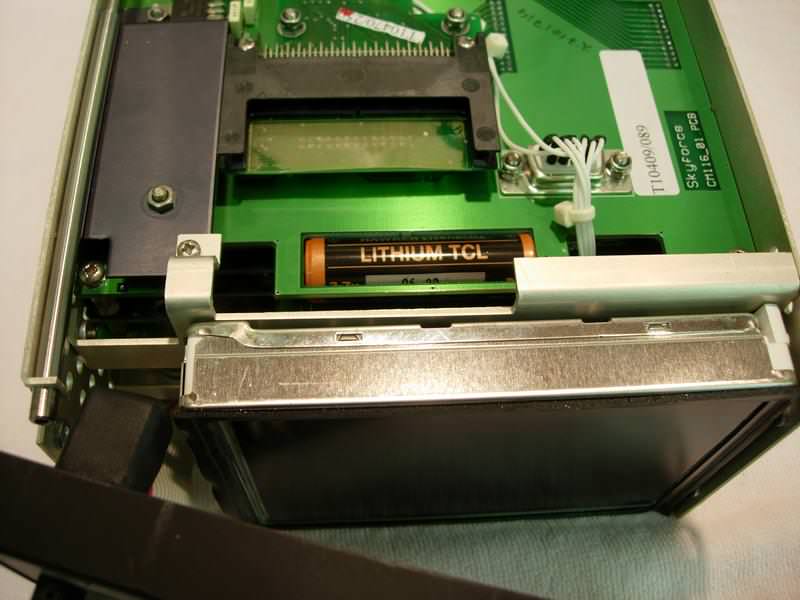
Remove the top and bottom covers by removing the rear two Phillips head screws on each cover. Position the unit bottom side up. Now you can see the battery trapped between two circuit boards. The designer made it fiendishly difficult to remove and replace!

YJGi2AW.jpg


Remove the four screws on the sides that retain the faceplate. Now the plan here is not to undo any connections. Gently pull the faceplate forward and turn it to the side leaving the ribbon cable attached. Now remove the four side screws and the fifth screw on the bottom brace on the circuit board that hold the screen in place. Gently pull the screen forward and a little up to clear the side panels and lay it face down in front of the unit still attached to its ribbon cable.

oJjxuXE.jpg


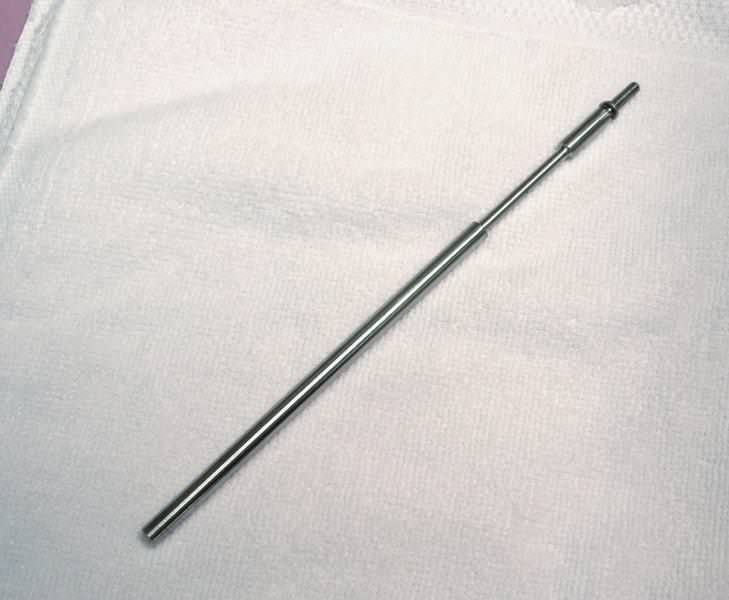
You can now remove the long retaining rod screw that runs from the front to the back of case. Be careful not to drop the small lock washer on the threaded end of the rod.

Z00viyN.jpg


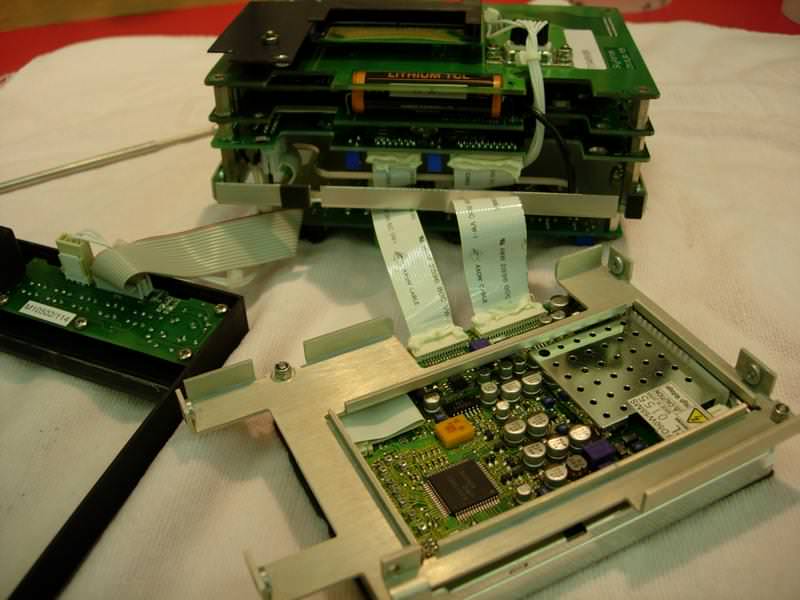
Remove the four side screws that hold the chassis sides to the circuit board assembly. Note that the forward most two screws on each side are much shorter than the other two. Now move to the back. Remove the large nut and washer from the coax connector. Remove the two screws holding the sub D connector and the remaining screws from the back. You can now pull the case to the rear about an inch and remove the four bolts holding the fan guard and cooling fan in place. Now the rear and two sides can be removed as a single piece.

D2aaJmG.jpg


Now comes the tricky part. You must be very careful here. You will see that there are a multitude of inter-board connector pins between the two boards that trap the battery. First remove the four screws that attach the upper board to the standoffs. Very carefully pry up the upper board just enough so it is above the battery. You may have to raise the sides alternately a very small amount at a time. You do not want any of those pins coming out!

Ov9IRjo.jpg


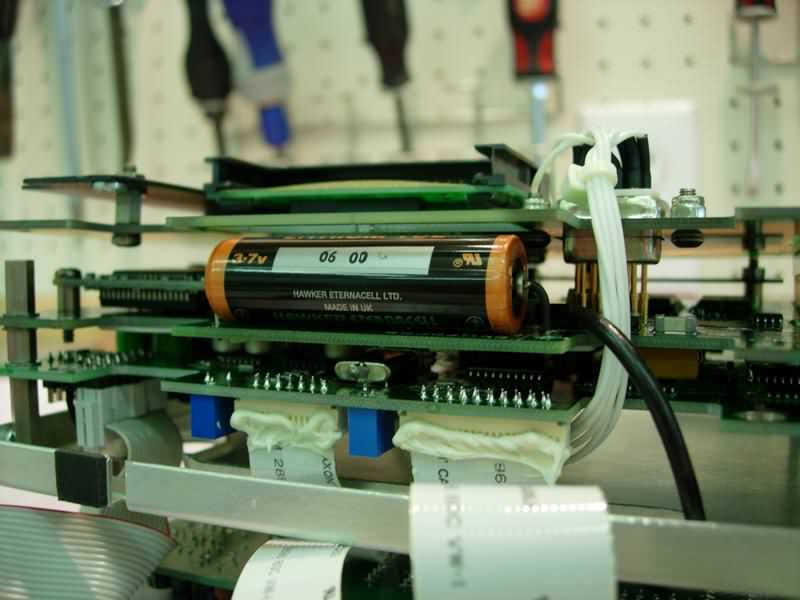
Okay, you can now get to the dead battery, but be careful it may not be fully discharged. Mine still showed 1.2 volts. Cut the negative lead first right next to the battery. Now you can cut the positive lead and remove the bad battery. With a soldering iron, heat the base of each cut lead and pull each one out of the board. Try to insert the negative lead from the new battery into each hole in the board to make sure the holes are clear. One of my leads came out clean, but I had to use some solder wick to open up the other hole so that the new lead would fit.

Bend the leads of the new battery downward and cut them about 3/8? below the bottom side of the battery. Cut and install a short piece of shrink tubing on the positive lead so that it will end at the point where the lead enters the board.

Insert only the positive lead in the board and solder it in place first. Then insert the negative lead and solder it. Carefully press the top board back into place trapping the new battery in the board opening. Now take a deep breath. The job is done except for putting this whole mess back together!

5kALxzo.jpg


All the screws had a white powder on them that I guess was some form of thread lock. It would be best to put a small drop of blue Loctite on each screw as you do the reassembly. And don?t forget to reinstall the long locking rod before you replace the faceplate. I almost did.

When its all back together be sure you reinsert the data card before applying power to the unit. If all went well it will come back alive and be good for another 5 to 10 years. The battery I removed was dated June 2000, so I guess that nine years of life isn?t so bad.

As a final note, don?t do any of this when the humidity is low and you have a lot of static electricity around unless you have all the appropriate grounding protection in place. I actually waited until the humidity was high and made sure to touch a grounded metal lamp base occasionally. A static spark can wreak all sorts of havoc so be careful.

Good luck and don?t call me if you kill the thing!
 
Last edited:
Just replaced my KMD-150 internal battery...

and all went well while following Jim's procedure. It took me about three hours, going real slow. The removed battery was dated 04/01 and lasted nine years. Measured 0.36v coming out. The new one showed 3.64v going in, and it fit fine.

A couple extra suggestions. Heat the screws a bit by placing your soldering iron on the screw head to help in loosening the loctite material. Doesn't take much, but this way you will not be stripping screw heads. Do not do this for the fan bolts. Also, I curved the battery leads so when I swung the battery down and in, the leads followed into the holes without stressing them. Be vary careful if you have to clip excess lead from the bottom of the board after soldering. You don't want to have the dikes short between the lead and some $$$ item on the board below it.

After installation, the unit found itself after 4 minutes. I reprogrammed it to my liking, added a couple flight plans, shut it down and powered back up several times. All the RAM data was kept so it looks like I'm good to go.
 
Last edited:
KMD 150 Internal Battery Change

FWIW -

My KMD 150, circa late 2001 mfg., lost internal battery power a while back (2nd time in 8 years) and I noticed this thread re/replacing it yourself. After getting the previously mentioned replacement battery, and reviewing the well organized instructions on the process I forged ahead. When I took off the lower cover to expose the battery, imagine how surprised and happy I was to find the battery in a black plastic, spring retention battery holder - with nothing else needed except to "pop" the old one out and replace it with the new one! The whole job took about five minutes, and after reloading all of the user defined waypoints I reinstalled it and test flew with all aspects of the MFD functional. The battery that I received from BatteryGiant.com with the axial leads turned out to be the exact same battery as was in the unit, except the wire leads were soldered to the ends. After removing the black shrink tube from the battery as it was delivered - what I found underneath was the same "factory" cover and number as the one I replaced - XENO Energy XL-060F 3.6V.

I don't know when King made this change - but I'm glad they did it before my Serial Number. From now on I will change this battery every 4 years. I also built a external power harness from a 12VDC transformer so I can keep power on the "box" while changing the battery so as not to lose any stored data - if there is still some life in the battery at the time of the change.

HFS
 
I've got a KMD 150 also that had this problem. At first, Bendix King also started giving me some crazy info about how it was going to have to go to England for like $500 or $600. ( Some secretary). Had to take mine to EPPS aviation at PDK in Atlanta. Cost me $165 smackeroonies!!!:mad:
 
Our club aircraft has one in it - the problem we have is trying to figure out how to remove the unit from the panel without breaking something if we kept at it. I'm sure it's probably as simple as pushing in a couple tabs and sliding it out, but we couldn't make it happen.


Battery is needing replacement.

Think I found it... the lower right hand side, insert a 3/32" wrench into the mounting hole
and turn counterclockwise until locking paw releases unit from rack.
 
Last edited:
KMD 150 battery replacement

Just finished doing a battery R&R on 2 of these, first one took about an hour, the second about 45 min. Being an old avionics bench tech comes in handy!
BTW, you really don't have to remove the side and rear covers, fan etc as spelled out here. Just removing the front along with the top and botton covers was enough to do the job no problem.

If anybody needs this done and doesn't feel comfortable doing it themselves I'd be happy to do it for a small fee.
 
KMD150

I bought the Skyforce CM2000 several years ago instead of the KMD150 because I didnt want the silver trim on the King unit. At the time Bendix said they were the same, covered the warranty and said they would service.

Building has taken a 100 years longer than I planned so I decided to put the unit in my Commander while I continue to build before it becomes completely obsolete. I took it out of its protective wrapper hooked a portable GPS antenna to it and hooked the positive and negative leads to a portable power source to check it out - of course this is after I cut the hole in the panel yesterday. Low and behold, I get a brief (very brief, you have to look for it) indication of light on the screen and the fan comes on and runs but thats it. For all intents and purposes it appears the screen is dead.

Any ideas? Does it require more than the pos & neg wires to power on the display? Any help is appreciated before I box it up and send it to King!

Making me wonder a lot about the rest of the avionics I have sitting on my shelf in the closet...

Thanks, Doug 713-206-3160
 
Use a Battery!!!

Try it with a 12v battery, it is ill advised to use an "inexpensive" power source alone without a battery :eek:
 
KMD150 / Skyforce 2000

Good news is Honeywell still covers these same as King model. I tried changing batteries and while screen was brighter it was still blank. Honeywell rep suggested changing data cartridges before sending unit back as the software is actuallly in the card. Anyone got an old one they want to sell?

Thanks, Doug
 
KMD-150 battery change

Mine died this past weekend. Thanks to some excellent posts, I was able to do the swap in about two hours. The battery was available locally at Batteries Plus for around $12...not too bad vs. waiting on shipping from an internet purchase.
Now to vent...Bendix King should be ashamed of themselves for such a goofy placement of a life-limited component. What a pain...
This is like having to pull your car engine out to change a spark plug.
 
I'm going to resurrect an old post here.

I have one of these Bendix/King GPS units in my -7. I didn't build the plane nor equip it.

Currently I have a 6 pack of steams in front of me, the B/K 150 and radio in the middle and an Advanced 2002 EMS on the passenger side.

The Advanced 2002 EMS died this past weekend. I am planning on upgrading to a newer Advanced unit that has Flight, Engine and possibly GPS/moving map.

For the most part I like the unit. It is "older" but still works well. A couple of questions if you don't mind.

1. Will the B/K KMD 150 interface with a Trio Auto Pilot controller head ?
2. Will this unit be obsolete in 5 years where no more software upgrades will be offered ? If so, now maybe my time to change it.

Thanks,

Darren
 
1. Will the B/K KMD 150 interface with a Trio Auto Pilot controller head ?
2. Will this unit be obsolete in 5 years where no more software upgrades will be offered ? If so, now maybe my time to change it.
Thanks,
Darren

I really like my "old" KMD 150, it a great VFR GPS and other than changing the battery I've never had a problem with it. It's also been driving my TruTrak A/P flawlessly for 5 years.

King still supports it, will it be obolete some day, sure but at the moment I still think it's one of the most user friendly VFR GPS's out there.
 
Hey Walt, thanks for the reply. I think I'll keep the B/K as I am quite use to it. It can't work with the Zaon traffic collision unit to overlay traffic on the moving map but that's ok. From others who use the Zaon XRX, they say the LCD display is good enough. For now I'd rather fly than monkey around with the panel more.

BTW, that is a beautiful -7A you have !! Even a Canadian boy can appreciate the paint job :)

Darren
 
Darren,
My bird has the KMD-150 slaved to the Trio AP.
They work fine together. I love the 150. It is so easy to use that even a caveman can do it!
 
Replaced my battery today. Thanks to this thread it was pretty simple. I went to Batteries Plus and they had the battery without the axial leads. The guy at the store welded leads on for me at no charge. I installed the 150 and it powers up fine without the annoying battery message. I haven't flight tested it but I am confident I got it fixed. Thanks for the DIY.
 
KMD 150 Pinout

Does anyone have the pinout for the KMD 150?

Edit: I have one now.

Thanks,
Mike
 
Last edited:
KMD150 Case Screws

Well I replaced the KMD150 internal battery for the second time, first one was 2010. This time I managed to strip out the head of a case screw. The screw is one of five that holds the screen frame to the chassis, and is a countersunk Philips head screw measuring 1/4" total length. Does anyone know of a source for these, besides Bendix King? Their installation manual does not show or list these. Thanks for any help.
 
Bob,
I bought some from Mr. Metric: http://www.mrmetric.com/

They were a local source for me. Maybe a metric fastener source nearer you would carry them. Unfortunately the parts are in the hangar so I don't have the size or part number handy. I can look it up tomorrow if you'd like.
 
Correct screws for KMD150 case

A follow up to mention correct screws to secure the screen frame to case and the black outer frame to case (in case any screw heads get stripped out). They are metric. Use M2.5 X .45 X 6 mm Flat Head Phillips Machine Screws A2 Stainless Steel. Got mine from Fastener-Express.com.

There are two places where the screw needs to be cut down and this can be done without too much difficulty.
 
KMD150 Battery

Mine just went dead for the second time... 5 years ago I bought a new battery from Batteries+, and at the same time I bought a battery holder for a couple of bucks... Soldered it in.... This time around it will be a 1 minute replacement....

After I spend 5 minutes pulling the cover off the unit itself..
 
Battery

Ben,
Let us know how it goes.
Where did the holder fit, etc.
I have replaced my battery once like you, but wasn't smart enough to look ahead. Good for you!
 
Back
Top