Those "solid" rivet call outs for riveting the leading edge assembly ribs to main spar...most folks acquiesce and pull LP4 pop rivets or such. I challenged this task and I engineered a way to stick with the vans design! ...by driving the impossible to reach SOLID rivets in the leading edge ribs.
QA results: No smiley faces. No bent over shop heads. No gaps between ribs n spar.
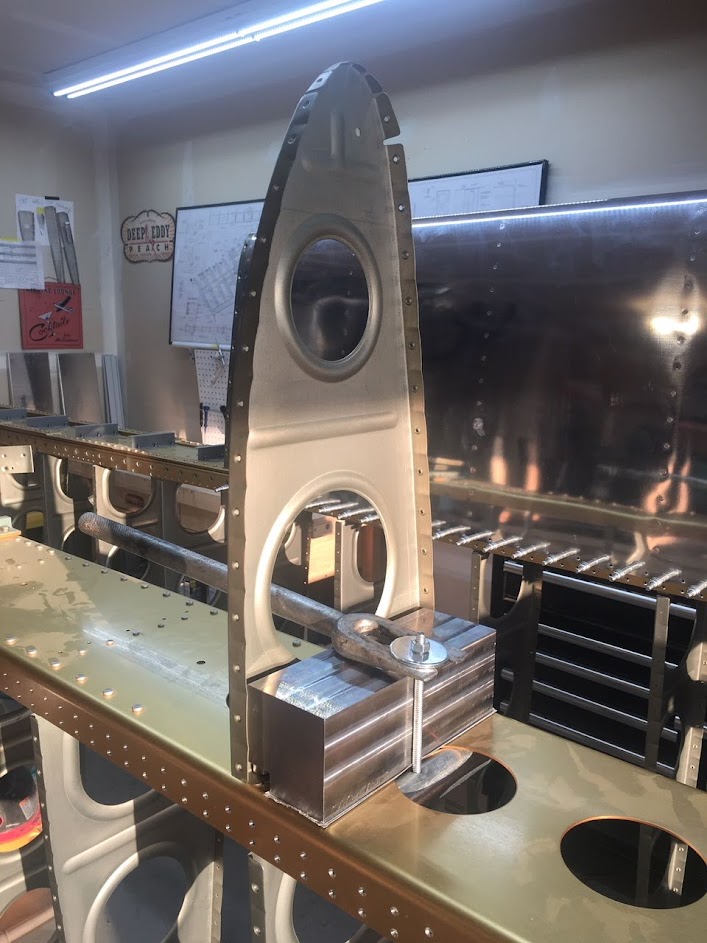
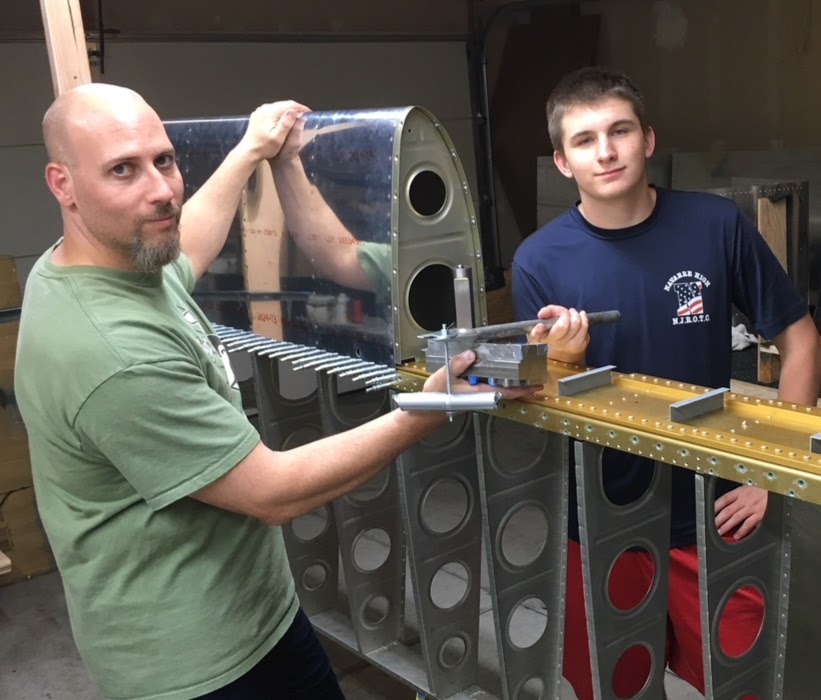
What? How?: I drew up and tolerance'd a big steel block that holds five AN470 rivet sets. Imaging a rectangle block approx. 7" x 2.5" x 2.5" weighing about 13lbs or so. Placed this engineered tooling inside the leading edge assembly. Imagine if you have the wing in a jig/stand at this time, like you are supposed to at this phase, then this block lays inside and on top of the main spar. Then I back riveted vertically from the wing's aft side with a 12" offset back riveting set. Pretty awesome.
I was able to coax the Vans team into sharing with me actual dimensions for hole locations! Then I tolerance'd the tooling for the machinist.
Essentially this process is a heavy steel block (heavy mass desired) to back rivet against. And use a medium sized automotive ball-joint spreader as a pry bar. This remedied the long reach and clamping need. Basically my mission was to harness the easiest rivet method...back riveting, for purpose of best possible Quality.
I'll try to add photos here. But I am willing to align with anyone and lend you this tooling...even give a helping hand.
Sticking to the drawing and managing quality results equals finesse. An awesome feeling.
QA results: No smiley faces. No bent over shop heads. No gaps between ribs n spar.
What? How?: I drew up and tolerance'd a big steel block that holds five AN470 rivet sets. Imaging a rectangle block approx. 7" x 2.5" x 2.5" weighing about 13lbs or so. Placed this engineered tooling inside the leading edge assembly. Imagine if you have the wing in a jig/stand at this time, like you are supposed to at this phase, then this block lays inside and on top of the main spar. Then I back riveted vertically from the wing's aft side with a 12" offset back riveting set. Pretty awesome.
I was able to coax the Vans team into sharing with me actual dimensions for hole locations! Then I tolerance'd the tooling for the machinist.
Essentially this process is a heavy steel block (heavy mass desired) to back rivet against. And use a medium sized automotive ball-joint spreader as a pry bar. This remedied the long reach and clamping need. Basically my mission was to harness the easiest rivet method...back riveting, for purpose of best possible Quality.
I'll try to add photos here. But I am willing to align with anyone and lend you this tooling...even give a helping hand.
Sticking to the drawing and managing quality results equals finesse. An awesome feeling.
Last edited: