What's new
Van's Air Force

Don't miss anything! Register now for full access to the definitive RV support community.

Jim Cone's tail cone finished

Finished Tail Cone

Nice job, Jim. If you don't have anything else to do, and you'd like to make a trip down to Marietta, Georgia...
Anyway, looks good.
Meade and George
#16:D
 
Jim,

How did you get the tail cone halves? My plans say they won't be shipped until the "Finish" kit.

John
 
Jim,

How did you get the tail cone halves? My plans say they won't be shipped until the "Finish" kit.

John

They are included in my tail kit bill of materials, but they are listed as back ordered. I called in yesterday and Van's said that they would not be in until the end of the month. I hope they are not in the finish kit, because I have all ready paid for them.
 
Nice job on the fiberglass Jim. I did not get any of the glass with the kit, still waiting. Nice to see some pics of how to set it up.
 
Last edited:
Jim, Photo #6 shows 5 rivets on the aft verticle stabilizer spar (center of the picture) that have not been riveted. I found the print does not instruct us to rivet these. Clearly, they should be riveted with the blind rivets. Also, behind the rudder (aft vert stabilizer spar, again) did you rivet all of the holes yet? There were about 30 that had not been riveted when I got done. I re-read the plans and could not find where it says finish rivet all holes. I pulled the rudder and finished it up.

Any thoughts?

Good catch! I just figured that those holes would be riveted when the tail cone fairing was mounted. I will check with Van's before I rivet them. BTW, I got my fairing when I picked up the kit.

On another point, be sure that you mount the fairing far enough forward to allow it to clear the stabilator. If it does not clear on the side, you can us a heat gun and some wedges to bend the side in a bit. Carefully heat the fairing top and bottom and then push a shingle or similar wedge between the fairing and the stab. Let it cool for an hour or so and it will stay in the new place.
 
Good catch! I just figured that those holes would be riveted when the tail cone fairing was mounted. I will check with Van's before I rivet them. BTW, I got my fairing when I picked up the kit.

Check the rudder attaching spar also. I found about 30 rivets that were not called out to be riveted.
 
Jim, Photo #6 shows 5 rivets on the aft verticle stabilizer spar (center of the picture) that have not been riveted. I found the print does not instruct us to rivet these. Clearly, they should be riveted with the blind rivets. Also, behind the rudder (aft vert stabilizer spar, again) did you rivet all of the holes yet? There were about 30 that had not been riveted when I got done. I re-read the plans and could not find where it says finish rivet all holes. I pulled the rudder and finished it up.

Any thoughts?

I just talked to Gus at Van's and he said that the plans should have had you rivet those when the skins were riveted on. Same for the other holes.
 
Hi Jim,

Thank you very nice.
How many hours did you spend on the tailkit?

Rudi

It took 74 hours. That includes priming and finishing the VS and Rudder tips and sanding to 2000 grit sandpaper to make them as smooth as glass. It does not include the tail cone fairing finishing, as I ran out of pin hole filler. It will probably take 3 to 4 hours to get that one like the tips.
 
Jim,

Again thanks for your photos. Have a request. Could you list the steps (maybe a short tutorial) and products you used to finish the fiberglass components. It will be a NEW process that I have to learn and certainly want to do it right.
 
Nice job on the fiberglass Jim. I did not get any of the glass with the kit, still waiting. Nice to see some pics of how to set it up.


I was still wating for the fiberglass parts, but when I called in last evening I was told I would not be getting the tail cone glass halves. It has been moved to the finish kit. I was told that will save shipping costs. I am not completly sold that this is the real and only reason. The cost of the glass tail cone parts are were in the tail kit and now the cost is going to be in the finish kit. Sounds like we will be paying twice for the same parts, but to this they said that the cost of the added rivets in my kit offset the cost of the tail cone. It sounds like those of you who got the tail cone, will be paying for your missed rivets when you buy a finish kit with no tail cone and those of us who did not get the tail cone paid for our missed rivets with the tail kit that did not have a tail cone. Not a big deal, but I was looking forward to adding the tail cone halves and making my tail look more complete. Comunication on this could have been better.

The VS and rudder tips are still coming.
 
It took 74 hours. That includes priming and finishing the VS and Rudder tips and sanding to 2000 grit sandpaper to make them as smooth as glass. It does not include the tail cone fairing finishing, as I ran out of pin hole filler. It will probably take 3 to 4 hours to get that one like the tips.

Only 74 Hours, Well Done, Thanks a lot. Reason is it looks like I'm matching your build hours closely on the wings, so i wanted to estimate my hours on the tailkit as well. Rudi
 
Jim,

Again thanks for your photos. Have a request. Could you list the steps (maybe a short tutorial) and products you used to finish the fiberglass components. It will be a NEW process that I have to learn and certainly want to do it right.

As an EAA Technical Counselor and Flight Advisor, I have written a lot of articles for various publications and newsletters. I wrote an article about sanding and would be happy to post it here if DR will allow it. It is about one half of a page long. If Doug does not want it posted here, send me an email with "sanding" in the subject and I will send it to anyone who asks. Sanding and filling are the keys to a good finish. Painting is about 10%.

Email: [email protected]
 
Fiberglass cone

They are included in my tail kit bill of materials, but they are listed as back ordered. I called in yesterday and Van's said that they would not be in until the end of the month. I hope they are not in the finish kit, because I have all ready paid for them.

Van's told me the cone w/be sent w/the fuselage kit. It's expensive to ship.
 
Cone

They told me when I picked up my tail kit on Thursday that the cone would be sent in the finish kit. Working on my inventory today.;)
 
Tail Cone

UK Builder. Tail cone came witlh tailcone/empennage kit in seperate cardboard box. The original finish is good quality, does not look like a load of work to get a good finish. However, I have I have requested a copy of guru Jim Cone's paper.

Jim Devlin
 
Thanks Jim!

I finished my wings, except for messing up a flaperon trailing edge. When you peel the blue film off of .016" parts, be careful, if they bend they are toast!

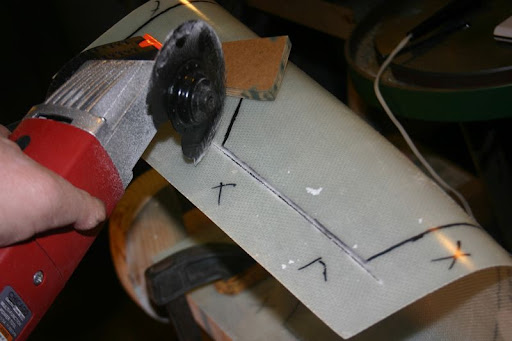
So while waiting for my fuse, I decided to do the fairings. I first tried tinsnips (yuck-crushed it) and hacksaw. The hacksaw slid around and scratched it, and a sabre saw was too wiggly!

I bought a clone multi-tool from harbor freight, and it really did well. It has a powerful vibrating action and I could slot the fiberglass and then cut it.
IMG_6861a.jpg


Afterwards, I used a moto-tool with a sanding drum to get close to the scribe line, which I darkened with magic marker.

Does anyone know if they are good for cutting canopies? I think they are safer than an abrasive wheel, they kind of work like a Doctor's cast saw.

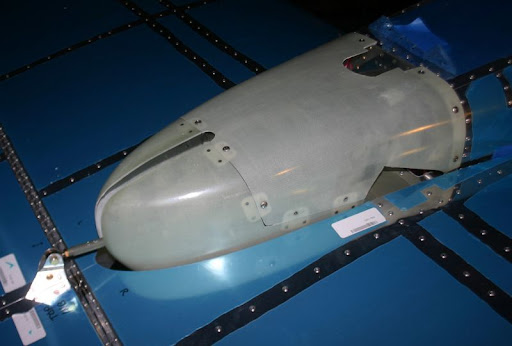
On my airplane, the aft split part of f-1294B almost touched the stab, so I moved the top forward about 3/16". I then had to expand the spar box cutouts and the rudder horn cutout. It might have been better to slide the whole thing (top and bottom) forward. They are really nice parts.

IMG_6865a.jpg


Then I read Jim Cone's post and he saved me from putting the nutplate in thin air. Thanks!
John
 
On my airplane, the aft split part of f-1294B almost touched the stab, so I moved the top forward about 3/16". I then had to expand the spar box cutouts and the rudder horn cutout. It might have been better to slide the whole thing (top and bottom) forward. They are really nice parts.
John

Did you double check the clearance from your rudder before committing to this?
The rudder clearance to the tail cone fairing is quite close.
 
UK Builder. Tail cone came witlh tailcone/empennage kit in seperate cardboard box. The original finish is good quality, does not look like a load of work to get a good finish. However, I have I have requested a copy of guru Jim Cone's paper.

Jim Devlin

Not anymore, they moved it to the finish kit.

My only real grip is at the time of my order it was in the tail kit and sent by ups in a seperate box. when I confirmned my order and given a shipping quote this was still the norm. My plans do not have it in the finish kit. They say it is in the tail kit. I have been waiting for that box. I did not find out it was not comming and the cost I paid for it was applied to the missing rivets: untill I called them. Communication should have been better.
 
Back
Top