What's new
Van's Air Force

Don't miss anything! Register now for full access to the definitive RV support community.

Main Gear Leg Fairing Clamp

wirejock

Well Known Member
This is an alternate to the "fiberglass finger" method of clamping the Gear Leg Fairing with a breeze clamp.
This seems to work really well. Fabricate two of these. I made them mirror to each other so the outboard nut plates are higher outside on both port and starboard. I oriented the breeze clamp so the access hole to adjust it is on the inboard side. Aesthetics.
It's easier to lay it out, drill, dimple and install nutplates before bending and cutting relief holes.

Attach it snug but not tight. Drill the screw holes in the fairing and the access hole to adjust the breeze clamp. Screw the fairing to the clamp. Adjust the fairing. Tighten the breeze clamp. Easy peasy.

Edit...
The clamp works better if the lower nutplates are outboard. Drawing shows them the other way.
Reason is access from under the wing. It's pretty close as it is so lower nutplates on the outboard side are a little easier to put screws in.

Edit 04/21/2023
I uploaded the pdf to my Google Drive. If you want to download. Here's the link
Gear Leg Fairing Clamp
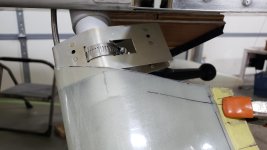
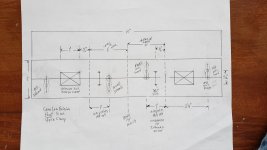
20220812_152639.jpg
20220812_163144.jpg
 
Last edited:
Great!

Neat solution. What thickness material did you use? Are you planning to radius the cutout corners a little bit more? ;)
 
Clamp

Neat solution. What thickness material did you use? Are you planning to radius the cutout corners a little bit more? ;)

Final two are .032". They fit pretty good.

I made several.
First was .025". Too thin.
Next one, I didn't offset the nutplates. Screws hit each other. Plus the breeze clamp hole was way off. The last fit the shape of the fairing much better.

I promise to spend countless hours making them structurally perfect after the fairings are fit. Even though it's not a structural part. I don't want to make another set! :D
 
Last edited:
I love it. Very timely too. Have been trying to figure out a more functional way to attach the fairing.

RD
 
Link posted

I edited my original post and added a link to the file to fabricate the Gear Leg Fairing Clamp
 
This is an alternate to the "fiberglass finger" method of clamping the Gear Leg Fairing with a breeze clamp.
This seems to work really well. Fabricate two of these. I made them mirror to each other so the outboard nut plates are higher outside on both port and starboard. I oriented the breeze clamp so the access hole to adjust it is on the inboard side. Aesthetics.
It's easier to lay it out, drill, dimple and install nutplates before bending and cutting relief holes.

Attach it snug but not tight. Drill the screw holes in the fairing and the access hole to adjust the breeze clamp. Screw the fairing to the clamp. Adjust the fairing. Tighten the breeze clamp. Easy peasy.

Edit...
The clamp works better if the lower nutplates are outboard. Drawing shows them the other way.
Reason is access from under the wing. It's pretty close as it is so lower nutplates on the outboard side are a little easier to put screws in.

Edit 04/21/2023
I uploaded the pdf to my Google Drive. If you want to download. Here's the link
Gear Leg Fairing Clamp

View attachment 29389
View attachment 29390
Very timely - my son and I are replacing the main leg fairings on our recently acquired RV6A and are looking for a better attachment method. Unfortunately we have no fabrication experience. Anybody know of a shop or person that I could pay to use the schematic (and have them read the additional details in this thread) to make a set of these brackets? Otherwise, I'm guessing we'll just need to use the usual tab method - which seems doomed to snap off doen the road - and sooner for us since my son is flying it about 10 hours/week.
WIREJOCK: I'd gladly buy a set from you - but understand that you don't want to go through the hassle again.
 
After 500 hours on my seven, the fingers are showing signs of disintegration.
I never liked the idea of clamping on a tapered surface. I'm thinking your solution should be more effective at stopping the fairing from migrating down the gear leg. I installed 3M tape on the inside of the fairing and on the gear leg which seems to help. Thank you!
 
Just found this post from Jan 2023 (before wirejock's solution) - and wondering if others have successfully taken this approach...
"The tongue and clamp is due for failure. Probably other solutions too. The leg fairing flexes quite a bit with the gear leg. On landing for example, compression on top and tension on the bottom. I re-glassed the tongues a couple times, then just gave up since it would always crack after 100 hrs or so.
Turns out, the intersection fairings at each end hold things just fine. No more cracks or stresses on any of the fiberglass parts. Seems it works well to just let the gear leg fairing 'float' between the other two."
 
Leg fairing clamp

Very timely - my son and I are replacing the main leg fairings on our recently acquired RV6A and are looking for a better attachment method. Unfortunately we have no fabrication experience. Anybody know of a shop or person that I could pay to use the schematic (and have them read the additional details in this thread) to make a set of these brackets? Otherwise, I'm guessing we'll just need to use the usual tab method - which seems doomed to snap off doen the road - and sooner for us since my son is flying it about 10 hours/week.
WIREJOCK: I'd gladly buy a set from you - but understand that you don't want to go through the hassle again.

I recommend asking a local at the nearest EAA Chapter meeting. It's a simple flat piece of .032 with holes and nutplates then rolled around a pipe. If you can't find a builder, let me know. I'll make a set. It won't be very soon though. I'm trying to finish and going out of town soon.

Just found this post from Jan 2023 (before wirejock's solution) - and wondering if others have successfully taken this approach...
"The tongue and clamp is due for failure. Probably other solutions too. The leg fairing flexes quite a bit with the gear leg. On landing for example, compression on top and tension on the bottom. I re-glassed the tongues a couple times, then just gave up since it would always crack after 100 hrs or so.
Turns out, the intersection fairings at each end hold things just fine. No more cracks or stresses on any of the fiberglass parts. Seems it works well to just let the gear leg fairing 'float' between the other two."

Mine float at the bottom inside the pant fairing. I have no idea if the clamp works or not. My airplane is not finished. However, I did borrow the idea from someone else.
 
I recommend asking a local at the nearest EAA Chapter meeting. It's a simple flat piece of .032 with holes and nutplates then rolled around a pipe. If you can't find a builder, let me know. I'll make a set. It won't be very soon though. I'm trying to finish and going out of town soon.

Mine float at the bottom inside the pant fairing. I have no idea if the clamp works or not. My airplane is not finished. However, I did borrow the idea from someone else.

Thanks for the reply and suggestion - will check with the local EAA chapter folks.
 
I have done something similar but used a rubber intake tube coupler that I split and unrolled. Bulletproof.
 
I have done something similar but used a rubber intake tube coupler that I split and unrolled. Bulletproof.
I'm a couple days away from installing replacement main leg fairings on my RV6A and would love to hear more details of your approach/solution. I'm new to plane ownership so the more details you can provide about exactly what materials you used, where you got them and how you installed them would be greatly appreciated!
 
Back
Top