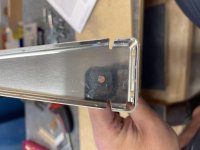
I’m working on my last project kit before finally starting on my -10 in earnest. This is the control surface practice kit. When the ribs were clekoed to the front spar they were nice and tight; no gaps. As soon as I squeezed the rivets you could watch the flange open up ever so slightly. Same thing happened on both sides. What am I missing that is causing this? TIA!!

Van's Air Force
You are using an out of date browser. It may not display this or other websites correctly.
You should upgrade or use an alternative browser.
You should upgrade or use an alternative browser.
Gap between rib flange and spar (practice kit)
- Thread starter TTaylor
- Start date

It's not enough to squeeze the rivet; you must also push/pull the rivet head firmly enough to close any gap prior to squeezing. Maybe you are, but are accidentally relaxing the pressure while you squeeze? This is why it's always recommended, when possible, to put the rivet head on the thinner piece of material, to make it easier to pull the 2 pieces together. Because you only have 2 rivets in this piece, it's much harder for one cleo to hold everything in tight. Next time try a small clamp near the rivet hole.
wirejock
Well Known Member
Setting rivets
Yep. What he ^ said.
Another trick is the rubber hose doughnut. Buy a section of windshield washer hoses. One size fits 3/32" and one fits 1/8". Slice off a doughnut slightly thicker than the protruding rivet shank. When you set the rivet, the rubber doughnut forces parts together. Works for any rivet setting method.
It's not enough to squeeze the rivet; you must also push/pull the rivet head firmly enough to close any gap prior to squeezing. Maybe you are, but are accidentally relaxing the pressure while you squeeze? This is why it's always recommended, when possible, to put the rivet head on the thinner piece of material, to make it easier to pull the 2 pieces together. Because you only have 2 rivets in this piece, it's much harder for one cleo to hold everything in tight. Next time try a small clamp near the rivet hole.
Yep. What he ^ said.
Another trick is the rubber hose doughnut. Buy a section of windshield washer hoses. One size fits 3/32" and one fits 1/8". Slice off a doughnut slightly thicker than the protruding rivet shank. When you set the rivet, the rubber doughnut forces parts together. Works for any rivet setting method.
Yep what they said. I found the “doughnut” method works for me….small piece of hose sitting over the shank and squeeze with the pressure against the flush head….keeps those flanges very firm…..
PaulvS
Well Known Member
Ideas
Possibly the rib flange became distorted and the edges puckered up when the rivet shank swelled. If you drill out the rivets and disassemble (for practice) you will be able to see if there was contact between the parts directly around the hole.
As mentioned above it is preferable to have the factory head against the thinnest part.
Silicone surgical tube is good for doughnuts because it doesn't leave a black mark.
Thanks guys! I’ll remember these tips for next time. I’ve seen the donut trick discussed by Plane Lady and Austin Manke, just wasn’t prepared at all for the way this morphed as the rivet squeezed. Thanks again!
Do you have a link to these videos?
I used “O” rings
I used thick O-rings with the same idea. Place the O ring on the rivet shank and when the squeezer closes, the O ring is compressed first - squeezing the aluminum sheets together before & during the rivet setting. Really helps out on the thin flange parts.
I used thick O-rings with the same idea. Place the O ring on the rivet shank and when the squeezer closes, the O ring is compressed first - squeezing the aluminum sheets together before & during the rivet setting. Really helps out on the thin flange parts.
wirejock
Well Known Member
Doughnut
See below. It just slips over the shank.
See below. It just slips over the shank.
I'm new to this....having a hard time understanding the positioning of this "doughnut"
Another trick is the rubber hose doughnut. Buy a section of windshield washer hoses. One size fits 3/32" and one fits 1/8". Slice off a doughnut slightly thicker than the protruding rivet shank. When you set the rivet, the rubber doughnut forces parts together. Works for any rivet setting method.
Do you have a link to these videos?
Here is PlaneLady's - you can jump to 11:00: https://www.youtube.com/watch?v=xGHZLWY9KXA&list=PLDGsaS3osmwvtkSMiqoDZ8N-hbme9_N9J&index=37
Austin Manke's @ 16:50: https://www.youtube.com/watch?v=cvwDYFGeK6s&t=696s
I got similar behavior where the end ribs of the horizontal stabilizer attach to the front spar. I probed with a feeler gauge and it seems like the parts are touching around the hole. I think the deflection is the effect of the clamping pressure that comes from setting some #4 rivets in fairly thin material.
In this case I would not worry about it. The load is carried though the attachment of the skin to the rib. Those 2 rivets are there to hold the rib in place for assembly. And I’m not just giving a personal engineering opinion. I had a similar thing on my airplane on the vstab which was snagged at inspection and I sent a picture to Vans and they confirmed that it was no issue. But by all means try to do the best work you can an avoid the situation in the future. I didn’t know the donut trick.
JeremyL
Well Known Member
The head placement
Place the manufactured head of the 470 on the thinnest material to avoid distortion(rib flange in this instance). That should take care of it. Another good practice with the squeezer (if possible) place the cupped set on the upper arm of the squeezer yoke so you can pull and apply pressure to the manufactured head and the two pieces being joined.
Place the manufactured head of the 470 on the thinnest material to avoid distortion(rib flange in this instance). That should take care of it. Another good practice with the squeezer (if possible) place the cupped set on the upper arm of the squeezer yoke so you can pull and apply pressure to the manufactured head and the two pieces being joined.

