wirejock
Well Known Member
I borrowed this idea from Mike Starkey. Thanks Mike. Saved my bacon. Here's his original post.
https://vansairforce.net/community/showthread.php?t=68674
I made a few changes.
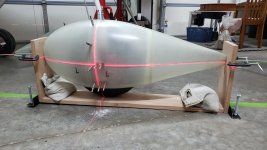
The jig is amazing. I fought with the pant for days. It has to be aligned in three axis. It's round and floppy so the slightest touch, throws it out of alignment. No way to drill without it moving. So here's what I did.
First the jig. I used oak. Mine is 1x6. I prefer hard wood for jigs.
Cut three pieces. The base is the length of the pant. The two vertical need to be higher than the pant center line plus a little. I used 12". The leveling braces can be anything. I had some 1-1/2" angle iron. It also allowed me to tap the four holes 3/16-16 and use carraige bolts as legs. Draw center lines on the two leveling braces and mark one for both leveling legs and screw holes. I used three deck screws each end. Start with pilot holes. Clamp the pair and drill. Separate, clamp and drill the other set of holes. The reason is it makes them identical. Now lay the jig base on a flat bench and match drill the verticals and base for the mounting screws. Now you can finish drilling the leveling angles to full size.
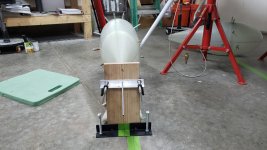
Clamp the two verticals so the mounting holes are aligned and drill two holes dead center 6" and 10" from the bottom. A few more won't hurt. Enlarge to whatever size pin you plan to use. Mine are 3/16" polished steel. Cut between the holes to form a slot for the pin. This allows for leveling the pant. Assemble the jig. Grab some scrap and make two pin clamps. I used some aluminum angle. Drill a hole for the pin. This will be clamped to each side to level the pant. Add some markings to each end dead center. Jig is ready.
Now we need some other stuff.
Wrap the tire with tape and draw a line dead center.
Make a 1" spacer block with a #40 hole dead center. Tape it to the tire so the crosshairs match the centerline of the tire.
Draw centerlines fire-aft on the top, bottom, inside and outside of the pant. Assuming you've already put the two parts together with clekos! A laser level makes this much easier. Mark the aft end center top, bottom and sides. Mark center of the nose. Use the level to connect top and bottom. Set the pant on the bench and align the seam per plan to the vertical laser then raise or lower the level till the line matches the aft side center mark. The laser will point to the nose center point. Connect the line. Drill the pin holes fore & aft.
Drill a matching hole per plan where the tire block hole will land on the Aft Pant. Just a little math.
I assume you've done all the other stuff. Level the fuse with tires off the ground. Draw a centerline on the fuse belly. Extend the centerline to the floor. Blah, blah. Laser level man!
Measure the distance from fuse centerline where the line on the tire intersects the floor and add a line fore-aft matching that dimension.
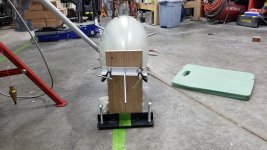
Slip the jig into place and level the base so the base is barely touching the tire. Bolts can go in from the top or bottom if the holes are tapped. Nuts lock position.
Cleko the Aft Pant to that block and slip it into place. That forces the top of the pant to stay aligned to the centerline of the tire. Insert the pin and slide the angle over the pin. Repeat with the nose part of the pant. Cleko.
Now, it's just laser and measuring. The jig has a centerline. Measure from that line to the line on the floor. Match them fore-aft. The pant is aligned to the centerline of the fuse.
Use a mirror to look under and check the pant centerline is aligned to the tire centerline. Might need some cutting here or there. Now set up the laser level on blocks so the vertical line is where plans show and the horizontal is near center. Measure the fore-aft centers of the pant from the laser line and make them match. Clamp position with the angle brace. Pant is aligned to longeron level. Verify. Mark the floor so you can get close to perfect if you have to disassemble to cut. Reassemble and verify.
Drilling was tricky. Use a light and tiny bit. Once you hit a hole, it can be drifted to center. Use clekos or screws. Done!
Draw lines to mark the bracket edges. We need to fill the space.
Now take it all apart. Drill some holes to inject flox. Scuff the inside. Apply packing tape to the brackets. Reassemble with waxed screws but leave them loose. Clekos outboard. Verify position. Mix flox with cabosil and squish into a syringe. Inject into the holes. We want to fill the space without changing the dimensions. Cure. It should be all blocked up with holes exactly where they belong.
I am writing another article for my blog with much more detail. Feel free to check it out.
http://wirejockrv7a.blogspot.com


Last edited:


