What's new
Van's Air Force

Don't miss anything! Register now for full access to the definitive RV support community.

Alternator bracket

Paul 5r4

Well Known Member
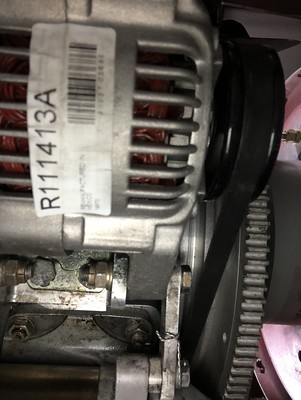
I modified the alternators forward bolt direction of insertion, (and used a shorter bolt), to make an alternator change out easier. Last fall I had an alternator failure on the way to Petit Jean, Arkansas. With the help of some local folks I got it changed out but it took five hours. The problem was the forward bolt at the hinge point. There is no way to remove this bolt by pulling the head forward because it comes into contact with the ring gear well before coming out of the hole. I ended up removing the propeller to get the job done. I found another post regarding the same problem written by Paul Dye. His solution was to remove the entire alternator mounting bracket where it mounts to the engine case. Still a major pain because of the tabs that are bent over the bolt heads as you can see in the last photo. When I tried to remove that bolt, when the head contacted the ring gear, there was still at least a half inch in the hole. First picture is before any changes were made.

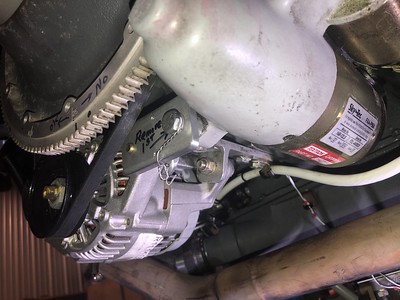
I studied this for a while and finally came up with what you see in the bottom two photographs. There's no tension on the bolt so it's only job is the mounting of alternator to the bracket. The aluminum bridge between the alternator bolt and the starter bolt I believe is to help keep the alternator from bowing a little towards the starter when tension is applied to the belt. I made a new aluminum piece and tapped the hole to receive the threaded end of the bolt from the aft side. The head of that bolt is safety wired as you can see in the last photograph.

If I experienced another alternator failure now I could get the new one installed and be on my way again in about 90 minutes. Only tools needed are two 1/2 inch wrenches, safety wire pliers and the wire.

IMG_8538 by Paul Gray, on Flickr

IMG_8579 by Paul Gray, on Flickr

IMG_8581 by Paul Gray, on Flickr
 
Last edited:
I would have removed the 4 bolts holding the lower bracket to the case. This would allow the alt support bar to pivot down and the bolt would have cleared the ring gear.

Larry
 
Last edited:
RVFan, My alternator is from the local autoparts store. It was a drop in replacement for the one that came with the FF kit. I changed to automotive for a couple reasons... price and availability (even on a Sunday), in nearly any city. To more accurately answer your question here is my alternator information.

Lester number is 14684
Suzuki samurai years 86-95
Part number 14824

Note: I'm not sure what the significance of the lester no. is but someone on here let me know I would need it and they were right.
 
Last edited:
paul5r4- Thank you for this post and for taking the time to explain it with pictures. You and the others that put in the effort solely for the benefit of others are true heroes to a lot of us.

Wcalvert. Thank you but it’s the curved or angled bracket that I need For a O320 fixed pitch RV-6A. The one that I am replacing was straight but the Lycoming bracket has an offset in it. I am assuming I need a straight one to keep the alternator somewhat aligned.

Walt, I hope to someday. I am Ballin on a budget here. My condition inspection is going on a credit card, lol.

This is far and away the best online community I have come across of any kind. I am the guy that most on here say shouldn’t be flying. I hadn’t flown in 30 years. I got my currency back, flew a 172 for dozen hours and then let my mouth overload my wallet, my skillset, and my life and my ass and gambled on a dream that all of us here have had for decades. Now I have 30 hours on it nothing could have made me happier. My ace in the hole is that I am an airport manager and have an A&P that keeps a close eye on me. He said “find that bracket and I will put it on for you”. i said no until I tried to unbolt that top bolt in the bracket which is unremoveable and will require some type of sorcery to remove. So here I am looking for that bracket for him. Thank you guys!!!!!
 
I'm not sure if this may be the part you are referring to? It is the alernator brace arm, part number VA-152-1. I think it has been discontinued but a replacement could be cut out from aluminum plate or welded from steel bar, as in the second picture. (For those with sharp eyes, the safety wire on the bolts is not yet installed.)

20240315_092540.jpg20240315_092613.jpg
 
"The aluminum bridge between the alternator bolt and the starter bolt I believe is to help keep the alternator from bowing a little towards the starter when tension is applied to the belt."

Is this bracket required? Recommended? Steel or aluminum? I ask because I don't currently have it on my engine.
I just walked through the maintainence shop here and there is a metal brace on all the 540s and 360s. Mine has safety wire.
 
"The aluminum bridge between the alternator bolt and the starter bolt I believe is to help keep the alternator from bowing a little towards the starter when tension is applied to the belt."

Is this bracket required? Recommended? Steel or aluminum? I ask because I don't currently have it on my engine.
Here is another thread on the need for a link between the alternator and the starter. Apparently, if you have a B&C alternator no brace link is required to the starter because they balance the alternator. If a different alternator is used the brace link is 'required'.

 
Last edited:
Back
Top