
Van's Air Force
You are using an out of date browser. It may not display this or other websites correctly.
You should upgrade or use an alternative browser.
You should upgrade or use an alternative browser.
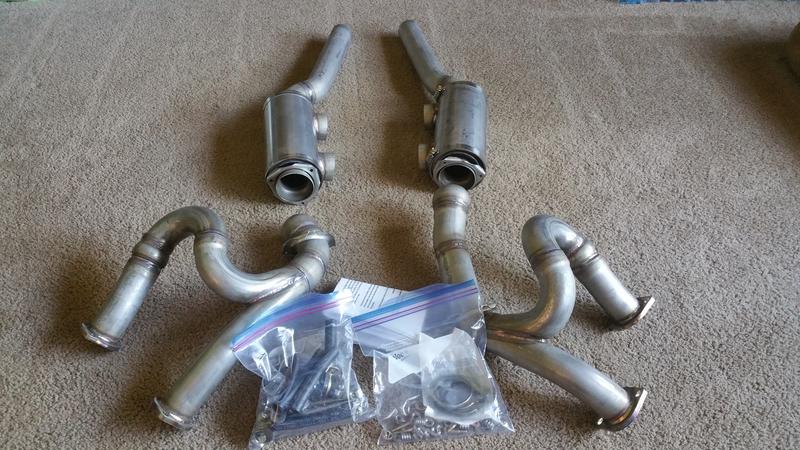
Vettermans trombone exhaust has arrived!! Any tips would be helpful!
- Thread starter dwranda
- Start date

Zuldarin
Well Known Member
David, if I remember correctly you have the James cowl correct? If so make sure that Clint added the extra twist to the forward cylinder down pipes so that it clears your cowling. I had to send both of mine back to get this adjusted. He may have already incorporated that into the design now but thats the only place I had any issues that I recall.
terry.mortimore
Well Known Member
Vettermans trombone exhaust has arrived. Any tips would be helpful!
Hi there, check that the flanges mate up to your cylinder exhaust port surface squarely. Mine did not, I had to file one side down to make them mount properly. Apparently the centre to centre distance on my engine was different than the fixture used to make them.
The up side is that I now have 290 hours on them, without any issues.
Wish I had known about the adjustment for the Sam James cowl, I fibreglassed a bump out to clear the left side.
Terry
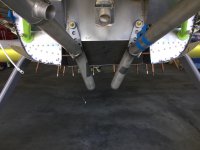
Well I got the exhaust on last night and it seems that the forward ends of both heat muffs are contacting the cowl. I'll play around with it some more today then probably have to call Vettermans. It did go on easily though and was fun messing with something other than the canopy and cowling. Really growing tired of those 2 freaking things!
8A
I installed trombones (without mufflers) on my 8A - fit without any issues. However, be aware that trombones will not fit the M1B engine with stock sump.
Ron B
Has anyone done the trombone exhaust on an 8A. The Vetterman website says not sure at this time for 8A.
I installed trombones (without mufflers) on my 8A - fit without any issues. However, be aware that trombones will not fit the M1B engine with stock sump.
Ron B
Last edited:
Use mouse milk on all the slip joints before installation, and whenever you have the cowlings off.
Let's be honest, that stuff is great for loosening joints, but at exhaust temps - it burns off in a few hours of operation.
For this application, nickel based anti-seize works well and will last longer, or use Loctite 299175 which also has a corrosion inhibitor good for 2400ºF.
KiloFoxtrot
Well Known Member
FWIW, I have the Trombone on a M1S with a Superior Cold Sump.
Fits perfectly. Follow the instructions, easy to install and no issues.
RISERIC
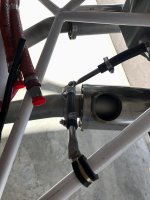
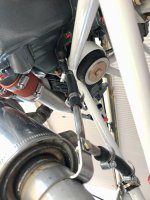
I have the same engine and exhaust and I would like to see how you installed the hanger brackets for the exhaust.
Thanks
Ken
Simon Hitchen
Well Known Member
Ball joints
Keep the muff joints loose ish. I over tightened and over 100 hours or so the weldment into the muff broke and left it hanging. Keep it moveable and lubricated
Keep the muff joints loose ish. I over tightened and over 100 hours or so the weldment into the muff broke and left it hanging. Keep it moveable and lubricated
+1 to keep the joints loose and use nickel anti-seize
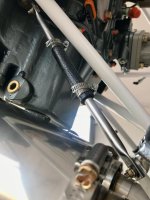
Ken, here's what I have on hand.
I will be at the airport later today and can take more photos for you if needed.
Absolutely, it's part of the installation instruction to keep lightly clamped.
And as Ron suggested above, use nickel anti-seize in the joints.
RISERIC
I have the same engine and exhaust and I would like to see how you installed the hanger brackets for the exhaust.
Ken, here's what I have on hand.
I will be at the airport later today and can take more photos for you if needed.
Keep the muff joints loose ish. I over tightened and over 100 hours or so the weldment into the muff broke and left it hanging. Keep it moveable and lubricated
Absolutely, it's part of the installation instruction to keep lightly clamped.
And as Ron suggested above, use nickel anti-seize in the joints.
Attachments
wawrzynskivp
Well Known Member
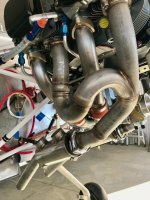
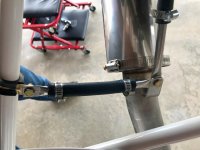
Flares for hangar tubing
It's been mentioned before, but a rehash is always good:
The tubing that form the hanging support for the ends of the tubes is prone to slipping.
In my mind a rolled bead at each end of that tubing would be the perfect solution so that the hose clamp could be mounted just above the roll and lock everything in place.
I didn't have that tool and used a very slight flare instead, works great. Others have had success with knurling or just roughing up the surface with a stone to give it some tooth.
rmarshall234
Well Known Member
Alternative hangers
I've never liked that design, they always seem to slip or break and it looks like something cobbled together at the last minute with scraps that were laying on the shop floor. No way to treat a beautiful $2K exhaust system IMHO.
Not an RV, but here's what I'm using on my biplane build. $35 each from one of the auto hotrod shops.
Attachments
Draker
Well Known Member
Let's be honest, that stuff is great for loosening joints, but at exhaust temps - it burns off in a few hours of operation.
For this application, nickel based anti-seize works well and will last longer, or use Loctite 299175 which also has a corrosion inhibitor good for 2400ºF.
Yea, a local A&P who had a look at my project also recommended anti-seize on the slip joints. I assume you need to pull the exhaust completely to apply it, as you need to move the pipes to work the material into the joint.

