What's new
Van's Air Force

Don't miss anything! Register now for full access to the definitive RV support community.

RV-6 rebuild project in Palm Springs CA

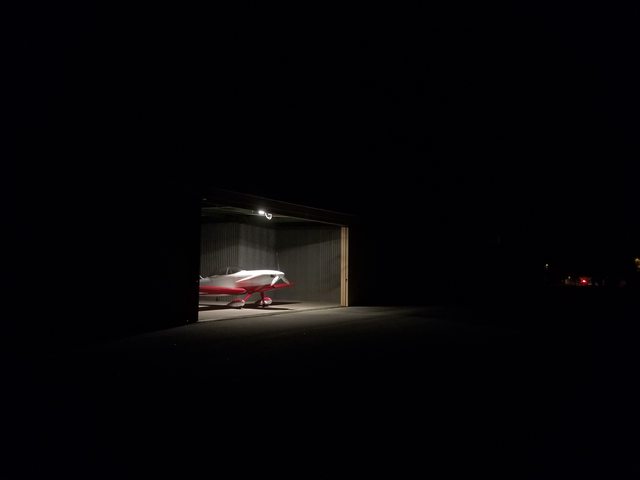
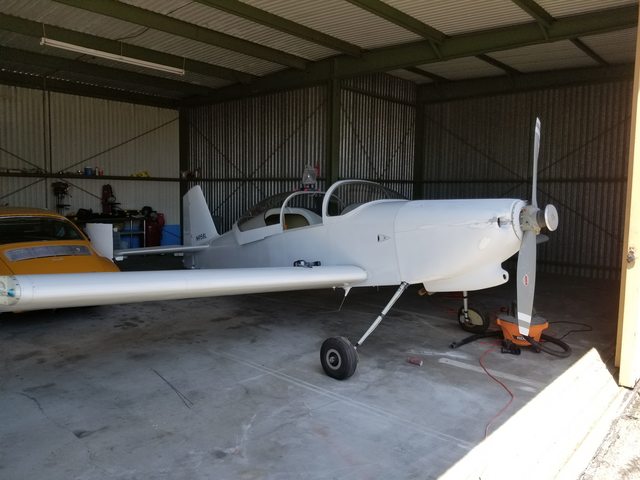
Spent another few hours at the hangar this evening.

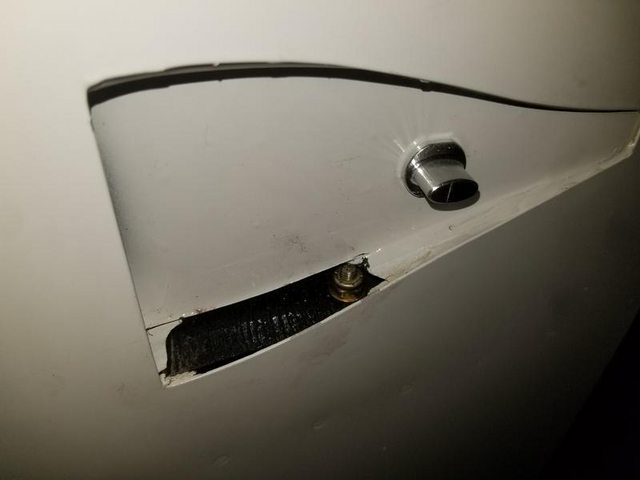
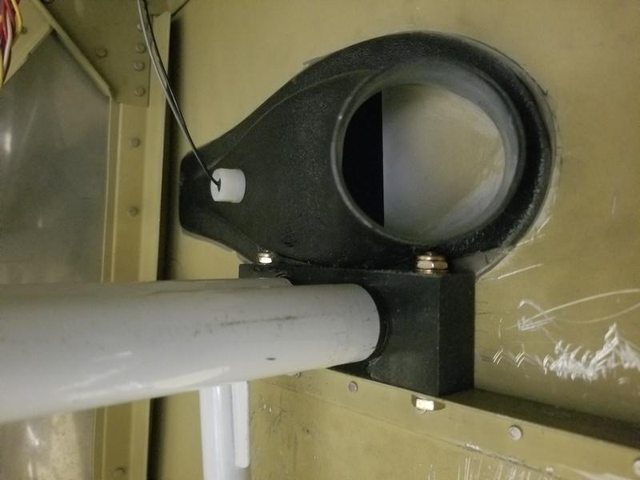
ELT is nearly wired. After that, everything is done, except fuel flow and tank senders, which I haven't fitted yet.

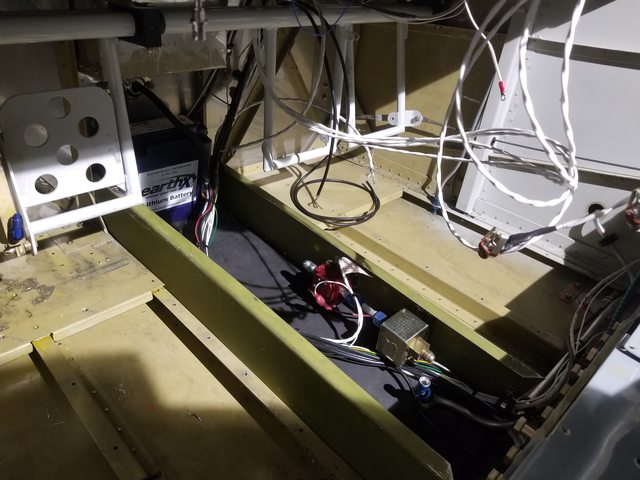
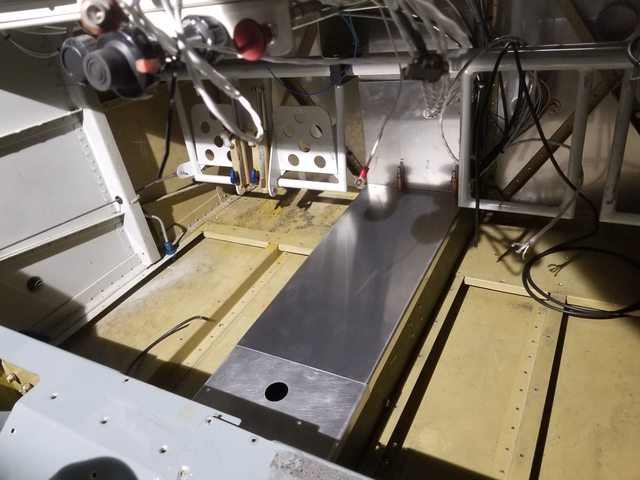
Having been through 800 iterations of the same idea, I've finally settled on what I'm doing with the floor, and how to address my centre console idea. The centre of the floor will have a small raised tunnel, similar to the transmission tunnel on a car. Inside this I will put my EarthX battery, wiring harness, fuel lines, pump and red cube.

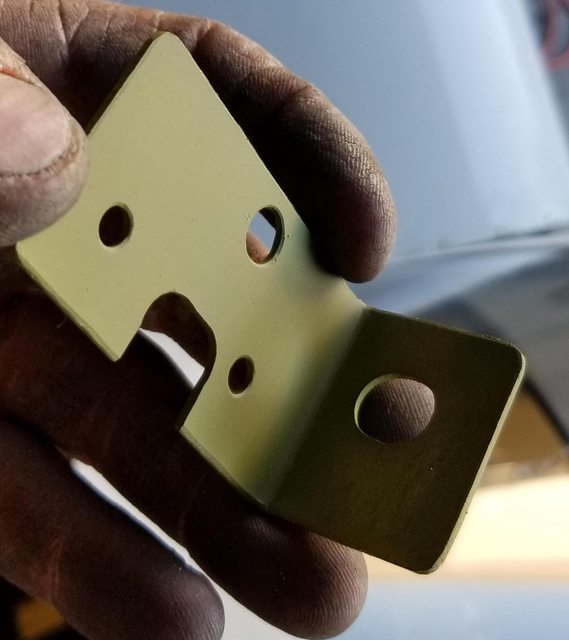
I'd like to put the tank selector and elevator trim on a separate, standalone bracket.

Question... is it OK to use the wing spar bolts to hold this bracket in place? The bracket would span 6 of the large high-tolerance bolts at the top of the spar (three on each wing). I understand that the bolts are in shear, but don't want to discover that they're also somehow in tension, and that having a slither of 2024 sandwiched in there is not safe.
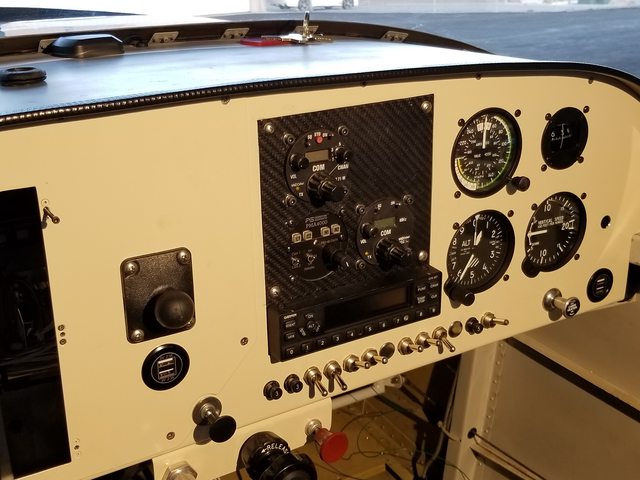
 
Have you seen the forward spar kick panels and center box that covers the fuel valve plumbing as used on 7 & 9 models? They mount to each other & the cover screws to the seat floor panels. Cleans up that area pretty good.
 
Have you seen the forward spar kick panels and center box that covers the fuel valve plumbing as used on 7 & 9 models? They mount to each other & the cover screws to the seat floor panels. Cleans up that area pretty good.

Hi Ralph. Yes I have. My 6 actually has a similar situation, only the kick panels were missing when I bought the project.

The builder had a center console that ran from the front of the seats to the underside of the panel. You could seel oads of wires etc by hanging out of it, and I didn't like it much.

For now, I'm going to do the floor, the center tunnel (had a neat idea for this that will qualify the aircraft as 100% American. All shall be revealed). I may reinstate the kick panels at a later date.
 
Another long day in the hangar. Replaced the wingtip lights with LED units, as per a thread found on here. Ran the wig-wag for the first time and it looked great. I've always wanted an aircraft with wig-wags.

Curt Pullen dropped by to inspect the mess I have made. Curt has an RV-7A which he built about 15 years ago. He was a crew chief on C5s once upon a time.

Intercom is in. I still cant work out the last bit of wiring and it's driving me insane.

I fitted the hanging rudder pedals! They were the first thing I addressed after buying the project. I screwed them up because I was having problems with the air ducts interfering with the mounts at each end, and it was a bit of a knock to the confidence. In the months after, I came up with a solution (that only mildly defaced the finish of the aircraft) and it worked well, so pretty happy.

Next things to address... Proseal new tank senders, install new aluminum fuel lines (plus pump and red cube), pre-oil the motor and... it might be ready to run. Amazing.
 
Last edited:
You might revisit the RV7 tunnel for Fuel Injection. It provides a pretty big "dog house" for the pump and filter as well as incorporating the fuel selector. I cut the tunnel short of the firewall and dressed my wires through a conduit. The kit includes the heater venting. I put a blanking plate on that since I cut off the tunnel short of the firewall. I cut off the tunnel short as it takes quite a bit of monkeying around at the firewall to make your control cables work. It was just easier and cleaner to cut it off and blank off the bottom of the heated air plenum above it.
The kick plate doesn't work on a 6. They are built into the design of the 7. You have to modify the "dog house" with mounting flanges, and yes, I tied these under the spar bolts, four of them total, left/right, top/bottom.
Mine is injected so it worked great to have the system at the time with all of the parts from Vans with very little modification.

I will be down there in March golfing the PGA West Courses. I am not sure I will have time to run up there but would love to see your project. We'll see.
 
Hi Jon. Weird - I'm actually in the Indian Wells Resort tonight - my wife won a stay in some library raffle thing.

I met Chris (who put me on this aircraft when it was for sale) last March, whilst he was here for the tennis tournament. He'd flown his Magni autogyro in to Bermuda Dunes, saw my RV-4 parked on the tie downs, and asked the airport to contact me. We met up, I flew in his autogyro, he flew in my RV, and he went and bought a 6A.

I'm carburated, so I don't need a giant tunnel. I've started making one which is about 3.5 inches high. That gives me room to hide the battery and fuel stuff, which is all I need.

I fitted the right fuel tank today after Prosealing the new sender. For some reason the original builder had used a right-handed sender in the left tank as well, and I had bought a left and a right from Vans. So I need to buy another right one before I can fit that tank.

Once I get the fuel line assembled, this baby is ready to start. Madness.
 
I fitted the hanging rudder pedals! They were the first thing I addressed after buying the project. I screwed them up because I was having problems with the air ducts interfering with the mounts at each end, and it was a bit of a knock to the confidence. In the months after, I came up with a solution (that only mildly defaced the finish of the aircraft) and it worked well, so pretty happy.

Here are some shots of my solution:

s0d0A1ll.jpg


The left bracket fitted, only just. It's wedged right up under the duct. The right bracket fouled the right duct by 1/8th inch.

So...

Chop chop chop. Not the most elegant solution, but it should look fine once I've filled it...

kIhud9ql.jpg


From inside:

axVmj3Tl.jpg
 
Tunnel is going in. I'm making this up as I go along, so pace is absolutely glacial. Lots of screw-ups.

Pretty certain the Red Cube is too close to the pump. Not sure I care that much - it's an easy fix if it's a problem.

SVZlVFYl.jpg


Top cover in place. The end at the firewall does a 90-degree up to meet the recess for the prop governor. Looks neat. I'm going to run flexible hose from the pump to the gascolater.

TraxeTql.jpg


In other news, I turned on my radio for the first time. Could hear KPSP ATIS very, very faintly. Thought it could be my AP-60 audio mixer, so I bypassed it, but nothing changed. I imagine the volume pot on my Sigtronics SPA-4S is done for. Looks like I'm in for a new intercom :(
 
Last edited:
I once called Sigtronics about a jack failure in a very old intercom. They just sent me the part free of charge. Give 'em a call and see what they might offer to check out the intercom.
 
I do not think I would want the fuel lines housed in the same box/ enclosure as the Earth EX battery or even a Odyssey. I have seen a LiPo battery catch on fire from slight over charge rate. That would not have been good with the battery buried where you could not get it away from the fuel lines should it be arcing or on fire.
 
I do not think I would want the fuel lines housed in the same box/ enclosure as the Earth EX battery or even a Odyssey. I have seen a LiPo battery catch on fire from slight over charge rate. That would not have been good with the battery buried where you could not get it away from the fuel lines should it be arcing or on fire.

Right, that was going to be my next question. I haven't fully committed to that as the battery location.

I can fit the battery on the firewall in the engine bay, but would have to run a long, heavy cable to the starter solenoid over the other side. It would also mean having to pull the battery and battery box out to allow space to change the oil filter (not a huge issue, but somewhat annoying).

Or I could loop the fuel line 180 degrees back down towards the spar, out of the box section, under the passenger floorboard and up to the gascolator.

Or I could encase the fuel line in fireproof sleeve from the pump to the firewall.
 
You might think about a thin stainless or mild steel case/box for the EarthX and place it ahead of the firewall. Might even hang it from the engine mount as long is there are good places for the heavy airframe ground and the A+ wires.

One minus ahead of the firewall is; it gets hot under the cowl especially after shut down. Good fire sleeve for the fuel lines and a secondary steel or stainless box behind the firewall may be a good compromise.
 
Last edited:
Thanks Boyd. I am going to the hangar today, so I can spend another six hours thinking about it.

I'd prefer it in the engine bay, but hadn't considered the heatsoak issue after shutdown.

I could easily build a stainless box to hold it in its current position.

All this said, I did read a thread on here about an EarthX battery filling the cabin of an RV-8 with smoke. Both occupants of the aircraft were very experienced pilots who managed the situation and landed on a road without even damaging the aircraft. My concern is that I wouldn't handle the same situation as well.
 
Last edited:
With the kind assistance of fellow RV owner (and builder, and ex C5 crew chief) Curt Pullen, I moved the battery to the engine bay. We built a rather beautiful box for it, and attached it to the right side of the engine mount with Adel clamps.

Photos to follow when I remember to take some.

In the meantime, here's a shot of my 4 looking lonely

1gfSNg4l.jpg
 
Last edited:
I'm keenly watching and hoping for progress here. I like checking in on this thread because I'm currently thinking I'm just crazy and stupid to be starting an extremely similar restoration project. Wish there were pics of the fuel tank install process. Please keep up the great posts.
 
I've been ignoring the project. My RV-4 ate a cylinder, so I replaced it, did the hour of power and remembered how much I enjoyed flying just for the sale of it. So I did a bit more, then went to the Arizona Flying Circus fly in. A few days later, an RV-7-owning friend visited from the UK and we flew basically all week.

I really love my RV-4. It's that wonderful combination of being easy to fly but tricky to master. It's going to be hard to sell it once the RV-6 is finished.

Anyway, went to the hangar today. Called for fuel and had the guy fill my left tank two gallons at a time as I calibrated the gauge. Pulled the top hose off the oil cooler, loosened the spark plugs and pulled the prop through to get oil pressure. Retightened everything, set the Emag timing, and hit the starter...

Nothing.

My ****ing starter solenoid is dead.

So I hand-propped the motor. After a couple of whumps and bangs it sprang to life. Oil pressure is good, prop makes all the right noises (I've never owned a CS prop before). I ran it for ten minutes and shut it off. Major milestone reached.

So now my to-do list looks something like this...

Get a starter that works and fit it to the engine
Install intercom & radio
Patch some of the redundant holes in the firewall with stainless
Fill, calibrate and check right wing tank
Repair the cowling where someone has done a hash job of of the screwed-together bit at the front
Connect-up nav light wiring
Get a condition inspection
Fly

And on my non-urgent list:

Fit gear leg fairings and pressure recovery wheel pants (I have all the parts)
Make covers for seat cushions (the old ones are basically turning to dust)

I'd also really like to fit electric trim to this - since I removed the centre console thing under the panel, the cable is all in the way and looks ugly as ****.

It looks like there was a kit available some time ago, but the cable part has been discontinued. Any leads greatly appreciated!
 
Last edited:
In my view (17 + years of RV6 ownership) manual trim is superior to electric. If you go electric get a switch with quite a strong spring pressure so it is clear from the feel of the switch when you are applying trim. You could not pay me enough to use any of the switches made by Ray Allen.
Pete
 
In my view (17 + years of RV6 ownership) manual trim is superior to electric. If you go electric get a switch with quite a strong spring pressure so it is clear from the feel of the switch when you are applying trim. You could not pay me enough to use any of the switches made by Ray Allen.
Pete

Thanks Pete. My feeling too - manual over electric every time. It's just in this application, with the centre console removed and no logical place to mount the cable, I think the setup is going to be a bit of a mess.
 
I will of course contradict you 2 gentlemen and state that I would never install a manual trim :D
Changed from man to el trim on the -4, the only regret was not havin done it in the first place. Installing the Mac motor in the finished elevator was kinda challenging, but doable.
Main advantage is weight, ease of install and looks follow closely behind. Reliability has never been an issue and the standard hat on the stick and toggle on the panel work perfect by just tapping them. And in any case RVs don?t require that much trimming...
 
During my short (so far) time with my RV-6A, I really wish it had manual trim...or at least a system that allowed one click to half, one click/or two clicks to full, and one click up.

Hopefully i can see the progress in person in a few weeks James...
 
Back to the starter: most aviation starters are repurposed automotive parts repackaged in a aviation appropriate casting so it can be mounted to an aircraft engine.

Since this is an experimental,just take the starter to your local auto electric repair shop and have it repaired. That way you won't need to wait for shipping and return. Easy peisie!
 
Thanks Boyd. After a bit of testing, I ascertained it was the solenoid that had gone out. A bit of googling showed that it came from a late model Crown Vic, so off I went to Car Quest, who had one in stock.

Turns out the Crown Vic solenoid is for a SkyTec starter, and mine is a plain old Textron Boat Anchor. It's close, but not the same.

After much pondering about whether to throw another $500 into the bottomless pit for a new lightweight starter, a friend (who is building an RV-8 with all the nice bits on it) kindly offered his preloved Boat Anchor for free. So that made up my mind.

Another bit of good news that I forgot to mention earlier - after calling around many prop shops and being quoted anything from 4k for an overhaul to 15k for a new prop, I found a place called Golden State Propeller in San Luis Obispo. As luck would have it, they service the big kit at Palm Springs Air Museum, and had a truck travelling down to drop off a P-51 prop.

So my Hartzell went back on their empty truck. They checked it over, deemed it in decent condition (it has only flown 110 hours after all), did the eddy current inspection for $125 and offered to return it on the next visit in a few weeks. I couldn't wait to have it back, so flew to KSBP, rolled it up in sleeping back, wedged it in the back of the RV-4 and flew it home.

A big shout out to Golden State Prop for wonderful service, and for not treating me like a cash machine.
 
Last edited:
Next thing on the list - this one makes me feel really itchy...

I heard, somewhere down the line, that this aircraft was built for the first owner by a Vans serial offender. As such, the overally build quality is really nice.

Allegedly, the owner (clearly not a serial offender) then finished the project himself (including wiring, which is how I ended up buying the aircraft as as rewire project).

There are lots of detail bits that let the aircraft down, and these screw points at the front of the cowl are one of the worst.

I'm not sure what was going through this person's mind, but it looks like they cut the overlapping tab off one side of the cowling and then 'rectified' the issue by reattaching some ratty aluminium plates with a hundred wonky-*** screws. Unfortunately, being a tailwheel version, this foul mess ends up proudly displayed directly at eye level.

I removed the cluster of screws and the messy aluminum plates, and am now wondering what to do to cover it up (that doesn't involve filling, sanding and repainting the entire upper and lower cowl).

So far my ideas have gone as far as a stainless cover plate, or filling the holes with white epoxy as I did in order to work the air vent duct around the rudder pedal assembly.

This shouldn't matter, but it does. It's such a sad sight and sets a bad tone that isn't really indicative of the rest of the machine.

Any thoughts or ideas greatly appreciated...

K654tyAl.jpg


a1wgRyKl.jpg
 
Last edited:
fill

I would sand it down to bare fibreglass in that area and then fill the holes with epoxy and flox but know that's not your goal. I would also countersink the holes a bit before filling to increase the strength.

Perhaps cover the area with clear tape and make a fibreglass patch over top?

A stainless plate would also look nice but you'll prob want to fill those holes in some how
 
Last edited:
I would fill the holes completely, then lay up some glass on the bottom cowl to make a new tab. It isn't hard or itchy! Let me know if you want help and I can bring my fiberglassing stuff and get it started.

I have some photos of my cowling and how I built up some tabs for the outer sides of the cowl overlap, and my hinge pin covers, which are flush mounted. The overlap on the outer sides helps with keeping the engine cool. It keeps the pressure differential high between the baffled/unbaffled sides of the engine.

IMG_3172-M.jpg


More photos and captions here:
https://www.overthehills.com/RV-9A-Project/Finish-Kit/Cowling/
 
Some fiberglass stuff and a few other odds and sods arrive from Spruce. Once the cowling is done, the aircraft will be ready for a Condition Inspection.

I have sort of been ignoring the last detail up till now - I need to start thinking about selling my beloved RV-4. I can't have (shouldn't have, don't need) two RVs.

I'm not going to advertise it properly just yet as I have a few little things to fix up on it. But if you're in the market for a decent 180hp RV-4 and have found this, well done.

General overview: Built 1987, 1050 hours TTAF (has incomplete logs from before my ownership), GRT Sport EX glass, Catto three blade prop, KLX 135A GPS Com. California aircraft since built, with neat Bakersfield / Harmon history. Flies as an RV-4 should - beautifully. Willing to deliver anywhere in CONUS at cost. $49k.
 
Last edited:
Cowl update.

After much deliberation, I concluded that the cowl just really let the whole aircraft down. The way it had been butchered with all the screw holes, and how they sat perfectly at eye-level, proudly displaying a total disregard for craftsmanship... It was just garbage.

I figured, given how much time I've been working on this thing, the only way was The Right Way. So I bought some fiberglass supplies and got to work.

On the bottom of the lower cowling were two exit holes for some home-made exhaust system. The aircraft has a Vetterman system on it now, and these had since been covered with aluminum plate. You couldn't see them when the aircraft was parked, but I knew they were there and didn't like it.

a27RDdMh.jpg


I took two pieces of cardboard, rubbed them with wax, and taped them over the holes.

QfIvEoXh.jpg


Then I laid upfour layers of bid on the inside.

SwrPIcdh.jpg


Once dry, I skimmed the outside with flox paste, block sanded it down, skimmed it with a thin film of body filler, then blocked it from 40 through to 320 grit.

On the front end, I added back the screw tabs that had been cut off, and filled the dozen or so screw holes with flox.

mNLCinkh.jpg


I also added in the outer tabs that Bruce had suggested in his earlier post. To get the shape right, I joined the halves together and worked inside the cowl, brushing on melted wax (from a blue birthday candle) to stop the epoxy sticking to the lower cowl.

mdAjyv2h.jpg


6p8XpHQh.jpg


Then I began fettling the gaps. My day job is photographing stuff for car manufacturers, so I am slightly neurotic about shut lines and reflection lines in vehicles.

Several years ago I restored a '68 Porsche 912. The shell went back to bare metal for crash and rust repairs, and after that I epoxy primed it and block-sanded it for paint. Video of that here! https://youtu.be/wT37apmGdLY

Prepping bodywork is filthy and time-consuming, but I found the process extremely cathartic (to the point where I think I'd be quite happy to do it every day as a job). The end result really is worth all the effort.

mpN0wosh.jpg


UFb6Wgoh.jpg


f8JQAUUh.jpg


wP5xbcRh.jpg


Anyway, doing this cowl today took me right back to that state of mind. I began fiddling with the panel gaps, which were not good, and then things started to work out. They're not as beautiful David Howe's Harmon Rocket (Hi David), but they're significantly better than they were and should make this aircraft a lot easier on the eye. Here's the end result...
 
Last edited:
kKVIfixh.jpg


j2PjzA8h.jpg


Next step is to hang the thing on the aircraft, fit the nutplates, hit it with 320 grit and drop it in for paint next week.
 
Porsche

That bare silver Porsche frame looks like it is ready for wings!

Nice work on the RV cowl and for doing the Right Thing.
 
A while back, whilst trying to decide what coms to put in this thing, I found a local ad from a guy selling basic 2.25" mount radios for a few hundred dollars a pop. His name was Frank, and he had a stock of 25kHz-spaced stuff which he was getting from Germany after Europe went to 8.33kHz spacing. I figured one of these would suffice until I'd flown the aircraft enough to decide whether I wanted to keep it or otherwise.

Frank sorted me out with a Becker unit, which I wired to a Signtronics intercom which I had laying around. I couldn't get sound to come out, so, suspecting the intercom was duff, I changed the intercom to another Sigtronics box, but the improvement was marginal. I wasted a lot of time trying to get it to work, and didn't really learn much in the process.

So went back to Frank and asked him to build me a harness (which I, at first, called a 'loom', much to his Germanic delight). Somewhere along the line the Becker, and some extra money, was swapped for two Dittels of the same 2.25" format, and a PMA-4000 intercom.

Yesterday I tried to install it into the aircraft, only to discover I'd spaced the holes in the insert panel too far apart, meaning the radios did not clear the mounting brackets. Difficult to explain, but it meant I had to make another insert panel.

My local powdercoat place is a massive rip-off, so not wanting to go that route again, I looked into alternative finished for the new part. Realizing that I had a whole load of epoxy leftover from the cowl repair, and some carbon fiber left over from my Cri-Cri instrument panel years back, I decided to laminate the aluminum with it. I lightly spray-glued the panel, carefully laid it onto the carbon (as not to disturb the weave), then epoxied over it with a foam brush. The next morning, I took a razor blade and cut around the edges. The end result is crisp, and I'm really happy with it.

gjimMUGh.jpg


93iFDQRh.jpg


I might do some other bits of the interior in this finish.

Also, yesterday, flew to Victorville KVCV to gawk at Covid-grounded airliners with a friend (who just completed his Airbus rating and is not flying any time soon). Anyway, he has a nice RV-4. Check out all this equipment just sitting there, costing...

lqL5uNkh.jpg


OEYgbLmh.jpg


Clfu5cqh.jpg
 
Last edited:
Eerie pics :eek:
Nevertheless beautiful, pity they don?t match my natural eye field format which is horizontal ;)

And a good thing you still have that -4 (and allowed to fly it) :cool:
 
Big progress today.

I've been putting off, for months now, making the little L-brackets that tie the floor stringers to the spar box. Just a fiddly job that wasn't going to produce any exciting end result.

Today I decided to get on it. The reason being, I just had a slab poured for a housing addition and I really can't be bothered to start framing it. This is some high-functioning procrastination.

Here's one of the brackets. The larger hole and notch is to clear existing rivets. My hands are a disgrace, sorry.

NOJOe3Vl.jpg


Cowl fitted up. It's not a nice user experience, like my RV-4, it's a real ****fight to get it on and off. That's not going to change without re-riveting all the piano hinge, which I'm not going to do.

Still fettling the gaps around the front. Added some flox and rough blocked it back to shape. It looks about ready to go, so the next task is to to high-build primer the whole thing and start the final sanding.

Cp9Fm5Vl.jpg


The reason I did so much work on the plane today. The slab is calling. IGNORE, IGNORE...

HwPSAnul.jpg


Bqa7sMgl.jpg


Back to the good stuff - here's the end result of that coms panel remake...

1QXQkA6l.jpg
 
Last edited:
You are a brave man to undertake a room addition on your home while rebuilding an airplane! Hats off to you.

-Marc
 
Brackets

It's worth putting in the floor stringer brackets because it will help reduce risk of smoking belly rivets. The plans and instructions are a bit lacking in detail for this item, as well as the brace for the inner two floor stringers, so I think some builders can miss them.

That looks like quite a big slot in your bracket so not sure what rivets it is clearing? I am working on that area at the moment and the bracket has one 3/16 hole to attach to the spar box, and two short AN3 bolts through the floor stringer. The longer leg of the F-699 bracket tapers down from the spar to the floor stringer per plans page 46 top left corner.
 
Well the RV-4 sold today to the first viewer. I don't feel particularly happy about it - I love that aircraft. It was my gateway to aviation in the US and I have lots of happy memories attached to it. It was also mega to fly.

The buyer brought along Lars Pedersen, of this parish, for the pre-buy. Lars also looked around my 6, having seen in in the past when it was in pieces and had a cobweb for an electrical system. He seemed to like how it was coming along. I enjoyed seeing Lars' well-travelled RV-7, which is a lovely build and has some nice kit on it.

Anyway, now I need to turbo-on with the 6. No point owning an aircraft that doesn't function as a flying device.

The cowling is looking better. Like, stripped of paint, but at least the gaps are half decent now, and the front doesn't look like someone attacked it with a shotgun. I'm finding it easier to get the cowl on and off the aircraft, too - you just have to learn each aircraft's little 'dance routine' as David Howe put it whilst talking on the phone a few days ago. David has been a great counsellor for many parts of this job.

GDz91ulh.jpg


Got tiddler to help me with the gear fairings. He was actually quite interested in it all. There's an ulterior motive for his enthusiasm for airport visits since Signature have free cookies and we always walk across the ramp to get one.

Jj4lhQlh.jpg


I left him alone with the sanding block for 15 seconds and he scoured a bunch of lines into the face of the prop. No point getting angry with him. When he's older I will point them out to him at every given opportunity for the purposes of emotional blackmail. Silver linings, etc.
 
Last edited:
Congrats on your sale.

Also, condolences on your sale.

My wife limits my airplanes to two, so whenever I eye an additional airplane I consider selling my -4...the thoughts are never easy so I imagine the sale wouldn't be a delightful experience.
 
I left him alone with the sanding block for 15 seconds and he scoured a bunch of lines into the face of the prop. No point getting angry with him. When he's older I will point them out to him at every given opportunity for the purposes of emotional blackmail. Silver linings, etc.

This made me chuckle and smile as I can totally relate! I was working on my cowling in the garage at home with my lil' dude who was 2 ish. I'll be darned if I didn't turn my back long enough to mix some epoxy and he'd grabbed the sanding block of 40 grit and went to work on my wife's van, that doesn't exactly buff out. Or when he parked his Strider bike on the aft fuse I'ld just freshly polished all the scratches out of...
On a positive note, after being subjected to the airport/hangar environment for about 4 years they can generally be trusted, even in other people's hangars.
 
Last edited:
James, the bones of that RV-6 are really nice. It won't be an RV-4, and as long as you don't ask it to be one, you won't be disappointed. I can assure you that it will be up to the challenge of being a magic carpet/adventure machine. The issues with it appear to all be in the realm of the aesthetic. Trivial really, in the grand scheme of things, at least insofar as performance is concerned. And well within the scope of your obvious talents to resolve.
 
On a positive note, after being subjected to the airport/hangar environment for about 4 years they can generally be trusted, even in other people's hangars.

I'm looking forward to this. He's a menace at home, but at the hangar he knows to behave, and I even had him handing me tools, which is a real benchmark. It's nice to have a lackey.

James, the bones of that RV-6 are really nice. It won't be an RV-4, and as long as you don't ask it to be one, you won't be disappointed. I can assure you that it will be up to the challenge of being a magic carpet/adventure machine. The issues with it appear to all be in the realm of the aesthetic. Trivial really, in the grand scheme of things, at least insofar as performance is concerned. And well within the scope of your obvious talents to resolve.

Thanks Lars. Looking forward to having a little more space, amongst other things. I'm looking into that trim servo stuff right now.
 
-4 vs ?6

Flight control feel, basically no difference. The lift section of the wings being shorter on the -6 give it a higher effective wing loading which can be felt, the more so with a 360 up front.
Where the -6 looses is visibility... though I?m seating as high as I can, I loose sight of the runway in the flare when 3 pointing. Vis is also worse, partially blocked forward right, whilst taxiing or on initial take off roll.
Flying aeros is more enjoyable in the -4, sitting on the centerline, balanced vis right and left.
Larger tanks and more payload for the -6.
Better looks for the -4 (those cowl cheeks on the narrow fuse are sooo sexy).
Of course, the -6 wins hands down with its cargo compartment. The ability to slide the canopy all the way back on the Supertracks, load a pile of luggage or my foldable bike from the ground, and wifey on the right seat make it a winner :)

Judging by the quality of your work, yours will be a winner as well!
 
OK, so I'm down to a handful of things left to do on this silly old crate. One of them is to mount the manual trim cable and, due to reconfiguring the centre tunnel (yes, I should never have done this, but the firewall and gascolator were already positioned for this setup), I'm just not happy with any of the options.

So I'd like to hack the green snake out of the fuselage and go to electric trim.

Before we get into a big conversation about how manual trim is better, I've owned aircraft with both and don't have strong feelings about either.

I have strong feelings about the pluralization of the brand name 'Lego' when describing Lego bricks, I have moderate feelings about how Americans spell words like 'pluralization' with a 'z' rather than an 's', and I don't care about stuff like how my trim inputs are delivered, as long as its available.

So, in the interests of getting myself out of this situation, does anyone have any decisive info on the Gretz tailcone-mounted trim servo setup? I'm looking for info on

  • which Ray Allen servo to use?
  • what length Bowden cable to use?
  • photos of servos installed using this method

Any assistance is, as ever, greatly appreciated.
 
Well the RV-4 sold today to the first viewer. I don't feel particularly happy about it - I love that aircraft. It was my gateway to aviation in the US and I have lots of happy memories attached to it. It was also mega to fly.

James, thanks again for selling me your -4. She is sweet! I will take good care of her and keep the Bakersfield history alive.

Mark.
 
Last edited by a moderator:
Welcome to VAF

Mark, welcome aboard the good ship VAF:D

Are you the guy who had the BD4 in the hangar where we had the SacRVators lunch meeting a few years back??

Lars may have been a hangar mate?
 
Hi Mike, Yep that's me. I sold the BD4 three years ago and did some other stuff for a while. Now getting back in. Gotta have an RV, and the 4 is the most "personal fighter plane" of them all. I had the hauling machine. Now I want the FLYING machine! I have decided that it's all about the flying not the hauling. Thanks for remembering me.

Mark.
 
Something scary

Mark, welcome aboard the good ship VAF:D

Are you the guy who had the BD4 in the hangar where we had the SacRVators lunch meeting a few years back??

Lars may have been a hangar mate?

How time flies (ha). That was over 10 years ago. More like 12. Glad to have Mark be the keeper of a very special RV-4.
 
Back
Top