
Van's Air Force
You are using an out of date browser. It may not display this or other websites correctly.
You should upgrade or use an alternative browser.
You should upgrade or use an alternative browser.
Show us the status of your 6/6A project!
- Thread starter WingsOnWheels
- Start date


Hobo
I'm New Here
Panel Upgrade
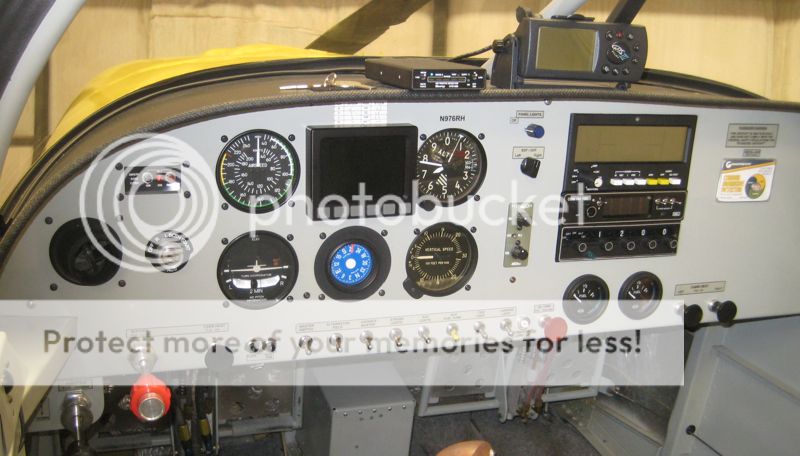
I decided to re-do my panel over the winter to accomodate an iPad mini on the right side of the instrument panel. The central radio stack had to go. Here is the old setup that served me well for 14 years:
Here is the new panel:
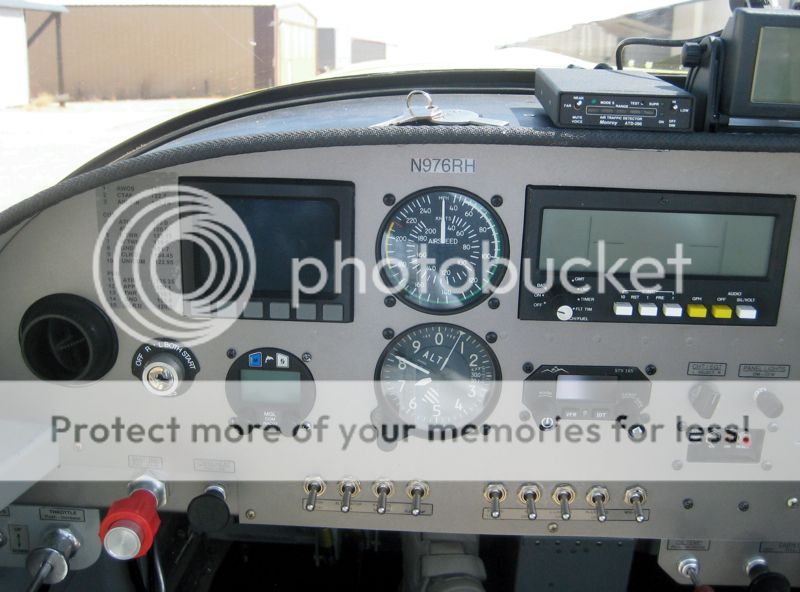

The only new items are an MGL V6 comm, a Sandia Aerospace STX -165 transponder and fuse blocks behind the fold-down door on the right. Net loss of seven pounds from the empty weight.
I've got about 10 hours on the new radio and transponder and I like them both. The transponder was dead simple to wire for my simple installation, +12V, a ground wire, static air connection and an antenna.
I decided to re-do my panel over the winter to accomodate an iPad mini on the right side of the instrument panel. The central radio stack had to go. Here is the old setup that served me well for 14 years:
Here is the new panel:
The only new items are an MGL V6 comm, a Sandia Aerospace STX -165 transponder and fuse blocks behind the fold-down door on the right. Net loss of seven pounds from the empty weight.
I've got about 10 hours on the new radio and transponder and I like them both. The transponder was dead simple to wire for my simple installation, +12V, a ground wire, static air connection and an antenna.
Michael White
Well Known Member
Does your ipad have attitude?
And if so, does it talk back to you?


WingsOnWheels
Well Known Member
I guess you are too far to come over and do my windscreen...haha
Great work on the fairing. I hope I can get mine to come out that nice. Also great to see some movement in the RV-6 forum, been pretty quiet around here.
Great work on the fairing. I hope I can get mine to come out that nice. Also great to see some movement in the RV-6 forum, been pretty quiet around here.
AJ85WA
Well Known Member
Cheers Colin
Thanks Colin
I actually enjoyed this part of the project, did not think I would. Yer I would love to help.....half a world away though haha I left some detailed pictures and info on my blog, hope it helps if you ever need it.
The RV6 is is pretty silent on here, but she speaks for herself these days
Cheers AJ
WingsOnWheels
Well Known Member
Well, next time we make it to OZ, I may have to come see it in person. Last time we were down under, we stuck to the north and east. Next time around we want to make it to some of the areas we missed. Too much country to see in a couple weeks. Unfortunately, it will probably be a while. 17 hours traveling witha toddler is no fun. Have to wait until she grows up a bit.
Last edited:
SportAvServ
Well Known Member
Good on ya mate!
Very nice job, takes a bit of elbow grease to do that. I will be on the right coast next May, hope you can fly it over so I can have bit of a look. ;->
Randy
Very nice job, takes a bit of elbow grease to do that. I will be on the right coast next May, hope you can fly it over so I can have bit of a look. ;->
Randy
Side panels
Great looking job. Have a question where are the side panels coming from, I need a set for my RV-6.
Perry [email protected]
Great looking job. Have a question where are the side panels coming from, I need a set for my RV-6.
Perry [email protected]
WingsOnWheels
Well Known Member
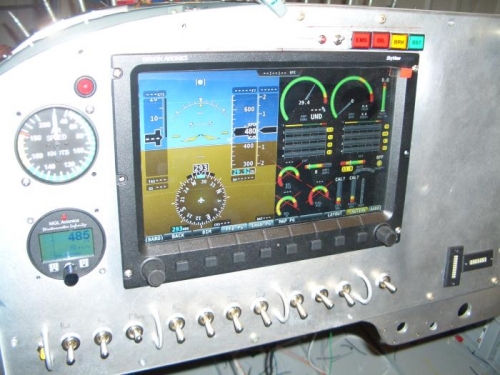
Did my first set of electrical fuctional tests this weekend. I first spent a good ammount of time checking everything with a multimeter with the power off. I then powered the system (no avionics connected) and check everything to make sure the power was going where it should when it should.
Only ran into two issues, niether are hard to fix.
1: I had swapped the coil connections for the Bat and Start relays (woops), easy to correct.
2: There is a short in the pilot PTT circuit. I'll have to dig into that.
Otherwise everything worked as it should. I have more testing to do, but it is getting there.
I spent a few minutes wondering what the big "E" in the upper right corner of the EFIS meant. Was it a warning or connection problem...couldn't find anything in the manual. I then realized that the "E" is on the plastic screen protector...haha
Last edited:
Rob Erdos
Well Known Member
RV-6 Panel: Critique Request
RV6ators,
I'm just in the process of exchanging ca$h for avionics from Stein. The panel design is nearly finalized, and I am looking for some constructive feedback.
My project is a tip-up RV-6, intended for IFR under Canadian regs. The design is as follows:
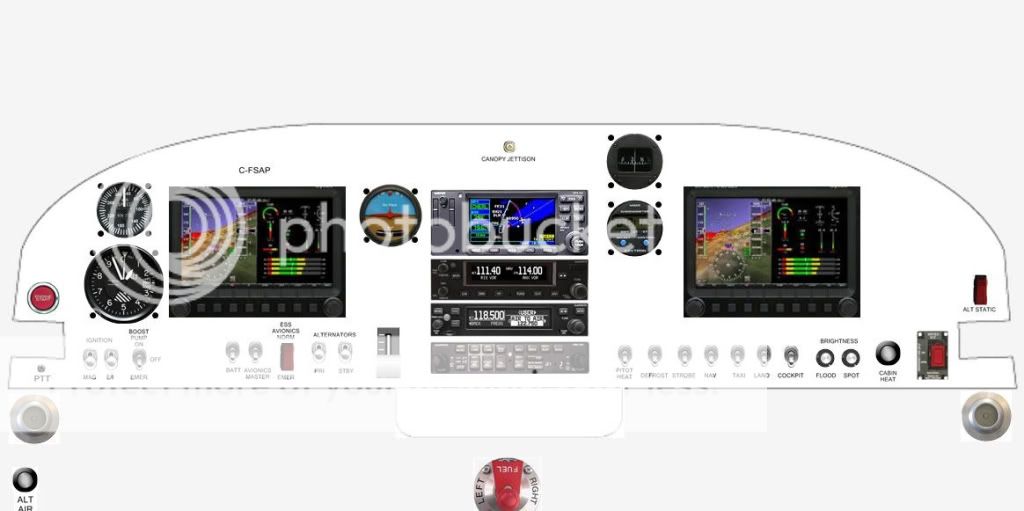
Here is a bit of background on my thinking:
1. Canada requires two independent nav systems. A single GNS 430, for example, won't cut it because they consider the screen to be a single point of failure. That's why I opted for a GNS 400W and a separate Com/Nav/ILS;
2. The electrical system will be based upon a Vertical Power VP-X Sport. It's a way-cool system, but it's also a massive single point of failure, so as per VP's recommendations I will use their "Method B" back-up circuit design. The ESS AVIONICS switch will bypass the VP-X to directly power the left PFD, Turn Coordinator, GPS and Nav/Com. (No, I don't think that the transponder should be included in the back-up circuit. If my electrical system dies in IFR I'm mainly interested in knowing where I am myself and shooting an approach. If ATC wants to know, I'll tell them.);
3. The Boost Pump will be wired through the VP-X, but will also have a "direct" circuit when the switch is selected to "EMER". Note that all bypass circuits will be protected by CB's;
4. The power supply will be redundant, in that there is a 55A primary alternator, and a B&C 8A back-up alternator. The left PFD will have a battery;
5. The lower-left push button the panel is a secondary PTT switch, for use when the passenger is flying or when the AP is engaged; and
6. Our Authorities seem to be a bit inconsistent in regard to IFR approvals for homebuilts. Our regs don't require TSO'd avionics, but some of the inspectors are reputed to have refused to approve "all glass" panels. Personally, I think that the dual Skyview, dual alternator design is sufficiently robust for IFR, but to avoid conflict I have also included a mechanical ASI, altimeter and turn coordinator. The choice of TruTrack for the turn coordinator is to obviate against common mode failure of all Dynon equipment due to a remote probability of software malfunction.
I'm mainly looking for feedback on ergonomic or functional boo-boos that I may have overlooked. Thanks,
Rob Erdos
Ottawa
RV6ators,
I'm just in the process of exchanging ca$h for avionics from Stein. The panel design is nearly finalized, and I am looking for some constructive feedback.
My project is a tip-up RV-6, intended for IFR under Canadian regs. The design is as follows:
Here is a bit of background on my thinking:
1. Canada requires two independent nav systems. A single GNS 430, for example, won't cut it because they consider the screen to be a single point of failure. That's why I opted for a GNS 400W and a separate Com/Nav/ILS;
2. The electrical system will be based upon a Vertical Power VP-X Sport. It's a way-cool system, but it's also a massive single point of failure, so as per VP's recommendations I will use their "Method B" back-up circuit design. The ESS AVIONICS switch will bypass the VP-X to directly power the left PFD, Turn Coordinator, GPS and Nav/Com. (No, I don't think that the transponder should be included in the back-up circuit. If my electrical system dies in IFR I'm mainly interested in knowing where I am myself and shooting an approach. If ATC wants to know, I'll tell them.);
3. The Boost Pump will be wired through the VP-X, but will also have a "direct" circuit when the switch is selected to "EMER". Note that all bypass circuits will be protected by CB's;
4. The power supply will be redundant, in that there is a 55A primary alternator, and a B&C 8A back-up alternator. The left PFD will have a battery;
5. The lower-left push button the panel is a secondary PTT switch, for use when the passenger is flying or when the AP is engaged; and
6. Our Authorities seem to be a bit inconsistent in regard to IFR approvals for homebuilts. Our regs don't require TSO'd avionics, but some of the inspectors are reputed to have refused to approve "all glass" panels. Personally, I think that the dual Skyview, dual alternator design is sufficiently robust for IFR, but to avoid conflict I have also included a mechanical ASI, altimeter and turn coordinator. The choice of TruTrack for the turn coordinator is to obviate against common mode failure of all Dynon equipment due to a remote probability of software malfunction.
I'm mainly looking for feedback on ergonomic or functional boo-boos that I may have overlooked. Thanks,
Rob Erdos
Ottawa
First Flight for N364BT
Finally, fifteen years after I bought the tail kit, she flies!! Got my Airworthy Certificate on Saturday from Adam Valdez (Bakersfield, CA) without any problem other than a few embarrassments over missing cotter pins. My friend, Mike flew her for her first flight yesterday, and today was my turn. Oh boy, words cannot describe it. Lots to do, we want to get her ready for the paint shop on Friday and then, lots and lots of flying. Thanks to everyone on this forum for more support and encouragement than anyone could ever want.


Finally, fifteen years after I bought the tail kit, she flies!! Got my Airworthy Certificate on Saturday from Adam Valdez (Bakersfield, CA) without any problem other than a few embarrassments over missing cotter pins. My friend, Mike flew her for her first flight yesterday, and today was my turn. Oh boy, words cannot describe it. Lots to do, we want to get her ready for the paint shop on Friday and then, lots and lots of flying. Thanks to everyone on this forum for more support and encouragement than anyone could ever want.
Panel Shot
 [/IMG]
I've been working on my panel... added, autopilot servos, AOA, Gemini PDF and a Garmin 400W. It's a little different, but the Trutrak EFIS (discontinued) and overall panel work well for me. It's amazing to me the info available in the cockpit now compaired to 10 years ago when most of my flying was done. Much safer now. I'm not there yet, but hoping to make an IFR capable plane out of this. Any suggestions?
I've been working on my panel... added, autopilot servos, AOA, Gemini PDF and a Garmin 400W. It's a little different, but the Trutrak EFIS (discontinued) and overall panel work well for me. It's amazing to me the info available in the cockpit now compaired to 10 years ago when most of my flying was done. Much safer now. I'm not there yet, but hoping to make an IFR capable plane out of this. Any suggestions?
Last edited:
IFR
Suggestions????
Yes.. it is good that you have the Gemini... that is a good back-up.
But I sense you need dual panel-mounted nav-coms. What about Pitot heat?
also, I am uncomfortable with your throttle quadrant lay out, as it looks like you have a push-pull mixture knob, then carb heat? then by-pass control, all the same type of knobs.... a recipe for disaster! (We often reach for controls by feel, especially when things get busy....
My suggestion is to replace the mixture control with a vernier of the appropriate shape ($$$) and bring the carb heat to the left of the throttle.
Remember, you may not be the only one to ever fly this airplane... and even with familiarity we can grab the wrong knob....
I am all for standard configurations.
Jim Frisbie
RV-9A (IFR)
375 hrs.
Peter and Jim,
Thanks for the input. I've got 100+ hours on my EFIS also and have really enjoyed it. Trutrak is going to upgrade it from an APIII to an APIV for me for a really good price. That will add GPSS steering and the capability to fly coupled approaches.
Jim, I plan to add a heated pitot to the AOA system. Do you think that will suffice? The handheld radio on the left has nav capability and glideslope for backup. I have it connected to a Bob Archer antenna in the left wingtip. I'm planing to add a VAL Nav2000 above the 400W with a separate glideslope indicator where the magnetic compass is.
John
Jim,
I like your idea about moving the carb heat to the left of the throttle and upgrading the mixture cable. I'll add that to the list of "to do's".
I'm also going to add an iFly 720 for geo-referenced approach plates on a ram mount on the right side of the panel. I have a battery backup on order for the Gemini.
John
Pittsartist
Well Known Member
Here's my story in pictures - Started June 2013
A 16 year old "barn find" - virtually untouched RV6 Q.B. / Slider
http://www.flickr.com/photos/115470196@N06/
A 16 year old "barn find" - virtually untouched RV6 Q.B. / Slider
http://www.flickr.com/photos/115470196@N06/
IFR Panel update

I revised engine controls per Jim's advice. (Thanks Jim. Much better.)
I may be the first to connect a Val NAV2000 to a Trutrak EFIS APIV which is easy thanks to two wire RS232 connection. Haven't flown an ILS approach with it yet, but the VDI pops up as it should. The EFIS/400W play together beautifully.
I put an MGL E3 engine analyzer next to the PFD for backup CHT's, Oil T and Fuel Pressure. I'm looking for an affordable 2" CDI with glideslope indicator to put where the round VSI is now. That should give me good retundancy for EFIS (except for the autopilot function).
Added a backup battery which can power the EFIS or PFD and an alternate static source switch. Still need a heated pitot and the cdi/glideslope indicator, but I think I'll be well under $20K on the panel and autopilot servos. Lucas at Trutrak has been very helpful.
Now to get IFR current again, and I'll be back in the clouds (mild ones).
John
It expands when you add water
and money$$$
Pittsartist
Well Known Member
Week 45 of my build - and it's ready for the paintshop
Admittedly no upholstery and there's the wing fitting to do, but still I'm very pleased to have been able to get it done to an acceptable (to me at least) standard so quickly
I'm pretty confident that I'll be flying in very close to a year from day one of the build.
www.flickr.com/photos/115470196@N06/
Mevans
Active Member
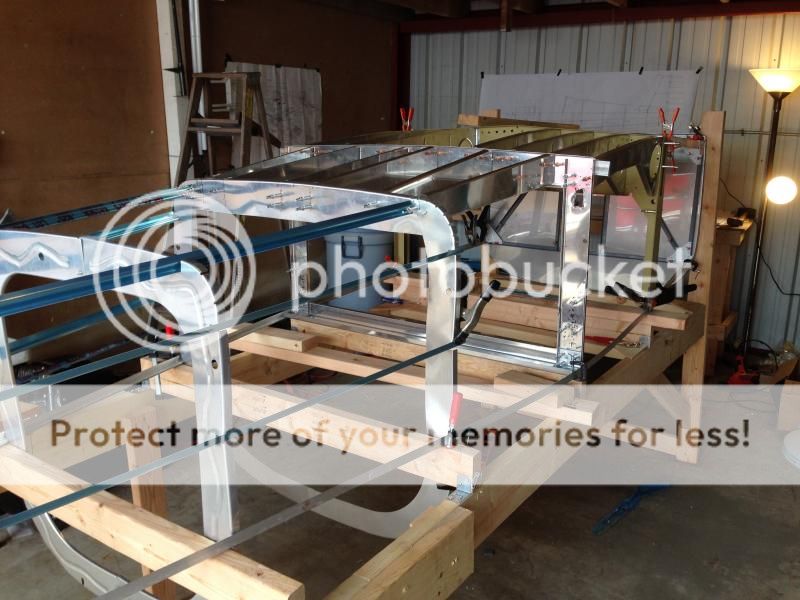
Am I on the right track? nothing is riveted, need more clamps and still need to square it all around.
1. When i get ready to drill holes to start securing it, do i place a few skins on to make sure it aligned, or do i trust the measurements and drill and cleco? Are the skins able to trimmed?
2. I destroyed a F602R, what is the easiest way to get a replacement?
1. When i get ready to drill holes to start securing it, do i place a few skins on to make sure it aligned, or do i trust the measurements and drill and cleco? Are the skins able to trimmed?
2. I destroyed a F602R, what is the easiest way to get a replacement?
To answer your question, you trust your measurements and then drill holes for assembling the bulkheads, stringers, etc. Do yourself a favor and drill the holes a bit off-center and use small flat head rivets to secure the skeleton together. That way, when you put the skins on, you can have a rivet dead center in the intersection formed by the bulkhead and former. That's not necessary, but I like the effect better.
Jim Bower
RV-6A N143DJ flying since 2011
Jim Bower
RV-6A N143DJ flying since 2011
Mevans
Active Member
Thanks, that makes sense, in thinking from "the inside out" I guess it does not really matter how the skeleton is held together, it is just holding shape for the skins. I also plan on predriling the skeleton, then clamping on the skins and drilling from the underside through the pre drilled holes into the skins.


Pittsartist
Well Known Member
Painting ..... 90% done, only 50% to go.
http://www.flickr.com/photos/115470196@N06/
http://www.flickr.com/photos/115470196@N06/15796322737/
http://www.flickr.com/photos/115470196@N06/
http://www.flickr.com/photos/115470196@N06/15796322737/
WingsOnWheels
Well Known Member
Wow, I'm impressed! that is a great looking paint job. Planning to travel to Texas anytime soon?
Pittsartist
Well Known Member
Wow, I'm impressed! that is a great looking paint job. Planning to travel to Texas anytime soon?
Thanks Colin,
In fairness, I only built the aeroplane. The painting is being done by a company called Lant Lane Bodyworks who have painted quite a few RV's before. I was a little apprehensive about the choices of design and color I had in mind - but now I'm getting to see it all on the aeroplane I've become really enthusiastic
. The quality of their work is first rate.I also have help from my friend Tom who is doing the airbrushing for me. (where would RV builders be without help from friends !). The next batch of photos should show the results of this.
I've spent quite a lot of time in the U.S. over the years - but never in Texas so far.
One day, definately !
Best Regards,
Richard
Pittsartist
Well Known Member
More progress - we now have wings, tail feathers and at least one wingtip
http://www.flickr.com/photos/115470196@N06/
http://www.flickr.com/photos/115470196@N06/
vlittle
Well Known Member
Here's a safety tip. On my HR-II, I have similar stipes on my wings, but they extend over the leading edge.
After paint, I lost about 6 knots in top speed. Oil drop testing showed that the paint ridges on the stripes were tripping the airflow in the critical area near the leading edge of the upper wing.
Since my paint was already done, it was a horrible feeling to get out the sandpaper and sand the ridges smooth. I was able to do this and i am now ready for flight testing to measure the effect.
If you have the opportunity, now is the time for the paint shop to address this issue.
Cheers
Pittsartist
Well Known Member
Here's a safety tip. On my HR-II, I have similar stipes on my wings, but they extend over the leading edge.
After paint, I lost about 6 knots in top speed. Oil drop testing showed that the paint ridges on the stripes were tripping the airflow in the critical area near the leading edge of the upper wing.
Since my paint was already done, it was a horrible feeling to get out the sandpaper and sand the ridges smooth. I was able to do this and i am now ready for flight testing to measure the effect.
If you have the opportunity, now is the time for the paint shop to address this issue.
Cheers
Thats interesting Vern.
The orange on my wings goes completely around the leading edge and covers about the 1st 25% of the underside of the wing. The paint is clear coated on top of the orange so the "step" is actually relatively smooth and rounded.
It will be fairly easy for me to remove this with 2000 grit wet and dry and re polish. I had considered doing this - but purely for cosmetic reasons before your post.
Right now I'm focussed on getting through my paperwork approval process (it takes around 13 weeks in total here in the UK
) during all the "waiting for paperwork" time methinks I'll do some sanding and smoothing.cheers,
Richard
Pittsartist
Well Known Member
First engine run, all good.
http://vimeo.com/119671683
Probably only a week to go now till first flight.
I'm Excited !
http://vimeo.com/119671683
Probably only a week to go now till first flight.
I'm Excited !
NYTOM
Well Known Member
Guess I'm gettin be be a old Fa#t
Maybe it's just me but I'd love to see that video without rock music drowning out the beautiful sound of the engine.
Maybe it's just me but I'd love to see that video without rock music drowning out the beautiful sound of the engine.

