I am building a new panel and would like to include pitch and roll autopilot from Garmin. I've done some searching and although pitch servo mount and brackets are available for the 4 through Vans, nothing I can find for the roll mode. Any 4 drivers out there using a pitch and roll autopilot? I have the trutrak bracket/mount roll servo drawing to work from but would love to see someone else's project that included this option.

Van's Air Force
You are using an out of date browser. It may not display this or other websites correctly.
You should upgrade or use an alternative browser.
You should upgrade or use an alternative browser.
RV-4 Autopilot
- Thread starter Fly2eat
- Start date

Jvon811
Well Known Member
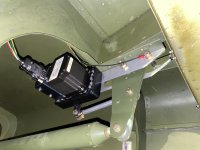
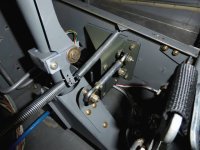
I believe the two most popular places for the Roll Servo are in the wing and under the floor, to the right of the front seat. Some don't like the under floor option because of interference with the backseaters footwells (if you have those installed). I was able to make the geometry work and still have the footwells, just takes a bit of fiddling. Pitch servo is pretty standard. I basically copied some pics I had saw on VAF and other places of pitch servo mount designs and made my own. Dynon AP install manual had a good diagram/plan. Rigidity is the key. These are GRT servo's but I believe the Garmin's are the same form factor or close to it.
disclaimer: The roll servo pic is not the final install... the geometry is better now and has been working for 150 hours.
Also, I'm not sure why the last pic is upside down. It's right side up on my computer but flipped when uploaded to VAF.
disclaimer: The roll servo pic is not the final install... the geometry is better now and has been working for 150 hours.
Also, I'm not sure why the last pic is upside down. It's right side up on my computer but flipped when uploaded to VAF.
Attachments

Last edited:
Sam Buchanan
been here awhile
There is another option for the roll servo that was used in years past in the RV-6 before custom bracketry was offered from the autopilot vendors. The roll servo can be mounted at the wingtip and connected to the bellcrank with a pushrod. Here are some details from a RV-6A installation in the previous century.
http://home.hiwaay.net/~sbuc/journal/navaid.html

http://home.hiwaay.net/~sbuc/journal/navaid.html
I believe the two most popular places for the Roll Servo are in the wing and under the floor, to the right of the front seat. Some don't like the under floor option because of interference with the backseaters footwells (if you have those installed). I was able to make the geometry work and still have the footwells, just takes a bit of fiddling. Pitch servo is pretty standard. I basically copied some pics I had saw on VAF and other places of pitch servo mount designs and made my own. Dynon AP install manual had a good diagram/plan. Rigidity is the key. These are GRT servo's but I believe the Garmin's are the same form factor or close to it.
disclaimer: The roll servo pic is not the final install... the geometry is better now and has been working for 150 hours.
Also, I'm not sure why the last pic is upside down. It's right side up on my computer but flipped when uploaded to VAF.
Thanks Jvon! It looks like the mount is a little farther back in that first picture potentially allowing the back seat footwells. You don't perchance have a shot of your final position allowing footwells? It looks like the other two shots are the pitch servo?
There is another option for the roll servo that was used in years past in the RV-6 before custom bracketry was offered from the autopilot vendors. The roll servo can be mounted at the wingtip and connected to the bellcrank with a pushrod. Here are some details from a RV-6A installation in the previous century.
http://home.hiwaay.net/~sbuc/journal/navaid.html
Thanks Sam. It looks like the wing tip may be the other option. My neighbor just finished his RV-8 and his roll is in the right wing, but there is a ton more room and inspection ports on the 8 than on the 4.
Not trying to change your mind
Understood. The Rocket fuses have a little more width than the 4s. That said, most foot heels aren't that wide so though an adaptation of your footwell might be an easy approach. Just letting you know an interesting option from a clever builder (not me). I'll probably have this as pictured and a bias servo on the opposite side. Best of luck
Thanks Freemasm. This looks like a nice setup but would affect the back seat footwells. I think I am going to have to either go to the wing, or the wing tip.
Understood. The Rocket fuses have a little more width than the 4s. That said, most foot heels aren't that wide so though an adaptation of your footwell might be an easy approach. Just letting you know an interesting option from a clever builder (not me). I'll probably have this as pictured and a bias servo on the opposite side. Best of luck
blackbeard10
Well Known Member
Jvon811
Well Known Member
L.D.,
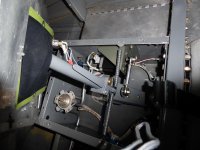
You are correct, the last two pictures are of the pitch servo setup. The roll servo mounting location in my airplane is as you see it in the picture. The change in geometry I referred to was the pushrod and clearance hole in the fuse structure. My airplane origially had a NavAid Devices wing leveler and that clearence hole (in the pic) didn't fit my GRT Servo geometry.
The only Mod I had to made to the mounting bracket to clear the footwell was to lower the Servo mount as low as possible on the bottom of the aircraft to clear the footwell. Maybe somewhere around 3/4"-7/8" lower than the standard GRT mount (similar to Dynon and Garmin). I just lowered the mounting holes that bolt to the servo body and removed the excess at the top of the mount. The footwell depression clears the servo now by about 3/8".
Scott Hersha
Well Known Member
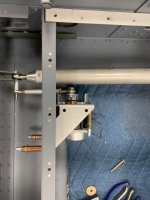
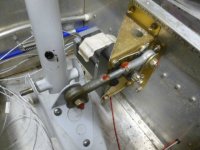
Another possible location for the roll servo on an RV4. Easy location to access and inspect.

Photo might be upside down or sideways.
Photo might be upside down or sideways.
Can easily be in the RV-4 stick well so won't interfere with passenger foot wells.
And the "bracket" attached to the stick weldment is very easy to make.
Finn
That's an interesting solution and would solve several of my issues!! Thanks for posting FinnFlyer!
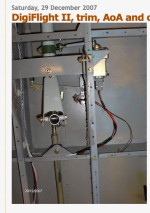
He did a fantastic job and a lot of helpful tips and tricks. Thanks for posting. I read his blog some time ago.This is how I did mine. I have rear seat footwells. This photo is from gikonhome.blogspot.com. , a super build site from a British RV 4 builder.
Perfect Justin! I am thinking this will work as you describe.L.D.,
You are correct, the last two pictures are of the pitch servo setup. The roll servo mounting location in my airplane is as you see it in the picture. The change in geometry I referred to was the pushrod and clearance hole in the fuse structure. My airplane origially had a NavAid Devices wing leveler and that clearence hole (in the pic) didn't fit my GRT Servo geometry.
The only Mod I had to made to the mounting bracket to clear the footwell was to lower the Servo mount as low as possible on the bottom of the aircraft to clear the footwell. Maybe somewhere around 3/4"-7/8" lower than the standard GRT mount (similar to Dynon and Garmin). I just lowered the mounting holes that bolt to the servo body and removed the excess at the top of the mount. The footwell depression clears the servo now by about 3/8".
That's an interesting solution and would solve several of my issues!! Thanks for posting FinnFlyer!
Actually the pictures and pdf file are from the guy that sold me his Dynon servos.
Today I just finished re-making the angle or bracket that attaches to the stick weldment in steel today (had done it in 0.02" alu to check the geometry when I first installed the servo).
Finn
Actually the pictures and pdf file are from the guy that sold me his Dynon servos.
Today I just finished re-making the angle or bracket that attaches to the stick weldment in steel today (had done it in 0.02" alu to check the geometry when I first installed the servo).
Finn
Mornin Finn, do you by any chance have some shots of your re-do on the roll servo bracket?
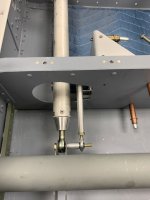
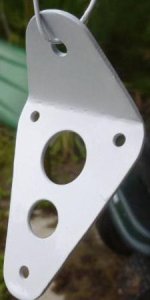
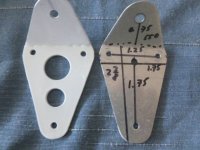
Stick assembly to servo link bracket.
Used 4130 1/16" plate. Beefier than needed.
Really the only point I wanted to strengthen was around the 3/16" hole for the link to the servo arm. Should probably have made it with 1/16" alu and enlarged and put a small bushing in that hole.
I'll update this post with more pictures later when re-installed.
Added link to pdf file with dimensions for servo mount bracket. Shows up a a black square below. Click on it to open or download.
Do not take my dimensions as gospel. Mock something up with cardboard or thin alum. Make sure you get the servo throw you want. That link doesn't bind on bend nor servo arm. That you have room for nuts underneath screws (or bolts).
Finn
Attachments
Last edited:
Thanks Finn. That setup will work without affecting the back seat heat or the foot wells. Thanks for sharing!Used 4130 1/16" plate. Beefier than needed.
Really the only point I wanted to strengthen was around the 3/16" hole for the link to the servo arm. Should probably have made it with 1/16" alu and enlarged and put a small bushing in that hole.
I'll update this post with more pictures later when re-installed.
Added link to pdf file with dimensions for servo mount bracket. Shows up a a black square below. Click on it to open or download.
Do not take my dimensions as gospel. Mock something up with cardboard or thin alum. Make sure you get the servo throw you want. That link doesn't bind on bend nor servo arm. That you have room for nuts underneath screws (or bolts).
Finn
control springs on your photo
What is the bar that parallels the control stick that has the control springs attached at the bottom? It's rather long and runs up the stick in the picture. I'm wondering if there is any reason why the springs could not be incorporated into or on the manufactured servo attachment plate instead of on the bottom of the stick?
L. D.
Hi Finn,Can easily be in the RV-4 stick well so won't interfere with passenger foot wells.
And the "bracket" attached to the stick weldment is very easy to make.
Finn
What is the bar that parallels the control stick that has the control springs attached at the bottom? It's rather long and runs up the stick in the picture. I'm wondering if there is any reason why the springs could not be incorporated into or on the manufactured servo attachment plate instead of on the bottom of the stick?
L. D.
Can easily be in the RV-4 stick well so won't interfere with passenger foot wells.
And the "bracket" attached to the stick weldment is very easy to make.
Finn
Hi Finn,
I see the control springs attached to a bracket on the bottom of the control stick. What is the longer part of that bracket that runs up the front side of the stick?
L. D.
Scott Hersha
Well Known Member
That is the manual trim lever, a spring biased system that works very well for manual aileron trim. This of course won’t allow your autopilot control system to auto trim your airplane.
That is the manual trim lever, a spring biased system that works very well for manual aileron trim. This of course won’t allow your autopilot control system to auto trim your airplane.
That's right. And I don't have that. See post #18 for a picture of my installation. I have electric aileron trim (small trim tab on left aileron similar to elevator trim tab).
Finn
Thanks Scott and Finn. Mine were matched drilled wings so hopefully won't need aileron trim. I don't have it so I guess I'll find out on first flight!
Don't know what kind of flying you're planning. Regardless, I'd suspect you'll need some type of roll trim. Not building a 4 but close enough. If there's an easier/better way to effect it than the last post here, I'd like to know for myself.
https://vansairforce.com/community/showthread.php?t=182781
Just because of left and right tanks I think you'll find that you will want some kind of roll trim -- unless you have an autopilot.
Reason I installed the electric roll trim was with poor man's wing leveler in mind. (Figured I could rig up something simple with mercury switches or something.)
Then, because I got the Dynon D-100, I talked myself into buying used Dynon servos when I saw them advertised here. So probably really won't need the roll trim.
Finn
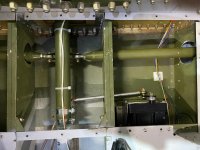
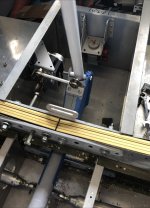
My approach. Thanks to all
Settled on the approach a la’ Finnflyer and Mr Hersha. Took a while
but the kinematics work out and there’s clearance for any item/fastener replacement and the 2” duct to route beneath the servo. Pay no attention to the linkage fastener length. Those are just temps to check out the mechanics. Two differences, at least that I’m aware of.
My column attachment bracket is 063 aluminum. If I can find a shoulder/step washer to use at the linkage attachment, I’ll use that. Any leads, please let me know. Otherwise, I’ll make a bushing out of steel tubing. Could also quickly make a replacement out of 4130.
I only connected the aforementioned bracket with the two #8 screws. The third “out of force plane” fastener made no sense to me. The forces applied by the actuator are quite low and each fastener has ~ 1700 lbs ultimate tension and single shear. If further reasoning is comforting, the actuator only attaches with 4@#4 screws.
Thanks to all the thread contributors. Thoughts, gentlemen?
Attachments
Scott Hersha
Well Known Member
Nice job Scott! Looks good to me. I used 3 #8 screws on the bracket (overkill probably) and made my bracket out off mild steel from Menards, but the setup is very similar. Your setup which is further up towards the stick will give you more torque, which is probably a good thing. This configuration works very well, and is easy to check and service. Seems like a preferred location for RV4 roll servos.
.....very similar. Your setup which is further up towards the stick will give you more torque, which is probably a good thing....
First off, make no mistake assuming I have any experience with autopilots; however, in my experience with designing (mostly industrial gas turbine) systems, it is most always better to take advantage of the full range of motion of an actuator whenever possible. Regardless of how finite the feedback, doing the aforementioned reduces the chances of the system acting overdamped/hunting/etc. Who knows what issues I'll encounter trying to validate everything but hopefully that issue won't be one of them.
On other related second thoughts, I'm probably going to forgo a bushing and thicken the attach bracket to match that of the actuator arm. I'm fine with the strength aspect as installed but unsure of any linkage fastener hole wear. I'm assuming Garmin's analysis and experience have validated their material choice from that perspective so I'll probably copy that in time.
Much thanks to all.
Last edited:
Peter Grylls
Member
Used 4130 1/16" plate. Beefier than needed.
Really the only point I wanted to strengthen was around the 3/16" hole for the link to the servo arm. Should probably have made it with 1/16" alu and enlarged and put a small bushing in that hole.
I'll update this post with more pictures later when re-installed.
Added link to pdf file with dimensions for servo mount bracket. Shows up a a black square below. Click on it to open or download.
Do not take my dimensions as gospel. Mock something up with cardboard or thin alum. Make sure you get the servo throw you want. That link doesn't bind on bend nor servo arm. That you have room for nuts underneath screws (or bolts).
Finn
Thanks for posting that stuff. You have simplified my research enormously.
jull_under
Active Member
TruTrak servos
Anyone install TruTrak servos for roll & pitch.
Pictures would be greatly appreciated.
Also, what hardware was used to fabricate pushrods, rod end bearings etc.
I can't find an "install kit" like the other manufacturers.
Thanks.
Anyone install TruTrak servos for roll & pitch.
Pictures would be greatly appreciated.
Also, what hardware was used to fabricate pushrods, rod end bearings etc.
I can't find an "install kit" like the other manufacturers.
Thanks.
Anyone install TruTrak servos for roll & pitch.
Pictures would be greatly appreciated.
Also, what hardware was used to fabricate pushrods, rod end bearings etc.
I can't find an "install kit" like the other manufacturers.
Thanks.
I installed Garmin but I pulled the TT drawings/models from their website when looking for ideas. IIRC, both pitch servos attach almost identically to the elevator bell crank. That should be the easy one.
Unlike TT, there is no Garmin RV-4 release for roll servo installation. TT attaches a band to the control column for actuator attachment. While it would have been an easy thing to replicate, the mechanical advantage/leverage is fairly limited thus requiring more actuator force. Mr. Hersha's and FinnFlyer's approach made better use of the available kinematics. Since anything I did would have required custom fabrication/application, I decided to stand on their shoulders.
If I were installing TT, I would have followed their kit instructions and not thought twice about it.
jull_under
Active Member
Hello everyone.
I'm fabricating the servo bracket/mount for the roll servo.
What's the thickness of your aluminum bracket for the roll servo.
I'm wondering if 1/16" would be stiff and sturdy enough.
For the pitch servo, I'm buying the servo mounting kit from Dynon.
Thanks !
I'm fabricating the servo bracket/mount for the roll servo.
What's the thickness of your aluminum bracket for the roll servo.
I'm wondering if 1/16" would be stiff and sturdy enough.
For the pitch servo, I'm buying the servo mounting kit from Dynon.
Thanks !
Anyone install TruTrak servos for roll & pitch.
Pictures would be greatly appreciated.
Also, what hardware was used to fabricate pushrods, rod end bearings etc.
I can't find an "install kit" like the other manufacturers.
Thanks.
Hello everyone.
I'm fabricating the servo bracket/mount for the roll servo.
What's the thickness of your aluminum bracket for the roll servo.
I'm wondering if 1/16" would be stiff and sturdy enough.
For the pitch servo, I'm buying the servo mounting kit from Dynon.
Thanks !
Totally depends on your bracket design.

