
Van's Air Force
You are using an out of date browser. It may not display this or other websites correctly.
You should upgrade or use an alternative browser.
You should upgrade or use an alternative browser.
NACA Inlet Ducts
- Thread starter jpharrell
- Start date

jmjula
Well Known Member
I just followed what a few others did. Proseal between skin and vent, eight 3/32nd blind rivets with 1/2sq aluminum pieces for added security. This is one of the few pics I have of it: http://jmjula.home.comcast.net/~jmjula/images/fuselage/f_tubing_d.jpg
West with flox, well scuffed - rock solid on 2 aeroplanes.
Used clecos to locate and clamp, then filled holes with loddy later.
Used clecos to locate and clamp, then filled holes with loddy later.
longranger
Well Known Member
West with flox, well scuffed - rock solid on 2 aeroplanes.
Used clecos to locate and clamp, then filled holes with loddy later.
I don't get to talk with our West Midlands friends as often as I'd like; can you translate "loddy" into American for us who are English challenged?

panhandler1956
Well Known Member
Me too
I pro sealed mine exclusively too, but be careful that it doesn't move away from the skin during curing. My first one did and I had to start over after cleaning up the respective surfaces - not fun!
I like the clamps shown above - good solution to the problem I had.
I pro sealed mine exclusively too, but be careful that it doesn't move away from the skin during curing. My first one did and I had to start over after cleaning up the respective surfaces - not fun!
I like the clamps shown above - good solution to the problem I had.
Wing scoop
I finished one wing last night Woohoooooooo!
I'm ready to install the inboard skin with the scoop on the other wing. I am just realizing that I didn't receive the scoop with the wing. Someone suggested they come with the fuse. I inventoried the fuse and didn't see any scoops.
Do you think it would be best to install the wing scoop on the skin prior to riveting?
Give me the scoop
They are kind of like an option on a car
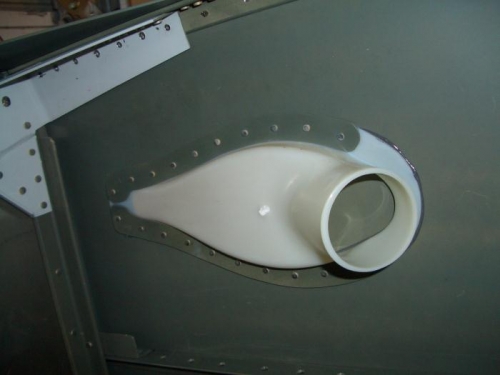
I studied the area available and what I wanted to do with routing the air. I riveted the plastic ducts in place on the side skins (no proseal). I located them high and forward to have a straight and out of sight routing of the hose/duct to the pilot and passenger controlled vents. I originally installed the plastic in cockpit control vents but I found the leakage was lowering my TAS so I replaced them with the expensive metal ones.
Bob Axsom
BSwayze
Well Known Member
Good Question, John
I remember going through this same thought process. The directions aren't real clear about this, as you noted. I don't think it's too critical when you mount the vents. I think you can mount them pretty much any time you like. I waited until after I had the rudder/brake pedal assembly in place and the vent lines, etc. installed. That way they aren't in the way.
I wrote up how I did mine, with lots of pictures and discussion, on my log page here: Installing the Side Vents
I used proseal, too. You don't need rivets. It looks so much nicer and these vents will NEVER come off. The only prep work I did on the vents was to scuff them up a bit, prepping for eventual paint. I figured it's much easier to scuff them on the bench than after they're installed and you have to reach through the opening.
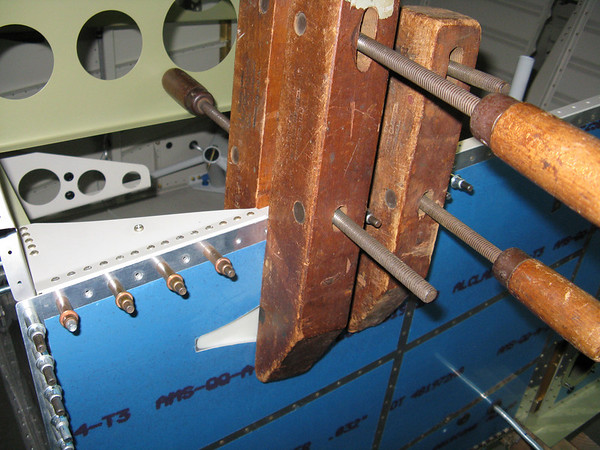
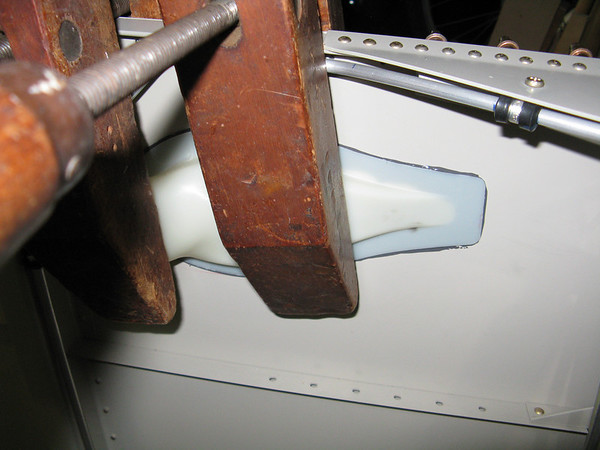
Here's a simple homemade clamp I made up. Strapping tape and a wood block. This will hold just fine, since the clamping pressure is light.


I used small pieces of masking tape as markers, to make sure the positioning of the vent is accurate after the proseal is applied. After it's clamped in place, additional masking tape will hold it in place and keep it from sliding out of position until the proseal cures.

The finished result:


Good luck with yours... have fun!
I remember going through this same thought process. The directions aren't real clear about this, as you noted. I don't think it's too critical when you mount the vents. I think you can mount them pretty much any time you like. I waited until after I had the rudder/brake pedal assembly in place and the vent lines, etc. installed. That way they aren't in the way.
I wrote up how I did mine, with lots of pictures and discussion, on my log page here: Installing the Side Vents
I used proseal, too. You don't need rivets. It looks so much nicer and these vents will NEVER come off. The only prep work I did on the vents was to scuff them up a bit, prepping for eventual paint. I figured it's much easier to scuff them on the bench than after they're installed and you have to reach through the opening.
Here's a simple homemade clamp I made up. Strapping tape and a wood block. This will hold just fine, since the clamping pressure is light.
I used small pieces of masking tape as markers, to make sure the positioning of the vent is accurate after the proseal is applied. After it's clamped in place, additional masking tape will hold it in place and keep it from sliding out of position until the proseal cures.
The finished result:
Good luck with yours... have fun!
West Midlands............
How Very Dare You !!!!!!
They are all heathens, speak strangely and paint themselves blue.
I'm from Yorkshire - a proud nation up in the north of the country.
Loddy is a vernacular for filler - jollop, bondo, clart, etc
How Very Dare You !!!!!!
They are all heathens, speak strangely and paint themselves blue.
I'm from Yorkshire - a proud nation up in the north of the country.
Loddy is a vernacular for filler - jollop, bondo, clart, etc
longranger
Well Known Member
West Midlands............
How Very Dare You !!!!!!
They are all heathens, speak strangely and paint themselves blue.
I'm from Yorkshire - a proud nation up in the north of the country.
Loddy is a vernacular for filler - jollop, bondo, clart, etc
A proud nation, eh? Yorkshire must be England's version of Texas
. Hmmm... I added three more words to my vocabulary today, loddy, jollop, and clart.
All evidently synonyms related to the building of airplanes. To an American ear you all speak strangely. On the last night of a week-plus visit with those friends from Essington, Wolverhampton, and about 75% of the way through a large bottle of something that had leaked out of a distillery, I proudly announced that I'd learned a new language: English! (Who knew "fanny" wasn't a polite term...)WingsOnWheels
Well Known Member
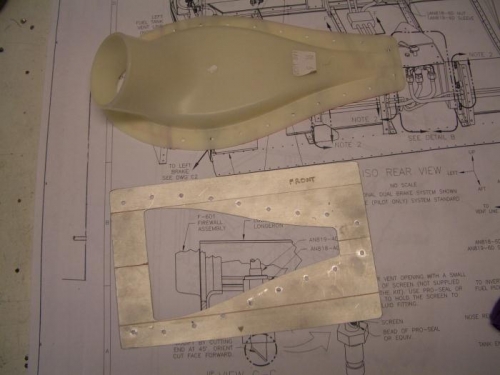
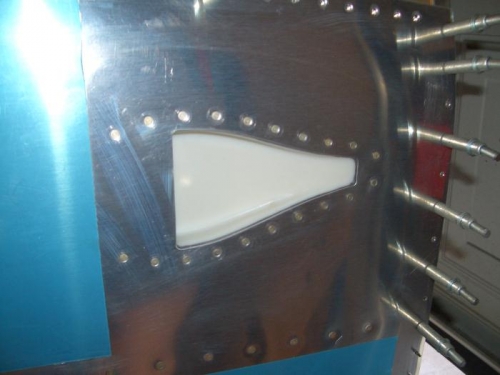
Here is how I installed mine. At the time, I didn't even think about installing with just proseal, nothing wrong with that, just never crossed my mind. I used proseal and rivets. The rivets are probably overkill. The doubler strips are 0.40.
Just make sure install them so you can still get the rudder pedal assembly out! If they are too far aft you will have a problem.
I started by making a cutout template with a staight edge I could use for alignment. If someone want to borrow the template, just shoot me a PM with your address, just make sure I get it back.
Missing Instructions
Thanks for all the good suggestions posted here but I still wonder about the "official" Vans instructions. Should I assume that there are none for the NACA inlets since nobody has mentioned what page of the instructions or which drawing details it?
Thanks for all the good suggestions posted here but I still wonder about the "official" Vans instructions. Should I assume that there are none for the NACA inlets since nobody has mentioned what page of the instructions or which drawing details it?
From memory, there are some drawings inside the vent kit and they are fairly sketchy as they apply to all models and positions (8 is under the wing).
Keep your entries smooth and don't panic, if you use Proseal or West, they won't fall off....
Keep your entries smooth and don't panic, if you use Proseal or West, they won't fall off....
Vent installation
Acccess to what ? It would be a small hole to work thru.
Ed Booth, RV6,7,10,9A
A FRIEND OF MINE TOM PROCOB INSTALLED HIS WITH NUT PLATES ,MAKES FOR HANDY ACCESS.
Acccess to what ? It would be a small hole to work thru.
Ed Booth, RV6,7,10,9A
RVG8tor
Well Known Member
One of both
I used Proseal to attach the one on the fuselage. I used a retainer ring with nut plates and screws for the one on the underside of the wing. I wanted to easily remove the vent if I ever needed to change the hose that routes the air to the fuselage. I can unscrew and and pull the vent out through the hole in the wing to remove the hose clamp that holds the hose. Removing this clamp would not be easy with the wing installed. I know the hose will last a long time, but I plan to have my plan even longer than a long time


I used Proseal to attach the one on the fuselage. I used a retainer ring with nut plates and screws for the one on the underside of the wing. I wanted to easily remove the vent if I ever needed to change the hose that routes the air to the fuselage. I can unscrew and and pull the vent out through the hole in the wing to remove the hose clamp that holds the hose. Removing this clamp would not be easy with the wing installed. I know the hose will last a long time, but I plan to have my plan even longer than a long time
bug screen
One additional thing I did with the vents was to install a piece of screen over the interior end of the vent (before installing the scat tube.) If you have ever had a wasp sneak into your cockpit, you understand why!
It also keeps larger pests from finding a way in while the plane is parked.
Jim
RV-9A (flying...220 hrs.)

