What's new
Van's Air Force

Don't miss anything! Register now for full access to the definitive RV support community.

TruTrak Pitch Step Motor to Bellcrank Push-rod

RV7ADRIVER

I'm New Here
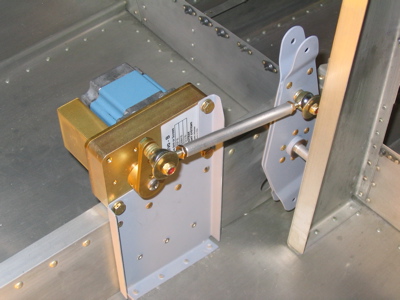
I'm installing the TruTrak auto-pilot pitch step-motor in my RV-7A for a Digiflight II auto-pilot.
No problem with the Tru-Trak bracket or the RV elevator bellcrank. They are both in the correct location.
According to Tru-Trak I have the correct parts.
The auto-pilot push-pull rod goes off at an angle when connected between the step-motor arm and the bellcrank. The bellcrank end is toward the right by half an inch.
I'm expecting it to be in a straight line like the roll push-pull rod but it isn't.
What's up with that?
Has anyone out there run into this?
Thanks in advance.
 
Trutrak installation

I use a spacer in the AN bolt from the servo and a smaller spacer on the bellcrank to keep the push rod straight. These spacers that I'm refering to, come in from TT with the brackets. If you didn't get any with you package, let me know and I will send you a couple.
Alex D
 
More On The TruTrak Pitch Control Installation

Alex D.

Thanks for your response to my post.
When I called TruTrak yesterday the guy I talked to said "I don't think ours is off by that much". [Half an inch]. He said "it should be fairly straight". He said "I could add a couple washers to the motor arm to align it if I need to". I called TruTrak again this morning to clarify this spacer issue. The guy I talked to this morning said that "yes" it is off by that much. They know about it and it is okay. Not a problem. Just let it connect at an angle. In my package they have actually included two washers that are used as spacer at the bellcrank end [and makes the angle worse] so the push-pull rod doesn't rub on the bellcrank. I asked about spacers on the motor arm and he said "no". It is better not to do that. It puts less stress on the arm without a spacer there and to just let it go back at an angle. Sounds kind of goofy to me but that is what I am hearing. I've done some searching on RV builders web pages and it looks like everyone using the TruTrak unit is installing a spacer of some type. One I saw had used spacers behind the bracket and offset the entire bracket. TruTrak said "no" don't do that. I'm not sure what the best solution is. Maybe split the difference with half a spacer and less of an angle????
If you or anyone out there has another opinion, I'd love to hear it.
Thanks for the help.
 
The angle is not a problem on my RV-6A ... BUT!

The rod end bearings will accomodate the angle and the motor isn't put at a leverage disadvantage. The RV-6 roll servo installation on the fuselage floor has over an inch "misalignment" by design and it works perfectly. The pitch servo is at much less of an angle offset. The guys at Tru Trak are the best source of information along with the good participants in this forum so your approach to getting information when in doubt is good. If you have everything installed properly an angle offset between the motor arm and the bellcrank is only a problem if there is interference during the travel.

When I originally installed the motor on the vertical bracket I had the motor installed on the wrong side of the vertical bracket and it threw the alignment off somewhat. The incorrect installation is very nice looking giving no clue that it is wrong except for the greater misalignment - maybe that is how I caught it, I don't remember for sure but you should go back over your installation very carefully to make sure you didn't fall into that trap. My correct installation has the blue body of the motor hanging out on the left side of the keel mounted bracket and the actuator arm is on the right side of the bracket and keel. This is the same side of the keel as the elevator bellcrank and the angular offset isn't very much. I can post right and wrong photos if necessary.

Bob Axsom
 
Last edited:
TT Pitch Servo Install

The instructions from TruTrak for my pitch servo install shows the flanges on the verticle rib facing opposite directions. My RV-9 Fuse are both facing the same direction. The bracket supplied with the servo seems to align "almost" perfectly with the bellcrank. If you wish, I will send a pic.
Rolly Clark
Finish Kit
 
Servo

Had problems with the pitch servo arm as well as the mounting bracket supplied by TT. Vans provided a much nicer bracket, so I used it instead. Still the arm length was a problem. A conversation with TT was in order. They gave me the " fundementals" of rod lenght based on travel of the servo lever and angular position. Made my own according to their instructions and worked out well. I did mention that the bracket they supplied was not up to standards. They admited as much. Overall, they were very helpfull and willing to help in any way. It appeared that I had purchased "one of the first", hence the not so neat bracket.
Damned nice AP compared to the overpriced Stec I had on my Arrow. The stepper motors TT uses are a far improvement over the cheap brush type motors used on Stec. Had to have mine fixed at $750.
T88
RV10
 
TruTrak Pitch Control Installation Update

First of all, Thanks to everyone for your responses to my post. You have all been helpful. The TruTrak people have been helpful too. They are not giving up on this.

I did double-check my parts and installation and everything is correct. Also, TruTrak says "yes" the rod does connect at an angle and that is correct.

Today, I tried to install the push-pull rod at an angle as described by TruTrak. I used the hardware they included in the kit. It didn't work. The end bearings rubbed the oversized "safety" washers. I called TruTrak again this afternoon. They said: Then don't use the "safety" washers. They really aren't needed. Okay, I can buy that. Even if an end bearing broke-out it is not really a safety of flight issue. I'd just loose the use of the autopilot.

I keep thinking it is much easier to just put a spacer on the motor arm [like most people seem to be doing] and make the rod align with the bellcrank. I noticed that the RV-10 pitch motor installation photo on TruTrak's web page shows an even larger spacer on the motor arm and another one on the bellcrank. So then why do they say don't do that???
While I had the guy from TruTrak on the phone I asked him again about just putting a spacer on the motor arm. Same response as before. "No" It's not a good idea. Actually they don't do that for the RV-10 either. [Like their photo]. They redesigned their bracket. They don't advise using a spacer on their motor arm.

That half-inch offset on such a short arm looks a little half-baked to me. I may just live with it. After all, TruTrak says it's fine like that. Just shim until nothing rubs and it's good to go.

That guy that shimmed the entire bracket may be on to something. I am toying with the idea of using a scrap piece of half inch aluminum plate and drilling the #$@* out of it to make it light. Use it to shim the entire mounting bracket out a half-inch from the center rib and everything will be in perfect alignment. All the installation problems go away. I don't think that would create a new one. ??????
 
RV7ADRIVER said:
That guy that shimmed the entire bracket may be on to something. I am toying with the idea of using a scrap piece of half inch aluminum plate and drilling the #$@* out of it to make it light. Use it to shim the entire mounting bracket out a half-inch from the center rib and everything will be in perfect alignment.

I'm about to install my own TT pitch servo so I'm following this thread with great interest. Have you thought about using square cross section extruded aluminum tubing to make standoffs? That seems like it might be lighter than a drilled-out plate but still get the job done. Or, you could get clever with aluminum angles and make a box-shaped standoff to move the servo into proper alignment. Hmm...

mcb
 
Today, I tried to install the push-pull rod at an angle as described by TruTrak. I used the hardware they included in the kit. It didn't work. The end bearings rubbed the oversized "safety" washers. I called TruTrak again this afternoon. They said: Then don't use the "safety" washers. They really aren't needed. Okay, I can buy that. Even if an end bearing broke-out it is not really a safety of flight issue. I'd just loose the use of the autopilot.


Unless.......the loose servo pushrod managed to jam the bellcrank! I decided to use aluminum tubing spacers to move the servo of my AlTrak because I didn't want to eliminate the safety washers:

http://thervjournal.com/altrak.htm

The servo installation has worked perfectly for a few hundred hours now.

Sam Buchanan
 
TruTrak Pitch Motor Installation

Sam B.

I agree. I want to keep the "safety" washers.
I'm leaning towards your type of installation so I can do that.
[Moving the entire motor bracket].
I'm now thinking of spacer possibilities.
I can make the bracket spacer thinner than 1/2" by using two washers between the rod and the motor arm and only one between the rod and the bellcrank.
That narrows the spacer by 3/16". A 1/4" shim plate would get it really close.
Also, did you attach the bottom motor bracket flange to the bottom skin?
TruTrak says that is optional with the RV7 & 9 models. They normally attach the motor bracket to the center rib with two rows of rivets. Did you find it necessary with the bracket moved away from the center rib to also attach to the skin?
 
Also, did you attach the bottom motor bracket flange to the bottom skin? TruTrak says that is optional with the RV7 & 9 models. They normally attach the motor bracket to the center rib with two rows of rivets. Did you find it necessary with the bracket moved away from the center rib to also attach to the skin?

I did not attach the bracket to the belly skin. The bracket mounting seemed stiff enough without the bottom rivets and there have been no service issues. If installing the bracket during aircraft construction, it would be easy to add the rivets but it was more involved as an add-on (drilling out/installing rivets singlehanded while working in the tail of the plane, messing up the paint, etc, etc) than I thought necessary.

Sam Buchanan
 
TruTrak Pitch Servo

7ADriver; As I mentioned earlier,I had the same problem with my installation. The pushrod would come in contact with the bell crank at end-of-travel in one direction and the servo arm washer in the other direction. My soloution was to use 3/16 Alum plate with a few lightening holes, cut to the same shape as the bracket up to the top of the verticle rib, and match drill the bracket/plate combo to the rib. I used 470-4 rivets. It is a very rigid mounting and the alignment is almost straight on. Good luck.
Rolly Clark
RV-9
 
TruTrak Pitch Motor Bracket Installation

Rolly 9,

I decided to do the same thing. Except I need a 3/8" spacer to make everything straight with the necessary washers installed. I'm using 3/8" aluminum plate. I cut my spacer the same as you described. I removed all of the center and I'm keeping just 3/4" around the entire outer edge. I am drilling holes in what's left of the spacer to lighten it up. It looks like it will work just fine.
 
For what it's worth, I installed my bracket this weekend and decided not to put a spacer between the bellcrank rib and the bracket. I will probably put a short spacer or some washers between the servo arm and the rod end bearing to prevent the pushrod from rubbing anywhere. I figure if a 1/2" spacer is called out in the roll servo installation instructions, a small one should be good for the pitch servo as well.


Pay no attention to the lack of safety wire in the photo, this was just a test fit. Click the image for more bracket installation pics if you like blurry photos of shiny objects.

mcb
 
Quote:
Also, did you attach the bottom motor bracket flange to the bottom skin? TruTrak says that is optional with the RV7 & 9 models. They normally attach the motor bracket to the center rib with two rows of rivets. Did you find it necessary with the bracket moved away from the center rib to also attach to the skin?

To which I replied:

I did not attach the bracket to the belly skin. The bracket mounting seemed stiff enough without the bottom rivets and there have been no service issues. If installing the bracket during aircraft construction, it would be easy to add the rivets but it was more involved as an add-on (drilling out/installing rivets singlehanded while working in the tail of the plane, messing up the paint, etc, etc) than I thought necessary.

Correction for sake of archives:

In the course of poking around in the fuse today while working on the condition inspection, I discovered that I had indeed attached the servo bracket to the belly skin. The attachment was via two #6 screws and nyloc nuts. The belly skin was drilled and countersunk for the screws.

Sorry for letting this info fall through the mental cracks......... :confused:

Sam Buchanan
 
Back
Top