
Van's Air Force
You are using an out of date browser. It may not display this or other websites correctly.
You should upgrade or use an alternative browser.
You should upgrade or use an alternative browser.
Prop Pitch
- Thread starter todehnal
- Start date

Actually, if you have the old version of the prop hub (the one with the white plastic indexing barrel in the center) you can run the engine with the spinner removed.
If you have the new style hub that uses the indexing pins for pitch adjustment, the spinner should be installed for ground runs.
If you have the new style hub that uses the indexing pins for pitch adjustment, the spinner should be installed for ground runs.
rv3flier
Well Known Member
I think I have the old style prop hub as there's a white plastic bushing in the center and there're no indexing marks that I can see. The prop hub and blades were replaced by Sensenich in June 2011.
As a follow up, the static rpm went from 4700 to 4850 but a remeasurement of the prop blade angles indicated a change of a tenth degree toward a flatter pitch. I did run the motor for 5 minutes at 2450 rpm and retorqued the bolts before doing the static test. In any case it looks like another 2 tenths of a degree (66.5) should get me close to 4950.
As a follow up, the static rpm went from 4700 to 4850 but a remeasurement of the prop blade angles indicated a change of a tenth degree toward a flatter pitch. I did run the motor for 5 minutes at 2450 rpm and retorqued the bolts before doing the static test. In any case it looks like another 2 tenths of a degree (66.5) should get me close to 4950.
When working on a project with Sensenich a few years back they even said they set their blades by hand. They said that the pins looked like a good idea on paper, but even with the white plastic indexer in the center by hand is more accurate and easier to be exact over the pins. Pins are a good way to get in the ballpark. The pin indexing doesn't always get you the exact rpm result you may be shooting for too.
rv3flier
Well Known Member
I can move one blade quite a bit before the other one will move - hard to believe that mine has indexing pins. I was able to get 66.5* but only gained 30 rpm static so I'm now at 4880 at 13* C. I'm going to leave it alone until I see how much the static rpm changes with OAT and normal operating oil temps. I'm getting 5150 rpm at 75 kts on climb out.
Thanks for the feedback.
Thanks for the feedback.
Phantom30
Well Known Member
Nothing personal with me.
I love to swap ideas, training methods, shortcuts and especially new information just out hot off the press from MFG's like Rotax and of course cat skinning. It is just like debate class was back in school. It would be a dull world if we all thought alike and then nothing would ever get done. If you can't be opened minded and learn why live.
I have heard from several friends with RV's that Scott and I are entertaining and we don't even get paid for it.
p.s
Just an FYI
I just had an RV12 owner call this afternoon from northern AZ. with overheating problems. He was using Evans coolant. It is not recommended by Rotax any longer and carries a 20F-30F temp penalty. Better to stay with the now more conventional recommended 50/50 mix with more heat absorbing properties.
Roger....that guy from AZ would'nt possible be "first name Bob" by any chance?
Harvey rv12
Well Known Member
How to make digital protractor
I recently purchased a built rv-12. I've been
Reading about setting prop pitch using
a home made digital protractor using
a sears digital level. I believe Tony T.
and rv3flier have made them. Could you
share the design so I can build one?.
I have an E-LSA built rv-12 with
sensenich adjustable prop, and want to
check the pitch and maximize the
usefulness of the prop.
Thanks in advance
Tom O.
Hi Tom,
You can certainly use a nice prop protractor like this one;
http://www.aircraft-spruce.com/catalog/appages/propprot.php?clickkey=29175
You can also just use a 12" digital torpedo level like the one you may have from Sears with a rubberband and or use both. I use both.
You already have a flying aircraft so static is probably already close and it flys so you need to just fine tune the pitch for the best all around balanced performance since we use ground adjustable props. After a few years of testing for different companies the best all around Rotax WOT rpm at your average altitude is around 5600-5650 rpm at WOT in flat and level flight.
If you live in Los Angeles and never fly over 3K then set it for that. If you live in Mammoth, CA with a field elevation of 7100+' and always fly at 11K-13K then the pitch should be set for that.
Never have the prop adjusted so it is below 5500 rpm at WOT.
Mark each blade with a mark approximately 8"-9" back from the tip on each blade. Always loosen the larger 8mm hub bolts first and no need to loosen them any more than you can turn them by hand when loose. Face the plane and rotate the first blade around so it is on your right. Place the level on the blade so it is level with the ground. If we do this for each blade they will all be equal. Now place the level on the back side of the blade so one end points to the floor. Put the rubberband around the tips of the level around the blade and it will hold it in place. Look at the pitch on the level. It really doesn't matter at this point what the exact number reading is. If you need 1/2 degree adjustment to a finer pitch then loosen the other prop bolts until you can turn the blade so it is 1/2 degree flatter than the original reading. Snug the blade bolts back up, but don't worry about torquing them until you are done. Now remove the level and do the same for the other blade(s). Once done double check each blade before you torque the bolts up. Always torque the large 8mm bolts first. These are first to loosen and first to tighten. If you needed a different degree adjustment then that is what you would have done. Now go fly and see if your WOT rpm in level flight is around 5600-5650 rpm. This tends to give you the best climb, cruise, top end speed and fuel economy.
Here is a good article on prop pitch:
http://ctflier.com/index.php?/blog/6/entry-21-understanding-the-ground-adjustable-prop/
Hope this helps some.
Gagarin737
Well Known Member
Tony Tessitore
Tony's Tools&Work Fixtures

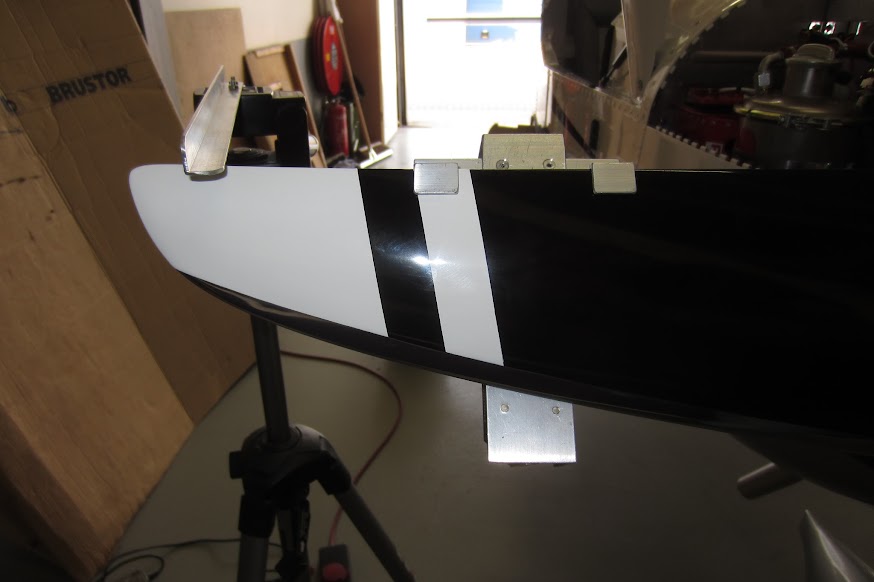
My fixture hangs on the prop flange (only picture I could find). The tripod with the aluminium angle is to have the blade in the exact same position each time you measure:
I believe Tony T.
and rv3flier have made them. Could you
share the design so I can build one?.
Thanks in advance
Tom O.
Tony's Tools&Work Fixtures
My fixture hangs on the prop flange (only picture I could find). The tripod with the aluminium angle is to have the blade in the exact same position each time you measure:
Last edited:
rv3flier
Well Known Member
After several more attempts to get my prop pitched to get to the 4960-5020 recommended static rpm, I've got it to 5030 with 68.4* on each blade -- (note that the degrees I measured would be different for someone else with differences in the fixture mounted to the digital level, etc.). Unfortunately, I haven't been able to get to fly at altitude as yet due to weather and an intervening trip, but I'll report in a week or so when I get the chance to fly again.
cactusman
Well Known Member
After several more attempts to get my prop pitched to get to the 4960-5020 recommended static rpm, I've got it to 5030 with 68.4* on each blade -- (note that the degrees I measured would be different for someone else with differences in the fixture mounted to the digital level, etc.). Unfortunately, I haven't been able to get to fly at altitude as yet due to weather and an intervening trip, but I'll report in a week or so when I get the chance to fly again.
That's exactly what mine is set to. The degrees are pretty close, of course those jigs are very sensitive and the prop isn't exactly flat so it's tough to get the same degrees even with making marks and being careful.
FYI - mine does really well with climb performance but I have noticed it is a bit of a dog in cruise. I just took it on a fairly long cross country to Cortez and while it performed very well taking off at gross in CEZ (5918') and again at Holbrook AZ (~5300') at very high Den Alt - I noticed my actual fuel flow was pretty high, and my speeds should have probably been a little higher.
My guess is that you'll notice better than book performance in TO rolls and climb and worse numbers in cruise/fuel flow.
The nice thing is you can adjust for the mission.
dbhill916
Well Known Member
prop pitch measurement tool from Sensenich
I found an interesting wooden tool with my prop that appears to be custom made by them for the setting of prop pitch using a digital level. Did these get added to the kits recently? (Mine arrived last December.) I zeroed a digital level relative to the canopy rail (thanks, Scott!) and then measured the angle of the top of the wooden tool. Thanks to the previous poster who also mentioned that you have to measure the ascending prop blade, and don't assume that the ascending blade angle is the negative of the descending angle.
I have not yet reached the point of doing full power runups, although I have run the engine at idle.
Has anyone else used this with good results?
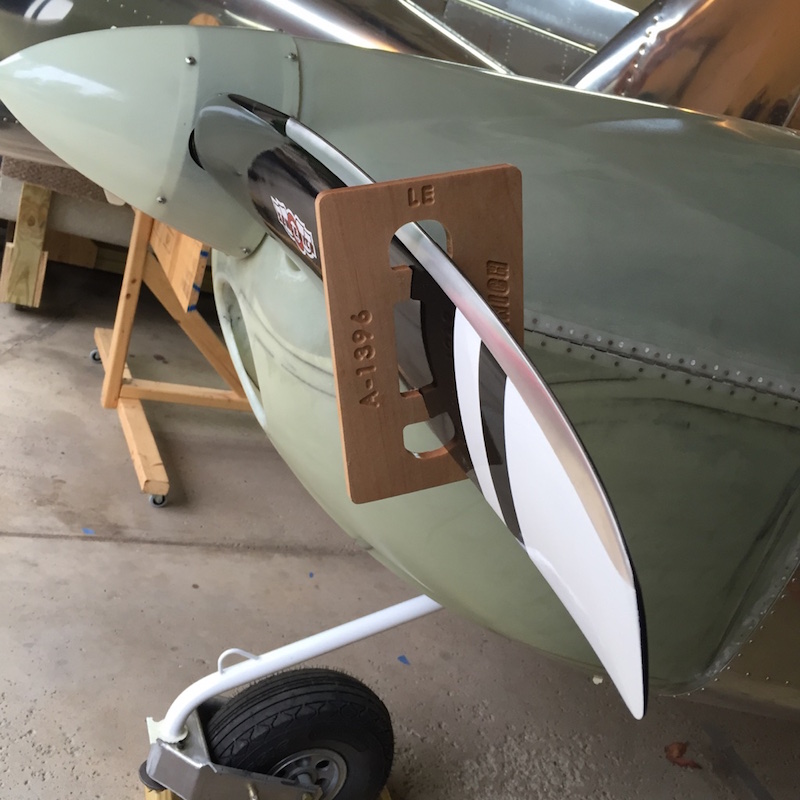
tomkk
Well Known Member
prop pitch measurement tool from Sensenich
That's what I used to set mine and it worked out OK although you have to be a bit careful to ensure the tool is placed on the blade(s) the same each time. If it gets canted side to side it'll affect the reading . It does a great job of conforming to the blade shape but before I use it again I'm going to figure out a way to mount a cross piece that'll lay on the blade edge to ensure the same orientation each time.
I zeroed the level on the rail as well. No biggie, but since we're not trying to achieve a specific reading but just ensuring both blades are the same, I don't think it matters what we zero to, just that it not change while we're doing our adjustment.
Also, I'm not sure why the measurement needs to be taken on the ascending blade. I found it more convenient to do it on the descending blade because the put the relatively flat trailing edge on top so I could use it with a level to position each blade in the same horizontal position before I took my reading.
I zeroed the level on the rail as well. No biggie, but since we're not trying to achieve a specific reading but just ensuring both blades are the same, I don't think it matters what we zero to, just that it not change while we're doing our adjustment.
You are correct Tom, but the benefit to zeroing is you can record the resultant angle in the log book. Then later if you remove the prop for some reason (Sensenich specifies that the blades be removed for condition inspection....) it would be easy to reset to the original value without the need to have the airplane sitting in the same spot as before, or have any influence by tire air pressure etc., because it is a fixed reference.
Also, I'm not sure why the measurement needs to be taken on the ascending blade. I found it more convenient to do it on the descending blade because the put the relatively flat trailing edge on top so I could use it with a level to position each blade in the same horizontal position before I took my reading.
Correct again. It can be done on either side. The main requirement is that both blades be in the exact same rotational position when the measurement is taken. Most people tend to use the descending blade position if they have made their own tool because it is easy to make it hang on the trailing edge repeatably.
tomkk
Well Known Member
You are correct Tom, but the benefit to zeroing is you can record the resultant angle in the log book. Then later if you remove the prop for some reason (Sensenich specifies that the blades be removed for condition inspection....) it would be easy to reset to the original value without the need to have the airplane sitting in the same spot as before, or have any influence by tire air pressure etc., because it is a fixed reference.
...
Good point, makes sense ...
I personally think the home made tools are better because you can make it so the digital level or protractor attaches to the tool.
With the Sensenich tool you have to hold the level up against it (one more error variable also).
I think a pre-made tool might be available from Van's in the future, but I am not sure when. Keep a watch out for an announcement.
With the Sensenich tool you have to hold the level up against it (one more error variable also).
I think a pre-made tool might be available from Van's in the future, but I am not sure when. Keep a watch out for an announcement.
After a long taxi warmup, I tried a full throttle static run. Only managed 4550 rpm. I have to fine the prop up a bit,- I have read that small adjustments make a big difference, - can anyone give me a rough guide on how many degrees or parts of a degree to go? Thanks for any help, Cheers, DEAN....
It would be interesting to know what your final degree change is when your done. I have found different props need different settings for static.
You need roughly a 400+ rpm change.
I'll throw my dollar into the hat and say at least a 1.75 degree flatter change and possibly more depending on your average altitude to get around
5600-5650 WOT rpm at your AVERAGE altitude. The average altitude will be the kicker for that fine tuning. Some are low fliers and some are high.
Thanks very much for your suggestions, guys, - Sink, you win the prize!! we moved it 1.7 degrees flatter, - now the static full RPM is 5020, - Happy with that. We didn't measure the angle to Horizontal or Vertical, so I can't help with that.. The aircraft has not flown yet, - hoping for a good compromise between climb & cruise performance... Cheers, DEAN...
Thanks very much for your suggestions, guys, - Sink, you win the prize!! we moved it 1.7 degrees flatter, - now the static full RPM is 5020, - Happy with that. We didn't measure the angle to Horizontal or Vertical, so I can't help with that.. The aircraft has not flown yet, - hoping for a good compromise between climb & cruise performance... Cheers, DEAN...
Dino, just curious if you see book cruise numbers without exceeding 5500 rpm with this setting?
Hi Dave, It hasn't flown yet, -soon,soon! Probably will fly on Tuesday, - just don't know which Tuesday! Cheers, DEAN..
Best of luck Aussie Brother, let us know how she does.
") Lots of flights scheduled for tuesday! Al from Albania is also scheduled on this date.
Lots of flights scheduled for tuesday! Al from Albania is also scheduled on this date.Best Rotax WOT rpm
Everything I have ever read from Rotax on the 912 ULS says that you should not be running 5500 RPM or higher for longer than five minutes. Ref. Royal operators manual.
"You already have a flying aircraft so static is probably already close and it flys so you need to just fine tune the pitch for the best all around balanced performance since we use ground adjustable props. After a few years of testing for different companies the best all around Rotax WOT rpm at your average altitude is around 5600-5650 rpm at WOT in flat and level flight.
If you live in Los Angeles and never fly over 3K then set it for that. If you live in Mammoth, CA with a field elevation of 7100+' and always fly at 11K-13K then the pitch should be set for that.
Never have the prop adjusted so it is below 5500 rpm at WOT.
Mark each blade with a mark approximately 8"-9" back from the tip on each blade. Always loosen the larger 8mm hub bolts first and no need to loosen them any more than you can turn them by hand when loose. Face the plane and rotate the first blade around so it is on your right. Place the level on the blade so it is level with the ground. If we do this for each blade they will all be equal. Now place the level on the back side of the blade so one end points to the floor. Put the rubberband around the tips of the level around the blade and it will hold it in place. Look at the pitch on the level. It really doesn't matter at this point what the exact number reading is. If you need 1/2 degree adjustment to a finer pitch then loosen the other prop bolts until you can turn the blade so it is 1/2 degree flatter than the original reading. Snug the blade bolts back up, but don't worry about torquing them until you are done. Now remove the level and do the same for the other blade(s). Once done double check each blade before you torque the bolts up. Always torque the large 8mm bolts first. These are first to loosen and first to tighten. If you needed a different degree adjustment then that is what you would have done. Now go fly and see if your WOT rpm in level flight is around 5600-5650 rpm. This tends to give you the best climb, cruise, top end speed and fuel economy."
Here is a good article on prop pitch:
http://ctflier.com/index.php?/blog/6/entry-21-understanding-the-ground-adjustable-prop/
Hope this helps some.[/QUOTE]
Setting initial pitch prior to engine start
Installed the Sensenich propeller yesterday and used the Sensenich pitch tool #3 to rough adjust the rough pitch as suggested in 47-03 step 7.
Later, the steps on 47-07 were followed. A digital level was zeroed on the canopy rail per the instructions, then attached onto the TOOL-00002 which was hung on the leveled propeller blade at the prescribed location. In order to achieve the stated 71.4 degrees of pitch, the propeller blades needed to be moved quite a bit ? should have written it down, but think the pitch was somewhere in the mid 60?s.
My question is directed to those builders who first set the propeller?s rough pitch using the #3 Sensenich pitch tool as per step 7 on 47-03 ... then later adjusted to 71.4 degrees following the new procedure on page 47-07 using a digital level and the TOOL-00002 to set the pitch ? did you too discover the Sensenich #3 pitch tool is not even close to 71.4 degrees? Just wondering if I?ve done (or am doing) something wrong.
Happy Building,
Phantom30
Well Known Member
Installed the Sensenich propeller yesterday and used the Sensenich pitch tool #3 to rough adjust the rough pitch as suggested in 47-03 step 7.
Later, the steps on 47-07 were followed. A digital level was zeroed on the canopy rail per the instructions, then attached onto the TOOL-00002 which was hung on the leveled propeller blade at the prescribed location. In order to achieve the stated 71.4 degrees of pitch, the propeller blades needed to be moved quite a bit … should have written it down, but think the pitch was somewhere in the mid 60’s.
My question is directed to those builders who first set the propeller’s rough pitch using the #3 Sensenich pitch tool as per step 7 on 47-03 ... then later adjusted to 71.4 degrees following the new procedure on page 47-07 using a digital level and the TOOL-00002 to set the pitch … did you too discover the Sensenich #3 pitch tool is not even close to 71.4 degrees? Just wondering if I’ve done (or am doing) something wrong.
Happy Building,
Not sure how much I had to move mine, but both required more than a little. I managed to get both blades within 1/2 degree or less of each other. Plane flies per spec....and really smooth. Loving it!!
After talking to the head Phd researcher a few years back from Sensenich and he said they thought the pins would work well, but not as good as they hoped, but looked good on paper. They set their props by hand without the pins. The pins only get you in the ballpark and once removed the blades should be fine tuned individually by hand. You should be able to get a 3 blade prop within
.1 degree between all blades without much trouble. Leveling the plane isn't necessary because what ever you do to one blade will be the same to the other. Knowing an exact pitch number isn't important. Just set a static for around 4900-4950 rpm and then it needs to be flown to get the final pitch setting. 2 blades and 3 blades will have different settings and some times different static rpms. Bottom line is the final WOT rpm in flat and level flight.
For ground adjustable props that seems to be around 5600-5650.
Altitude considerations count:
The pitch for one owner at sea level that never goes over 2K ft. will be different than someone who lives in Mammoth, CA and flies all the time at 10-13K ft. Set your prop for your personal average altitude. This is not a one size fits all.
Thanks Ric ... after hearing you too needed to move the blades quite a bit after using the Sensenich tool I feel much better now.
Sink thanks for the input. I understand the ultimate goal is based on the numbers during engine run as you stated ... and to get there, each builder has variables unique to the region the aircraft is based. I was just concerned because the pitch pin was not even close and I was expecting the fine tuning to be within a degree or so.
Sink thanks for the input. I understand the ultimate goal is based on the numbers during engine run as you stated ... and to get there, each builder has variables unique to the region the aircraft is based. I was just concerned because the pitch pin was not even close and I was expecting the fine tuning to be within a degree or so.
constantin_w
I'm New Here
Hi guys, I know this post is dead old. However, I recently bought a flying RV-12 from 2013 (912 ULS) which unfortunately has various unpleasant surprises hidden under the canopy...
Working on the reduction of these issues, one topic is also propeller pitch. I read through the whole topic here and came along two different numbers which seem to contradict. When the aircraft is on the ground and we push the throttle all in (WOT), where should the rpm end up? I read 4950 and 5600 rpm (quite a difference). I am from northern Germany with almost no elevation of the field (300ft) and our flight altitude is most likely 5000ft and less in most cases. Which rpm is recommended?
Thanks for your help!
Piper J3
Well Known Member
Set prop pitch to attain ~ 5150 RPM WOT during initial climb out. This is the sweet spot that will provide 900ish FPM climb and Van’s spec for 114 KTAS at 5500 RPM. With this pitch, throttle position will be pulled out about 1” for 5500 RPM and will allow engine to go over redline if throttle is advance to WOT in cruise flight.
NinerBikes
Well Known Member
5150 rpm at 75 kts (Vy) climbout speed, on take off.
You'll see more rpms, maybe 5200-5220, if climbing out at 85 kts.
After engine was warmed up, I seem to recall seeing about 4980-5000 rpm static. Might want to tie the rear eyelet off to a trailer hitch on a heavier truck or something before trying that, if your brake pads aren't bedded in fully yet to the rotors, like on a new plane.
Last edited:
There are a number of articles about setting the prop pitch on a Rotax 912ULS. The static - on the ground WOT - to see if I was close to a flight setting pitch was 4900-5100 RPM. If your degrees of pitch gets this RPM on the ground then moved to the flight test and note the RPMs like others mentioned in prior posts.
The other bench mark I use is a pitch that while in level cruise, at WOT, will show 5650 RPM. Then a very small increase or decrease of pitch to try and achieve the 5650 RPM.
Rotax Owner has some of these articles.
The other bench mark I use is a pitch that while in level cruise, at WOT, will show 5650 RPM. Then a very small increase or decrease of pitch to try and achieve the 5650 RPM.
Rotax Owner has some of these articles.

