What's new
Van's Air Force

Don't miss anything! Register now for full access to the definitive RV support community.

Help-Step 1 of emp. kit

alpinelakespilot2000

Well Known Member
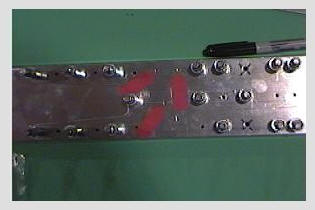
I just started the emp kit. Instruction one says to match drill all 1/8 holes on front spars (HS 902) and doubler (HS 907).

Right ABOVE where each of the attach angle brackets are to be placed, I have two holes that are prepunched in the doubler, but not on the spars. I know I am not supposed to drill through the bracket positioning holes (which are also prepunched on the doubler, but not the spar), but should I go ahead and drill through the spar where the two pre-existing holes are in the doubler ABOVE the angles. These holes are going to take the same size rivets as the adjacent ones, so it seems like I should go ahead and drill through the spar, but are the spar holes not pre-drilled for a reason? Did others' kits leave these two spar holes on each side unpunched as well?

Help PLEASE.

Thanks,
Steve
 
Same question

I too have the same problem but as it turns out I am having a friend over tomorrow to ck my progess and I am going to ask the same question.He has built a coulple of RV'S plus a A&P.So I will let you know the out come.This ought to be fun.
 
Short answer, yes, drill them. I believe that mine came that way as well and I could not figure it out. Once drilled and disassembled, however, I realized that if that hole were prepunched, the two halves would not have been exactly the same, necessitating a whole different piece for Van to have to manufacture. Once drilled, one definately becomes right and the other left! This picture may help...

http://home.comcast.net/~wcouv/My_Homepage_Files/Download/109_0969.JPG

Will
#91056
http://home.comcast.net/~wcouv/
 
Steve......

WOW! I started my 9-empennage yesterday, and had the EXACT same question. As I debated the issue for hours, I finally studied the plans close enough, and those holes do show rivets in them....so I went ahead and drilled them.

Another quick question though? On the two pieces that you have to build from aluminum angle (for the later final attachment to the fuse), did you build in the angled side on one side of each, as the plans show? I've seen numerous people post pics of this stage, and in every photo, it seems as though people just cut those pieces off square, and not angled? Perhaps it is just the angle of their cameras, but I was just wondering. It is a tricky little cut to make, especially keeping it intact when you come back and sand that angled area. Any input? Sorry I don't have the part numbers in my head, and the plans are out in my workshop....I'm sure you know which pieces I am thinking of.

Thanks!
 
Ya, I made mine with the angles in place. I think it's to give a bit more material for edge distance on the fuselage side of the angle. That way you can move the hole a touch if needed.

I remember back on this first "fabrication" job, thinking wow, i thought all the parts in this kit would be built for me! Now years later, it's just the first of many small things you get to build and adapt to the plane...

Keep going, you guys are doing great. It's neat to see the "next generation" of builders just starting their projects.
 
Thanks everyone, and thanks Will, for the photos.

I am not one to deviate @ all from plans, and as a matter of fact, I am perhaps too much of a perfectionist :eek:

One of them didn't turn out exact, and I think I will also be ordering up another piece of aluminum angle. By the way, Will, what did they charge you for another section of angle?

Thanks,
 
Yeah Drill'em

Tuesday - March 5, 2002

Here's a part of my web page while building the HS. I too was frustrated. In the end I drilled them. It works go ahead!

hs-907%20spar-question1a.jpg


We realized that after studying the plans, reading the instructions and watching the video tape that there was no mention of drilling holes in the spar to match the ones in the doubler plate (HS-907).


The plans didn't mention anything about this process though they are very explicit about a similar requirement in the VS.

The video tape was a little thin in this area (though still an excellent resource - I wouldn't want to be without it). The tape shows about 8 cleco's being put in the outer edge of the doubler with the appropriate drilling. Then all of the holes are shown completed and cleco'd and ready to be riveted. George does mention deburring and priming here. I'm just not sure about what to do with those 6 holes in total that are drilled in the doubler but not the spar.


Here's the holes marked that we're talking about (red arrows pointing to them). I'd sure hate to drill into something I wasn't suppose too. I know George, sooner or later you just drill it! :cool:
 
Attach angles

Gary,

I bought a 12" piece of angle stock from Van's and I think it was something like $10-$15 plus shipping. It allowed for several attempts until I got it right...but I am finally happy! I have pictures of all of my attempts together, but they are fairly embarassing! :eek:

Will
#91056 - Wings

http://home.comcast.net/~wcouv/
 
Back
Top