VAF POSTS & RV NEWS THAT CAUGHT MY EYE.....dr:
—————————————————————————
AOG Update …rph142
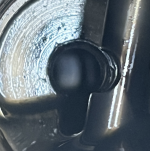
I drove out to Byron this afternoon to investigate the rear plug. The pic reveals the center pipe plug in the aft press fit plug is NOT installed. Oil should have a clear path to the sump. I took the front plug home for closer inspection. It looks to me like the dimple isn’t deep enough. I don’t believe there’s any concavity to the dimple, rather it looks like more of a flat spot.
 vansairforce.net
Outboard Aileron Hinge - Trimmed Rib Edge Distance
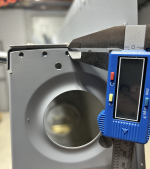
I believe I followed the instructions correctly when trimming the 2 outboard wing ribs, however when I went to attach the aileron hinge brackets and match drilled the #30 holes the edge distance seems quite small. When I used the calipers, it showed about 2.5 mm. To me, this seems quite close and I'm not sure I am happy with that little material. I have decided to make a couple of reinforcement type doublers that will be on the inside of the wing rib to provide a bit more strength. Curious in any others have found this while attaching the outboard hinge brakets.
 vansairforce.net
Milestone: First Engine Start …AdamB RV-10 video
 vansairforce.net
Cold Starting Technique - Figured Out!
Prior to buying my RV-7 this past year, it had been about 30 years since I last flew piston aircraft. It took me a while to realize but looking back, I probably had very few hours behind injected Lycoming engines. Back in the late 80's and early 90's, I had time in Cherokee 140-160-180's, Cessna 150-172's, Citabrias, Tomahawks, Seminoles, Dutchesses, etc. All of these have carb'd Lycomings. The Bonanzas, Barons, 182s, etc. I flew had injected Continentals. I flew other piston planes building my first 1500 hours but the point is, I had little time behind injected Lycomings. So it's no wonder I had no muscle memory for starting these engines.
When I acquired the RV-7, I did a lot of reading about P-Mags and researched starting procedures for injected Lycoming engines. I'd read numerous comments about P-Mag'd engines starting within a blade's rotation.
For whatever reason, the "priming" technique I'd settled on was to leave the throttle cracked, positioning the mixture full rich and running the fuel pump until nominal fuel flow (GPH) was indicated (and then cranking the starter with the throttle cracked and the mixture returned to full lean). While this worked, I definitely never saw the nearly instantaneous starts that P-Mag owners have reported.
After reading Paul's comment above, I decided to try running the fuel pump with the throttle fully open and the mixture full rich (and then cranking the starter with the throttle cracked and the mixture returned to full lean). Eureka! Now I agree with the P-mag owners who have written that their engines start nearly instantaneously! There's no question that running the fuel pump with the throttle fully open vs. slightly cracked has made a substantial difference in the starting performance of my engine (Aerosport IO-375).
I'm sure many of you are reading this and thinking "thanks for stating the obvious" but with decades since I last flew pistons, it certainly wasn't obvious to me.
Thanks to Paul for the good tip!
PS - "Cold" is a relative term. I'm in Florida, so I definitely haven't had to start the engine very much in actual cold weather conditions. I'm simply referring to starting the engine after it hasn't run for a day or more.
 vansairforce.net
Governor Cable Pics …David Paule -3B
Beginning to end….
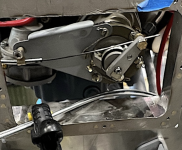
The governor cable leaves the cockpit through a hole in the left side of the footwell,
https://vansairforce.net/threads/rv-3b-daves-in-colorado.85658/page-15#post-1761984
Fuel tank and Fuel line questions
There are days building an RV-12iS when everything seems to be going smoothly and the plans all seem to make sense, and then there are days like today when I wonder if I can even understand simple instructions. I assembled my fuel tank out of order last summer in order to take advantage of the warm weather to work with the Proseal. Then SL-0070 came out and I waited until warm spring weather to work with the sealant and finish installing the inspection port. In between I made some of the fuel line components and finished all the fuselage steps that would allow me to test install the fuel tank as shown on the final page of section 26. It's there that I've begun to doubt my work.
First problem: The fuel tank seems to fit very tightly into the baggage compartment. It looks like the AK-42H rivets are as flush as I thought. The heads are slightly domed and bind on the F-01204J bulkhead flange caps. I'm not sure that's the real problem, though because once I managed to get the tank in place, I still had trouble getting the NAS1149F0332P washers in between the tank and the bulkhead flanges because the fit was so tight. Is this typical of how tight the tank fits? I think it would be a nightmare to remove the tank with the canopy in place with such a tight fit. It's certainly not possible to put it in and remove it without marking up the flange caps as far as I can tell. I fear I may not have countersunk the holes in the T-01225 flanges as much as I should have, which may mean rebuild the fuel tank.
Second problem: This is relatively minor, but there is no mention in the plans of dimpling the screw holes in the F-01229-1 and F-01229A panels but the underlying screw holes are dimpled. I assume this is an oversight? It's more confusing because where these panels are installed in section 38, AN526C832R6 screws are specified, but none were supplied with my kit. It seems like it would make more sense to dimple the holes and use AN507C832R8 screws (of which I have ample numbers) for this panel. I was willing to just go ahead with this plan, but have lost my nerve after seeing how difficult it is to properly place the fuel tank.
I'll mention my third concern, involving the F-12127K fuel line from the shutoff valve to the tank. I carefully measured this line according to the instructions and I think I was very successful in bending it to match the drawings, but it looks like it's very short. I couldn't hook it up to the fuel tank because I had left the pressure testing fittings on the fuel tank when I test installed it thinking the job was going to be easy. But it seems like it is almost a half inch short. I've confirmed that the drawings are to the proper scale, so I didn't mis-measure the bends. I'll recheck and tweak the bends or remake the part when I next install the fuel tank, but it left me wondering in general what the tolerances are on the rigid fuel lines? How much are you able to manipulate the lines for the final installation?
Would someone be willing to share their experiences with these parts?
 vansairforce.net
Plenum to cowl clearance
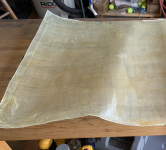
How much space should there be from the plenum to the cowl?
My plenum top was molded using the cowl so it mirrors the cowl curves. Once I have proper clearance, I’ll finish building the plenum.
https://vansairforce.net/threads/plenum-to-cowl-clearance.226156/
Harness Routing …BAR PIREP (14)
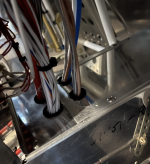
Larry, I struggled to come up with a way to get all my wires, antennas and pito and static lines up from the tunnel to behind the panel. I ended up putting snap bushings in the forward tunnel, cover and running all of my Iines up to those snap bushings. Ended up being four total snap bushings for everything. I think it worked out pretty good and I don’t have any worries about anything chafing.
https://vansairforce.net/threads/harness-routing-through-console.226141/#post-1761989
OFF TOPIC:

PS: Older issues of the ‘VAF News’ can be found at:
 www.vansairforce.net
—————————————————————————
AOG Update …rph142
I drove out to Byron this afternoon to investigate the rear plug. The pic reveals the center pipe plug in the aft press fit plug is NOT installed. Oil should have a clear path to the sump. I took the front plug home for closer inspection. It looks to me like the dimple isn’t deep enough. I don’t believe there’s any concavity to the dimple, rather it looks like more of a flat spot.
AOG Byron Airport
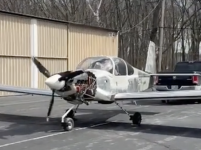
I stopped at Byron airport C83 this afternoon for fuel and immediately after takeoff the windscreen became covered in oil. I lost forward vis in just few seconds. I immediately turned back and landed while monitoring oil pressure. Thankfully the pressure never dipped below 60psi. The plane is...

Outboard Aileron Hinge - Trimmed Rib Edge Distance
I believe I followed the instructions correctly when trimming the 2 outboard wing ribs, however when I went to attach the aileron hinge brackets and match drilled the #30 holes the edge distance seems quite small. When I used the calipers, it showed about 2.5 mm. To me, this seems quite close and I'm not sure I am happy with that little material. I have decided to make a couple of reinforcement type doublers that will be on the inside of the wing rib to provide a bit more strength. Curious in any others have found this while attaching the outboard hinge brakets.
Outboard Aileron Hinge - Trimmed Rib Edge Distance
I believe I followed the instructions correctly when trimming the 2 outboard wing ribs, however when I went to attach the aileron hinge brackets and match drilled the #30 holes the edge distance seems quite small. When I used the calipers, it showed about 2.5 mm. To me, this seems quite close...

Milestone: First Engine Start …AdamB RV-10 video
RV-10 #41687 - N810AB
Today I took delivery of my RV-10 emp kit. Looking forward to getting through the inventory and getting started. And the fun begins!

Cold Starting Technique - Figured Out!
Prior to buying my RV-7 this past year, it had been about 30 years since I last flew piston aircraft. It took me a while to realize but looking back, I probably had very few hours behind injected Lycoming engines. Back in the late 80's and early 90's, I had time in Cherokee 140-160-180's, Cessna 150-172's, Citabrias, Tomahawks, Seminoles, Dutchesses, etc. All of these have carb'd Lycomings. The Bonanzas, Barons, 182s, etc. I flew had injected Continentals. I flew other piston planes building my first 1500 hours but the point is, I had little time behind injected Lycomings. So it's no wonder I had no muscle memory for starting these engines.
When I acquired the RV-7, I did a lot of reading about P-Mags and researched starting procedures for injected Lycoming engines. I'd read numerous comments about P-Mag'd engines starting within a blade's rotation.
For whatever reason, the "priming" technique I'd settled on was to leave the throttle cracked, positioning the mixture full rich and running the fuel pump until nominal fuel flow (GPH) was indicated (and then cranking the starter with the throttle cracked and the mixture returned to full lean). While this worked, I definitely never saw the nearly instantaneous starts that P-Mag owners have reported.
After reading Paul's comment above, I decided to try running the fuel pump with the throttle fully open and the mixture full rich (and then cranking the starter with the throttle cracked and the mixture returned to full lean). Eureka! Now I agree with the P-mag owners who have written that their engines start nearly instantaneously! There's no question that running the fuel pump with the throttle fully open vs. slightly cracked has made a substantial difference in the starting performance of my engine (Aerosport IO-375).
I'm sure many of you are reading this and thinking "thanks for stating the obvious" but with decades since I last flew pistons, it certainly wasn't obvious to me.
Thanks to Paul for the good tip!
PS - "Cold" is a relative term. I'm in Florida, so I definitely haven't had to start the engine very much in actual cold weather conditions. I'm simply referring to starting the engine after it hasn't run for a day or more.
Cold Starting Technique - Figured Out!
We’ve got four Lycomings in our hangar right now, and they all have slightly different priming requirements for instance. Basically though, your steps 1-6 are “squirt some fuel into the cylinders”. My only thought is that if the throttle is only cracked when you squirt fuel, then you aren’t...
Governor Cable Pics …David Paule -3B
Beginning to end….
The governor cable leaves the cockpit through a hole in the left side of the footwell,
https://vansairforce.net/threads/rv-3b-daves-in-colorado.85658/page-15#post-1761984

Fuel tank and Fuel line questions
There are days building an RV-12iS when everything seems to be going smoothly and the plans all seem to make sense, and then there are days like today when I wonder if I can even understand simple instructions. I assembled my fuel tank out of order last summer in order to take advantage of the warm weather to work with the Proseal. Then SL-0070 came out and I waited until warm spring weather to work with the sealant and finish installing the inspection port. In between I made some of the fuel line components and finished all the fuselage steps that would allow me to test install the fuel tank as shown on the final page of section 26. It's there that I've begun to doubt my work.
First problem: The fuel tank seems to fit very tightly into the baggage compartment. It looks like the AK-42H rivets are as flush as I thought. The heads are slightly domed and bind on the F-01204J bulkhead flange caps. I'm not sure that's the real problem, though because once I managed to get the tank in place, I still had trouble getting the NAS1149F0332P washers in between the tank and the bulkhead flanges because the fit was so tight. Is this typical of how tight the tank fits? I think it would be a nightmare to remove the tank with the canopy in place with such a tight fit. It's certainly not possible to put it in and remove it without marking up the flange caps as far as I can tell. I fear I may not have countersunk the holes in the T-01225 flanges as much as I should have, which may mean rebuild the fuel tank.
Second problem: This is relatively minor, but there is no mention in the plans of dimpling the screw holes in the F-01229-1 and F-01229A panels but the underlying screw holes are dimpled. I assume this is an oversight? It's more confusing because where these panels are installed in section 38, AN526C832R6 screws are specified, but none were supplied with my kit. It seems like it would make more sense to dimple the holes and use AN507C832R8 screws (of which I have ample numbers) for this panel. I was willing to just go ahead with this plan, but have lost my nerve after seeing how difficult it is to properly place the fuel tank.
I'll mention my third concern, involving the F-12127K fuel line from the shutoff valve to the tank. I carefully measured this line according to the instructions and I think I was very successful in bending it to match the drawings, but it looks like it's very short. I couldn't hook it up to the fuel tank because I had left the pressure testing fittings on the fuel tank when I test installed it thinking the job was going to be easy. But it seems like it is almost a half inch short. I've confirmed that the drawings are to the proper scale, so I didn't mis-measure the bends. I'll recheck and tweak the bends or remake the part when I next install the fuel tank, but it left me wondering in general what the tolerances are on the rigid fuel lines? How much are you able to manipulate the lines for the final installation?
Would someone be willing to share their experiences with these parts?
Fuel tank and Fuel line questions
There are days building an RV-12iS when everything seems to be going smoothly and the plans all seem to make sense, and then there are days like today when I wonder if I can even understand simple instructions. I assembled my fuel tank out of order last summer in order to take advantage of the...
Plenum to cowl clearance
How much space should there be from the plenum to the cowl?
My plenum top was molded using the cowl so it mirrors the cowl curves. Once I have proper clearance, I’ll finish building the plenum.
https://vansairforce.net/threads/plenum-to-cowl-clearance.226156/

Harness Routing …BAR PIREP (14)
Larry, I struggled to come up with a way to get all my wires, antennas and pito and static lines up from the tunnel to behind the panel. I ended up putting snap bushings in the forward tunnel, cover and running all of my Iines up to those snap bushings. Ended up being four total snap bushings for everything. I think it worked out pretty good and I don’t have any worries about anything chafing.
https://vansairforce.net/threads/harness-routing-through-console.226141/#post-1761989

OFF TOPIC:

PS: Older issues of the ‘VAF News’ can be found at:
Doug's Area ....The VAF News & my flying resume.
Pushed out every now and then.

