As long as there is no wind, you’re ok.That's lucky. It all looks good in the photos.
Plenty of dust to deal with here, but we're on a farm in the midst of a very dry season.

As long as there is no wind, you’re ok.That's lucky. It all looks good in the photos.
Plenty of dust to deal with here, but we're on a farm in the midst of a very dry season.
Cowl Bodywork Completed
Got all the bodywork done on the cowls with the side pins hidden under the RV14A plaque. Everything fits well and the pins and Skybolts all go in with no issues.
View attachment 31681
I used the same pin hinge covers as these on my RV7. What did you do with the ends of the hinge pins behind the covers? Thanks Kloot
Attached the baffles.
View attachment 31685
View attachment 31684
Started fitting the snorkel. It was too wide by 3/4". So, I cut it in half and took a section out in the middle and epoxied/floxed it back together. After some bodywork, it looks pretty good. Primed it today and will paint it tomorrow.
View attachment 31683
Thank you Scott. That’s what I’m going to do. Didn’t know if there was a better mousetrap.Kloot,
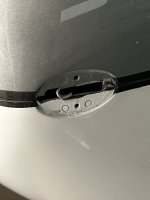
I bent the pin around to form a loop. This allows pulling it out easier.
Scott

 www.malcotools.com
Here's what mine looks like with the trick cover removed.Thank you Scott. That’s what I’m going to do. Didn’t know if there was a better mousetrap.