What's new
Van's Air Force

Don't miss anything! Register now for full access to the definitive RV support community.

Under-compartment for baggage area

kirkbauer

Well Known Member
I want to put a compartment under the baggage area for tools -- that way I always have them with me but they aren't in the way. My plan is to put it between the left tunnel rib and the next rib towards the baggage door. Here is the area (note that this shows the right floor panel but I'd be modifying the left floor panel which is closer to the door).
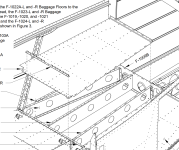
unnamed.png

A couple of notes. I don't plan to access this very often so I didn't want to mess with a hinge. The RV-10 is not aerobatic so I'm not worried about the lid having to withstand a lot of vertical force. But I do want to make sure the lid won't get damaged from a suitcase or similar being placed on top of it. I plan to line the entire compartment with foam (like a storage box) so that nothing can move around under the floor skin. I will also have carpet over this -- I will need to pull the carpet back to access the compartment. Therefore I think it is OK if the compartment is not perfectly flush.

Here is my plan so far and I'm looking for feedback:
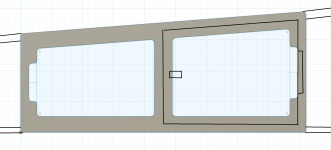
Capture.PNG
They gray piece will be a 0.05-thick aluminum backing plate that would go under the floor skin. At the top and bottom I plan to rivet it between the standard floor and the rib flanges. This will make the floor just a little bit uneven (by 0.05"), but I'm thinking with carpet it won't be noticeable. Note that I drew the flanges of the ribs to the left and right of the piece. The piece will not go all the way to the ends of the compartment, instead it will end approximately 3-4" prior to the front and back of the area. I will flush rivet the edges on the left and right of the drawing to the floor above.

I hand-drew the lid on the right side showing what one of the two lids would look like. Each lid will have a flush latch on the inside and a "under tab" on the outside. The tab will fit under the backing plate as shown in the picture. Most of the lid will be resting on the backing plate, except where the tab slides in.

This is my first attempt at any major modifications and I wanted feedback.
  • I know the floor provides some structural support for the ribs and I wanted to make sure I don't compromise that. That's why I have this solid backing piece that rivets to the ribs and has the center support. I may want to put some additional strength under that center support that divides the two compartments.
  • I definitely need to reinforce the lids in some way. In the plans, there are some stiffeners under the floor in this area, but I don't think that's enough for this lid. Because the lid is not attached anywhere it won't have any tensile strength.
Any suggestions on reinforcing the lid? Build a frame out of angle iron? Use foam and fiberglass to build a fiberglass sandwich underneath?
 
Good point. I was thinking about spraying the foam with PlastiDip not sure if that would help with potential for moisture?
Moisture will ALWAYS find a way in, and any coatings will make it harder for moisture to get out. You could use a fully close-celled foam like polypropylene often used in packaging.

For all the trouble you are going to, it would make sense to put a piano hinge on it, and flush latch.

Structurally, I would be more comfortable if the doubler was wider, and riveted to the original skin around the perimeter as you said.
Using the original hole pattern for the floor skin to the ribs would be fine. Along the front and back edges, if those aren't at a bulkhead or rib, put a piece of light angle on the back, something like 0.032 x 1" x 1".
 
Moisture will ALWAYS find a way in, and any coatings will make it harder for moisture to get out. You could use a fully close-celled foam like polypropylene often used in packaging.

I guess I need to do some research on that. I hadn't considered moisture getting in there. Is it as simple as keeping desiccant in there or could it be more substantial than that? Are we talking about water getting in from underneath during flight? I ask because I did apply proseal on all of the belly skin seams.
For all the trouble you are going to, it would make sense to put a piano hinge on it, and flush latch.

I was thinking I didn't want the hinge to be sticking up, nor did I want to spend the money and weight for a flush hinge.

Structurally, I would be more comfortable if the doubler was wider, and riveted to the original skin around the perimeter as you said.
Using the original hole pattern for the floor skin to the ribs would be fine. Along the front and back edges, if those aren't at a bulkhead or rib, put a piece of light angle on the back, something like 0.032 x 1" x 1".

Yeah, exactly. In my drawing, the top and bottom edges will be riveted between the spar and the original floor of the cargo area. For the fore and aft edges (far left and far right in my drawing) I was going to just rivet to the floor but was considering some sort of structure under there.
 
Quite honestly, I don’t think this is a great idea. As others have said, gluing insulation onto the skin is an open invitation to trapping condensation and eventual corrosion. Remember the structure created by the wing skin, ribs, and floor creates a very strong box-like structure. Careful engineering is needed to be sure to retain the full strength. Finally, having a small tool box gives you some loading flexibility. Two men up front? Tool box aft end of baggage area. Four adults plus bags? May need to move toolbox forward to under the pilot’s legs, to keep cg in limits.
Edit: plus, weight on the baggage floor tends to load the rivets in shear, where they are very strong. Weight on the inside of the external skin will load the rivets, at least partially, in tension, where they are not quite as strong. This analysis is beyond my capability.
 
Last edited:
I have one of the SkyDesigns storage containers installed in my 10 baggage area.
It’s a well thought out design that has not only a doubler for the floor cutout but an actual box as well. So a triple layer around the cutout.
It holds a quart of oil, a rag and my wheel chocks. Not much else.
I think there’s a real trade off between usability/volume and strength here which is probably quite complex. As a minimum I’d study Ken’s design closely.

As for the water/foam, 2 things I can guarantee. 1 - it will get wet in there at some stage. 2 any kind of layer stuck to the skin will trap it, with potentially destructive consequences. If you have the ability to remove the foal easily this can be mitigated but you’d need to remember.

I left my 10 outside for a night without a cover. It rained all night and the amount of water that ran down the top and got past the baggage door seal was an eye opener.
It then migrates down and forward and ends up under the pax seats and baggage floor before draining.

IMG_0541.jpegIMG_0611.jpeg
 
The basic idea is not a bad one at all however there are some improvements you could make to strengthen things up. It depends how carried away you want to get as to how you go about it. As Mr. Smith said - the doubler under the floor skin needs to be wider and I would place a double row of rivets around the perimeter.

Check out AC43-13 for some ideas on how to go about it.

PM sent.
 
I put a compartment in there. Doubler, double row of rivets. I used a hinged door. I used press to release latches. I would not do that again (the latches). I used locking top Tupperware boxes to contain anything that goes in there. I used a piece of 3/8” closed cell foam on the floor. It is not glued in a can be easily removed.

I used 025 for the door reinforced with 3/4” 032 angle. I would use at least 032 for the door.

So far I keep tie down ropes, some tools, and some spare parts there. It does get them off the baggage floor and the lock top boxes make sure nothing goes through the tunnel lightening holes.

I wish there was a tow bar that would fit in there. The bogi bar is great but it is inconvenient in the baggage area with three roll boards.
 
I have one of the SkyDesigns storage containers installed in my 10 baggage area.
It’s a well thought out design that has not only a doubler for the floor cutout but an actual box as well. So a triple layer around the cutout.
It holds a quart of oil, a rag and my wheel chocks. Not much else.
I think there’s a real trade off between usability/volume and strength here which is probably quite complex. As a minimum I’d study Ken’s design closely.

As for the water/foam, 2 things I can guarantee. 1 - it will get wet in there at some stage. 2 any kind of layer stuck to the skin will trap it, with potentially destructive consequences. If you have the ability to remove the foal easily this can be mitigated but you’d need to remember.

I left my 10 outside for a night without a cover. It rained all night and the amount of water that ran down the top and got past the baggage door seal was an eye opener.
It then migrates down and forward and ends up under the pax seats and baggage floor before draining.

View attachment 69262View attachment 69261
As usual, Ken comes up with a really nicely thought-out and finished package. In the time the OP would spend making pieces and parts, this kit could be installed and finished up.
 
As usual, Ken comes up with a really nicely thought-out and finished package. In the time the OP would spend making pieces and parts, this kit could be installed and finished up.
Plus the documentation is top notch as well.

The other thing I forgot to mention - as with most mods - its much easier to do it while building than as an afterthought!
 
Quite honestly, I don’t think this is a great idea. As others have said, gluing insulation onto the skin is an open invitation to trapping condensation and eventual corrosion.
Note I was never planning on gluing the foam -- it would just be in there, tight enough that it can't move around much.

Finally, having a small tool box gives you some loading flexibility. Two men up front? Tool box aft end of baggage area. Four adults plus bags? May need to move toolbox forward to under the pilot’s legs, to keep cg in limits.

The tools I plan to put in there weigh less than 2lb so I'm not worried about moving them.

As usual, Ken comes up with a really nicely thought-out and finished package. In the time the OP would spend making pieces and parts, this kit could be installed and finished up.

I'd love to buy that package, but as far as I can tell it is not available. Am I missing something?
 
Thanks Richard for posting pics of your RV-10 storage container install. Thank you Steve for your favorable comments.

This product was developed at the suggestion/encouragement of one of our RV-14 customers but, wanting to get the most return on my development effort, I figured it would be wise to design it to fit the RV-10 as well. Many RV-10 pilots routinely carry one or two 25 lb bags of shot in their baggage compartment as this makes the airplane more pleasant to fly when lightly loaded. In a sudden deceleration - think crash - those innocent looking bags of shot become powerful projectiles. Yikes! So a big part of the design is to be a place where shot-bags can be restrained and this became the "defining" load-case. Otherwise, they are good for those loose items - chocks, oil, rags, small tool kit, etc. - that we all seem to have floating around in our baggage compartments.

The design-intent with these under-floor storage bins was to make them as large as practical without requiring modification to any part other than the necessary cut-out in the baggage floor. That design-intent was mostly achieved except on RV-14 where a small "mouse-hole" had to be added to one of the baggage ribs to accommodate the camloc latch.

We're currently procuring certain parts for these kits but, unless you need something shipped today, they are very much available :cool:
 
Back
Top