claycookiemonster
Well Known Member
Firstly, the video (easily available on You Tube) is wonderful! No hedging my appreciation for seeing before doing. I watched and rehearsed several times before doing it.
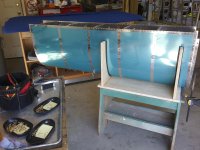
Secondly, just an FYI, I was finishing up project tanks which were completed up to the baffle installation. I attempted to "leak test" just the nose of both tanks before the baffle installation by resting them in the assembly cradles, surrounded by brown craft paper with water up to the vent line. The water was dyed red to make leaks more obvious, but none were found. Not much hydrostatic "head" but better than nothing.
I used 50cc veterinary syringes to hold the mixed Proseal. They are fine, and the exit of the nozzle is 3/16ths, so - perfect. They are a bit cumbersome to fill, and then initially really a two hand job to squeeze a bead out of them. I found that each tank baffle installation could be done in less than 90 cc of Proseal. So, I mixed up 1 1/2 syringes and got busy.
Be ready: have your garbage bags or bins open and ready so you can throw sticky things adhering to you there without having to hold anything else. Have boxes of rubber gloves opened and ready. Have several rolls of paper towels ready. Have all the popsicle sticks or tongue depressors ready. I'd recommend a small open jar of MEK because your squeezer dies will get sticky and dropping them in MEK will help. Set the music and put your phone away. Go to the bathroom. I found that each baffle installation from start to finish took about 3 hours. Forewarned.
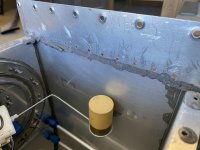
The initial move of laying down the perimeter bead and dropping the baffle on it was fine. Just as the video shows. All parts were cleaned ferociously first and all points where Proseal might want to adhere to aluminum were scratched up with Scotch Brite Pads first.
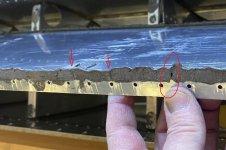
The next step was challenging. The video talks about "twirling" the AD-41H closed-end rivets into the holes with a bit of Proseal on the shafts to create a seal.My frustration was that they didn't actually easily "twirl" into the holes, despite clecoes in all other holes from baffle to rib. These rivets are NOT tapered, but rather sharp on the edges, so they do not help aligning rib to baffle. What do you do? The baffle has been dropped in place. It's aligned by other clecoes, and yet the AD-41H's (with a coating of Proseal) do NOT want to go easily into the hole. I'm not sure if Van's reamed or relived these holes prior to installation. All I can say is that some FORCE was required via the rivet puller to get them down into the holes. It worked, but I'm going to lay a dome over these rivet heads as I finish up. Because.
The AN-470 AD-4-4 solid rivets on the outer ribs generally went well, though I think the previous owner of my project did not drill out these to full size. Did you remember to do this? What's one more #30 drill covered with Proseal?
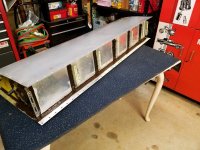
At this point, with pull rivets on the baffle to rib, and solid rivets on the outer rib to baffle, I turned the tanks baffle-side down to encourage the Proseal to ooze down. It's a bit of a PITA to rivet upside down, but laying the tanks across the cradle (actually both cradles) allowed me to get the skin-to-baffle 426 AD 3-3.5 rivets while imagining the sealant flowing down perfectly to cover all sins. (Leak testing not done yet. Stay tuned)
Seriously, other than the unexpected drama of the closed end rivets not wanting to easily "twirl" into their homes, all went well. Daytime temps here in UT are mid 60's, so I'm giving the baffles a week to get to know their new neighbors.
Tomorrow will be "Z" brackets, and I'm anticipating the same problems with the longer AD 44-H rivets to attach the "Z" brackets to the baffle. I do not know what help that anticipation will be, other than to minimize the nervous breakdown I experienced yesterday.
After that will be access plates and senders. Yes, I know: "twirl" the screws through Proseal so the threads are sealed too.
Tanks. Tanks a lot.
Secondly, just an FYI, I was finishing up project tanks which were completed up to the baffle installation. I attempted to "leak test" just the nose of both tanks before the baffle installation by resting them in the assembly cradles, surrounded by brown craft paper with water up to the vent line. The water was dyed red to make leaks more obvious, but none were found. Not much hydrostatic "head" but better than nothing.
I used 50cc veterinary syringes to hold the mixed Proseal. They are fine, and the exit of the nozzle is 3/16ths, so - perfect. They are a bit cumbersome to fill, and then initially really a two hand job to squeeze a bead out of them. I found that each tank baffle installation could be done in less than 90 cc of Proseal. So, I mixed up 1 1/2 syringes and got busy.
Be ready: have your garbage bags or bins open and ready so you can throw sticky things adhering to you there without having to hold anything else. Have boxes of rubber gloves opened and ready. Have several rolls of paper towels ready. Have all the popsicle sticks or tongue depressors ready. I'd recommend a small open jar of MEK because your squeezer dies will get sticky and dropping them in MEK will help. Set the music and put your phone away. Go to the bathroom. I found that each baffle installation from start to finish took about 3 hours. Forewarned.
The initial move of laying down the perimeter bead and dropping the baffle on it was fine. Just as the video shows. All parts were cleaned ferociously first and all points where Proseal might want to adhere to aluminum were scratched up with Scotch Brite Pads first.
The next step was challenging. The video talks about "twirling" the AD-41H closed-end rivets into the holes with a bit of Proseal on the shafts to create a seal.My frustration was that they didn't actually easily "twirl" into the holes, despite clecoes in all other holes from baffle to rib. These rivets are NOT tapered, but rather sharp on the edges, so they do not help aligning rib to baffle. What do you do? The baffle has been dropped in place. It's aligned by other clecoes, and yet the AD-41H's (with a coating of Proseal) do NOT want to go easily into the hole. I'm not sure if Van's reamed or relived these holes prior to installation. All I can say is that some FORCE was required via the rivet puller to get them down into the holes. It worked, but I'm going to lay a dome over these rivet heads as I finish up. Because.
The AN-470 AD-4-4 solid rivets on the outer ribs generally went well, though I think the previous owner of my project did not drill out these to full size. Did you remember to do this? What's one more #30 drill covered with Proseal?
At this point, with pull rivets on the baffle to rib, and solid rivets on the outer rib to baffle, I turned the tanks baffle-side down to encourage the Proseal to ooze down. It's a bit of a PITA to rivet upside down, but laying the tanks across the cradle (actually both cradles) allowed me to get the skin-to-baffle 426 AD 3-3.5 rivets while imagining the sealant flowing down perfectly to cover all sins. (Leak testing not done yet. Stay tuned)
Seriously, other than the unexpected drama of the closed end rivets not wanting to easily "twirl" into their homes, all went well. Daytime temps here in UT are mid 60's, so I'm giving the baffles a week to get to know their new neighbors.
Tomorrow will be "Z" brackets, and I'm anticipating the same problems with the longer AD 44-H rivets to attach the "Z" brackets to the baffle. I do not know what help that anticipation will be, other than to minimize the nervous breakdown I experienced yesterday.
After that will be access plates and senders. Yes, I know: "twirl" the screws through Proseal so the threads are sealed too.
Tanks. Tanks a lot.