Hi Folks !!
I post this here because it will be the same answer for the -6, -7 and -9…….probably -14 as well.
I am helping to put a tip up canopy on a -9 which was formerly riveted on, but after a mishap (aircraft is in a rebuild process) the owner wants to glue it on this time using Sikaflex.
On my -8 it was straight forward and no structure was overlapping the canopy.
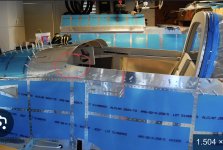
On the tip up canopies, at least at the -9 i am working on, there is a small overlapping „flap“ where the canopy sits in.
When using Sikaflex, i wouldn‘t want any fix structure to be in contact with the canopy, i‘d rather have a bed of Sikaflex which allows the canopy to ……. flex/float….move/stretch a bit.
Please see attached picture to know what i mean.
How did you Sika your canopy on? Did you cut of those „flaps“ or placed the canopy in it??
Thanks for your help!
Mit Fliegergruss…
I post this here because it will be the same answer for the -6, -7 and -9…….probably -14 as well.
I am helping to put a tip up canopy on a -9 which was formerly riveted on, but after a mishap (aircraft is in a rebuild process) the owner wants to glue it on this time using Sikaflex.
On my -8 it was straight forward and no structure was overlapping the canopy.
On the tip up canopies, at least at the -9 i am working on, there is a small overlapping „flap“ where the canopy sits in.
When using Sikaflex, i wouldn‘t want any fix structure to be in contact with the canopy, i‘d rather have a bed of Sikaflex which allows the canopy to ……. flex/float….move/stretch a bit.
Please see attached picture to know what i mean.
How did you Sika your canopy on? Did you cut of those „flaps“ or placed the canopy in it??
Thanks for your help!
Mit Fliegergruss…