PaulvS

Well Known Member
This is about how to spray paint the fuselage and the belly and what painting sequence to follow so as to try and avoid orange peel and dry spots by maintaining a wet edge.

For comparison, if painting a car then the painter might start at the front quarter and spray up and over the hood and down the other quarter. Then move up the pillars and spray the roof from left to right. Next would be the doors on the one side and then the other. Finally the rear would be painted from the one quarter and over the trunk and back to the other rear quarter. This sequence keeps a wet edge open so that fresh paint is sprayed onto an overlap surface that is still wet and helps the overspray to blend in.

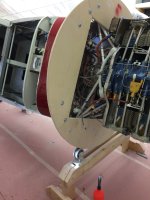
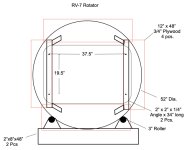
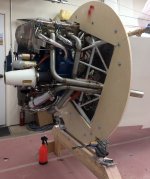
The fuselage looks more complicated to paint than a car because of the belly. Some painters put the fuselage on a rotisserie but if that is not feasible (engine is already mounted) then what is the best sequence to spray the belly along with the other fuselage panels? Any insights and tips would be appreciated!
 
Here is what I do. Your mileage may vary.

I start on the left side at the middle of the wing. I paint forward to the fire wall. The cowlings are removed. Then I switch to the right side and paint from the firewall to the middle of the wing. As I’m painting on the sides I spray just under the bottom corner a little bit. Now I switch back to the left side and paint from the middle of the wing to a spot that is easy to remember where I stopped. Usually the aft edge of the rear window. Switch back to the right side and paint from the middle of the wing to the leading edge of the horizontal stabilizer. Now back to the left and pick up where I left off and finish that side. One last trip to the right and finish out that side. The vertical is painted but the horizontal is covered and painted at another time. Now that the top and sides are done I jump on a creeper and paint the belly starting at the firewall and work my way aft.

This kind of seems like a lot of moving around but it really isn’t. 10 to 15 minutes is all this takes.
 
What's best? Heck if I know. ;-)

What worked for me was to mask the fuselage and spray the top and sides in one session, then the belly a day or two later. Say you take that approach. You mask the belly to the skin lines (actually leave the last inch of the next skin unmasked). You spray the top and sides of the airplane, plus that 1" section of the belly skins you left unmasked. As I recall, best practice is to spray the sides first, then the top of the fuselage towards the end of each coat to minimize overspray problems. A day or two later, reverse the masking, but leave that 1" section that has some paint on it visible. You sand that area (knocking down any tape/paint ridges) to give good adhesion, and then spray the belly. With the belly coat, you're spraying right up to a skin line, so the transition will not create a noticeable paint line.
 
Last edited:
This is about how to spray paint the fuselage and the belly and what painting sequence to follow so as to try and avoid orange peel and dry spots by maintaining a wet edge.

For comparison, if painting a car then the painter might start at the front quarter and spray up and over the hood and down the other quarter. Then move up the pillars and spray the roof from left to right. Next would be the doors on the one side and then the other. Finally the rear would be painted from the one quarter and over the trunk and back to the other rear quarter. This sequence keeps a wet edge open so that fresh paint is sprayed onto an overlap surface that is still wet and helps the overspray to blend in.

The fuselage looks more complicated to paint than a car because of the belly. Some painters put the fuselage on a rotisserie but if that is not feasible (engine is already mounted) then what is the best sequence to spray the belly along with the other fuselage panels? Any insights and tips would be appreciated!
I dont think you can avoid dry spots and taped at skin overlaps may bring other undesirable appearance.
Another option to consider is spray the whole thing in one session for good paint bonding. Spray the overlaps heavy so you can cut and buff where/if needed.
 
I've just begun the painting process on my -9A before final assembly using single stage urethane paint. It's much easier to do with the wings and control surfaces off the plane IMHO. Wings can be set on saw horses using PVC pipes in the rib lightening holes spraying one side, then flipping over and doing the other. All control surfaces along with cowling and fairings also painted on homemade painting props. Fuselage bottom painted first, then the sides. The paint I am using instructions specify additional coats may be applied direct without additional prep if done within 16 hours. Accent stripes will be taped off and painted before that 16 hours. The only thing I will have to paint on my back will be the fuselage bottom.
Depending on the paint line ridge from tape off, I may or may not add a coat of clear top coat to smooth them out. I don't want to cut and buff for fear of going too far and having to repaint those areas making things look worse. I am not a pro but invested in good painting equipment. I am perfectly content with a 10 footer paint job.
 
I wish I would have had my plane raised up higher off the floor when I painted the fuselage/belly. Ten inches would have been nice. I had the tail raised some but by the time you are painting the forward area of the belly it’s difficult to keep the paint gun upright and spray upward. You could use some car ramps or blocks of wood under the wheels. You might need to use a step stool for painting the top side but that wouldn’t been problem.

A helper in the paint booth would really help too, to move the hose around and whatever you need to keep moving. Someone moving a light around so you can see well on the belly would really be nice. Have game plan and understanding with your helper so they know what to do and keep talking to a minute because painting takes some concentration.

P.S.
I should have loaded up on some Tylenol because by back was killing me rolling around under the plane…
 
When I was painting my -8 at home, I raised the tail up like in normal flight level. I used the cup liner system that allows me to paint with the cup in the inverted position. I was laying on the creepy crawler and sprayed from the bottom. I had the respirator on but I also protect my face with the full-face shield, because the overspray will come down on your face. The most difficult place is at the landing gear because of the lower clearance, compare to the tail section.
 
If you need a tail dragger higher off the ground to paint, chock the wheels and raise the tail as high as you need. I put mine at a steep nose down attitude and just walked up under it. There is a tipping point, so secure it so it doesn’t nose over.
 
I recommend raising the tail high as you can get it. If the engine is installed, watch out for the tip over point as another poster mentioned. Also use a good quality paint. If it is single stage, thin it more than the directions say. The paint will flow out better thus minimizing orange peel and you will not have dry spots. You just have to watch for runs and sags in the paint. Lastly, I regret using white paint on the belly.