ronrapp

Well Known Member
Patron
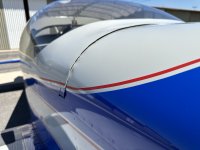
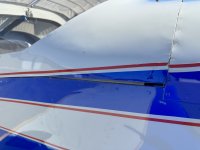
The other day I had the right side canopy seal get partially sucked out into the breeze during a flight. I figured I just needed a new seal.

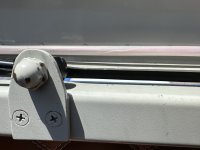
But after looking into it further, I noticed that a gap develops between the canopy seal and the fuselage in flight. The airflow over the canopy seems to create lift. But this gap happen on the left side of the canopy, only on the right side. Both sides are well sealed on the ground, but once airborne that gap develops only on the right.

I've never been happy with how the canopy fits, especially on that side. FWIW, I did not build the aircraft.

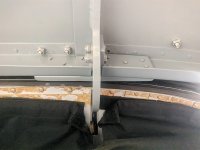
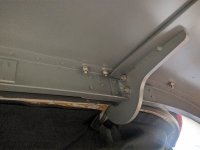
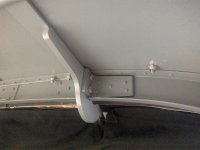
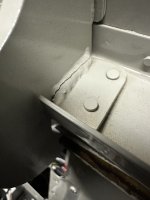
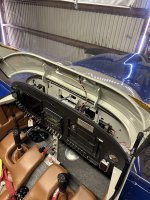
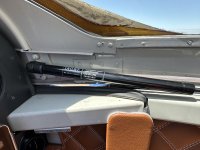
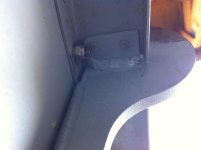
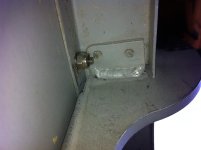
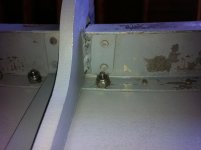
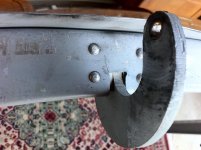
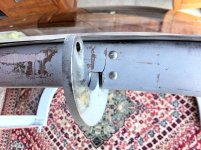
Anyway, after searching the VAF forums, I read of a -6 owner who found a crack in the canopy frame where the hinge arm is welded to it. So I inspected my own airplane in that area and sure enough, found the weld was cracked.

I talked to my mechanic about it, and we're not sure quite how to proceed. I also emailed Savvy, and the ticket was handed off to someone who owns an RV and also maintains a couple of them, but his best suggestion was to contact Van's and see what they say. I did email them but haven't heard back. I assume they're busy with the LCP issue.

In the previously mentioned VAF thread, there was discussion about having it re-welded, but there was concern about applying heat that close to the plexiglas. How much would be transmitted to the glass through the frame, etc. There was also mention about replacing the weld with a stiffener or bracket.

I also noticed that the thread is 12 years old, so I'm not sure what experiences and repair methods have been seen by the proverbial brain trust since that time.

I'd welcome any ideas on how to:

a) repair the hinge weld
b) improve the fit of the canopy
c) get the right side to stop lifting in flight

Many thanks,

--Ron
 

Attachments

  • IMG_1889.JPEG
    IMG_1889.JPEG
    482.3 KB · Views: 307
  • IMG_1890.JPEG
    IMG_1890.JPEG
    884.9 KB · Views: 309
  • IMG_1880.JPEG
    IMG_1880.JPEG
    636.7 KB · Views: 283
  • IMG_1881.JPEG
    IMG_1881.JPEG
    585.7 KB · Views: 220
  • IMG_1887.JPEG
    IMG_1887.JPEG
    380.5 KB · Views: 249
  • IMG_1888.JPEG
    IMG_1888.JPEG
    397.9 KB · Views: 229
The first question I would have to ask is - "Why has that cracked?" because while it might not be the first to do so, there are a lot of RV-6's and RV-7's out there that haven't cracked at that location. Perhaps check to see if the pivot arm is not square to the airframe and operate the canopy slowly to check if it's being twisted as the canopy opens and closes.

As I recall that weld is only on one side of the arm, is that correct? I don't believe it would be worth trying to weld that back up as its in a tight location to start with and the proximity of the perspex and the risk of damaging it and your paintwork would be high. I'm not saying it can't be done, but it would be difficult. I suggest you look at the possibility of drilling out the rivets that hold the welded bracket to the frame, grind the weld down on the swing arm and install a bracket that picks up on the existing rivet holes in the frame, then drill a couple of new holes in the swing arm. I would probably use a piece of 4130 steel around 0.063" thick and when installing it, make sure that any misalignment in the swing arm and the canopy is corrected. You might find you can also pull the canopy down lower to the fuselage and correct that gap you have on the right side when drilling the bracket to the Arm.

Instead of 4130 you could probably use a piece of aluminium angle but you'd want to go pretty beefy... maybe a bit of .125" angle?

If you pay attention to what the frame is telling you when making the corrections and pay attention to detail, I'm sure you'll be able to fix this quite easily but it won't be a 5 minute job.

Good luck.
 
Check for correct struts installed. Your strut on the right side is pushing the canopy forward into the upper skin. You can install a stop on the rail behind the sub panel (drill a hole through the subpanel) with an adjustable bolt and nut as a stop to hold the canopy from pushing forward due to the strut force in the closed position.

The weld crack looks like it is not moving. It broke due to the pressure of the strut.... check for correct struts installed.... By memory (not always accurate) I think the strut should be about 25#. Test by placing a piece of wood on a bathroom scale and pressing the strut down on the scale. It should read about 20 - 25 #'s as the strut collapses.

With the proper struts (2) installed and the stops mentioned above installed, I would grind down the weld (providing the weld on the other side of the arm is not cracked) and remove the paint to bare metal and place a fillet of JB weld twice the size of the weld.

There is no need for the rubber seal that is on top of the panel.... It is not a stock item and may be adding stress to the canopy frame.
seal.JPG
 
You raise a good point Warren. It would of course help if people hadn't followed like sheep and installed the gas stuts in a geometery that even requires the stops in the first place.
 
I had the same idea with an angle to make a repair. Also, later in the 6 and early 7's Vans issued a it for reinforcement of the canopy frame, you should consider that. Many have added higher force struts so be sure yours are to the original specification.

Deflection - I added those stops on my 7 during build and they are useless once the canopy frame is built (mine with the reinforcement) as it is plenty stiff.

OK - edit - I get the loading now and don't think the struts are the primary cause. That hoop acts as a beam with a serious discontinuity at the hinge. These are the "wings" people talk about. The vertical loading (air and mechanical forces) at the frame rail pushed (pulled) it up, also a thick heavy rubber seal adds a lot to that each closing. The canopy rail seal must, must be low contact force or the entire rail is leveraged and pushes up. The canopy likely has to be pulled down to close it in order to compress the seals. The only way to get this particular canopy to fit is to build a new one. I spent nearly a year getting mine to fit evenly around the perimeter unloaded i.e. w/o the struts. And it is still .030" too much gap on the right side for the tear drop seal to work well.

To best address the whole thing (IMO), would be to make a stiff repair to the hinge, remove all the sealing materials, install the canopy brace, fill the closing gaps with something solid, then use the Vans teardrop seal material. All in that order. I found the canopy build very particular about the order of doing things.

OP-25 is the canopy brace kit.
View attachment OP25 Tip-Up Canopy Brace.pdf
 
Last edited:
Yes, I was one of the people who had this same issue on my -6. One side cracked fully through, the other was about half-way through when I figured out what the issue was. I did have the stock 25# struts when it failed.

I predict that you'll find when you disassemble the parts that the weld doesn't properly penetrate the two pieces. The broken part had an extremely small cross-section, like 1mm across, compared to the thickness of the parts that were welded together. It's amazing that it held as long as it did. I reported back to Van's at the time but was told that they "hadn't seen that before."

I replaced the welded joint with a couple of beefy angle brackets cut from a piece of stock I had lying around. Riveted to the front former, and bolted through the pivot arm.
 
The canopy likely has to be pulled down to close it in order to compress the seals. The only way to get this particular canopy to fit is to build a new one.

Actually, the canopy does not need to be pulled down to close it. It closes very straight and quite easily. Having previously owned a Pitts S-2B and flown an Extra 300 extensively, I'm very particular and cautious about my canopy. I always raise and lower it gently from the center, careful not to put any side load on it.

Both latches are well aligned and there's no sense of having to force any part of the canopy assembly. Which is part of what makes this so situation surprising.

The airplane does not have the canopy reinforcement installed. That kit is listed as "backordered" on the Van's web site. With the laser cut parts issue, I wonder how long it would take to get those parts if I ordered them. I'd ask Vans but I have not had any luck getting in touch with them.

So far I've heard JB Weld and angle brackets suggested as repairs, in addition to retrofitting the canopy reinforcement kit.

Question: does installing the canopy reinforcement kit require removing the fiberglass on the canopy frame?

--Ron
 
I predict that you'll find when you disassemble the parts that the weld doesn't properly penetrate the two pieces. The broken part had an extremely small cross-section, like 1mm across, compared to the thickness of the parts that were welded together. It's amazing that it held as long as it did. I reported back to Van's at the time but was told that they "hadn't seen that before."

I replaced the welded joint with a couple of beefy angle brackets cut from a piece of stock I had lying around. Riveted to the front former, and bolted through the pivot arm.

Thank you for chiming in on this post, Rob! I'm glad to hear of your success in getting it repaired. I'm still waiting to hear back from Van's on their advice for a fix, but I was wondering if it might be possible for you to post some detailed photos of your angle brackets and the modification to the pivot arm?

Also: did you install the canopy reinforcement kit?

Thanks again,

--Ron
 
Thank you for chiming in on this post, Rob! I'm glad to hear of your success in getting it repaired. I'm still waiting to hear back from Van's on their advice for a fix, but I was wondering if it might be possible for you to post some detailed photos of your angle brackets and the modification to the pivot arm?
I did post photos when it happened, but I think those were lost when Picasa folded. I can't even find the post I made now. I'll look through my archive and see if I can find anything.

Also: did you install the canopy reinforcement kit?
No. I have the kit, I ordered it while I was repairing the cracked weldments. At the end of the day, my canopy fit isn't perfect now, the pilot's side front corner sits up about 1/8" when closed. I think it's because I didn't properly set the distance between the two front corners before I drilled and riveted everything back together. I want to disassemble it and re-make the brackets to correct this before I reinforce it.

Others have suggested that the reinforcing helps with the "floppiness" of the tip-up canopy.

andoman said:
Answer: Likely due to no retrofitted stiffner
Thanks, but there are lots of -6 examples without the stiffener that don't have this issue. I believe the issue is that there was a batch (or maybe it's just a random occurence) of frames that were badly welded. If the welding on these was good, I can't see how it would have broken, the total area would have been stronger than the beefy angle bracket that I installed to replace it (which haven't had any issues for the last few years).
 
I was able to find these in my offline archive. I can't find any photos of the brackets I made to replace these, but from memory, I had a short section of 3"x 3" x 3/16" angle. I cut some pieces from that that would fit inside the channel of the canopy bow, then cut one side of the 3" arm down to about 1.5" or so. Shaped the free ends so they matched the space, and then drilled a five rivet pattern in the long arm and riveted it to the canopy bow, and drilled two bolt holes in the 1" arm and bolted it to the canopy pivot arms. I'm heading to the hangar now, i'll try to get some photos of the brackets in place.
 

Attachments

  • IMG_1735-Starboard Side Facing Fwd.jpg
    IMG_1735-Starboard Side Facing Fwd.jpg
    212.5 KB · Views: 87
  • IMG_1734-Starboard Side Facing Fwd Flash.jpg
    IMG_1734-Starboard Side Facing Fwd Flash.jpg
    285.9 KB · Views: 84
  • IMG_1733-Port Side Facing Fwd Flash.jpg
    IMG_1733-Port Side Facing Fwd Flash.jpg
    281.7 KB · Views: 86
  • IMG_1732-Port Side Facing Fwd.jpg
    IMG_1732-Port Side Facing Fwd.jpg
    380.9 KB · Views: 73
  • IMG_1730-Starboard Side Facing Aft.jpg
    IMG_1730-Starboard Side Facing Aft.jpg
    537.3 KB · Views: 85
  • IMG_1724-Port Side Facing Aft.jpg
    IMG_1724-Port Side Facing Aft.jpg
    617.3 KB · Views: 96
Thanks Rob! Yes, it would be awesome to have pictures of the completed alterations to your canopy frame, if you were able to get them while you were at the hangar.

I didn't build my aircraft, so the textual description of how you fixed your airplane didn't create as much of a "picture" in my head as you might expect. I'm going to have any modifications done by my A&P.
 
Drat, sorry Ron I got sidetracked at the hangar and ran out of time before I could get to taking photos. I've set a reminder for myself on Saturday to do it when i'm out there and will have more time.
 
It certainly appears as an obvious crack in the weld and from the discussion you can see the crack “move”? I only bring this up as it is common for the powder coat to crack and have the appearance of a crack. This doesn’t appear to be the case but if you’re not certain you can strip the powder coat off and expose the bare weld. I recently did this on my engine mount lower supports. Looked like a crack, but was just the powder coat.
A weld should never crack like this. This is a bad weld, bad base design, or stresses applied that were not anticipated in the design, like an installation issue.
I think you already know this, so sorry I’m not more helpful.
 
Drat, sorry Ron I got sidetracked at the hangar and ran out of time before I could get to taking photos. I've set a reminder for myself on Saturday to do it when i'm out there and will have more time.

No worries -- thanks for setting the reminder! I have a feeling I'll be using the same repair method you used, so the photos will be invaluable. :)

--Ron
 
It certainly appears as an obvious crack in the weld and from the discussion you can see the crack “move”? I only bring this up as it is common for the powder coat to crack and have the appearance of a crack. This doesn’t appear to be the case but if you’re not certain you can strip the powder coat off and expose the bare weld. I recently did this on my engine mount lower supports. Looked like a crack, but was just the powder coat.
A weld should never crack like this. This is a bad weld, bad base design, or stresses applied that were not anticipated in the design, like an installation issue.
I think you already know this, so sorry I’m not more helpful.

Every bit of info is helpful! I'm fairly sure it's an actual crack in the weld. The one thing everyone seems to agree on is that replacing it with another weld is a bad idea due to the potential for heat damage to the plexiglass.

From what Rob was saying, it seems like a bad weld in this case. Someone else mentioned it only being welded on one side, but I haven't been able to confirm that yet on my aircraft.

A friend of mine had the same issue as you did with the engine mount. He actually removed the mount and sent it to someone to repair, only to find it wasn't cracked at all.

--Ron
 
A thought . . .

Question: does installing the canopy reinforcement kit require removing the fiberglass on the canopy frame?

--Ron

The center section - no, but not sure about the sides. It is certainly problematic as it is attached before the canopy bonding and may not have room for setting rivets. Along the forward bow they are all pull rivets.

Having said all that by the book, I wonder if a 2K adhesive might work well on the bond to the underside of the forward canopy skin. I have done a little research on the specs and at 3500 psi strength, it is more capable than the spacing of the rivets provide with a 5/8" wide bond strip. David Paule is using G-Flex epoxy, but there are automotive compounds that might be considered. After touring the Greer SC manufacturing plant early this year, and observing that the SUV's are primarily held together by 2K adhesive (thermal cure) and augmented by a few resistance welds, I did some (shallow) research into the strength and specs for the Sikka brand products they use. It appeared that spot welds were only to keep the body-in-white together/aligned until it hit the oven upon entering the paint/coatings facility. If this path is chosen for your 6, the bond zone would have to be clean deoxidized metal to metal.
 
I finally got in touch with Van's tech support. Never received a reply to my email but I reached Kevin Miller at Van's Aircraft via phone.

Anyway, he suggested having an experienced aluminum TIG welder re-weld the pivot arm to the frame. I asked if there was any concern about heat damage to the plexiglass and he said there was enough space between the two that it wouldn't be an issue.

He further recommended adding a gusset or doubler to reinforce the area.

I asked if the canopy reinforcement kit (which is out of stock) would require removing the fiberglass from the canopy frame and he said probably not but it depends on how far the fiberglass extends.

I'd like to improve the fit of the canopy, especaially on the right side. You can see in the photos I originally posted how the paint stripes don't line up anymore, so something has been lifting the canopy out of position.

Kevin said it might be possible to have the aluminum TIG welder fill in the hole in the pivot arm and then drill another hole to lower the canopy on that side a bit.

Of course, I'm not sure what other issues that would create. Is it possible the crack is wide enough when the canopy is closed to allow the right side to rise up that high?

--Ron
 
Is it possible the crack is wide enough when the canopy is closed to allow the right side to rise up that high?

--Ron

I am afraid so. This means that the position of the "floppy" side must be held in the right position for the repair. You can push close the canopy and push down on that side to satisfy yourself of that connection.

If you think about it - - -imagine that the canopy is so flexible it adds nothing to the frame. Then consider it as a membrane, and when the canopy "air" loads pull up on the membrane it pulls upward on the perimeter of the frame. There are only three 4 contact points of the frame, hinges and the aft latches. The upward loads on the side rail come to the "hoop" causing any deflection to be resisted by bending the "hoop" at the front hinge. This loading is what causes the bending load concentrated (and maximized) at the hinges, and pivoting at that broken weld allowing the right corner to lift. Hope that makes sense.
 
I am afraid so. This means that the position of the "floppy" side must be held in the right position for the repair. You can push close the canopy and push down on that side to satisfy yourself of that connection.
This. I think the outer pieces of the reinforcement kit will help with this as well once installed. I could push the corners of my canopy frame down and get the skins to align with the forward fuselage when mine cracked.

Anyway, here are the photos of my replacement bracket. The stock was a 3"x3"x3/16" angle I had a 12" length of laying around. While that might be overkill, re-welding that mickey-mouse tab was not an option, IMO.

To help orient you, these are all of the passenger side, and all shot looking towards the nose. In the first photo you can see the lower flange of the additional reinforcement I added to the *front* of the canopy former. Basically a small C-channel aligned with the inner piece of the canopy former, it extends over the outer piece but doesn't curve to match it so the flange kind of disappears to the right. Sizing this is tricky as the flanges have to clear the forward fuselage flange too, but a little work with a scotchbrite wheel during fitting will get it.

Someone will ask, so... The nylocks sticking through are on the backs of the screws that hold the canopy fairing on the outside... Mine is aluminum and not bonded in place.
 

Attachments

  • PXL_20230826_152017365.jpg
    PXL_20230826_152017365.jpg
    358.9 KB · Views: 69
  • PXL_20230826_151723246.jpg
    PXL_20230826_151723246.jpg
    462.7 KB · Views: 60
  • PXL_20230826_151814148.jpg
    PXL_20230826_151814148.jpg
    640.1 KB · Views: 74
  • PXL_20230826_151717825.jpg
    PXL_20230826_151717825.jpg
    552.2 KB · Views: 64
Rob -- many thanks for taking the time to photograph and post those. It's very helpful. Now at least I can go to my mechanic with Van's suggestion (re-weld) as well as your field-tested fix.

Given the vibration that these aircraft experience on a regular basis, I'm more inclined to go with your hardware-based solution. It looks pretty darn beefy to me. And hopefully this thread will prove helpful in the future when someone else experiences a cracked weld on their tip-up.

Speaking of welds, I wonder why they only welded one side of the pivot arm to the frame?

Anyway, thanks again. I'll try to remember to post some pictures of my own when the repairs are completed.

--Ron
 
Thought I'd provide the post-repair update on this canopy issue in case it's useful to anyone in the future.

I emailed Vans several times and never heard anything back. So I called and was eventually able to speak with one of the support people. The suggestion from Vans was that I remove the canopy and have an experienced TIG welder clean out the old material and re-weld it.

I asked about the possibility of damage to the transparency from heat so close to the plexiglas and was told it would not be a problem.

So that's what I did. Or rather, what I had my mechanic do. The canopy is back on and although the right side still rises up a quarter or half inch or so in flight, the weld is holding nicely. After replacing the seal on that side, it doesn't get sucked out into the slipstream anymore.

The new gremlin I'm chasing down is a whistling sound that occurs at various pitches depending on the airspeed.

Oh, and a rattling of the aft part of the canopy at low RPM on the ground. I'm not sure if the secondary latch just needs more washers on it to create a tighter connection with the roll bar or what, but when I pull down on the secondary latch handle, the rattling stops, so that's definitely what's causing it.

--Ron