I am in the middle of tackling the rudder pedal modification on my RV-6A. That is, I've finally gotten the whole rudder pedal assembly out of the airplane. It was not fun or easy. Van's Service Bulletin says to expect 6 hours to do the whole job. Good luck! I've got at least that much time just getting the assembly out.
I started by removing anything in the way of being able to position myself under the panel.Then I removed the brake lines, rudder cables, F-6115 Center Bearing Bushing, and anything else that kept me from removing the bolts from the F-6116 Side Bearing Bushings. I only have brakes installed on the left side pedals and was able the leave the brake pedals and master cylinders attached during removal.
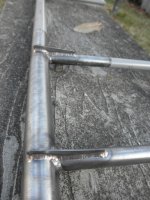
After removing the Side Bushing bolts, I could not get the assembly to swing out so it could be removed from the plane. I tried moving the whole assembly as far aft as possible to gain more side clearance. I tried moving one end forward and the other aft. I tried twisting the two tubes so one was almost on top of the other. Nothing would give me enough clearance to swing the assembly out or to remove even one of the Side Bushings.
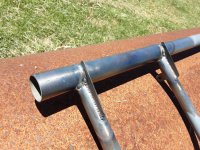
I thought about different things I could try. The easiest would have been to cut the cross tubes in half, then buy new ones (ouch!). They are now $163 each and presently on backorder. If you are planning on purchasing new ones with the gussets already welded on, cutting would be the easiest solution. I finally came up with the idea of cutting the Side Bushings (they're cheap) so that I could remove the tubes from the bushings giving me extra clearance..
I decided to use a vibrating multi-tool with a new wood saw blade attached. Before starting, I cut a piece of .032 aluminum sheet, much larger than the block, to slip between the fuselage skin and the bushings to protect the fuselage skin. Then, I positioned a Side Bushing so I could carefully make 45 degree cuts at the corners of the aft end of the bushing, straight in toward the fuselage skin,. The idea is to expose the sides of the tube. I had to cut a little remaining nylon (or whatever the bushings are made of) afterward. If you try this, don't push too hard. Concentrate on carefully controlling the tool and let the blade do the cutting work. Take your time! I was then able to push the end of the tube out of the bushing. Same with the other end of the bushing to release the forward tube. I still could not swing the cross tubes free, so I started on the other side. Finally, after releasing just the aft cross tube on the other side, I was able to remove one cross tube at a time out of the plane.
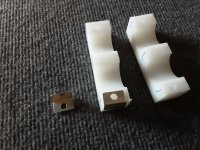
After having the gussets welded on, I envision again not having enough side clearance to get the pre-assembled assembly back in place. Splitting the F-6116 bushings, like what was done to the F-6115 center bushing, seems to be the best solution. Remember that it matters which way the bushings face, as the cross tube holes are not drilled straight into the bushings. I'll have to get creative to match the bolt holes already in the longerons to the bolt holes I'll have to drill in the new bushings. I think I will drill a bolt hole, as per the plans, in the forward end of the bushings first before cutting it in half horizontally. I'll lay the bottom half of each bushing on the longerons first, secure its back and forth movement by inserting a bolt into the drilled hole, then position the cross tubes into place (shortest tube forward). Then I can mark, or possibly partially drill in-place, the aft bolt hole in the bushing using the bolt hole already in the longeron as a guide. Remember that washers must be placed on the bolts, at the split, before bolting down the top half of the bushings to make up for the material removed during the cut. This helps keep the holes round.
Not a simple modification to perform, to be sure, but an important one.