PaulR

Well Known Member
I'm in the process of designing my panel and sure would like some input. I did this from a .dwg file and don't know of another way to put it in, other than scanning the drawing as a jpeg.
This is harder than I thought it would be. After flying Cessna's and Pipers for a long time, now that I can pick a method and placement, it's hard. Thanks in advance.


panelpic-1.jpg
 
Paul,

Set up the carb heat, throttle, mixture, and flaps just like Cessna did; left to right.

That way when you have to go around, you can push the carb heat in with your thumb, throttle and mixture go in with the palm of your hand, and you can toggle the flaps up with your middle finger.

When landing, you can toggle the flaps down w/o removing your hand from the throttle.

With the carb heat hidden between the throttle and mixture, you won't be able to get to it. My hands are just big enough to make getting to the carb heat a pain when it is tucked in between the two.

Also, put your fuel pump switch where I think you currently have your flap switch located, above the throttle and in line with the rest of the switches. (I could not read your switch labels, so it was hard to tell what was where.)

One thing that I did, which worked out really well was to put a small green LED centered above the Dynon. This was wired to the fuel pump and let me know if I left it on (illuminated) or didn't turn it on (dark) before takeoff or landing.

One other option is to put the AP74 under the D100, above the switches. This will leave you room on the right for other things, and IF you did this, move the radio stack over next to the Dynon on the right side. That will give you more room for future things. Or a clip to hold charts/notes/etc. as I did.
 
Consider deleting the steam gauge altimeter - you will have that on your Dynon and can use the GPS altitude value as a backup.

erich
 
couple of comments (-7 not 9)

Bills comment about the fuel boost pump LED is a good one as I keep forgetting to switch it off and it does screw up the fuel computer because for some reason when the fuel boost pump is on it shows a higher fuel flow than when off and when it is off the fuel computer is very accurate. This has happened on a couple of RV's around here and no-one is sure why.
In my layout I have the carb heat to the lfet of the throttle and the fuel boost/prime and flap switches between the throttle and mixture and as mentioned you can control all of these with your hand on the throttle which is handy.
One other thing to consider is the location of the D120, I have mine in exactly the same place and I find it somewhat difficult to read due to the angle to the display (I also have bifocals set to the instrument panel and it is somewhat further to the D120), as a result I tend to fly with the D100 in split screen mode. I did the setup to allow flying from the right seat so it was a trade off.
In mine the standby ASI and ALT are to the right of the D100, the reason I did this was to ensure that I modified my scan to use the dynon and I figured that if the ASI and ALT was on the left I would tend to look at them in left hand patterns, a friend has a similar setup and eliminated them entirely for that reason.
I did also manage to fit a map box under the D120.
I put the 496 under the D100 and while I like the position I wish I could angle it up about 10 degrees to make the display slightly less washed out, you may want to consider the same for your position.
Panel pictures are on the blog if you want to compare ideas
 
Slider or Tip Up?

You may want to locate the forward side panel support pieces on your layout if you're installing a Tip Up canopy. Those confine some of the panel configs. The slider option is fairly flexible for the panel layout however does have some restrictions./ DRR
 
Good panel Paul

I would keep the two steam gauges. They are cheep and you have room in your panel. If the power goes out, they still work.

You didn't say, but I assume that it is a day/night VFR panel.

Kent
 
I try to avoid a row of identical switches. It looks good, but invites confusion.

I would suggest grouping the switches functionally, considering how often you'll use them, and which hand will be free.

For example, I have my "engine" switches all together in a little group on the left subpanel (mags, boost pump, start enable). They are just in front of my throttle quadrant.

External lights are in a little group on the right.

Electrical switches (masters for two electrical systems) are under a voltmeter on the right subpanel (normally only used at the beginning and end of a flight).

Flap switch is behind the throttle quadrant, an easy reach in the pattern with the left hand.

Autopilot and trim "master/kill" switches are centered on the bottom of the panel, an easy reach with either hand if in a hurry (e.g. trim runaway or wonky A/P).

Pitot heat switch is an illuminated pushbutton between the steam gauge ASI and altimeter.

Everything else is on the stick or on the device it controls (e.g. nav/comm controls).

I can easily find any switch on my panel quickly without having to look at it. I find that this simplifies my workload.

It does look messier though...
 
Looking good! I don't have too much to add, other than move everything up as high as you can get it on the panel, especially flight instruments and maps. It will minimize the amount of transitional movement from inside the cockpit to out the window by your eyes. It also serves to help shield the EFSIes and maps from direct sunlight, which no matter how "super bright" they are still wash out in the direct sun. I assume you won't have the emergency release handle coming out of the top of the panel, so that space up there should be usable.

Next, don't worry too much about the sub panel ribs, they can be easily tweaked to work fine on your layout.

Switch wise it appears you're in pretty good shape as they are almost exactly what we'd recommend if we did the layout....but I would move that Carb heat out from between the main knobs for reasons already mentioned. Don't forget an ELT.

Lastly, it is wise to try and keep any of those bowden cables (parking brake, cabin heat, etc..) off of the main panel if possible and put them down with the other cables. Here's why...if you ever need to remove the panel, you'll have to completely remove the cables as they mount from the front - unless you make a larger hole and insert a bracket. Believe me, being able to just hang the knobs down from the panel comes in REAL handy years later.

Other than that, we're truly starting to get into areas of personal preference.

Speaking of personal preference (mixed with a bit of professional experience/bias), I'd leave the fuel and flaps alone, I'd move the intercom somewhere else and leave that space for future growth of "goodies". It's valuable space, and the intercom (while looks good there) precludes easy installation of a future unit....Map Box....been there done that and wouldn't do it again (for a whole host of reasons), but that's just my personal preference. :)

My 2 cents as usual!

Cheers,
Stein
 
Minor changes and suggestions

Paul:

I have the D100, D180, AP74 and inserted a Lowrance 2000C GPS with terrain in the middle. I placed the AP74 to the left of the D100 and I'm glad I did it that way. The AP has a neat option where you can tap the knob and then toggle HDG, ALT and altimeter. I use it all the time. Quite literally, you will be flying hands free after you finish the 40 hours.

Push the D180 more towards the pilot because the angle of your eyesight may impede clearly reading it from an angle.


Delete the steam. If the Dynon to the rite in your picture is a 180, you?ve already got redundancy. Let the past fade into history. Make sure you get the 800 nit screens, carb temp, internal batteries, & OAT. The batteries supposedly last 2 hours, but mine have lasted almost 4 hrs. Surely you will find an airport in 4 hrs unless your name is Lindberg.

BTW, the wind correction angle the Dynon HSI provides is incredible! You can look at wind socks & listen to ATIS all day long but the Dynon will advise you every second which way the wind is blowing in critical situations such as pattern work.


After 106 hours in my 9A, the most comfortable/useable screen setup I've found is 2/3 EFIS, 1/3 HSI on the D100, Lowrance in the middle which drives the AP74, and the full screen D180 dedicated to EMS and the timers. I plot a course with waypoints into the Lowrance, punch NAV after attaining level flight, and take a nap (just kidding). I would guesstimate that the AP reduced workload by 80 percent.

Place the radios underneath so the principal instruments are directly in line with your eyeballs. The switches are not used very often whereas the radios are used constantly. Therefore, we placed the switches (mine are fused switches) to the right allowing placement of the radio and transponder closer to your hands.


I also added a small glove box and that was a good decision too for important items like my reading glasses. Yes, I?m an old man.

If you'd like to see my layout, pls click on the photos taken during construction (before the AP74 was released). You can also see the clever method Chet (build partner) developed to cut the panel out of the alum.


http://www.arizonaairparks.com/rv-panel.htm


FYI, you may need help with the setup of the DSAB after installation. I read the manual at least 10 times but still needed help. The only gripe I have with Dynon is their menu structure. It could be more intuitive but no one's perfect (other than my wife).


Feel free to call or email.

Barry 520-797-0265
Tucson RV9A Superior O-360 106 hours
 
carb heat?

Paul,

Set up the carb heat, throttle, mixture, and flaps just like Cessna did; left to right.

That way when you have to go around, you can push the carb heat in with your thumb, throttle and mixture go in with the palm of your hand, and you can toggle the flaps up with your middle finger.

When landing, you can toggle the flaps down w/o removing your hand from the throttle.

With the carb heat hidden between the throttle and mixture, you won't be able to get to it. My hands are just big enough to make getting to the carb heat a pain when it is tucked in between the two.

A bit off subject; but I wonder how many use "carb heat" as standard practice, versus those who don't? I find the Cessna graduates tend to use it as part of the landing checklist, while many Piper grads don't.

Carb heat was used on earlier Cessnas because their Continental engines didn't have the carb attached to a heated oil sump like the Lycomings do. I tend to follow the Piper & Lycoming manuals which suggest "carb heat", only if you think you need it.

Since I live in a high altitude airport enviorment, and being a former "Piper pilot"; I feel that the risk of leaving carb heat "on" during a go-around is more important that potential carb icing. And of course, this just applies to the Lycs with the heated oil sump. And this is what most RV's have, with fuel injection being the exception.

All in all, whether we do or don't is a matter of preference; and it's just another debatable subject without a true right or wrong. As I said, it's the "altitude/ need for full power" and nature of the Lycoming setup, that has formed my view on the subject.

L.Adamson --- RV6A / 0360 Lyc / Hartzell CS
 
Back ups

While I digest what everyone has said, and that will take a little while today,(I probably should try to earn a little of my salary), the removal of the back ups raises a question.
They were not put in as much for back-up as for ease of use. I've never flown a glass panel and thought that the round gauges would be helpful in the beginning. I'd love to leave them out, as it's a Day/Nite VFR panel and I figure I can get along without them.
The right Dynon is simply a D-120.
I'm sure I'll have more questions as I digest what everyone has suggested. I appreciate all of it.
 
After owning a Garmin 296, and 496............I'd give serious consideration to installing a 696 which of course would change the panel dock. I really do like the 696 because of all the info it can display at one time, as well as clarity & brightness. I plan to eventually remove my center panel engine instrumentation to install the 696. It's currently in the left cockpit corner.

L.Adamson --- RV6A
 
Paul - your question about backups is a good one. I think you'll find most folks here will probably tell you that once you've got an EFIS you have to train yourself to look at the steam gauges. The EFIS information presentation is clear, precise and very easy to scan since everything is in one location, unlike steam gauges.

My installation is very much like the drawing in the original post. EFIS D-100, with ASI and ALT jus to the left of the EFIS. ASI is up as close to the top of the panel as I could get it so on short final all I have to do is flick my eyes down a hair and I have a big, easily readable airspeed indication. Well, that was the plan. The reality is that it quickly becomes second nature to use your EFIS as primary instrumentation. I now force myself to do regular cross-checks between EFIS and steam gauges.
 
I like your layout. Some comments, mainly to the responses you have gotten. One the panel is for YOU. Watch how high you put the big items on the panel, may hit the tipup if that is what you have. What are you going to do if you loose electrical, grab your back side? Are you good at landing an aircraft by the seat of your pants. I know if I had a full glass panel, sure nuf the electrical will fail, or just the efis.
 
Paul,

I like you panel layout and agree with Stein's comments. I would also KEEP the steam gauges as there a good backup in case the Dynon should fail. Hard to get it home with no instruments!

If you are considering *ANY* IFR flights, even for popups & let downs, I would highly recommend the TruTrak ADI as a backup as well. If your pitot or static ports become fully or partially clogged, that Dynon becomes a lead weight.
 
(snip) I've never flown a glass panel and thought that the round gauges would be helpful in the beginning. I'd love to leave them out, (snip))


I have another suggestion here :)

Spend some time with a computer flight simulator like x-plane or Microsoft fligh simulator. Use one of the airplanes with a glass panel.

A combat simulator like F/A-18 Hornet with a HUD also gets you used to reading the vertical tapes. After a couple of hundred hours of blowing virtual stuff up and landing on the carrier, you'll hate going back to round gauges.
 
One last thing...

Paul,

Call the vendors (Dynon, Garmin, etc.) and ask them to send you full size four color cutouts of the instruments.

Then take your panel and tape them in place, draw the switches, etc. and just look at it. Make sure your hand can fit between the switches, and that they are arranged in a logical order. (In my case they are by phase of flight rather than function.)

Put the panel some place where you will look at it every day. After about a month of moving things around you will be ready to cut it.

In the end, this is your panel and you will be the one flying behind it so build it the way you want it!

PS. Regarding the steam gauges, I have them in my panel in the same location you have them. I see no problem with using the steam guages as your primary reference or using the EFIS numbers as your primary, they will match.
 
Update

Well I've read and tried to digest all the good comments and have done a couple of things. First I took Steins advice and moved everything up. I added a FP On lite. It will be directly above the D-100 instead of the AP74.
I'm taking Bill's good advice and printing this out full size and will tape it on the blank panel and see what I think that way. I think I will also try it with the AP74 horizontal under the D-100 as that will leave room for dimmers where it is currently. I added a DB-9 under the switch for the serial feed to make updating easier.

Thanks alot to all who had/ have ideas. They are always welcome.

panel1.jpg
 
Paul,

It is starting to come together.

A couple more things to think about.

1) You want to keep your left hand on the stick while flying. So put the switches you need in a place where your right hand can get to them. The switches you need for starting should be over on the left as your right hand will be busy with the throttle.

2) Now think about putting some gaps between the switches so you don't accidently activate the wrong one. They don't have to be large gaps, just enough so that you don't accidently turn on or off the wrong switch.

3) Move the map and interior lights over to the right side. They are typically not critical for flight. The panels are small enough that you still reach them, if they are off to the side. (In my plane, the interior light switch is WAY over on the right.) Remember, you don't have to group all the lights together. In fact, it is preferable to group switches by phase of flight. Meaning, all the switches you need for landing are close and lined up in the order in which they will be used.

4) You can buy an angle adapter for the AirGizmo which will angle the GPS towards you. I've got one and it helps but I don't think it is required.

You will like having the D100 and D120. I tend to fly with the D100 split 2/3 EFIS and 1/3 EMS and have the CDI and glide slope displayed on the EFIS. Again, I'm VFR only and use the HSI display only occasionally. Even then, the D10 EMS I have is easy enough to read.

One last thing, think again about flip flopping the flap switch with the carb heat. It is difficult to toggle a switch up or down with your thumb. That's why Cessna put the flap switch on the right of the mixture. Mock it up and give it a try and don?t drill/cut anything until you are 100% certain.

To me, laying out the panel was one of the most important and enjoyable steps. Good to see you are taking your time laying it out.
 
...I added a DB-9 under the switch for the serial feed to make updating easier....
I forgot to address this part of your question. If I were building again, I would cut out the back of the AirGizmo, make a small aluminum box to hold the two DB-9 connectors and pop-rivet the box to the back of the AirGizmo.

That way, when you are ready to do an update, just remove your Garmin X96 and plug your computer into the DB-9.

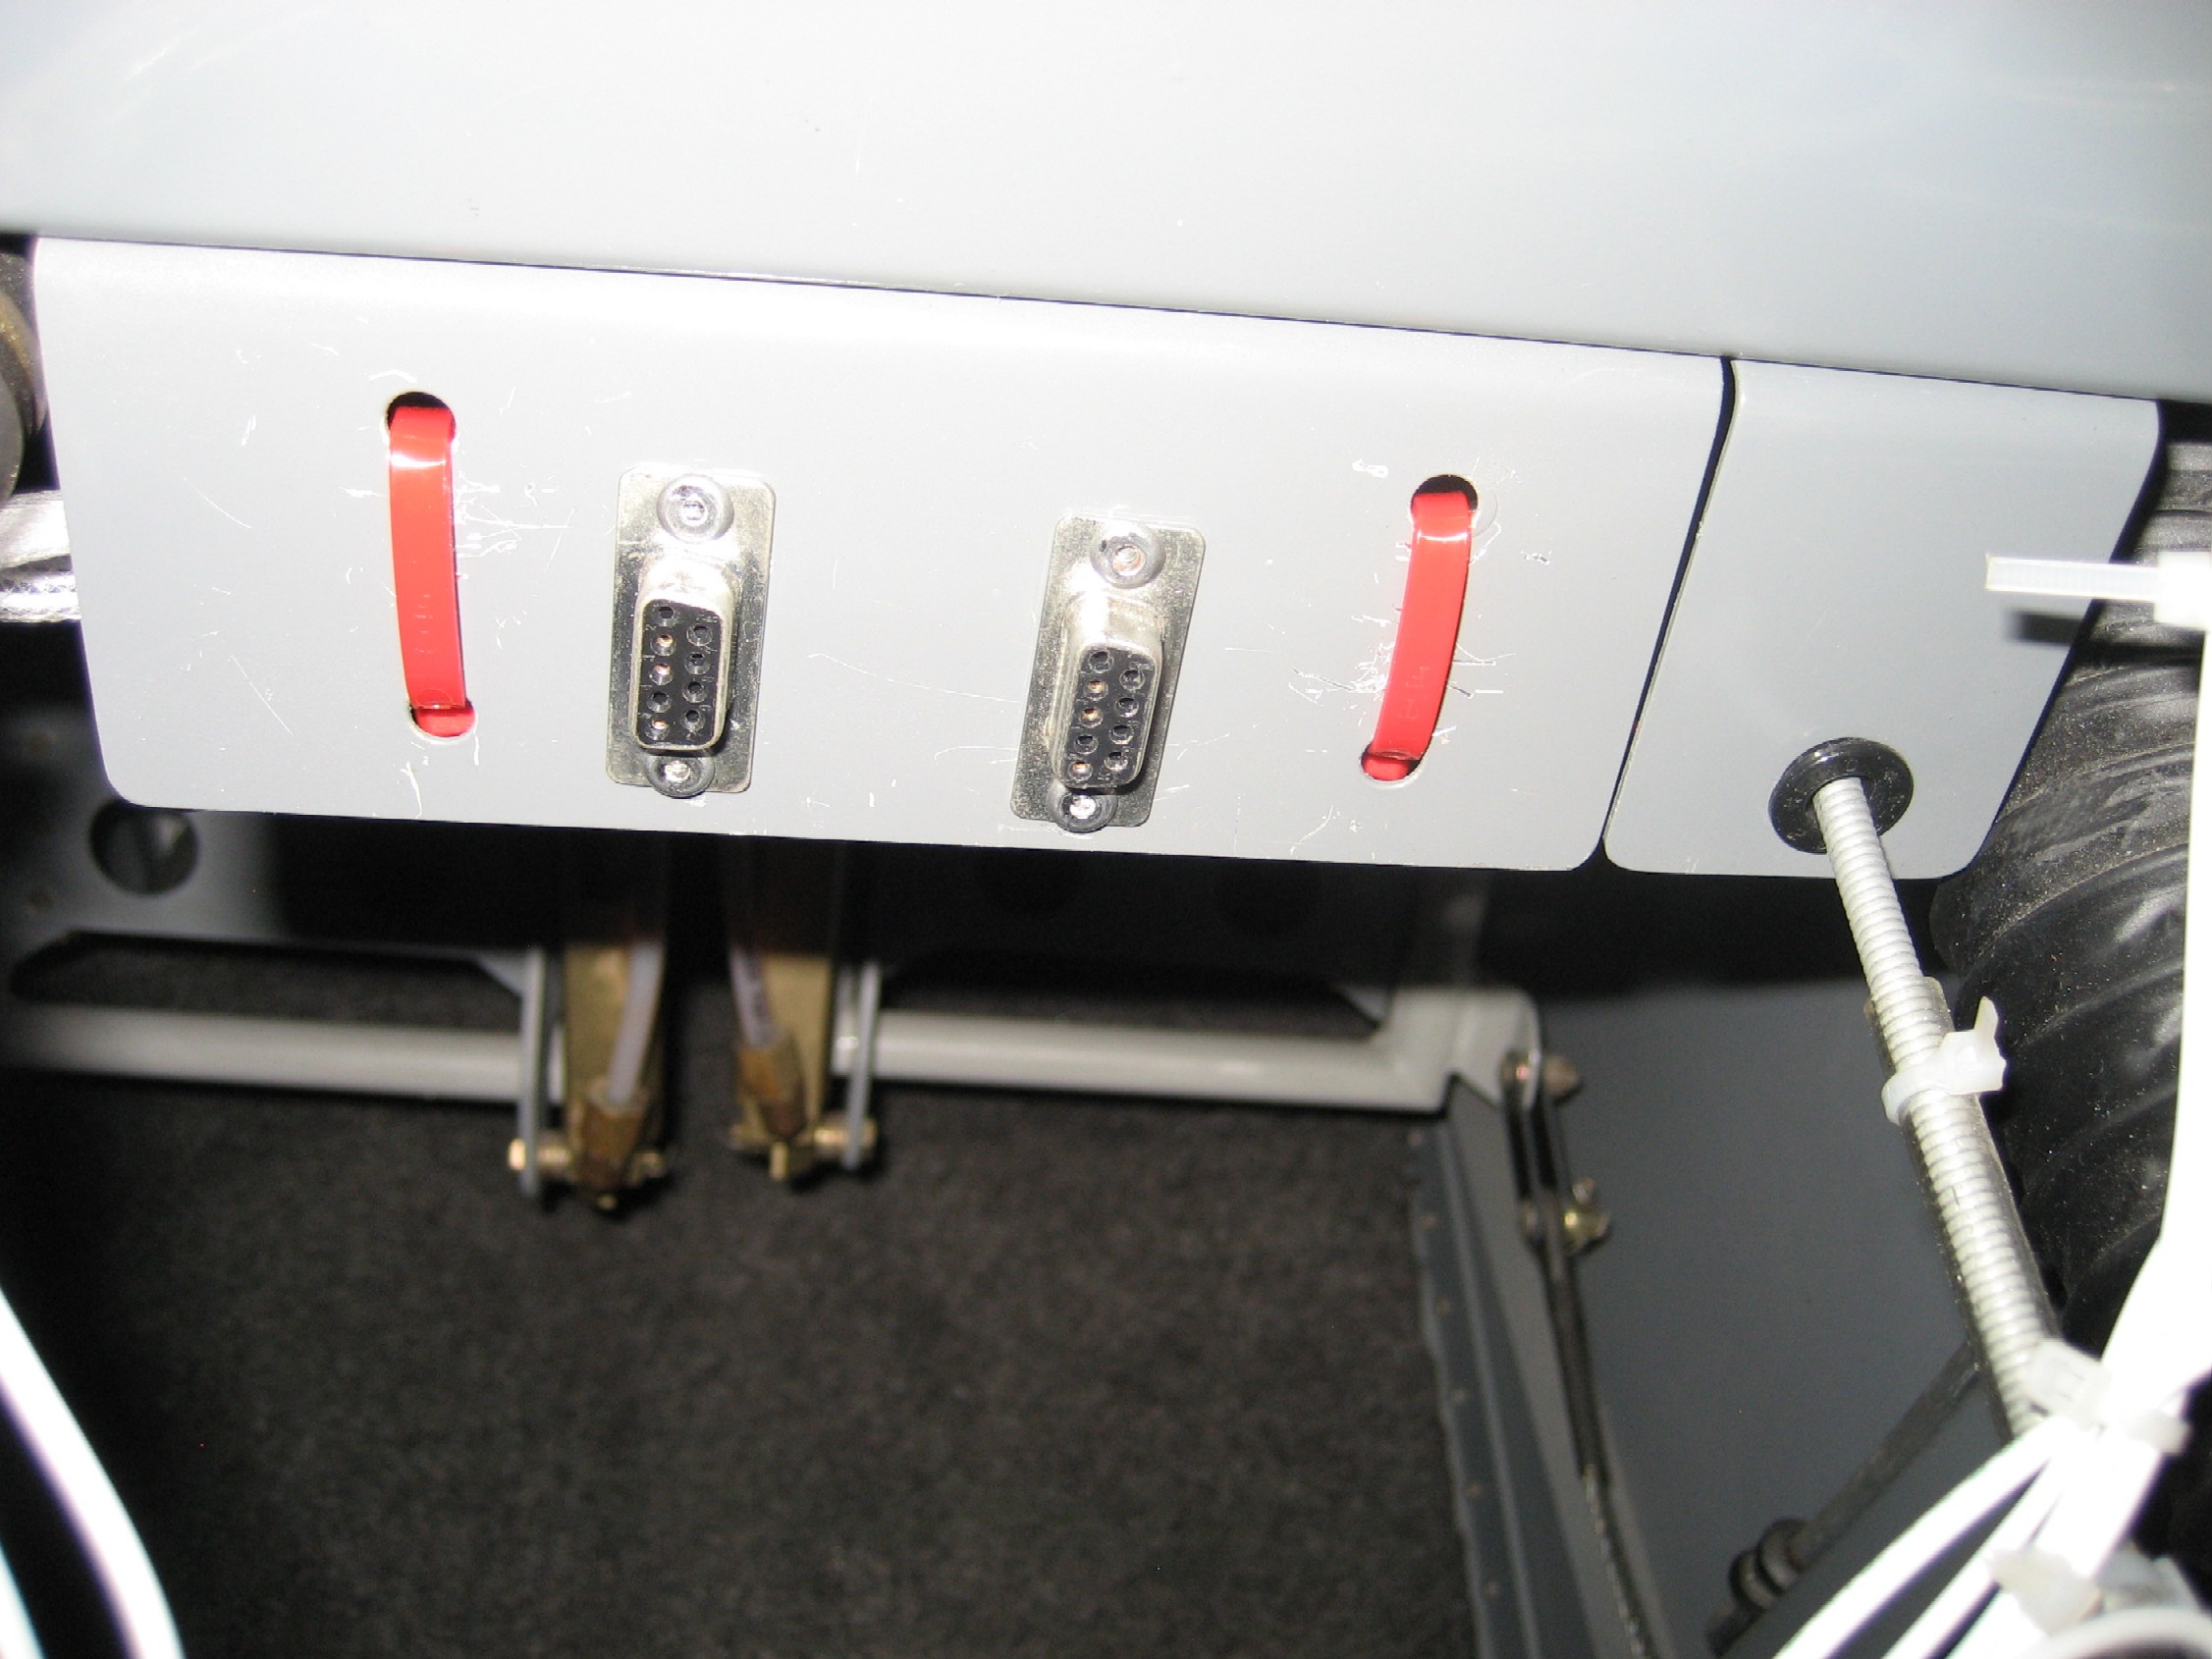
In my case, I riveted a section of the throttle bracket (since I didn't use it) to the sub-panel, over on the right side (No one has even kicked it, so it is well out of the way.), and cut/filed holes for the DB-9's, and then pop-riveted the DB-9 connectors in place.

Click on this picture. (They were labeled appropriately the week after the installation.)

(The cable to the right of the DB-9's is for the cabin heat.)

Of course, you could just cut, file, and rivet them to some out of the way place on the sub-panel. In this location, I can stand outside the plane, open the canopy, and reach in to plug in my computer. No need to climb in when doing the updates.

PS. I don't see a dimmer on your panel. I used it to control the radios and post lights I added for the ASI & ALT gauges as well as the light strip over the recessed switches. Just another consideration.

PPS. Think about adding at least one power port AKA cigarette lighter plug. I have two (from West Marine) and wired one to the always hot buss with thicker wire and a 7.5A fuse. That way I can charge the battery w/o opening the cowling. The 2nd plug was on the avionics master.
 
Last edited:
Great Advice

Thanks for all the advice.

Bill, I went and flew a 150 today and did some measuring and "ergonomic engineering". I going to move the interior light switches over on the right side along with the dimmers.
I'm going to swap the carb heat and the flap switch as I agree that my thumb isn't as nimble as my fingers. It will probably remain on the panel extension that holds the throttle/mixture. The boost pump switch will be in the main panel above.

Also, I had planned all along on a 12 power plug, somehow just forgot it. I will probably leave the radio stack where it is along with the D-120. Stein has a good point about the space under it. The intercom will probably end up where the AP-74 is if I like it under the D-100.

I never thought of the DB-9s in the gizmos. That would be a good place. I thought I had read on the Dynon site that with the dsab network, the updates would go to each invidual component from the master??? I wasn't planning on having two.

I'll get the drawing revised and printed up full size again and put it in the plane.

Thanks again for all the help.
 
...I'm going to swap the carb heat and the flap switch as I agree that my thumb isn't as nimble as my fingers. It will probably remain on the panel extension that holds the throttle/mixture. The boost pump switch will be in the main panel above...
Good move, it will work much better. Now if I could only talk you into a throttle quadrant. ;) BTW, I set the distance between my carb heat and TQ by figuring out how much room my hand would need to get between it and the TQ. Same with the flap switch, I had to move it further to the right than I had anticipated, that is why the flap breaker is between the mixture and the flap switch. The distances worked out great and "falls to hand", Here's a picture.

...I thought I had read on the Dynon site that with the dsab network, the updates would go to each invidual component from the master??? I wasn't planning on having two...
Afraid not, you will need two plugs. The AP74 and servos are updated via the D100 but you will need a second plug for the D120.

I wish I had thought of mounting the plugs in the AirGizmo when I was building. One advantage to putting the plugs on the sub-panel is there are less wires between it and the panel. My plane has very few wires running back there and it makes for a very clean installation.