Dugaru

Well Known Member
Sponsor
Friend
I noticed one of my fuel tanks was gurgling quite a bit and filling slowly. I suspected a blocked vent, but the outlet near the firewall looked okay: I could see that nothing was covering the little mesh screen that had been installed over the end of the vent tube, presumably to keep out insects etc.

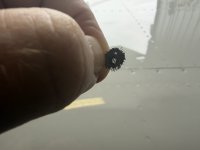
But then I looked closer. The screens had been attached with some sort of goo/rtv/sealant. Apparently, over time that material degraded and flowed into the mesh, giving the vent opening a serious case of atherosclerosis! This problem wasn’t easily visible when the screen was installed over the dark tube interior, but it was easy enough to see when held up to the light (see attached photo).

Lessons:
1. Innovations to increase safety can create their own problems.
2. Inspect vents carefully, preferably with a flashlight.
 

Attachments

  • IMG_0896.jpeg
    IMG_0896.jpeg
    1.2 MB · Views: 175
Wow. I can't even say that word, much less spell it...

But a good find. On a plane or a person.
 
I am puzzled that a blocked vent would lead to ‘filling slowly’. The open gas cap area is huge compared to the vent size, the air should easily exit there. ??
I can’t fault your physics. All I can say is that it gurgled a lot and you had to top it off slowly or you wouldn’t fill it. Still gurgles but seems to fill faster now. Perhaps not? I suppose it’s possible I serendipitously found a potentially dangerous condition after misdiagnosing the actual problem. 🤣
 
I had the little screens on there originally but took them off as the vent hole is barely larger than the screen gauge, plus it's difficult to proseal it on without having the goo obstruct (possibly what happened here). One data point anyway.
 
the slow fill and gurgling is the time it takes for fuel to flow in and around the baffle system. normal
One tank seems worse than the other. If a line guy tops it off without waiting, it will be shorted by almost 3 gallons. Normal variation?
 
Since I am my own line guy, I can put in 1 to 1 and 1/2 more gallons if I give it time and the plane is on pretty level surface. But it takes 2 minutes to fully settle, though I haven’t ever timed it. 😊🙈
 
I’ve done a bit more experimenting and observing, and the difference with the vent opening cleared is that the audible gurgling now continues after the fuel cap is replaced. Never heard that previously.
 
One tank seems worse than the other. If a line guy tops it off without waiting, it will be shorted by almost 3 gallons. Normal variation?
Yea, because they are in a hurry and won't wait for the tank to settle.

Since I am my own line guy, I can put in 1 to 1 and 1/2 more gallons if I give it time and the plane is on pretty level surface. But it takes 2 minutes to fully settle, though I haven’t ever timed it. 😊🙈
I'm my own line guy too. I stop about 1/2" down from the tank filler cap flange.....and watch the fuel level drop down a bit...then top off. Takes maybe 5 - 10 seconds.

If anyone's tank takes "minutes" to settle, I am going to suggest the fill / vent holes between tank ribs (NOT vent line or the holes where the vent line runs through...those are entirely different) were not drilled during the build, or they are undersized from what is called out on the plans. Or, they ended up being partly or totally covered by proseal.
 
Trying to get my head around this one -- I am almost 100% certain the vent being clogged isn't the source of the low/uneven fill rates and the gurgling. Perhaps there's something deeper in the tank amiss -- rib/baffling holes being plugged with debris?

Run a borescope into the tank and see what those baffle holes look like.
 
Trying to get my head around this one -- I am almost 100% certain the vent being clogged isn't the source of the low/uneven fill rates and the gurgling. Perhaps there's something deeper in the tank amiss -- rib/baffling holes being plugged with debris?

Run a borescope into the tank and see what those baffle holes look like.
Hard to see how these holes are important when filling the tank. As the gas gets close to full, it should flow unimpeded over the ribs. It’s only in a low fuel situation where the ribs would act as dams without the holes.
 
Hard to see how these holes are important when filling the tank. As the gas gets close to full, it should flow unimpeded over the ribs. It’s only in a low fuel situation where the ribs would act as dams without the holes.
The air coming out has to go somewhere. If the 1/4" vent holes at the top edge of the rib are plugged, air gets trapped between ribs
 
So for the original question, here is a simple, bullet proof vent modification kit for the RV-14 and RV-10 that eliminates the mud dauber and ice problem. It is very light as well.

Easy one AN fitting install: https://aceaviationsupply.com/products/essential-fuel-tank-vent

Carl
MUCH cheaper option: make safety wire loop, ~3/4"-1" diameter, about two turns. Squash the loop into approximately a straight line. Press the safety wire into the vent opening. It should fill the opening enough to: 1) NOT fall out, and 2) keep mud daubers out of the vent and, 3) MOST IMPORTANTLY, allow air to pass through.

That will be $150 for the pair. ;) Hey, it's cheaper than the one listed above.
 
Last edited:
so, by saying that the gurgling is from fuel thru the holes in the baffles? i built my own tank and baffles to prevent sloshing .how small are these holes?1/4''? my tanks dont slosh but ''chambers'' equalize in a second, like instantly.
 
Hard to see how these holes are important when filling the tank. As the gas gets close to full, it should flow unimpeded over the ribs. It’s only in a low fuel situation where the ribs would act as dams without the holes.
Have another look at the ribs used in the tanks - note the typical lightening holes are absent.
 
The tanks I just repaired (RV6) had 1/2” holes like tooling holes in the baffle ribs & gaps in the back corners where the flanges were bent. If you got too much sealant in the corners & blocked these gaps, I can see where air wouldn’t be able to vacate each bay quickly as fuel was being added to the tank. Just be patient at the pump & pretend you are refueling a biz jet (but not paying the price!)
 
Yea, because they are in a hurry and won't wait for the tank to settle.


I'm my own line guy too. I stop about 1/2" down from the tank filler cap flange.....and watch the fuel level drop down a bit...then top off. Takes maybe 5 - 10 seconds.

If anyone's tank takes "minutes" to settle, I am going to suggest the fill / vent holes between tank ribs (NOT vent line or the holes where the vent line runs through...those are entirely different) were not drilled during the build, or they are undersized from what is called out on the plans. Or, they ended up being partly or totally covered by proseal.
This^^

I do not have these issues on my 2 planes. Maybe have to stop for 5 seconds once or twice during filling. Have fueled other planes that take FOREVER to purge the air. Never really understood why until reading this post. Also believe part of the issue may be excess sealant blocking vent holes in the ribs.
 
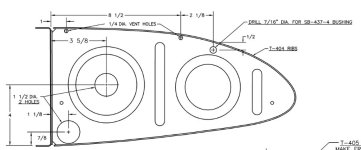
This is for the benefit of those who didn't built the fuel tanks on their plane, and may still be trying to picture what the heck is going on with a "slow to fill" fuel tank. The drawing attached shows the fuel tank rib call out for the fuel tank center ribs on a -6/6A. Other models have to have similar features, if not the same.

There are 5 holes called out that have to be machined into the center bay ribs on the tanks. (Again, I'm talking about a -6/6A here. These holes may be already punched on the latest kits or kit designs, I don't know.)
  • (2x) 1 1/2" diameter holes: These allow fuel to move between fuel tank bays during fill up and in flight.
  • (2x) 1/4" diameter holes: These allow air to vent out from bay to bay, and ultimately out the fill opening, as the tank is filled. They also allow air to move back in from bay to bay as fuel is used in flight.
  • 7/16" diameter hole: Used to install a snap bushing and 1/4" vent line. This allows the tank to vent to atmosphere when in flight. Once the snap bushing and 1/4" line are installed, very little fuel or air will get through that hole.
  • Note: the two sets of larger diameter concentric circles and the two vertical ovals shown on the rib are raised embossed areas to stiffen the rib web....they are NOT additional holes in the rib. Also, the two very small unlabeled holes shown are tooling holes used during factory rib forming.
If the (2x) 1/4" vent holes are missing, or completely plugged up with tank sealant, the air coming out of the tank during fill has no where to escape once the fuel gets above the top 1 1/2" hole. If these two holes are partly plugged up, it may take longer to vent the air out than if they were completely clear. Air may also pass through the triangular shaped corner relief area at the top left end of the rib....but that may be a smaller area than the two 1/4" holes.
Edit: Very likely this area gets filled in with sealant during construction...DO NOT bet on them providing any air venting.
Restricted area = slower to vent air out during fill up.

A borescope is the only way to tell what is going on inside a "slow to vent" tank. If the two 1/4" holes are missing or compromised, opening the tank and drilling them out is the only fix. 😧 Or, just live with it by slowly filling the tank and/or waiting for the air to vent out. 😲
 

Attachments

  • Wing fuel tank rib.jpg
    Wing fuel tank rib.jpg
    44.5 KB · Views: 31
Last edited:
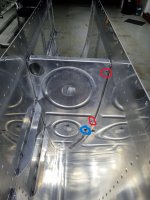
Picture of a 7 tank rib during construction.
The vent line goes through the blue hole (with a snap bushing), the 2 red holes are the holes discussed above for air flow through the tank.
View attachment 121719
and those holes are close to the ribs edge, so easy to fill them with sealant when making the fillet if not carefull. I have seen them blocked before on tank reseal jobs I did.
 
Air may also pass through the triangular shaped corner relief area at the top left end of the rib....but that may be a smaller area than the two 1/4" holes. Restricted area = slower to vent air out during fill up.
that top corner area is typically filled with sealant, as you need a good sized bead there when installing the rear baffle. The bottom corner area is bigger and not likely filled, but that dsoesn't help with air.
 
that top corner area is typically filled with sealant, as you need a good sized bead there when installing the rear baffle. The bottom corner area is bigger and not likely filled, but that dsoesn't help with air.
True about them very likely being filled in with sealant. I would not bet on them being there after installing the back baffle.
 
Okay as usual I have learned a ton here. Can't tell you how grateful I am for all the info and the time and care spent providing it.

So if I'm understanding all this correctly, I think there are actually two distinct problems that I lumped together due to a lack of appreciation of the physics and of the design involved.

1. My tank is a gurgler, likely because the holes designed to prevent that have been either omitted entirely or partially blocked by sealant. Will get a borescope in there to confirm. Likely no easy fix for that short of pulling the tank, but on the plus side it's basically an annoyance.

2. My vent line was partially obstructed. As noted above, after pulling the goo/screen off of the end, the tank is now for the first time audibly gurgling AFTER replacing the cap, something it presumably should have been doing previously. Such a blockage, if it got bad enough, could be bad juju.

I previously noticed that on a hot day with the tanks filled to the max by eager line guys, the right tank (the one with no vent line obstruction) vented fuel long before the other one did. Also, the tank with the obstructed vent was the one where fuel started leaking out of a rivet on top of the wing. Perhaps these clues were trying to tell me that I was already in bad juju land, with the obstructed vent causing increased pressurization of that tank?
 
Okay as usual I have learned a ton here. Can't tell you how grateful I am for all the info and the time and care spent providing it.

So if I'm understanding all this correctly, I think there are actually two distinct problems that I lumped together due to a lack of appreciation of the physics and of the design involved.

1. My tank is a gurgler, likely because the holes designed to prevent that have been either omitted entirely or partially blocked by sealant. Will get a borescope in there to confirm. Likely no easy fix for that short of pulling the tank, but on the plus side it's basically an annoyance.

2. My vent line was partially obstructed. As noted above, after pulling the goo/screen off of the end, the tank is now for the first time audibly gurgling AFTER replacing the cap, something it presumably should have been doing previously. Such a blockage, if it got bad enough, could be bad juju.

I previously noticed that on a hot day with the tanks filled to the max by eager line guys, the right tank (the one with no vent line obstruction) vented fuel long before the other one did. Also, the tank with the obstructed vent was the one where fuel started leaking out of a rivet on top of the wing. Perhaps these clues were trying to tell me that I was already in bad juju land, with the obstructed vent causing increased pressurization of that tank?
The lack of air bleed holes has no real downside after fill is complete. No external venting is required for the air to eventually work its way to the highest point where it wants to be. The volume is constant and not changing, things are just moving around - air and gas molecules just trading places. The exception being it will take a long time to fill if you want a truly full tank. Fuel level will keep dropping as the air makes its way out of the individual tank compartments.

The blocked vent is bad. Clearly it could pass enough air to equalize in your case while the pump was pulling fuel - it is quite strong. So, you got lucky there. The leaking rivets makes sense. The blocked vent creates a bit of pressure in the tank as the fuel expands. Probably not much, but may have been enough to push fuel through a compromised rivet seal that would not have leaked a atmo pressure. When they put cold fuel in your tank on a hot sunny day, it can expand pretty fast. If you can't evacuate that at the same rate, a slight pressure will build.
 
The lack of air bleed holes has no real downside after fill is complete. No external venting is required for the air to eventually work its way to the highest point where it wants to be. The volume is constant and not changing, things are just moving around - air and gas molecules just trading places. The exception being it will take a long time to fill if you want a truly full tank. Fuel level will keep dropping as the air makes its way out of the individual tank compartments.

The blocked vent is bad. Clearly it could pass enough air to equalize in your case while the pump was pulling fuel - it is quite strong. So, you got lucky there. The leaking rivets makes sense. The blocked vent creates a bit of pressure in the tank as the fuel expands. Probably not much, but may have been enough to push fuel through a compromised rivet seal that would not have leaked a atmo pressure. When they put cold fuel in your tank on a hot sunny day, it can expand pretty fast. If you can't evacuate that at the same rate, a slight pressure will build.
I sealed a couple tanks on a 4. Installed them and added fuel. Got a call from the airport two hours later, saying fuel was pouring out of the plane. Turned out one of the vent lines was fully blocked (mud dauber nest) and as the fuel heated, the pressure blew out a chunk of the new proseal. It was 2-3 days old, but that stuff takes a month for full cure. It can hold fuel after a day or so, but can't handle much pressure yet. Turns out they never noticed the blocked vent because there were so many leak paths in the failed sealant that were acting as vents and the pump pulled fuel just fine. I had pressure tested them to 1 PSI, so the pressure occurring from heating fuel on the ramp had to be at least 1 PSI and likely quite a bit higher.
 
It was 2-3 days old, but that stuff takes a month for full cure. It can hold fuel after a day or so, but can't handle much pressure yet. Turns out they never noticed the blocked vent because there were so many leak paths in the failed sealant that were acting as vents and the pump pulled fuel just fine. I had pressure tested them to 1 PSI, so the pressure occurring from heating fuel on the ramp had to be at least 1 PSI and likely quite a bit higher.
I suggest putting fuel in a tank with proseal not yet fully cured is not a good idea.
The blocked vent is bad. Clearly it could pass enough air to equalize in your case while the pump was pulling fuel - it is quite strong. So, you got lucky there.
Lucky is the key point. Here fuel heating and pressurizing a tank to the point of leaking is the best outcome. A fuel pump creating a vacuum in the tank is the worst outcome (as in fuel starvation and/or tank collapse). Remember the engine driven fuel pump on standard Lycoming engine is a positive displacement pump that is more than capable of collapsing a tank.

I suggest taking action to mitigate clogged tank vents. Start with using 3/8” vent line on the part that is out in the breeze with some barrier to insects. I include a vacuum breaking valve as the “plan B” option (see my #13 post).

Carl
 
I suggest putting fuel in a tank with proseal not yet fully cured is not a good idea.
proseal guidance is clear that exposure to fuel is acceptable after 24-48 hours of cure at 70* for the 2 hr variety. just not strong enough to handle pressure.
 
Last edited:
I wait minimum 4 days (preferably a week) before placing fuel in a repaired tank. Maybe over cautious but I’m very resistant to have to do a repair twice. Owners are always anxious to get back in the air until I ask them how their re re tank repair skills are.
 
The drain end of the vent is not the only area blockage could possibly occur. Stick your finger in the tank filler hole & check that the vent entrance (just behind the filler collar) might be partially blocked with a bit of Proseal.
 
Re: Blocked fuel tank vents. When Bruce Bohannon was trying to set altitude records in his highly modified RV-4, Exxon Flyin’ Tiger, he ran into oil cooling issues at higher altitudes. They came upon the idea of spraying water on the oil coolers to aid in cooling the oil. That worked and the oil temps were OK, but during one attempt as the water flowed down the firewall and the belly, it froze on the fuel tank vents and blocked them causing the engine to quit. During the descent one tank collapsed due to the pressure differential. Being that high he was able to deadstick the airplane to a safe landing at an airport.

In his own words:

 
Last edited:
Re: Blocked fuel tank vents. When Bruce Bohannon was trying to set altitude records in his highly modified RV-4, Exxon Flyin’ Tiger, he ran into oil cooling issues at higher altitudes. They came upon the idea of spraying water on the oil coolers to aid in cooling the oil. That worked and the oil temps were OK, but during one attempt as the water flowed down the firewall and the belly, it froze on the fuel tank vents and blocked them causing the engine to quit. During the descent one tank collapsed due to the pressure differential. Being that high he was able to deadstick the airplane to a safe landing at an airport.

In his own words:

Like carl, i also install a .5 psi check valve on one of the tanks vent line to deal with the possibility of a frozen outlet. A must have for ifr work imo.
 
Like carl, i also install a .5 psi check valve on one of the tanks vent line to deal with the possibility of a frozen outlet. A must have for ifr work imo.
This sounds like a very good idea, considering that my little fuel vent openings sure look like ice magnets. But as usual my ignorance knows no bounds - what kind of check valve do you use, and where is it installed?
 
This sounds like a very good idea, considering that my little fuel vent openings sure look like ice magnets. But as usual my ignorance knows no bounds - what kind of check valve do you use, and where is it installed?
you add a tee in your 1/4" vent line, either in the wing root or fuse. on the 3rd leg of tee, you add a std check valve. check valves allow flow in one direction only. valve should be installed so that air can be pulled into the vent lines, but cannot be pushed out. you just blow through it to confirm orientation. You want an activation pressure of .5 - 1 PSI. Many are plastic, so be sure it is rated for use with fuel, as many are air only. Mcmaster has a good selection. Finally, as you know, liquid fuel can be pushed out of these vents. you must orient this valve in a way that fuel will not collect on the valve. ok for fuel to contact it when it is pushing liquid out, just make sure that gravity can drain it away. Easy to install such that once fuel gets to it, it wants to stay there. for example, bring tube out of tee and turn upward then mount check valve there. Doing this near the top of the loop in the fuse helps also.

this doesn't help with expanding fuel with a blocked vent, just with the pump sucking fuel out with a blocked vent; the in flight ice over risk.
 
My -7 tanks fill up very slowly. I usually need to squeeze the filler handle at most 1/2 way or it will overflow before the fuel makes it past all the tank ribs and evens out. Never been any problem otherwise, I just get to stand next to my RV for a few more seconds every fill, admiring another nice VFR day!