rvator9a

Well Known Member
Anyone out there have any advice for panel layout on a side by side RV, I plan on using a large screen Dynon(unless I see something else at sun&fun) I have vans engine intruments. This is a budget build so I plan on possibly adding gps at a later date. What I'm interested in is placement of radio, switches, breakers, gauges and such that offers best access and convenience while flying. Any advice or possibly directions to a web site that would help with planning. Thanks
 
Which hand, how often.

Bob,

I did a search for "Instrument Panel Layout" and came up with a lot of recent posts with good info. They are listed at the bottom.

One way to help get the panel layout right is to:

Sticky tape paper cutouts of the instruments and switches on the panel.
Sit in the aircraft (In the workshop)
Go through ALL the checks from Start up to Shutdown.
Fly a few dummy circuits.

This will sort a lot of 'Bad Placement' out.

If for example, during the start drill, you find your right hand is on the throttle and the Mag Switches are sited for your right hand also.

Similarly, you want the Flap switch placed for your non-flying hand.

Otherwise it is hard to generalise as there is so much variation in RV panel layouts, though some general rules are;

Place the flight instruments directly in front of you.
Place the ASI (EFIS) as high as possible. This makes it easier to glance in at the Airspeed on short final.
Place the least used equipment furthest away from the pilot. This might be the Engine instruments or the Avionics.
Group switches. ie Lights together.
Place Warning Lights RIGHT IN YOUR LINE OF SIGHT.

Good luck,
Pete.

http://www.vansairforce.com/community/showthread.php?t=15960&highlight=instrument+panel

http://www.vansairforce.com/community/showthread.php?t=15533&highlight=instrument+panel

http://www.vansairforce.com/community/showthread.php?t=15277&highlight=instrument+panel

http://www.vansairforce.com/community/showthread.php?t=15145&highlight=instrument+panel

http://www.vansairforce.com/community/showthread.php?t=15059&highlight=instrument+panel

http://www.vansairforce.com/community/showthread.php?t=14717&highlight=instrument+panel

http://www.vansairforce.com/community/showthread.php?t=15617
 
Good advice on start switch placement. I have a followup question for taildragger drivers... how many hands does it take to start a TD RV? It seems like you'd want to use one hand to hold the stick back, your second hand for the throttle, and your third hand to crank the engine(!!!). I guess I can see why people put the starter button on the stick, though I'd personally prefer to avoid that.

thanks,
mcb
 
I have always managed, somehow, to start the engines with just two hands. Starter button on the stick = unnecessary complexity/weight plus the opportunity to push the button at inopportune times. "Simplicate and add lightness" -John Thorp (I think).
 
Nose over.

I have seen a Champion and a Pilatus Porter bury the prop due the throttle being 'cracked' a little to much.

Start Switch on stick is good insuranace.

Pete.
 
I've never seen the nose-over that Pete mentions, but I know it can and does happen. I don't have a start switch on the stick, but when I start, I always have my left hand on the throttle, the right hand on the starter switch, and the big Infinity stick grip held back between my thighs. If I felt I had too much throttle, it would be instantly pulled back to idle, and my left hand would go to the stick.

That's my plan.....we don't all have to have the SAME plan....but you have to have a plan...

Paul
 
RV9A

If your building a 9A here is a picture of Dr Cleve's recently completed panel. Not the same kind of equipment you might want to start with, but just an idea. Its an IFR panel oriented around the GRT EFIS and the Garmin 430.

In the 9a there are 3 support ribs behind the panel and the one in the center should bare particular notice when your doing layout. You dont want your center stack to lap over that center support rib because you cant cut away any of it for radio clearence. Its best to move your radio stack over slightly to the right to fit between the center rib and the right side rib. We had to notch the left hand rib slightly to allow the GRT EFIS to clear. Thats not a big deal and you can reinforce it with a doubler, but stay away from that center rib. Other than that the panel you see fits the 9a without restriction. Happy building :)

The IFR panel for Dr Cleve Thompson RV9A
 
mburch said:
how many hands does it take to start a TD RV? It seems like you'd want to use one hand to hold the stick back, your second hand for the throttle, and your third hand to crank the engine(!!!). I guess I can see why people put the starter button on the stick, though I'd personally prefer to avoid that.

Your own two hands are plenty for starting a taildragger, no need for a starter switch on the stick and no real need to hold the stick back to start. If your engine start technique requires aft stick to hold the tail down, your throttle hand is doing something wrong... as in having the throttle open too far. Just crack it a little, it doesn't need much.
 
Bent Porter

The Porter went over because he didn't have his normal compliment of nine Sky Divers in the back.
He was on a ferry.

The boss was not happy.

Pete.

PS. It wasn't me.
 
Bob,

When laying out your panel there are a lot of things to consider. I'm sure I'm not telling you anything new there.

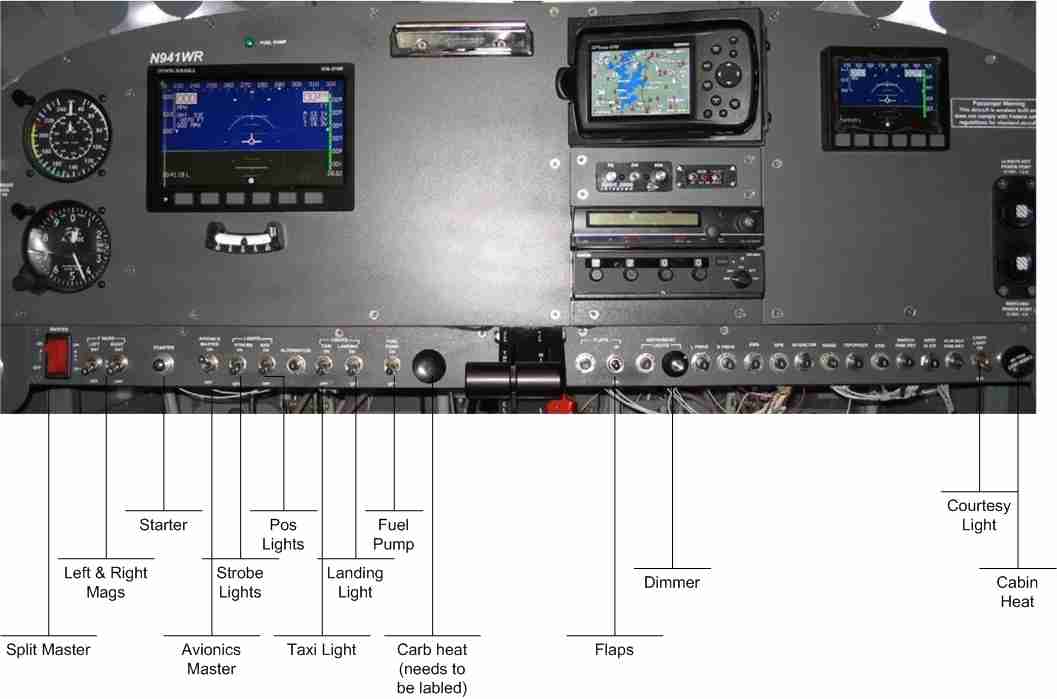
Back when I set mine up, I elected to lay it out based on what I like to call "phase of flight" rather than function. Thus, all my lights are not grouped together.

Basic instrument layout is up high in the panel so the transition from looking at the instruments to outside is not that great. The Garmin 496 is in an AirGizmo angled adapter at the top of the radio stack so I don't have to look down to see it. The backup airspeed indicator is in the upper left hand corner of the panel, right where I look when landing. Think about those things when laying out your panel.

I started by putting paper cutouts on the blank panel and then putting that right in front of my weight machine so I could look at it every day while working out. A number of things were moved around while I had the "paper tiger" mock up.

Switch placement was a big deal for me. Nothing fancy on the stick like a starter button. Airplanes, even tail draggers, have been around for a long time without such things. Also think about future maintenance when laying out your panel. There is nothing worse than building something only to find out you can't change a switch later on.

Back to that "phase of flight" thing.

The most critical phase of any flight is landing, so start there. I put the carb heat just to the left of the throttle quadrant. To the left of that is fuel pump switch, and to the left of that is the landing light. Just to the right of the quadrant is the flap switch. I can rest my hand on the quadrant, push all the levers forward, including the carb heat, and toggle the flaps up with my fingers for a "go around".

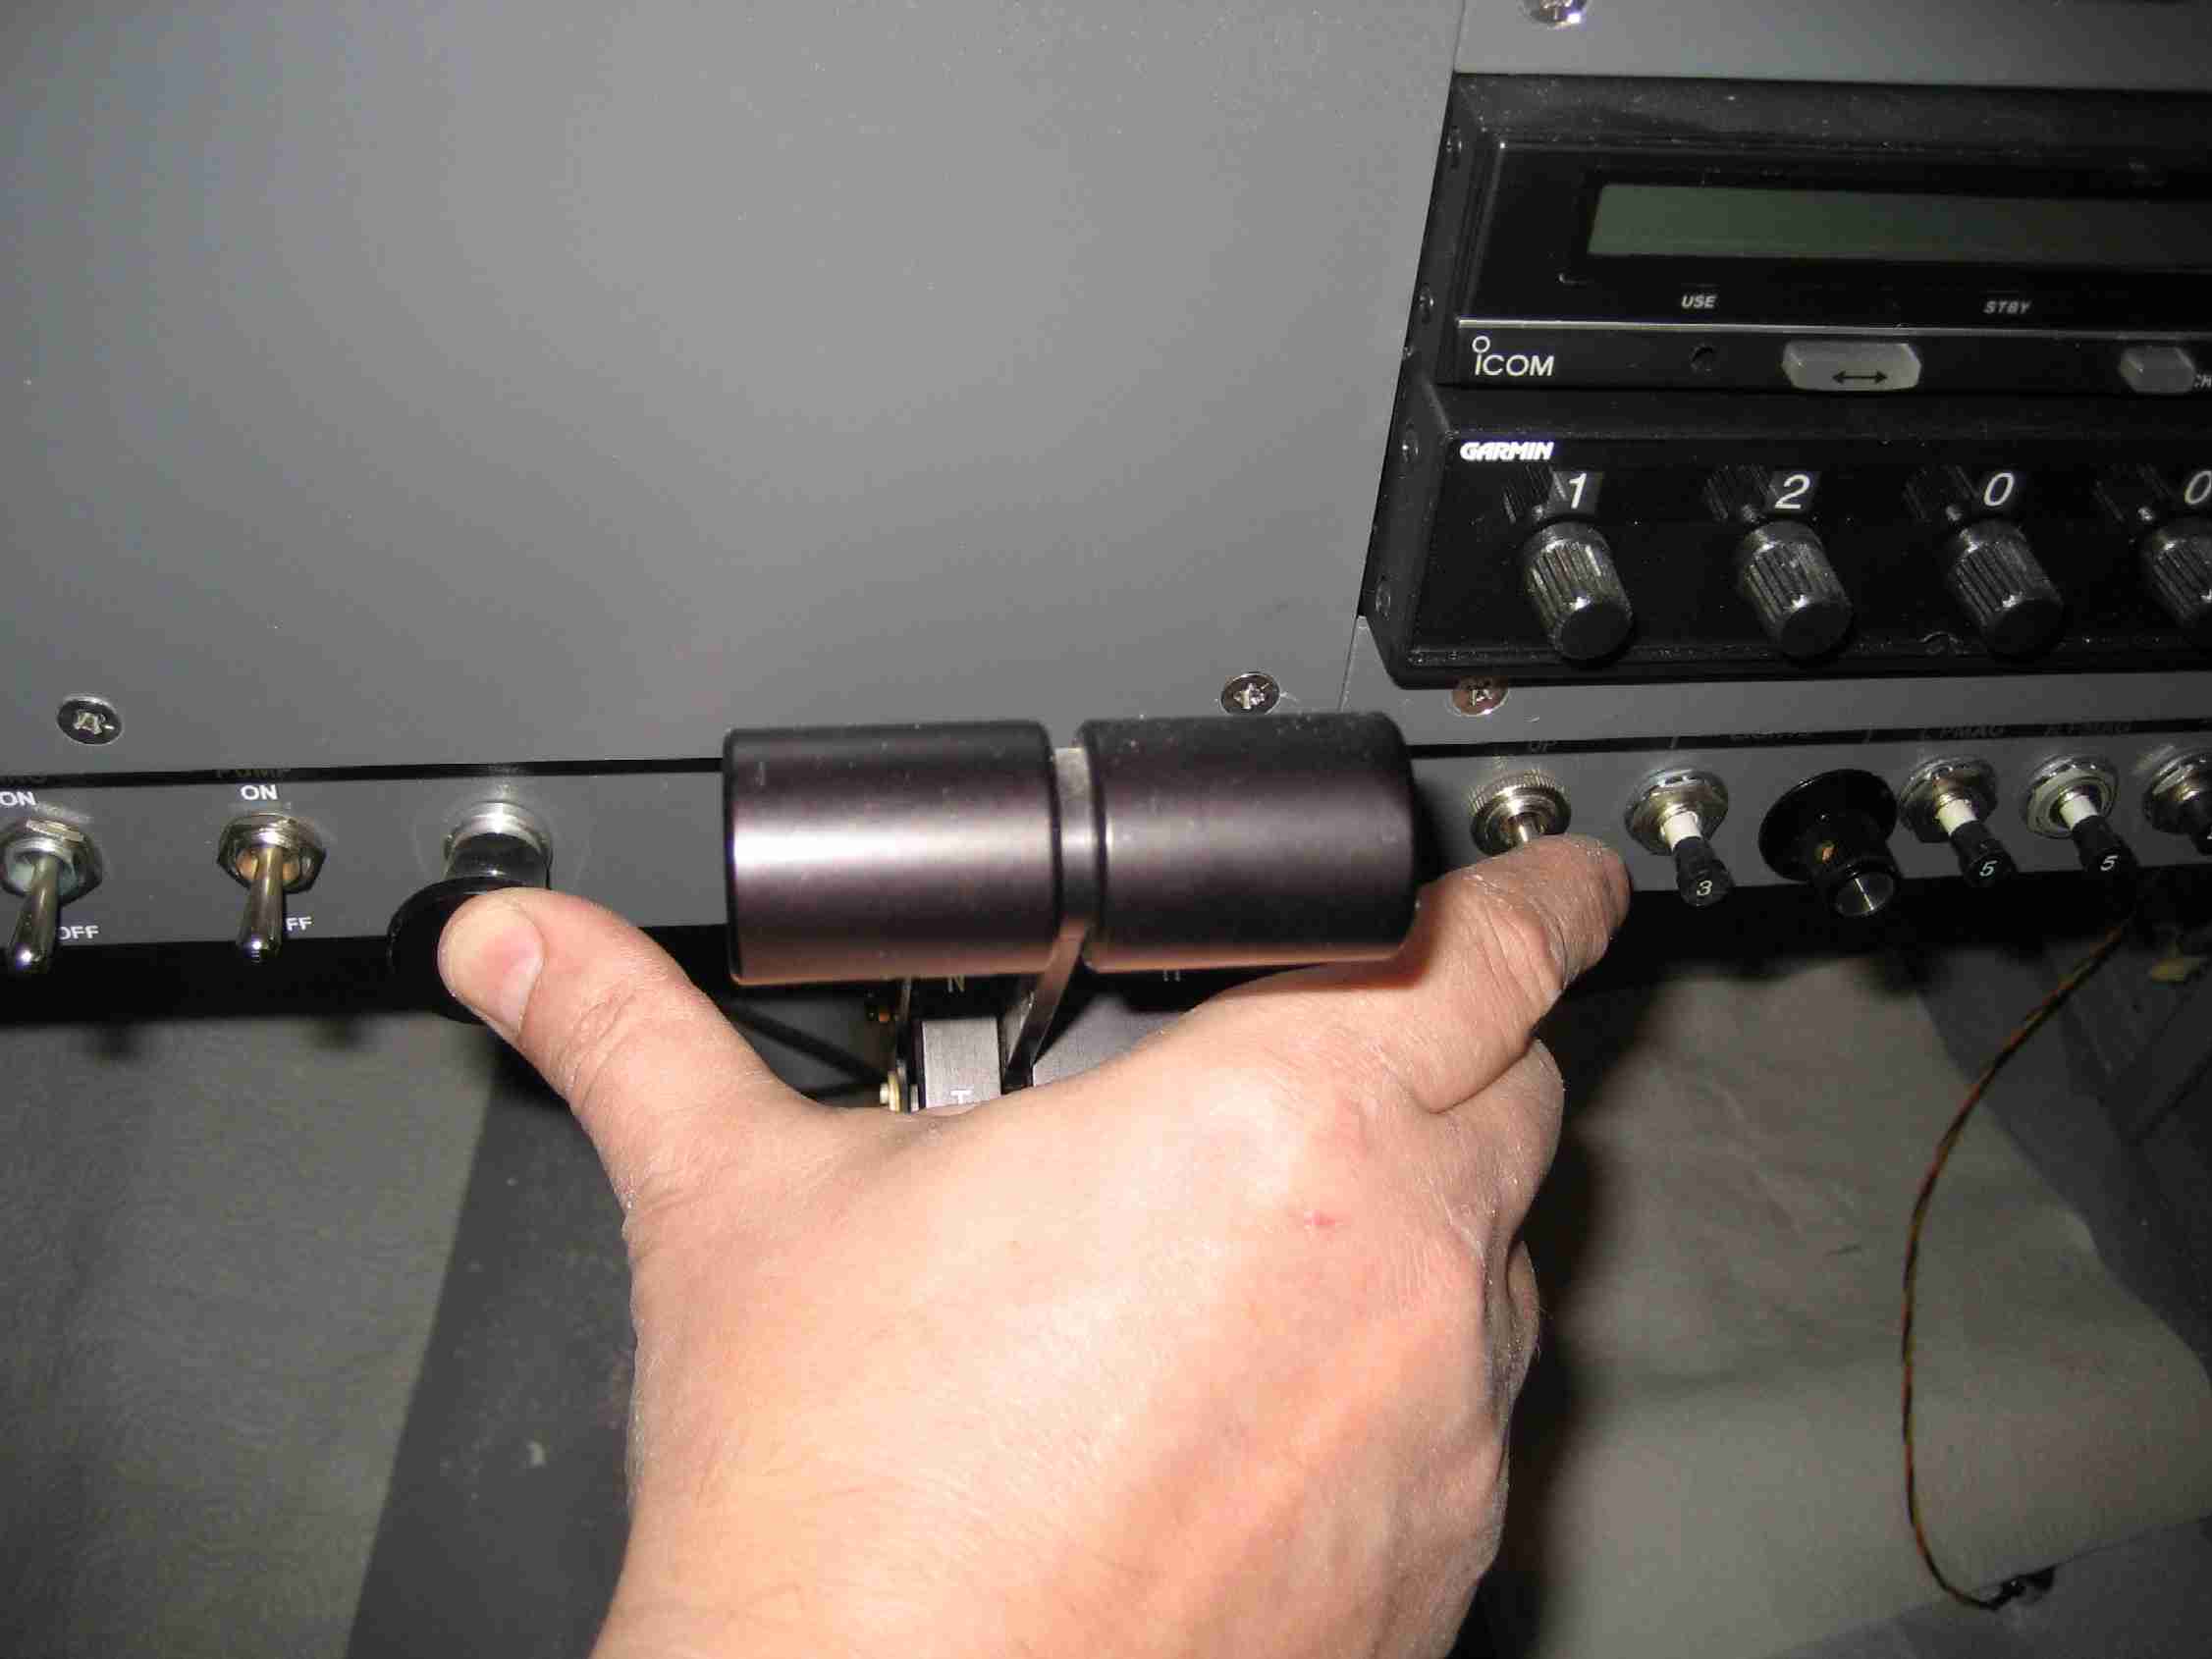
To the right of all that are the dimmer switch, interior lights, and CB's. Non-critical stuff over there out of the way.

Starting the plane is easy enough. On the very left side is the split Cessna master switch, to the right of that are the two mag switches, then the starter button. (No key for me.) Then there is the avionics master, strobes, position lights, taxi light, landing light, fuel pump, etc. A simple starting sequence.

Keep in mind, my plane is a day/night VFR ship.

As for warning lights, I have a Dynon D100 EFIS and D10 EMS. Those two units put both a red warning bar across the bottom of both screens if something goes out of bounds AND a tone in your headset. Thus, I felt there was no need for an additional warning light.

However, I did put a green "fuel pump on" light at the top center of the panel. This will get my attention if the pump is not on when I start my take off roll or if I leave it on after switching tanks in flight.

That should give you an idea of one guy's thought process when laying out his panel.

One other thought, with the radios to the right of center, the D10 EMS fits just to the right of the right rib, almost directly in front of the co-pilot's position. With the ability to interconnect the D100 EFIS and D10 EMS, the co-pilot can have their own flight instruments and I can have the flight instruments and engine instruments displayed on my side.

Good luck with your panel layout. Remember to lay it out the way YOU want. This is where you personalize the plane and make it yours!

For more details on my panel and thoughts, check out this page: http://www.repucci.com/bill/instruments.html
 
I did the whole print-out thing first.

Getting images, sizing them to real-world dimensions in MS Word, printing them and then taping them to the instrument panel. This will give you a great idea where you want to put things. You'll want to get inside the airplane for this. As for me, ergonomics are pretty darn important so I actually ordered my seats pretty early in the process so I would know exactly how the panel would feel.

After that...I used a sharpie marker and drew a reference line straight across the center of the panel (both vertically and horizontally) then measured off of those lines for all the holes.

2006-04-12.1463.jpeg


Then I punched/cut the square holes...

2006-04-17.1467.jpeg


And here's the 'almost finished' result.

2006-12-29.1837.jpeg


If you're doing a tip-up and you want to center the D-100 in the pilot's view, you'll need to modify the left rib behind the panel. Also if you're doing a tip-up you'll want to be aware that the tip-up canopy frame will block use of about the top 2.5 inches of the subpanel. That's why I put my switches along the top -- to avoid having to put anything deep under there. Plus, dealing with the switches is much easier in that location.
 
I am just finishing the design of my panel. I had Experimental Air (www.experimentalair.com) do a CAD layout of my panel and I printed it full size. I taped the drawing to the panel and sat in the plane to see if I could reach everything. I found a couple of places that I needed to make changes. I think it is important to get a feel for where things are located when actually sitting in the plane. However you want to do this, cutting out a picture of each instument, or having a CAD drawing done, it lets you get a feel for how you can reach everything.

I put my fuel pump and flap switches on the left side of my panel and my mag a starter switches on the left similar to Ironflight's.
 
ptrotter said:
I put my fuel pump and flap switches on the left side of my panel and my mag a starter switches on the left similar to Ironflight's.
Paul,
You bring up a good point. Switch placement has a lot to do with seat placement.

When building a SbS aircraft, I would not recommend putting the flap switch on the left side of the panel. On a -3, -4, or -8, that is the correct place for it.

When laying out your panel, try to minimize the amount of time your hands are off the controls. You do this by keeping the switches close to the primary flight controls. (Throttle and stick) Thus, put the switches low on the panel, close to those two items.

I've seen flap switch placements all over the place, some good and some not so good. IMHO one of the worst places I've see it is up and to the left of the throttle in a SbS RV. This required the pilot to take his hand off the throttle, move it across his body and up and then put his hand back on the throttle. All that is going on during a critical phase of flight and while being bounced around. It is very easy to retract the flaps in this layout when you meant to lower them, if you hit some turbulence just as your hand touches the switch.

Again, those are just my opinion and you know what they say about opinions.
 
Be careful about compromises...

I know that there are structural and panel space compromises that must be made when laying out your panel (I made some myself).
But when laying out where you what thing to be, always keep in mind the reason for the instrument/switch. How will it be used and when it will be used. If it has to do with flying then make sure it is easy to use while flying.

Pete mentioned a sound approach to figuring this out in his post. Try to get a feel for how your hands and eyes would find and use each item in the panel.

Kent
 
N941WR said:
I've seen flap switch placements all over the place, some good and some not so good. IMHO one of the worst places I've see it is up and to the left of the throttle in a SbS RV. This required the pilot to take his hand off the throttle, move it across his body and up and then put his hand back on the throttle.
Hi Bill,

Just wondering, where is the flap switch in your airplane? Most of the SBS RV's I've flown have had the flap switch just where you describe, a few inches up from and to the left of the center-mounted throttle. I'm sure there's a different place it could go but right now I'm having trouble thinking of where else I'd put it. Maybe I'm just having a mental block though.

cheers,
mcb
 
For what it's worth, here is my flap switch. Very easily accessible with your hand on the throttle. The LED indicators are for the trim system which is a little misleading. Still open to the possibility of ditching the LEDs and displaying trim on the Dynon.

2006-12-05.1809.jpeg
 
mburch said:
Hi Bill,

Just wondering, where is the flap switch in your airplane? Most of the SBS RV's I've flown have had the flap switch just where you describe, a few inches up from and to the left of the center-mounted throttle. I'm sure there's a different place it could go but right now I'm having trouble thinking of where else I'd put it. Maybe I'm just having a mental block though.

cheers,
mcb

Click on this picture.
The layout basiclly follows the 152 I learned in back when they were new.

As I said earlier, I can put my hand on the quadrant; push the throttle and mixture full forward with, push the carb heat in with my thumb, and toggle the flaps up with my index finger. All that happens w/o lifting my hand off the quadrant and while holding the throttle and mixture full forward.

Here is a picture of what I'm talking about:

The placement of the fuel pump switch next to the carb heat was dictated by that "phase flight" thing again. When getting ready to land, up goes both the taxi and landing light switches, up goes the fuel pump switch, and out comes the carb heat. All in a row, right next to each other.
 
Last edited: