burtw

Member
Sponsor
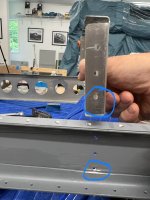
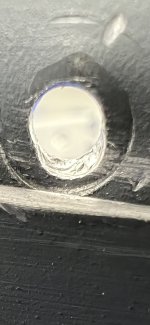
P 6-5 Step 1 RV-10 plans. Riveting the VS skeleton together. Successfully squeezed the VS-106 top rib but had trouble getting the yoke around the flange on the rear spar to rivet the inspar rib. Used the 2x gun and bucking bar for the 470AD4-4 rivet and cleared it. Drilled out but enlarged the hole as in the pics. Would normally just use a -5 rivet but the hole is attached to the spar caps and I’m not sure the larger rivet head or shop head will clear it. Gonna. All Vans tomorrow but would appreciate any thoughts. In hindsight I think I jumped too soon to the gun and might have used the DRDT to set the rivet. Also it took a bit of work for the 2x and thinking for that rivet I should have used the 3X gun.
 

Attachments

  • IMG_1898.jpeg
    IMG_1898.jpeg
    509 KB · Views: 187
  • IMG_1899.jpeg
    IMG_1899.jpeg
    662.5 KB · Views: 187
  • IMG_1900.jpeg
    IMG_1900.jpeg
    447.3 KB · Views: 181
I would try using an oops rivet. In case you haven’t heard of these, a -4 oops rivet has a -4 manufactured head and a -5 shank.
NAS1242AD is a 1/64" oversize rivet for MS20470AD. NAS1241AD is 1/64" oversize for MS20426AD rivet. Drill #.27
http://www.skybolt.com/catalog/034 Solid Rivets-Aluminum.pdf

Thanks, Bill. I've got the 1097s but not the 1242s. I think the hole might need more than 1/64 expansion but maybe not. The link to Skybolt was a File Not Found on their main page. When I searched for the 1242 it drew a blank. I've found them other places, but so far only by the pound, which would be overall. I'll keep looking.
 
You could put a doubler on the back side and match drill it to all 3 holes. You’ll probably need the next length of rivet. Not a perfect fix, but better than what you have.
 
This looks fixable to me. But bear in mind also: after accumulating several deficiencies like this on one part, it may be simpler and not too expensive to order replacements. Definitely get instructions from Vans before going the doubler route.

This is also a good time to review the rivet repair mil spec and look at your drilling out technique.

technique: I drill out the head only with full sized drill (#30 here), pop off the head (if it isn’t already on the drill bit) with a 1/8 pin punch, drill about halfway into the tail with a smaller bit (#40 for 1/8 rivets, about #45 or 1/16 for 3/32 rivets) and then grab the shop head if possible with altered (ground flat) small diagonal pliers. If it turns, you’re in luck. Gradually wiggle it out. If that doesn’t work you can gently hammer with a 1/16th pin punch (HF shorty ball peen) and then drill more but watch out to avoid bending the flange. You may be able to bend it back. Once. A little careful technique saves the hole.

if you’re drilling out an oops rivet remember the new hole size and change your drill sizes to match.

This is a marathon not a sprint. But also don’t get stuck just fix it and move on. There are specs to follow to declare your work airworthy. That’s a very different objective with a shorter time frame than “perfect”.
 
Last edited:
Gonna talk to Vans for sure. Can't imagine it's not fixable. If the spar cap wasn't in the way it would be pretty straight forward with the next diameter rivet. I'm new at this but I can see two possible solutions, if the engineering works out. Put a doubler the thickness of the spar cap across the back abutting the spar caps which would negate the spar cap interference problem since it would essentially be one continuous piece and If the larger rivet encroached on the spar cap, it wouldn't matter since the doubler would be at the same level. Alternatively, smoothly round out a few thousandths of the edge of the spar cap to accommodate the larger rivet. It's not that much materiel removed and if smoothed out to prevent stress risers would seem like the most efficient solution. Have to see what Vans says.
 
I've had a few similar situations where Van's advice has been to fix the hole as best as possible, put a rivet in it, then add an additional rivet in between. That assumes edge distance allows that approach.
 
I've had a few similar situations where Van's advice has been to fix the hole as best as possible, put a rivet in it, then add an additional rivet in between. That assumes edge distance allows that approach.
Another interesting idea. Thanks!
 
Burt,

I might be way off-base but the 3rd hole on the flange (the one at the top) looks like it has a scratch that's significant. It might be the pic is misleading, but make sure it's not bad. If it is, buff it out with scotch brite.

Cheers!
Mike
 
Last edited:
Burt,

I might be way off-base but the 3rd hole on the flange (the one at the top) looks like it has a scratch that's significant. It might be the pic is misleading, but make sure it's not bad. If it is, buff it out with scotch brite.

Cheers!
Mike
Nice catch, Mike. It was a small scratch much easier to see in the pic than spot on the piece directly. A little scotch brite took care of it.
 
Gonna talk to Vans for sure. Can't imagine it's not fixable. If the spar cap wasn't in the way it would be pretty straight forward with the next diameter rivet. I'm new at this but I can see two possible solutions, if the engineering works out. Put a doubler the thickness of the spar cap across the back abutting the spar caps which would negate the spar cap interference problem since it would essentially be one continuous piece and If the larger rivet encroached on the spar cap, it wouldn't matter since the doubler would be at the same level. Alternatively, smoothly round out a few thousandths of the edge of the spar cap to accommodate the larger rivet. It's not that much materiel removed and if smoothed out to prevent stress risers would seem like the most efficient solution. Have to see what Vans says.
If i understand your idea for the doubler... it looks like the edge distance of the rivet hole in the doubler would be violated.
 
If i understand your idea for the doubler... it looks like the edge distance of the rivet hole in the doubler would be violated.
I was suggesting that the doubler would span the width of the web between the two spar caps. Then when the bad hole was upsized if the larger rivet head overlapped with the spar cap it would be level with the cap so it wouldn't matter. It's true it would be right on the edge of the doubler, but I think that's just giving the rivet head a horizontal surface to sit on. The edge distance for the original (now upsized) hole in the spar web would still be there. Interesting question on whether the doubler, which would abut the spar cap also requires edge distance. I did call Vans and their solution was what Mike suggested above - drill another hole between the bad one and the one in the middle ensuring edge distance between all the holes. Never got to the doubler question although I'd be curious to know the answer. My thought on this was that the strength of the joint is maintained by the rivet filling the spar web and the rear flange as that was the original joint.
 
My thinking (such as it is?), would be that the reason for edge distances is to avoid getting a crack. So I'd think the doubler might crack at the edge? Problem?
Anyhow, glad there's a different, approved, solution for you. (y)
 
My thinking (such as it is?), would be that the reason for edge distances is to avoid getting a crack. So I'd think the doubler might crack at the edge? Problem?
Anyhow, glad there's a different, approved, solution for you. (y)
For anyone still watching this thread, the Vans solution worked out great. Drilled another hole between the bad one and the center one, filled the bad hole with a -4 as well as the new hole. One lesson learned (other than be VERY careful drilling out rivets) is that I didn't need to buck the rivet in the first place. I figured out how to reach them all with the squeezer which would have prevented the problem in the first place. I'll still need to improve my bucking skills since there's lots of that to do elsewhere.