dmat

Well Known Member
Advertiser
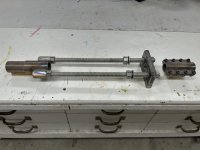
So…. I tried to star the restoration of 114RV and the first order of business was removing the tail spring so I could cut it and reduce the end so I can fit the new locking/full swivel tailwheel on.

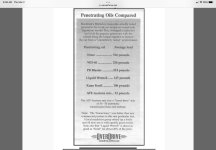
I pulled the 1x bolt that hold the spring to the tail and hit it with penetrating oil….. after with significant “persuasion” the thing DIDN’T Budge…..

I’m at a loss. Only thing I can think of :
1) there is another bolt holding in….?
2) using a Rivet gun to try and hammer it out from the inside of the tail?

Any help would be greatly appreciated,
Dan
 
Last edited:
Puller for tail spring

I used two threaded rods and some aluminum angle to build a puller. It’s hard to explain, but hopefully this short video helps. There are four angle pieces that fit over the stinger. Two on each end. You cut a U shape groove in the angles so that when mated together they create a round hole the diameter of the stinger. These angles push against the stinger bracket in the tail and the tail wheel assembly on the other end. All cheap hardware store stuff.

https://imgur.com/a/uXKop0Y
 
Last edited:
If its the early version with the 90 degree bend ou can use the end to hold on to and try rotating it.
I pulled one out by slowly rotating it.
Mike
 
When I did mine I was lucky that it had been oiled when installed. Came out easy.
Try mouse milk and put a heat gun on it from inside the access opening onto the weldment. Good luck!
 
Maybe a little home brew transmission fluid and acetone might help.
 

Attachments

  • IMG_0723.jpg
    IMG_0723.jpg
    136.7 KB · Views: 100
I do a good amount of work on rusted cars here in the midwest and rust is tough to deal with when you can't use a propane torch. In my experience rust penetrent won't be a big assistance. The rusting process causes the inner part to expand in size and that is the big problem. I recently removed a trailer hitch end from a receiver that had not been removed in 10 years. Heated very aggressively and it still took 30 minutes with a 4lb sledge to get it out and those aren't tight fits to begin with. I would be following the above posters advice on making a puller if you cannot find a way to beat it out from the back. It is most helpful to beat the inner part in both directions to help break down the rust, if you can.

Larry
 
Last edited:
Rust...........

Believe it or not! WATER! Moisture was a primary ingredient that caused the rust so water will "cut" it.

I first discovered this many years ago while helping a friend who restored Model Ts. We removed an axel from a Model T that had been buried for decades. The "U" bolts were so covered with rust that you couldn't even see the nuts. We soaked it in water for several hours, wire brushed it thoroughly, and the nuts came tight off.

Now once you have introduced cutting oil or anything else, this won't work, because the oil prevents the water from penetrating. I have used this method successfully for quite a number of years.
 
+1 for Kroil.
Removing the old school tailspring was also the first item I tackled on my -4 restoration.
I applied Kroil several times over the course of a day and let it work overnight. Using the 90 degree bend as leverage to twist, it came off without too much persuasion.
I used a little SCF-50 upon re-installation to (hopefully) eliminate future corrosion.
Good luck!
 
Some twisting and a pipe to give me leverage worked the trick! That’s everyone for the help!

D
 
Puller for Tail Wheel Spring - 2

I agree with the puller design shown on the video on Post #2 - I made one a long time ago for the same purpose. Mine is a bit more "robust", and can handle (without compromise) a more resistant spring. The device only needs to be strong enough to remove the spring you are working on. So mine may (probably is) be overkill - and the "Cinderella" tool may be somewhere in between. But this is the one I made -

HFS
 

Attachments

  • Tail Wheel Spring Removal Tool.jpg
    Tail Wheel Spring Removal Tool.jpg
    298 KB · Views: 86
I agree with the puller design shown on the video on Post #2 - I made one a long time ago for the same purpose. Mine is a bit more "robust", and can handle (without compromise) a more resistant spring. The device only needs to be strong enough to remove the spring you are working on. So mine may (probably is) be overkill - and the "Cinderella" tool may be somewhere in between. But this is the one I made -

HFS

YESSSS! That looks awesome! My stuck tail spring was on a relatively new SPA Panther so it probably wasn’t as stuck as the OPs. I think my issue was more about gaining leverage. Even with the “less stuck” stinger my pieces of aluminum angle bent a little under the force.
 
removing the tail spring so I could cut it and reduce the end so I can fit the new locking/full swivel tailwheel on.

2) using a Rivet gun to try and hammer it out from the inside of the tail?

Any help would be greatly appreciated,
Dan

I would get a firm bite on the end you are going to turn on the lathe with a pair of vice grips and hit the vise grips with a 4X rivet gun.