Jesse23

Well Known Member
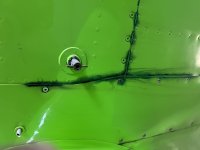
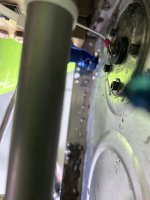
Trying to use vacuum to suck in small amount of pro seal (Flamemaster) on bottom inboard flange near drain valve. It doesn’t drip, but starts staining the seam, and I wipe off after each flight. I also noticed the bead of sealant is very gummy on the outside of the seam in that area, when the inboard panel is removed. Trying to avoid removing the tank with this process 1st.

Anyone have any vacuum numbers? I have a hand pump to draw from the vent line. I do not want to go over the line and suck a dent in the tank. It doesn’t take much.
 

Attachments

  • IMG_5519.jpeg
    IMG_5519.jpeg
    1.6 MB · Views: 60
  • IMG_5512.jpeg
    IMG_5512.jpeg
    775.5 KB · Views: 61
When I initially built my fuel tanks one of them had two leaks discovered during soap testing. I mixed the Proseal and thinned with some acetone and applied about a 1/2 inch of mercury (.5 MmHg) utilizing an auto store vacuum hand pump adapted to the vent line. (Fuel pickup capped.) With the vacuum, I continued to slather the slurry at the leak points every few minutes ensuring that the vacuum was refreshed occasionally. When I felt it had sucked enough of the slurry into the leak points, I removed the vacuum and wiped what I could with shop towels (no solvent). A retest a week later indicated it was holding and two years of fuel in the tanks there has been no weeping so it must have worked....
 
Sweet - thanks for the numbers. Will seal next week when the cans arrive. Was looking to use that process.
 
Consider using a vacuum cleaner (shop vac or smaller) to limit the amount of vacuum and reduce chance of damage.
 
When I initially built my fuel tanks one of them had two leaks discovered during soap testing. I mixed the Proseal and thinned with some acetone and applied about a 1/2 inch of mercury (.5 MmHg) utilizing an auto store vacuum hand pump adapted to the vent line. (Fuel pickup capped.) With the vacuum, I continued to slather the slurry at the leak points every few minutes ensuring that the vacuum was refreshed occasionally. When I felt it had sucked enough of the slurry into the leak points, I removed the vacuum and wiped what I could with shop towels (no solvent). A retest a week later indicated it was holding and two years of fuel in the tanks there has been no weeping so it must have worked....
I did basically the same thing repairing one weeping rivet on my leading edge several years ago, worked like a charm.
 
Be careful with vacuum. Always use a manometer..it is surprisingly easy to implode a tank. The leaks in the picture may be coming from far beyond where you suspect. I have fixed a bunch of tanks.
 
The vacuum cleaner comes up every once in a while and sounds good until you consider you are pulling gas fumes through a brushed electric motor.
 
Be careful with vacuum. Always use a manometer..it is surprisingly easy to implode a tank. The leaks in the picture may be coming from far beyond where you suspect. I have fixed a bunch of tanks.
I have had the inner panel off numerous times, it’s definitely that seam where the sealant is slimmy, just under the fuel line. There is no blue into the next aft compartment. Remove slimmy sealant, flush tank, scuff area, pull a vacuum and maybe do a 2 step seal. From the batch of sealant, take sone and thin down with acetone and give it a coat or 2. Wipe clean then follow up with the thicker part of the batch. Or, do another full mix (no thinning), the next day on top of the thinner batch, still keeping the vacuum. It appears many have had success, wo removing the tank.
 
The vacuum cleaner comes up every once in a while and sounds good until you consider you are pulling gas fumes through a brushed electric motor.
I shoved and blew a trash bag into the tank, taped it off to the outside skin, and pulled the bag out into the shopvac to isolate any fumes from the motor. Used the green Loctite method to seal a weeping rivet.
 
Judging by the external bottom view of your tank, you probably have leaks along the rear baffle seams too. Leaks of this type (definitely not a weeping rivet type) can only be repaired by getting inside, removing as much of the internal contaminated sealant as possible along those joints & applying a good bead of sealant over EVERY joint in that tank cell.

Never apply new sealant over an old soft (gooey) layer. The old degraded sealant will quickly contaminate the new stuff.

Always repair seams at least an inch or two beyond where you think the leak ends. (unless you really enjoy working on endless tank repairs...)
 
Last edited:
Gonna try from the outside 1st. It’s weeping and not dripping, but small band aid before pulling the tank. I also removed the nut plate under the fuel line to make the sealant work easier. Will report after a week of dry time.
 

Attachments

  • IMG_5533.jpeg
    IMG_5533.jpeg
    1.5 MB · Views: 25
I'm siding with Bill on the manometer. That would seem to minimize the risk of puckering a tank.
 
The rear baffle sealant has failed. That’s why it is rubbery as you mentioned. That can only really be fixed by resealing from the inside. I had the same problem on an 8 tank.