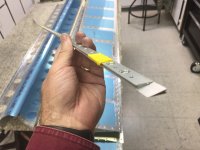
Working on my rudder, RV-14A, and was doing some practice countersinking on a small scrap piece of trailing edge...
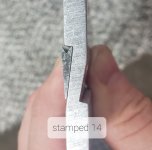
I'm using the Cleaveland Tools jig which is stamped 14 on one side and no stamp on the other. The directions said the side stamped 14 is for the RV-14... makes sense I thought...
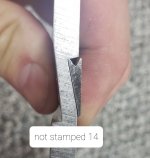
So the side stamped 14 gave me a countersink that was not perpendicular to the skin. Plus, the holes don't line up in the jig for the nose of the bit. I tried the other side and it seemed to work much better.
Has anyone else had this issue or am I making a dumb mistake?
I'm using the Cleaveland Tools jig which is stamped 14 on one side and no stamp on the other. The directions said the side stamped 14 is for the RV-14... makes sense I thought...
So the side stamped 14 gave me a countersink that was not perpendicular to the skin. Plus, the holes don't line up in the jig for the nose of the bit. I tried the other side and it seemed to work much better.
Has anyone else had this issue or am I making a dumb mistake?


") .
.