rvanstory
Well Known Member
I posted some pics in an older thread about covering my control sticks in leather stitched covers. I have received a few PM's with question on how this was done, so, thought I'd post more details here for those who want to copy.
Step 1: Drill a hole large enough to allow stick grip wires to pass inside the tube.
.jpeg")
Step 2: Obtain supplies. You will need:
a) thick "boot or belt leather" (approx. 1/8" to 3/32" thick)
b) Heavy thread in color of choice
c) Leather needles Link to leather needles
d) leather hole punch Hole Punch
Step 3: Make paper pattern for curvature of top portion of control stick. This took several iterations to get just right with paper. The width of the leather pieces need to be 1/4" smaller than the diameter of the control stick. This allows for the stretching that will happen when stitching.
Step 4: Mark and punch the holes for thread. Spacing is approx. 3/16" to 1/4", depending on how tight a stitch you want. Again, cut all leather 1/4" smaller in width than diameter to allow for stretching.

Step 5: Cut thread long enough for all the stitches. If I remember right, I needed about 3 times length of leather??? I also quadrupled the thread for a thicker look. You might be able to just find a thicker thread than I had.
Step 6: Stitch and make sure you follow same pattern of overlap each time.

Step 7: Glue tip of top of leather inside the control tube opening.
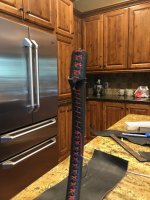
Step 8: Admire your work.


Hope this helps anyone else wanting to cover their sticks like this. There was a small learning curve to get it right (or good enough), but it really wasn't that hard.
Step 1: Drill a hole large enough to allow stick grip wires to pass inside the tube.
Step 2: Obtain supplies. You will need:
a) thick "boot or belt leather" (approx. 1/8" to 3/32" thick)
b) Heavy thread in color of choice
c) Leather needles Link to leather needles
d) leather hole punch Hole Punch
Step 3: Make paper pattern for curvature of top portion of control stick. This took several iterations to get just right with paper. The width of the leather pieces need to be 1/4" smaller than the diameter of the control stick. This allows for the stretching that will happen when stitching.
Step 4: Mark and punch the holes for thread. Spacing is approx. 3/16" to 1/4", depending on how tight a stitch you want. Again, cut all leather 1/4" smaller in width than diameter to allow for stretching.
Step 5: Cut thread long enough for all the stitches. If I remember right, I needed about 3 times length of leather??? I also quadrupled the thread for a thicker look. You might be able to just find a thicker thread than I had.
Step 6: Stitch and make sure you follow same pattern of overlap each time.
Step 7: Glue tip of top of leather inside the control tube opening.
Step 8: Admire your work.
Hope this helps anyone else wanting to cover their sticks like this. There was a small learning curve to get it right (or good enough), but it really wasn't that hard.