Scott Chastain

Well Known Member
Sponsor
Those of us who have pulled the trigger and purchased Garmin's latest and greatest might want to share their experiences with the AXIS system here. Many years ago, my father taught me how to fly in a J-3 Cub, an Aeronca Champ, and a Luscombe. Those panels weren't anything like what many of us fly behind these days, and some of the best learning experiences I've had in my transition to the all-glass cockpit have come from other pilots who openly share what they've learned. I'm very excited about the AXIS system, and from what I've already seen of it, there will be many, many hours of enjoyable flying to come with a fresh installation in my newly overhauled RV-8.

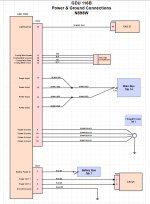
My installation comes on the heels of a newly installed G3X system. With only 30 hours on it, the GDU 460 got yanked, and I began the installation process of the AXIS in earnest. Using the checklist in the AXIS Installation Manual, I checked for fitment of the 116B behind the panel, then opened up a few backshells to begin modifying the harnesses. I had already created my new wiring diagrams, and I simply followed the directions and pinouts in the manual in execute the plan. Powers, grounds, and a new GSU 25 power-up system directly from the GDU were my first priority:
1784275235880.png

1784275391465.jpeg
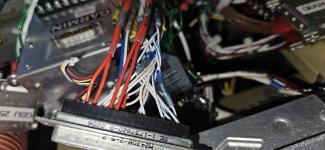
4 Power Leads to GDU 116B

1784275581353.jpeg
4-Lead Grounding Harness for GDU 116B

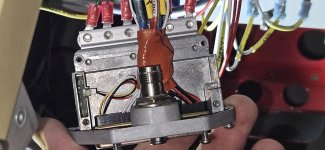
The GPS 175 required a new HSDB connection, so I opened up that backshell and wired it up.
1784275824071.jpeg
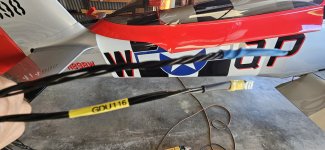
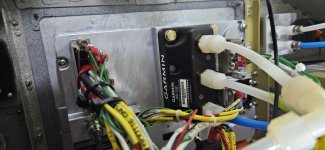
My original G3X installation carried the AHRS on the back on the GDU 460 and worked flawlessly. For the AXIS, the GDU orientation is moved counter-clockwise 90 degrees. So after all of my wiring was tethered and the continuity-power checks completed, I had to make a few adjustments to my plumbing behind the unit. For the most part, the installation came out fairly clean. All of my G3X harnesses had more than enough service slack to make the needed connections.
1784276134954.jpeg
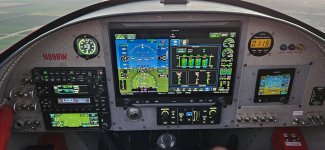
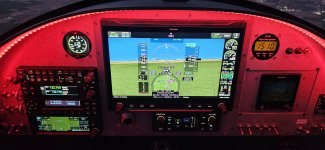
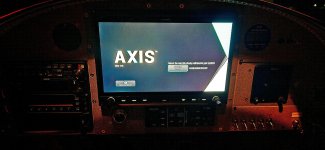
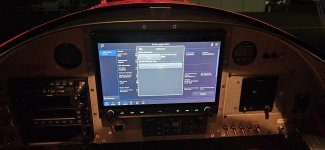
When it came time to throw the switch, I wasted no time peeling off the plastic and turning down the lights. That glass is sweeeet! Without even moving into the first steps of configuration, I can tell you that the definition of the display blows away anything I've seen before. The pictures here do it no justice at all. Just take my word for it: When somebody uses the term High Definition, this is most definitely it.
1784276745980.jpeg

1784276792407.jpeg
Next comes the long process of configuration. With my G3X configuration file and fuel calibrations saved, I'm still waiting for Garmin to release the first AXIS software update.

1784278349840.png

In the meantime, I can configure the system to interface with all of my previously installed LRUs with the exception of the G5; it, unfortunately, is also waiting for a software update (v8.70) before it will interface correctly with AXIS. Nevertheless, getting airborne and testing it out with a new W&B is getting very close. Until then, for those of us who are upgrading to AXIS from the G3X, I can happily report that the upgrade is truly a snap if you know what you're doing. Just follow the directions in the Installation Manual and you should be fine.

Best wishes, and thank you Garmin for taking my phone calls and answering my questions!

+Scott+
 
Last edited:
Those of us who have pulled the trigger and purchased Garmin's latest and greatest might want to share their experiences with the AXIS system here. Many years ago, my father taught me how to fly in a J-3 Cub, an Aeronca Champ, and a Luscombe. Those panels weren't anything like what many of us fly behind these days, and some of the best learning experiences I've had in my transition to the all-glass cockpit have come from other pilots who openly share what they've learned. I'm very excited about the AXIS system, and from what I've already seen of it, there will be many, many hours of enjoyable flying to come with a fresh installation in my newly overhauled RV-8.

My installation comes on the heels of a newly installed G3X system. With only 30 hours on it, the GDU 460 got yanked, and I began the installation process of the AXIS in earnest. Using the checklist in the AXIS Installation Manual, I checked for fitment of the 116B behind the panel, then opened up a few backshells to begin modifying the harnesses. I had already created my new wiring diagrams, and I simply followed the directions and pinouts in the manual in execute the plan. Powers, grounds, and a new GSU 25 power-up system directly from the GDU were my first priority:


View attachment 123493

View attachment 123494
4 Power Leads to GDU 116B

View attachment 123496
4-Lead Grounding Harness for GDU 116B

The GPS 175 required a new HSDB connection, so I opened up that backshell and wired it up.

My original G3X installation carried the AHRS on the back on the GDU 460 and worked flawlessly. For the AXIS, the GDU orientation is moved counter-clockwise 90 degrees. So after all of my wiring was tethered and the continuity-power checks completed, I had to make a few adjustments to my plumbing behind the unit. For the most part, the installation came out fairly clean. All of my G3X harnesses had more than enough service slack to make the needed connections.

When it came time to throw the switch, I wasted no time peeling off the plastic and turning down the lights. That glass is sweeeet! Without even moving into the first steps of configuration, I can tell you that the definition of the display blows away anything I've seen before. The pictures here do it no justice at all. Just take my word for it: When somebody uses the term High Definition, this is most definitely it.

Next comes the long process of configuration. With my G3X configuration file and fuel calibrations saved, I'm still waiting for Garmin to release the first AXIS software update.


In the meantime, I can configure the system to interface with all of my previously installed LRUs with the exception of the G5; it, unfortunately, is also waiting for a software update (v8.70) before it will interface correctly with AXIS. Nevertheless, getting airborne and testing it out with a new W&B is getting very close. Until then, for those of us who are upgrading to AXIS from the G3X, I can happily report that the upgrade is truly a snap if you know what you're doing. Just follow the directions in the Installation Manual and you should be fine.

Best wishes, and thank you Garmin for taking my phone calls and answering my questions!

+Scott+
Scott,
Thank you for this write-up! I’m in the initial research and planning stage of doing the exact same thing with my RV8 and your timely review is very helpful. Would love to get a follow-up report after you’ve had a chance to fly with it.
Regards,
James Baker
 
Hi, James,

You're going to love it! The amazing thing is, I didn't have to so much as remove my seats for the entire process of wiring it up! With the nice big G3X cutout, I was able to get it all done in the seat and didn't pull off a single panel. It was cake.

Best wishes!

+Scott+
 
After a long, hot day in the hangar, where I spent the better part of my Friday morning and all afternoon in the AXIS Configuration process, I watched the end of the week fading off with the sunset and decided to make a first flight with my new AXIS system.

I was not able to transfer my fuel level calibrations from the G3X over to the AXIS system for some reason. There is an Advanced Import feature where you are supposed to be able to transfer individual calibration curves---like from the left and right wing tanks---from the G3X calibration files that were saved before the GDU 460 had its plug pulled. I followed the directions to the letter, even making sure my USB-C memory stick was formatted to FAT32. I tried 3 or 4 times and failed, so I may have to resign myself to getting the tanks burnt off in the air so I can recalibrate the old-fashioned way: a few gallons at a time, one tank at a time. Later, I cranked over and taxied out to the compass rose where I performed the GMU 11 magnetic interference and compass calibration procedures. It was my first opportunity to watch all of my engine instruments come alive, and man, oh man, she's a sweet upgrade! After I brought the RV-8 back to the hangar, I completed the autopilot configurations and went though the ground checks with no squawks. As the redness of a dying day swept over the tarmac, it was time to get airborne with the new AXIS system.

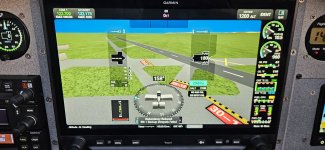
Taxiing out, the new 3-D taxi scheme came into view and diagrammed my airport beautifully. There was an issue with an RS-232 backup port not communicating with the GEA 24 which was already on the CAN Bus; nevertheless, the AXIS system lets you know in no uncertain terms when redundancy issues pop up. I may have to double-check the pinouts for that port to get them talking again.

1784351414137.jpeg
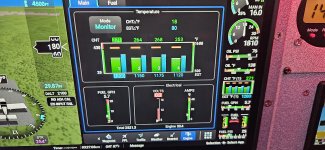
At runup, I noticed a vast improvement over the G3X for being able to read my EGTs during the mag/e-ignition check.

1784351630039.jpeg
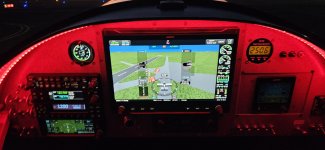
With everything checking out in the green, I announced for a departure to the west, taxied onto the center line, and let her rip. It was still about 95 degrees on the deck, so I was expecting a hot climb-out and kept my pitch pretty shallow. I wasn't planning on making anything more than a 15 or 20-minute flight anyway, so I shot for 4,500' and leveled off. I realized quickly on the climb-out that I must have missed calibrating my trim motors because my pitch trim was reversed and I had a non-calibration symbol emblazoned on the screen that I had not noticed before.

1784352586017.jpeg
At least I was able to configure my PWM lighting bus correctly. As things got a little darker in the cockpit, I threw on the LEDs and experimented with the display for a time. I had not populated my upper status bar with all the elements I enjoyed on the G3X, so I added that to my list of adjustments, then flew back to the east as the city began to bask in the darkness of the coming night.

1784352939678.jpeg

1784352966742.jpeg
Back home after a 25-minute joy ride, I got to see for the first time how helpful the 3-D taxiing will be at unfamiliar airports.

1784353154876.jpeg

1784353173321.jpeg
With the pitch trim motor and calibrations still having to be made, it is clear that I need to put aside the installation manual and break open the AXIS Pilot User Guide so I can really begin to know my way around the unit. I have a ton of learning ahead of me, but that's what makes this so fun! My next flights will include intercepts, engaging and using the GFC 500 autopilot, and perhaps shooting an R-Nav or two. We'll see. But for now, it's time to get some food in my gut and hit the sack. It's been a busy but exciting two days!
 
Last edited:
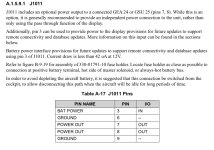
I see you kept the power for the GSU25 The same as the G3X.

The axis manual recommends that the GSU25 is not powered from screen but direct from the aircraft bus. Any idea why?
 

Attachments

  • IMG_4482.jpeg
    IMG_4482.jpeg
    198.4 KB · Views: 13
I see you kept the power for the GSU25 The same as the G3X.

The axis manual recommends that the GSU25 is not powered from screen but direct from the aircraft bus. Any idea why?
Hey, Trent,

I have no other use for those two power outputs on the J1011, so I decided to put them to work. Can you think of any better place to run those two wires? Maybe a lighting circuit? Anyway, I felt better about the redundancy of two power inputs rather than having to rely on a 2A fuse to power the whole GSU 25. As to why Garmin recommends the direct bus power, I don't know. That's a really good question. Maybe G3Xpert could answer that for us.
 
Maybe the output loses power if the screen fails.

If that’s the case:
I was thinking one input to the gsu from the PFD and one from a bus, for redundancy.
 
Configuring the pitch trim properly, I took off this morning for a breakfast flight and exercised the GFC 500 a good deal. As it did with the G3X, it works flawlessly on the AXIS bloodstream, and the airborne checkout passed with flying colors. As for the fuel calibrations, I'm waiting until Tuesday when I connect again with my Garmin dealer who will bundle all of my databases and charts and hand me the 32g USB-C stick that I need for the Advanced Import function. Apparently, 64g sticks or trying to transfer files through a USB 3/USB-C adapter won't cut it. But getting those original fuel calibrations installed will save me a lot of time and effort. Granted, it won't be the end of the world if I can't get them to work either, but hopefully, I can get the calibrations imported. We'll see how it goes next week.

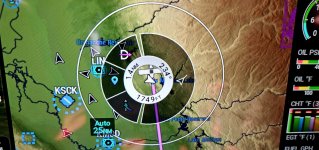
Heading home after breakfast up in the foothills, there evolved a great example of a potential traffic conflict on my climb-out. It was a Cessna who was also climbing out at nearly the same altitude. I had a good visual on him from about two miles out. As I easily out-climbed him, at our intersection he was already over 1,700 feet below and well behind me. The graphic for selected traffic looks a lot different than what I'm used to (*See subsequent post on what this ring actually is. It has nothing to do with traffic).

1784406930376.jpeg
I like it. A lot!
 
Last edited:
Was the AXIS delivered with any mapping loaded ?
If it was could you list which products.
Hi, Burnie,

Yes, there are databases and mapping products loaded into the AXIS system, but they are clearly expired. You'll see that notification during the "AHRS Aligning" process right after power-up. I heard yesterday from my dealer that Garmin was supposed to include (albeit at a co$t) an installation package which contains, among other things, a coupon for a free database download and the USB-C memory stick which I need for the "Advanced Import" G3X fuel calibration. Hindsight is 20/20, right? In any case, you'll be able to fly with the unit as is, but you'll also need to get the charts and maps updated with Garmin.

+Scott+
 
Last edited:
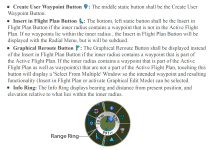
So, today's flight taught me something about that ADS-B traffic I mentioned earlier. That circle isn't showing vectors or separation at all. It's called a Range Ring in AXIS terms, and here is what the Pilot User Manual has to say about it:

1784421502316.png
Wow, that is a ton of stuff in there! I thought it had to do with traffic because placing my finger on the airplane symbol brought the ring onto the screen. Anyway, lots and lots to learn here, but it sure is a fun process!

Tonight, I'm heading out for a night flight to test things out some more. I want to get fully comfortable with my cockpit lighting busses and dimming features that were installed for the G3X but now need to be fully configured for the AXIS. I had a little trouble last evening with getting all of my radio stack bezels to light up properly. I'll work through it, though.

+Scott+
 
Hi, Burnie,

Yes, there are databases and mapping products loaded into the AXIS system, but they are clearly expired. You'll see that notification during the "AHRS Aligning" process right after power-up. I heard yesterday from my dealer that Garmin was supposed to include (albeit at a co$t) an installation package which contains, among other things, a coupon for a free database download and the USB-C memory stick which I need for the "Advanced Import" G3X fuel calibration. Hindsight is 20/20, right? In any case, you'll be able to fly with the unit as is, but you'll also need to get the charts and maps updated with Garmin.

+Scott+
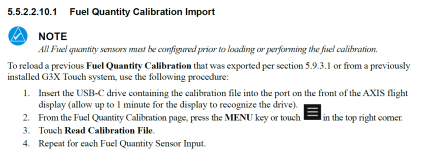
The fuel calibration import is not done via the advanced import function, but via the calibration page for each tank. Not obvious at all…
 
Hi, Burnie,

Yes, there are databases and mapping products loaded into the AXIS system, but they are clearly expired. You'll see that notification during the "AHRS Aligning" process right after power-up. I heard yesterday from my dealer that Garmin was supposed to include (albeit at a co$t) an installation package which contains, among other things, a coupon for a free database download and the USB-C memory stick which I need for the "Advanced Import" G3X fuel calibration. Hindsight is 20/20, right? In any case, you'll be able to fly with the unit as is, but you'll also need to get the charts and maps updated with Garmin.

+Scott+

If the Terrain DB is already preloaded and is 2020 version it will not be expired.
I would not bother reloading it as this is the 'latest' and will add a fair bit of time due to its size.
 
The fuel calibration import is not done via the advanced import function, but via the calibration page for each tank. Not obvious at all…
You're right! It isn't obvious. Reading digital manuals and clicking bookmarks all over creation can lead to a lot of overlooked details at times, so thanks for the heads-up!

1784484175080.png