[moderator - I didn't think this was that specific to the RV-10 but feel free to move it to the RV-10 group if is more appropriate)
I've had a -10 for about 2 years and the ball has always been centered in cruise. I did install the Aerosport Rudder Trim mod about a year ago to maintain tension on the rudder pedals on the ground so I didn't have to put on the gust lock for low to moderate winds.
Starting about 6-7 weeks ago, I've had this strange situation where there is a significant yaw to the left in cruise on some flights - about half the ball is off to the right so it needs constant right rudder once it happens. Out of the 15+ flights that I have done since then, it has happened on only 3-4 flights (quite a few of those flights were local flights at fairly low speeds).
I initially thought it might be a problem with the rudder trim so I took it off completely about a week ago but the problem occurred again last weekend. I flew to a formation clinic at KVIS (from KRHV), did a few flights as part of the clinic and flew someone back to KMRY and the problem didn't show up but then it showed up again on the last short leg from KMRY to KRHV (about 17 min). It appears that it may be correlated to a higher IAS/TAS but I can't be sure.
The range of motion of the rudder on the ground seems fine and there don't appear to be any impediments to smooth movement. An A&P friend suggested it may be something aerodynamic - maybe a fairing coming slightly loose at high cruise speeds so on Wednesday I went over the airplane with a fine toothcomb but all panels and fairings seem to be snug and no fasteners appear to be missing. I did a test flight with a wing mounted 360 camera to capture anything interesting but the problem did not recur (perhaps I did not fly fast enough).
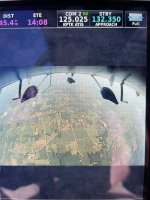
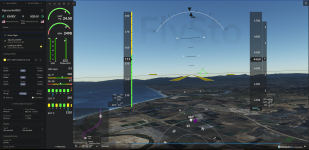
The EFIS photo is from an earlier flight when it occurred. On the last flight when the problem occurred (KMRY-KRHV), unlike on other flights when it happened, it was very obvious when it happened - I felt the yaw and had to put in right rudder in cruise. I have also attached a screenshot from an app called FlySto (I uploaded my flight/engine logs to it) right after the issue showed up and it shows an IAS at the top of the green.
Also, once the problem happens, it doesn't seem to go away until power is reduced quite a bit for the descent.
Any ideas of what might be causing this yaw or steps I might take to help figure it out.
Thanks,
Vas
I've had a -10 for about 2 years and the ball has always been centered in cruise. I did install the Aerosport Rudder Trim mod about a year ago to maintain tension on the rudder pedals on the ground so I didn't have to put on the gust lock for low to moderate winds.
Starting about 6-7 weeks ago, I've had this strange situation where there is a significant yaw to the left in cruise on some flights - about half the ball is off to the right so it needs constant right rudder once it happens. Out of the 15+ flights that I have done since then, it has happened on only 3-4 flights (quite a few of those flights were local flights at fairly low speeds).
I initially thought it might be a problem with the rudder trim so I took it off completely about a week ago but the problem occurred again last weekend. I flew to a formation clinic at KVIS (from KRHV), did a few flights as part of the clinic and flew someone back to KMRY and the problem didn't show up but then it showed up again on the last short leg from KMRY to KRHV (about 17 min). It appears that it may be correlated to a higher IAS/TAS but I can't be sure.
The range of motion of the rudder on the ground seems fine and there don't appear to be any impediments to smooth movement. An A&P friend suggested it may be something aerodynamic - maybe a fairing coming slightly loose at high cruise speeds so on Wednesday I went over the airplane with a fine toothcomb but all panels and fairings seem to be snug and no fasteners appear to be missing. I did a test flight with a wing mounted 360 camera to capture anything interesting but the problem did not recur (perhaps I did not fly fast enough).
The EFIS photo is from an earlier flight when it occurred. On the last flight when the problem occurred (KMRY-KRHV), unlike on other flights when it happened, it was very obvious when it happened - I felt the yaw and had to put in right rudder in cruise. I have also attached a screenshot from an app called FlySto (I uploaded my flight/engine logs to it) right after the issue showed up and it shows an IAS at the top of the green.
Also, once the problem happens, it doesn't seem to go away until power is reduced quite a bit for the descent.
Any ideas of what might be causing this yaw or steps I might take to help figure it out.
Thanks,
Vas
Attachments
Last edited: