What's new
Van's Air Force

Don't miss anything! Register now for full access to the definitive RV support community.

Installing a GRT HXr in an RV-7 (oh, and rewiring most of the airplane...)

gtmule

Well Known Member
So I recently received my GRT HXr from Steinair, and it's time to start thinking about installing it.

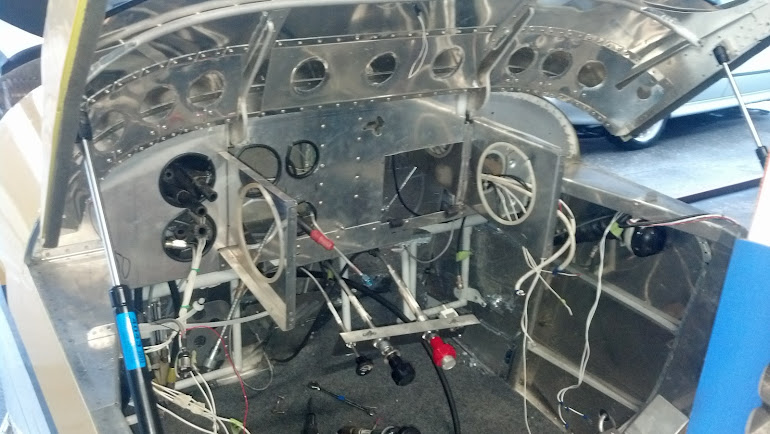
First off, here's what she currently looks like:

2012-08-04_17-59-08_460.jpg


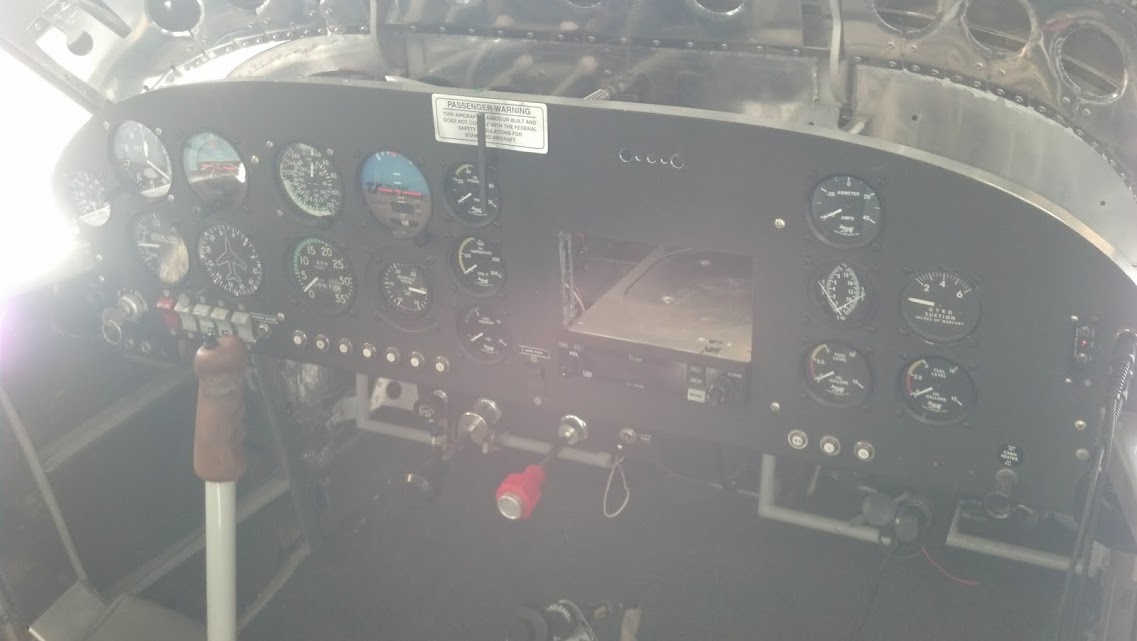
Vacuum/Electric 6 pack, an ADI Pilot I and an ICOM A210. The wiring is nice and safe for a VFR only airplane, but it's a total rats nest, so most of it has to go.

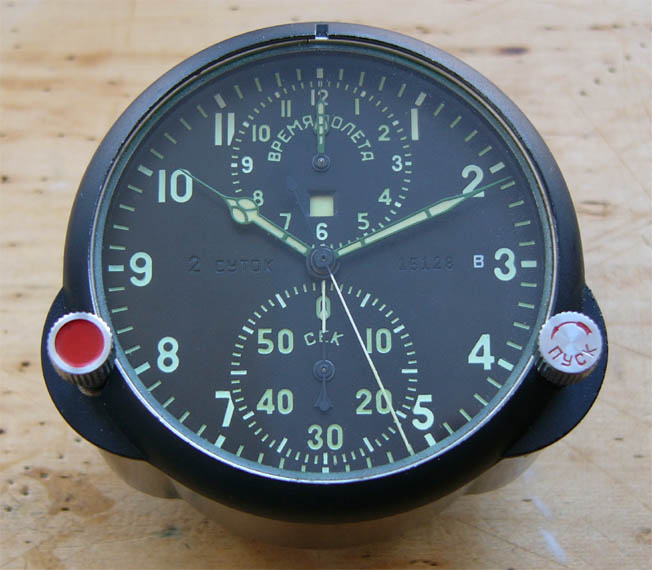
I'll be installing the HXr and related bits, EIS, engine sensors, new fuse busses, a B&C 8 amp backup alternator, a small brownout battery, a GTX327 transponder and a russian clock like Vlad's (an airplane has to have at least one mechanical dial)

Here's what I've come up so far for a panel design:

RV-7+panel+assembly.JPG


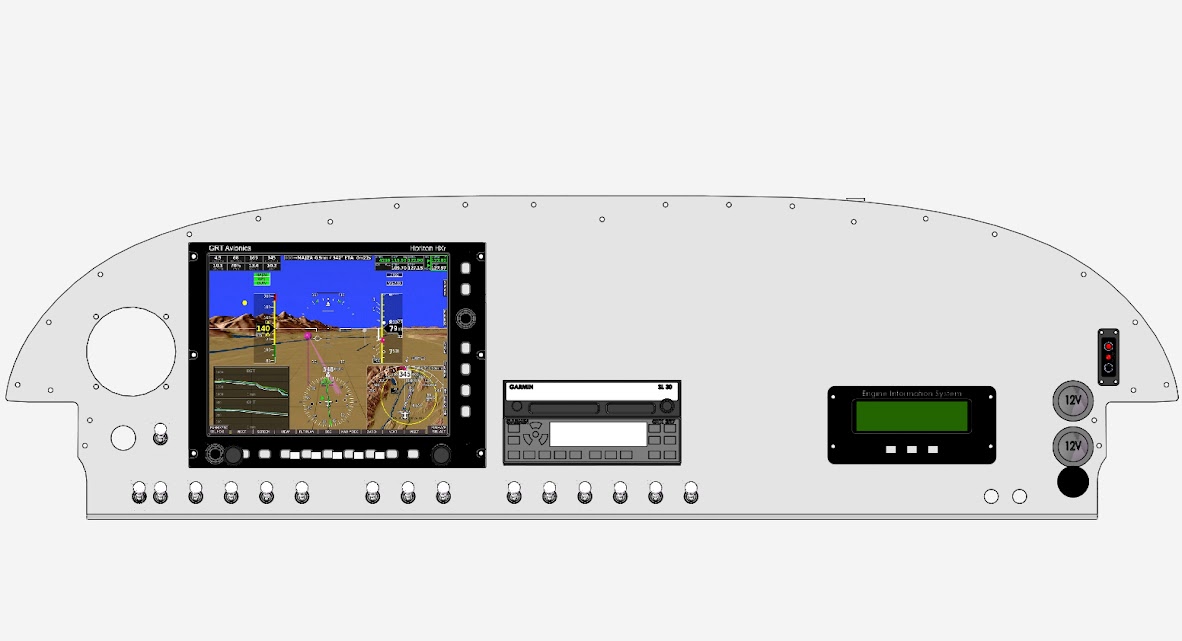
It shows an SL30, but that's the model I had, pretend it's an A210. I'll keep using the A210 intercom until messing with radios later (see below).

The 3.125" cutout is for the clock (not correct but close enough for planning, haven't drawn it in CAD yet). The hole under that is for the mag/starter key switch (I've already got it, might as well use it, plus I think the key is a good extra way to make sure the mags are cold, I keep the key in the canopy lock when out of the airplane, nice visual check). The switch next to that will switch the GRT tach drive from Left to Right mag for mag checks.

The switches (left to right) are:
Starting/running:
Master, main alt, fuel pump, avionics bus (will be DPDT to allow for turning the avionics on with and without the brownout battery)

Emergencies/problems:
E-buss feed (from batt), Backup alt field, Autopilot servos off

Lighting:
Strobe, nav, taxi, ldg, interior

Then there are two alt field breakers

I'm putting the EIS on the panel for now just for passenger/co-pilot comfort/use but it would go away if I ever put in a second EFIS screen.

The plan right now will be to fly like that for a while till recovering the bank account and getting used to the GRT stuff, then add an SL30, 430W, 480, 530W or something else to start my instrument training. By/At that point I will have added backup attitude/altitude/airspeed information in the form of either:

The GRT android extender a tablet and probably a second ADAHRS (really likely w/o the second ADAHRS, somewhat less with)
another HXr screen and second ADAHRS (not all that likely)
A Dynon D10A or similar small EFIS (ebay is my friend)

The panel is designed such that the EIS cutout won't interfere with making a bigger cutout to add another HXr or other big screen if the time came wiout making a new panel.

The throttle, mixture, carb heat and flap switch will stay on the usual little subpanel below the main panel, no changes there (except moving the flap switch to between the throttle and mixture)

Headset jacks will go behind the seats somewhere.

Thoughts?

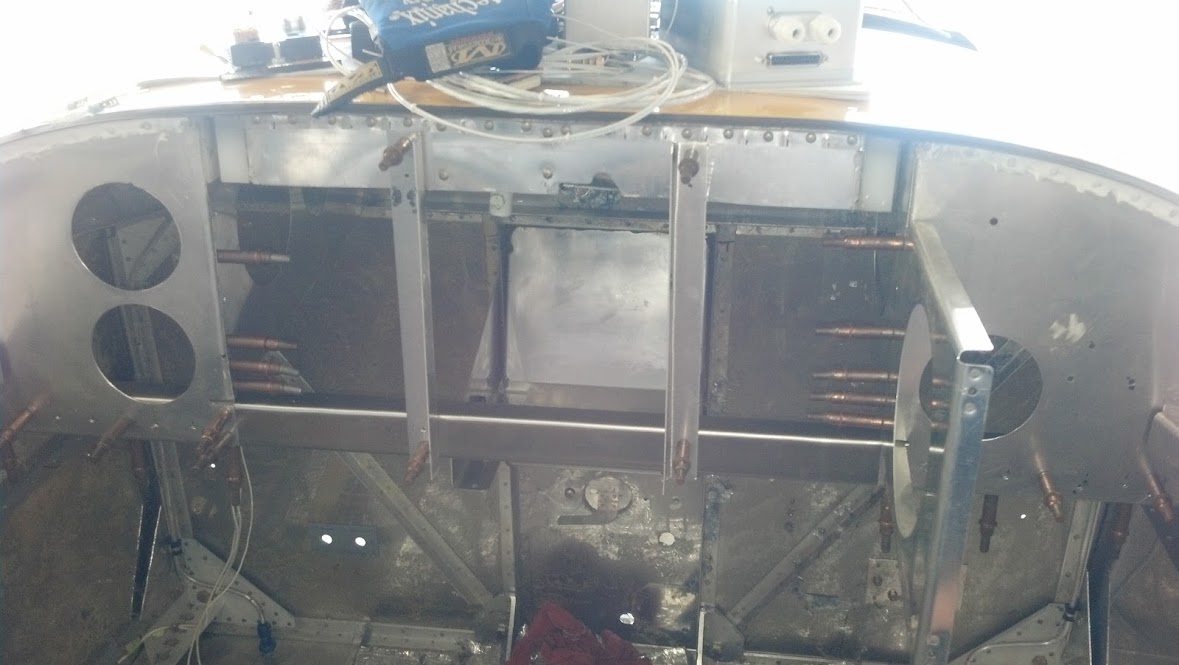
Part two will be ripping the current panel out, re-building some of the subpanel (to move the radios to the center requires filling one hole and making another, and the sub panel wasn't built nearly as nice as the rest of the plane)
 
Last edited:
If you're using the standard GRT EIS there is no need for a switch for the GRT sensors, for mag checks. Just wire both of them up. I think you designate one of them as primary. But the system will automatically use whichever one is working to give you an RPM reading during a mag check.

The HX will have a clock in it, so you don't need another one unless you already have one and want to use it.

I don't see the photos either.

Good to know bout the EIS, I can eliminate that switch. The clock is entirely unnecessary but cool.... :)

achs1.jpg
 
Last edited:
ADS-B out?

People doing panels these days should consider the 2020 requirements.

A 327's cost goes a long way toward paying for a 1090ES enabled transponder.
 
Hmmm... that graphic looks suspiciously familiar :cool:

I shouldn't have looked at this thread, though. Now I am obsessing about that Russian clock. Very cool.

Agree on building in ADS-B capability. I've had my plane flying for less than two months and I'm already wishing I had it. Fortunately I have the GTX327.

Yeah, I had to fix a lot of rebuild errors in Solidworks! :)

I live and fly in SUCH dead, empty airspace that I'm not overly concerned about it, and I alreayd have the 327, so doing a 330 (or whatever) would be easy enough when I add an IFR GPS (which is what compliant ADSB out requires at the moment, I think).
 
Two comments
1. I assume you have a gps somewhere feeding the HXr? Without it you won't have a lot of its features, like moving map.
2. If long term you want to be able to do IFR you really want back up flight instruments like a D6 or a Gemini. But I would try to leave the EIS box on the panel. Reason? It can be left on during engine start, and show nearly right away if you have or don't have oil pressure. Alternative is to boot up the HX on an aux battery before start.

Yes, I have the GRT VFR GPS to hook up to it. I plan on having an aux battery wired up to the avionics bus for this purpose, flipping the avionics bus on will also turn this battery on. The diode should keep the avionics bus voltage at the aux batt voltage, rather than the main battery bus voltage. It'll also be a few more minutes of backup if I ever need it.
 

That's amazingly cool, but beware of crossing the border into Canada and back. Those Russian instruments frequently have radioactive dials. A pilot i'm aware of flew his Nanchang CJ-6 into the US once, and the border guard came out holding a geiger counter... It was clicking before he got within 50 feet of the airplane.

He was allowed entry, but was told that he would not be allowed entry again unless the instruments were changed to a non-radioactive equivalent.
 
Love the clock

Good to know bout the EIS, I can eliminate that switch. The clock is entirely unnecessary but cool.... :)

achs1.jpg

I have dual GRT Horizon's and backup steam gauges --- and I also have an analog clock, but I must say your clock is a whole lot cooler than the one I have.:cool:
 
Wow, depressingly little progress in two months. Lots of work stuff going on.

Finally got it fired up on the bench (dining room table).

http://www.youtube.com/watch?v=x_LkpUHnSQY

Lots more wires to deal with. Once I get it all talking on the bench (soon...) I'll cut the panel and rip the plane apart...hopefully it won't take too long.
 
Last edited:
I got the clock......

Hi

I'm a new RV7A guy, bought it from Jamie Painter who did a great job building it, and I have the clock from a Sukhoi and a Interavia SP95 I used to have. Have a Pitts Model 12 now. It has the clock also!
I am working the issue between a Garmin G3X and a GRT Horizon of some kind. Good problem to have I guess but no clear differences and both nice pieces so it will work our either way:). Trying to avoid screwing up the good work Jamie did on the panel but not sure I can fit anything without a lot of moving around.
See you around the aerodromes.

Phil
 
Here's a thought

I recently purchased a GRT system. While visiting
the booth at Oshkosh, I ran into a few Grt owners
That said not to bother mounting the EIS on the panel.
"you'll never look at it". As the data is all there on the EFIS.
I addressed the concern of oil pressure reading at startup with
GRT. According to Carlos, he suggested to wire the EFIs
To the main bus and no problem with turning on the EFIS prior
To startup. My next question to GRT which I have yet to address is
What about the voltage drop when all the juice goes to the starter?
Will fill you in when I find out. My EIS is currently mounted behind
The panel. Maybe a backup battery or some kind of capacitor will address the voltage drop. Not Sure yet. Just thought I would mention this as an option.

Most folks that I know have been installing a simple aux battery setup to keep the EFIS up during start - I have all our airplanes wired that way, and it works great!

Paul
 
Hi Paul. Any spec on the battery? Location?
Thanks. Al

If you search Paul's past threads you'll find one about his RV-3 wiring that has a nice diagram of how it's wired in. I'm using a similar idea as his, with a modification or two. Basically it's just a home alarm backup battery that's diode isloated to only send current out to the avionics bus and only take current from the battery or main bus, through a 100 ohm resistor, to limit charging current. I'll be putting mine in a box on the sub panel near my fuse blocks.
 
Ok....the sucky weather, and lots of time off around the holidays convinced me, it's time to get started, so on Christmas eve, I did a panelectomy....

2012-12-24_12-36-32_216.jpg


2012-12-24_12-37-13_657.jpg


Next step is to sort of rebuild the subpanel, build a new panel brace for the LHS (something that straddles the HXr), build the box and shelves for my backup battery, AHRS, fuse blocks, mani pressure sensor, etc.

Hopefully have more updates after tonight. Need to remove the vacuum system and more wires, and get a plan together for addressing the subpanel. Going to try to find a helper to get the canopy off, too....
 
No pictures but I cleared out a bunch of wires, the rest of the vacuum system, all the seat and floor pans, removed the flaps for an unrelated project, got the tach drive cable out of the way and started planning the new sub panel and wiring...
 
The wiring is nice and safe for a VFR only airplane, but it's a total rats nest, so most of it has to go.

If it was originally a "total rat's nest" then it will certainly not have been "nice and safe". The two are mutually exclusive for obvious reasons. ;)
 
Last edited:
If it was originally a "total rat's nest" then it will certainly not have been "nice and safe". The two are mutually exclusive for obvious reasons. ;)

Ehhh. It basically looked like a certified airplane from the 40's-60's would have been wired. There was nothing close to coming apart or insulated poorly or whatever, it was just messy and hard to figure out what was what. Painters tape for wire labels, too.
 
Ehhh. It basically looked like a certified airplane from the 40's-60's would have been wired.

Dear Chuck, you and I must be looking at different certificated aircraft. But I've attached a photo of a radio stack for a Cessna 206. This is what I consider to be the standard of certificated wiring done by professionals.

Presumably your aircraft did not meet this standard. :( But it will after you finish rewiring it. :)

It is prima facie that professional, neat, planned, well bundled (and well documented) wiring is safer wiring for many reasons.


pic hosting
 
Last edited:
Dear Chuck, you and I must be looking at different certificated aircraft. But I've attached a photo of a radio stack for a Cessna 206. This is what I consider to be the standard of certificated wiring done by professionals.

Presumably your aircraft did not meet this standard. :( But it will after you finish rewiring it. :)

It is prima facie that professional, neat, planned, well bundled (and well documented) wiring is safer wiring for many reasons.


pic hosting


I agree that what you show is lovely, and ideal. Mine did NOT look like that, but that's certainly the goal (thought hopefully with less wires :) ). If you look at OLD or smaller certificated aircraft, you're more likely to find things looking a bit more sloppy. My old Stinson, for example, had lots of original wiring, and it wasn't particularly neat; that's how my RV looked.....most of is now ripped out or cut loose and straightened out, ready for a few hundred feet of lacing twine, lots of heat shrink and adel clamps, and various other kinds of love.

Edit, my RV also had ONE avionics tray :)
 
Progress IS happening. I've found a few things I didn't like, like about a half-can of spray adhesive on the back of the firewall holding up insulation (the foil backed blue cotton rags looking stuff that spruce sells). Pics tonight if I make it to the airport, but the subpanel between the canopy hinges is now gone, to be replaced with a combination of sheet, angle and a radio box.

Here's some angle I bent up at work today out of 0.040" sheet. The C-channel will form the bottom of the subpanel and the various angle will make up the top of the subpanel and the radio box.

2013-01-03_13-49-28_62.jpg


Trio pro pilot a/p (bought from Kahuna), a coffee cup and some C-130 tooling drawings in the background....looks like an engineer's desk :)

Edit: I forgot to mention that I spent a couple hours replacing the old UMA OAT probe with the GRT one. Builders for the sake of you all all who come after you...PLEASE PUT CONDUIT IN YOUR WINGS!!!! I can attest that even my big arms will fit from the inboard inspection cover all the way to the fuselage wall...but it ain't fun. I can also attest that its important to make sure you haven't wrapped the OAT leads around the aileron pushrod in the first bay....or you'll have to start over.
 
Last edited:
Current, messy state of affairs. I'll replace the LHS panel brace with something that leaves room for the HXr (some kind of angle arrangement, most likely).

2013-01-03_16-24-37_762.jpg


Next step is to disassemble all the firewall pass-throughs, remove all the insulation and GLUE, do some FWF work (pull all hoses and inspect, probabally replace) install CHT, EGT, OilT, OilP etc sensors, move some wires around and install firewall insulation on the hot side. My current plan is to re-use the pass-through's I have (stainless shields over rubber grommets) but replace the Napa RTV with the 3M 2000+ stuff.

In parallel, I'll start fabbing the sub-panel and actual panel and fitting everything together with clecos so that I can start getting final lengths of all my power wires (fuse block to switch, then switch to load) and sorting out where my ground(s) will be.....
 
Now I'm building it back up....

2013-01-12_15-18-33_757.jpg


That shows my C-channel cross piece and two pieces of vertical angle to support the backs of the radio trays. My two fuse boxes (main and e-buss) will go on either side of the radio boxes. The AHRS will live behind the subpanel, just inboard of the LHS panel support with the inboard side supported by a bracket I made that attaches to the rudder pedal hangar. The GRT EIS is going (hole cut out after I did this pic) on the RHS subpanel between the RHS panel brace and the top rail of the fuse. The Aux batt will go in a box on the aft side of the LHS of the subpanel. Magnometer will be in the aft fuse, somewhere behind the baggage closeout, probably on top. Headset plus on the aft ends of the armrests.....

Edit: after I took this picture, I got back on my firewall glue removal project, I'm about 30% done, with the whole lower left of the firewall done.
 
Back
Top