What's new
Van's Air Force

Don't miss anything! Register now for full access to the definitive RV support community.

Oxygen bottle mount in RV-10

fehdxl

Well Known Member
From my research, it seems that behind the baggage bulkhead is a typical place to mount the oxygen bottle. I have a few questions for the group.

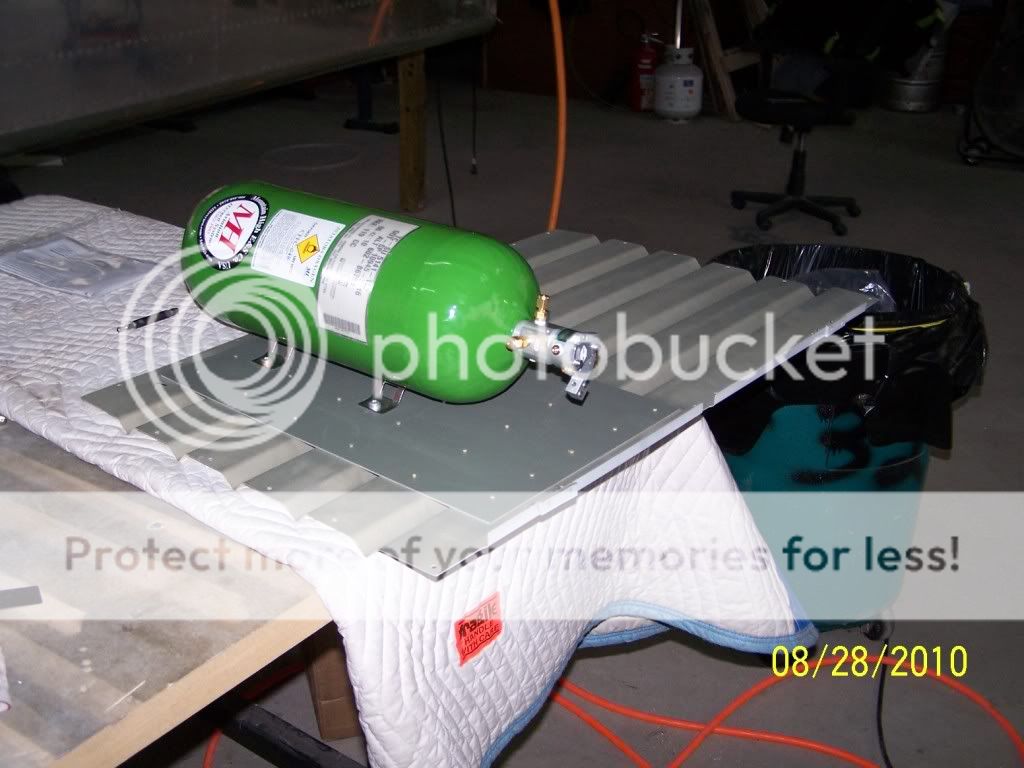
1-How close is too close to the battery? I've seen plenty that are within a foot, but if done this way, will likely only be 2 inches

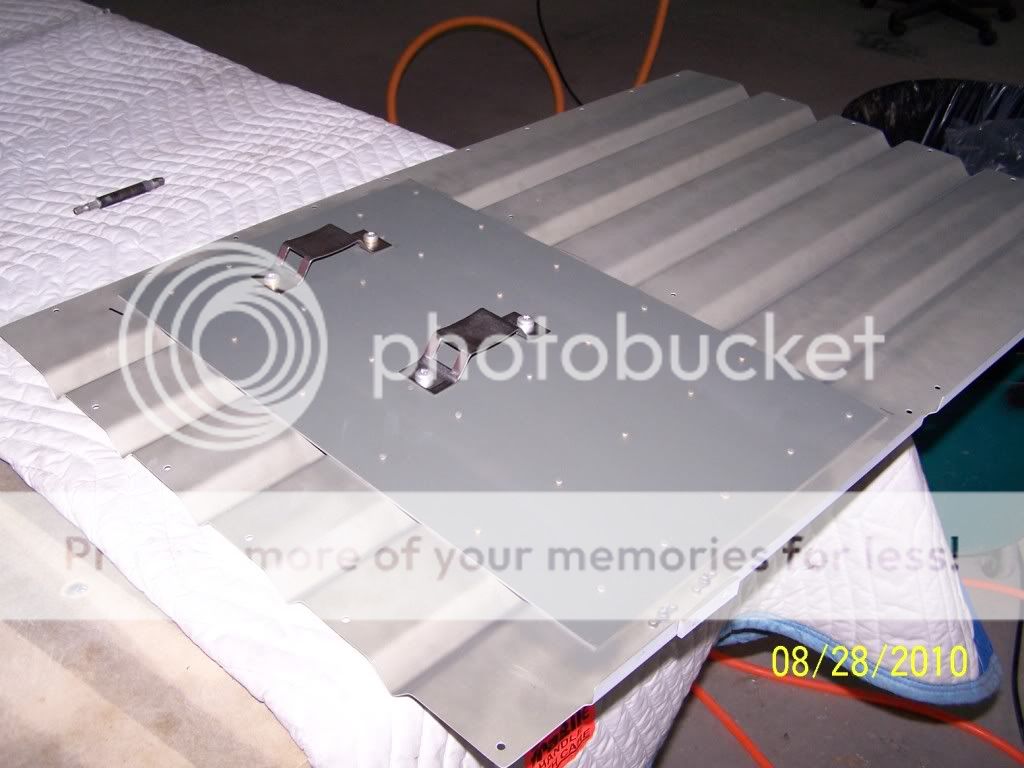
2-Will the skin support a 7 pound oxygen bottle? In the pictures below, the paper is representing a 2" by 4" doubler of .032.

3-I made up the c-channel from two angles for the mock-up, but will buy actual c-channel for the final mounting.

4-My plan B is to move the oxygen the next bay aft. 7 pounds that far back might start to make a difference...probably okay.

Thanks for the input and thoughts.

-Jim

P.S. Just noticed this may interfere with the auto-pilot pitch servo...may have to go to plan b or c...


I planned from the beginning to put my mounts on a pad similar in principle to the AHRS or ELT mounts that Van's supplies. Like you, I tried the right side of the battery but even up above the stringers and as close to the fuselage side as I dared I only had a couple of inches clearance from the pitch servo. Instead I decided to put it on the other side. Below is a picture of the mount, made from .040 aluminum and .032 angle. The angle nestles (and is riveted) to the stingers on the bottom; you are looking at the bottom of the mount.
DSC00405.jpg


Here is a shot of the finished mount in place. Making room back there for everything has been difficult. I have a larger battery (24V system) and the A/C to deal with. The AHRS will be on a modified version of Van's mount on the right side of the battery while ELT and strobe mounts will be left and right on the tail cone sides.
DSC00419.jpg


Here is a shot with the bottle in place. You can see that it has a fair amount of clearance from the battery (even more if you use the stock mount and battery) as well as other equipment. I haven't finalized the fill station but it will likely be accessible through the baggage compartment door.
DSC00420.jpg


Hope this helps or gives you ideas.
 
Thanks guys.


Patrick, Did you use pull-rivets to attach the angles to the stiffener?


So attaching a mount to the stiffeners does look like a better solution than the skin...will have to take a further look at that idea. Or do you all think that the skin would work too?

Thanks!

-Jim
 
Jim, I haven't riveted it in yet. I cut the lightening holes in the mounting plate so I could buck rivets with my small tungsten bucking bar; it's tight but doable (I know all the proper swear words... ;)). However, I will probably wimp out and use pulled rivets. The high G-loads there are primarily vertical, and the skin or stiffeners should buckle before the rivets fail in shear. I chose the horizontal mount also because of the G-loads; the engineering sheet with the mounting brackets clearly shows that they are not for a vertical installation and I didn't feel like building a complex vertical mount (though I admit that I was tempted).

As for mounting directly to the skin, I'm not savvy enough about the loading there to tell you if the doublers you propose will be enough to spread the loads from the tank and mount or not. I feel fairly confident with my solution because the plate spreads the loads between the stiffeners, which I expect will prevent any buckling there or on the skin. The angles provide further stiffening so now the question is whether the whole thing will come flying through the skin on a hard landing! :eek: Since I based the idea on the mounting solutions Van's already supplies for the ELT/Strobe mount, I am confident it will be adequate to the task.
 
Here they are
photo1-1.jpg


photo2.jpg


The fill port and pressure gauge is not shown in these photos but are located on the opposite side of the bottle. All I have to do is remove the low pressure line that go to the overhead console and the bottle comes out with the baggage bulkhead.
The bottle can be turned on and off with a push pull cable located on panel.
 
Last edited:
Permanent vs Portable Oxygen

I've been using portable oxygen for 10 years or so now. The really huge advantage of portable vs installed is that it's much cheaper and easier to refill the bottle if you take it to the fill station than if you have to take the airplane over there -- typically the refill cost is about half, but I don't recall the numbers. Also, I *strongly* recommend pulsed delivery (I've got older Mountain High units and love them). The reason is that this lets you get more use from your oxygen bottle between refills. It's not the cost savings that's important (it would take a long time for the refills to pay for the pulsed delivery units), it's that your bottle lasts longer, so you can make a long trip and back without running out of oxygen halfway through at some low altitude airport where you can't get a refill. If you do hard mount your oxygen bottle (a good idea in my book), at least make it quickly and easily removable so you can refill it quickly and easily.

Ed Wischmeyer
currently with an RV-8A
 
Yes if your having to refill at a FBO a portable would be cheaper to refill. I refill mine via the port on the baggage bulkhead with a large oxygen cylinder i keep in my hanger. Its pretty cheap.
 
Thanks for the pictures.

I'm leaning towards something like this (not proportioned correctly):


Thinking I'll move it one bay aft, along the aircraft right side.

I'll attach the for/aft facing 3/4 x 3/4 angle to the stringers and the left/right facing angle to mount the brackets.

What do you all think? Strong enough? Not going to hurt anything?

P.S. Now that I think about it some more, I'd have to mount those brackets a bit higher else the bottle will hit the left/right angle... there's only about 1/4" clearance from the mounted surface with those brackets. Hmm....

Thanks!

-Jim
 
Last edited:
Thinking I'll move it one bay aft, along the aircraft right side.

What do you all think?

Thanks!

-Jim

Watch out for C/G issues, steel tanks are heavy:eek:

Alum/composite tank is a lot lighter, but still that is a long way back of the C/G.
 

Do you have some structure supporting the tank underneath? The spec sheet for the brackets show that there is very little G tolerance in that orientation.

Edit: Whups! My bad; I was remembering the 2-4G axis as lengthwise for some reason. So you only have to worry about fore/aft forces in your installation. Jim, I think your proposed installation will be fine. Indirect heating should not be that much greater there than a few inches lower in your original proposal. Just be sure it doesn't interfere with any dorsal antenna locations you may be planning on.
 
Last edited:
Thanks everyone for the ideas and inputs. After spending a couple hours with an -8A builder brainstorming different locations and orientations, I think I've almost convinced myself where to put it....here:


I don't believe it will interfere with anything; even though it's closer to the skin that will be warmer from the sun, there is about 3" of clearance there; and I'll be able slide it fore and aft (even aft of the bulkhead) a bit depending on how large the regulator is. I do still have to add triangle braces to strengthen it laterally.

We figured that the stress under 4 G's is the same at the top as the bottom. Probably 9 pounds there...so that's 36 pounds divided by two brackets--18 pounds each. The rivets that go through the skin will be in tension (not the best technique) so I'm going to put two rivets through laterally as well.

So what are your thoughts? Good? Bad? Ugly?

Thanks!

-Jim


A few things to consider:
With any type of frontal impact the cylinder could break loose from the mount and only have the back of your head to slow it down.
Mounting it down low places the seat backs and some metal between you and the cylinder dissipating some of the energy should it come forward.
 
Pro engineers....question please. 10G is easy enough, but what is the meaning of "@ 1G./125 ms. sin." ?


10 G. Down @ 1G./125 ms. sin.
9 G. Forward @ 1G./125 ms. sin.
2-4 G. Side to side @ 1G./50 ms. sin

Dan, that's a vibration design/test limit. A constant 10G is one thing, but a fast sinusoidal (sin.) vibration from 0-10G is quite another. It's saying if you're going to subject the O2 bottle to a 10G downward acceleration, you better take at least 1.25 seconds to get there, starting from zero (actually you're starting from 1G down in level flight, but that's in the details). Not gonna happen in our planes when you think about it in terms of pushing the stick around, but vibrations throughout the airplane structure complicate matters a bit. Still though, without some accelerometers mounted to the airplane in flight, and in that particular location, there's no way for us amateur builders to know what's really happening. That would have to be one heck of a vibration though, not sure the airplane would survive it...

The only analogy I can come up with off the top of my head (and admittedly not a very good analogy at that) is an impact driver. A small constant force will not get those lug nuts on your car wheels to budge. Alternate between applying that same force and applying zero force every few seconds, still nothing. Start applying that same force in a quickly-repeating manner and suddenly the lug nuts break free.
 
It's been said before but I'll say it again: this forum is amazing. No matter what the question, it seems someone has the answer. I learn so much here. Maybe we should call this 'RVU'.
 
It's been said before but I'll say it again: this forum is amazing. No matter what the question, it seems someone has the answer. I learn so much here. Maybe we should call this 'RVU'.

Flion, this is just what I do for a day job. I'd gladly trade a good amount of structural engineering analysis/advice for even a small bit of Dan's fiberglass knowledge and skill. Or any one of the other myriad skills all the VAF folks collectively possess. There's some of just about everything here, that's what makes this community so great. And hopefully we'll always stay just as willing to help each other out.
 
A few things to consider:
With any type of frontal impact the cylinder could break loose from the mount and only have the back of your head to slow it down.
Mounting it down low places the seat backs and some metal between you and the cylinder dissipating some of the energy should it come forward.

Good point--that is very true, however, there is the bulkhead that separates the cabin from the empennage to stop it...not the strongest part but would definitely slow it down a lot.

Now all I have to do is make 8 triangular braces.

Thanks guys!

-Jim
 
Just to follow up on how I did this, here are some pictures.

I chose this method because:
- it's a good distance from the battery
- it's tied into the stiffener in both the vertical and longitude axis
- should be easy to access by removing the upper bulkhead cover

Now, anyone build a exterior access door for a fill-port?

Thanks for the help!

-Jim
40603


I'm going to be putting my fill port in the baggage compartment. One less opening to manage. Honestly, I don't fly at O2 altitudes that often so I don't think it will be inconvenient - or not often enough to make me regret it.
 
Back
Top