What's new
Van's Air Force

Don't miss anything! Register now for full access to the definitive RV support community.

Dimple Halo's

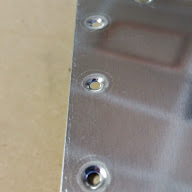
I hope everyone can put me at ease. I am working on the left rudder skin, dimpled using a DRDT. When I flipped it over, I noticed that the holes had somewhat of a white halo. Should I be worried or press on?

zE3_3SmoIRm244fVQxnbwmY0ztSI-9XjoSQfMdHvzCY=s192-p-no


9-AtDNS7TllxsKrvnE_0l2ifbfCeqeb2LS1f0NKGt9o=s192-p-no


HtO9hn_ytDLDX-8YfEKB_mMZNeeCuhjXxH3FENDihvU=s192-p-no
 
"Halo's"

The Halo's maybe created from the surface of the dimple dies. Micro surface rings on surface of the dimple dies, totally normal.

You can not over dimple with the DRDT-2 so I wouldn't suggest backing off the adjustment if you are happy with the dimple profile.

The dimples and halos is your photos look normal. Build on, no worries.
 
Yes, those are just witness marks where the shoulder of the dies contacted the skin, indicating a full dimple like they should be.

The alclad aluminum skin is so soft, nearly any contact at all will leave a mark. Take a Sharpie, write something on the skin, then wipe off the Sharpie ink with Acetone, and you'll be able to read what you wrote in the scratches left behind in the skin from the felt-tip Sharpie.
 
Thats good to see, it is evidence that the dimple is as deep as it should be, if you see no halo, chances are that the dimple is not deep enough and the rivet will not fit all the way flush. Good job!

Bird
 
I wouldn't worry about marks like this or even scratches. You or your painter will likely scuff the surface to help the primer adhere. I will be sanding my surface with at 120 grit sandpaper, as I won't be using alodine. The primer will easily cover this smooth.

Larry
 
Trailing edge

Greg, Bird, Larry - Thank you much! The rudder is together for the most part. Next step the dreaded trailing edge.

Pat

Pat,
Do not dread the trailing edge:). I had a piece of scrap metal laying around from an old project to use as a back plate. I used a piece of 2" wide 3/8 to 1/2" thick steel longer than the rudder. Clamped down the make shift back plate to the workbench and back riveted following the sequence given in the Vans instructions. Be sure to shim the rudder so that it lays flat on the back plate. It can be done with great results!
 
Proseal

Pat,
Do not dread the trailing edge:). I had a piece of scrap metal laying around from an old project to use as a back plate. I used a piece of 2" wide 3/8 to 1/2" thick steel longer than the rudder. Clamped down the make shift back plate to the workbench and back riveted following the sequence given in the Vans instructions. Be sure to shim the rudder so that it lays flat on the back plate. It can be done with great results!

What he said.
Plus, proseal the wedge in place with teaspoon size dollops at the end of each stiffener. Cleko it to an angle as mentioned then leave it for a week before riveting. Use a back plate and check every rivet to be sure you're on top of the plate.
 
What he said.
Plus, proseal the wedge in place with teaspoon size dollops at the end of each stiffener. Cleko it to an angle as mentioned then leave it for a week before riveting. Use a back plate and check every rivet to be sure you're on top of the plate.

Is it acceptable to use RTV on the stiffners instead of proseal?
 
RTV is OK

RTV works. If I recall the manual mentions using RTV on the stiffeners.
 
RTV

RTV works. If I recall the manual mentions using RTV on the stiffeners.

Yes, it is mentioned and probably fine but I would use proseal to bond the wedge and trailing edge. Just my opinion. Vans sells smaller quantities. You have to cut your teeth on the stuff sooner or later! :D
 
Back
Top