What's new
Van's Air Force

Don't miss anything! Register now for full access to the definitive RV support community.

Possible mistake on RV-14A Rudder Spar Reinforcement Plates

jdog0411

Member
Wanted to get the forum's opinion on the following...I've sent this to Vans technical support for their opinion as well, but in the meantime thought I would ask here also.

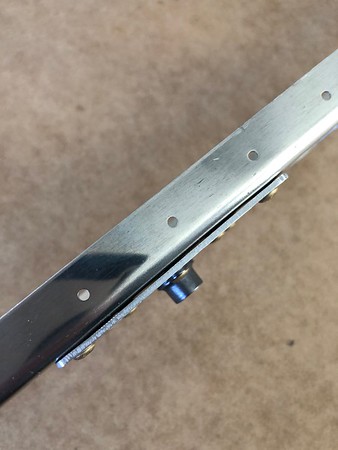
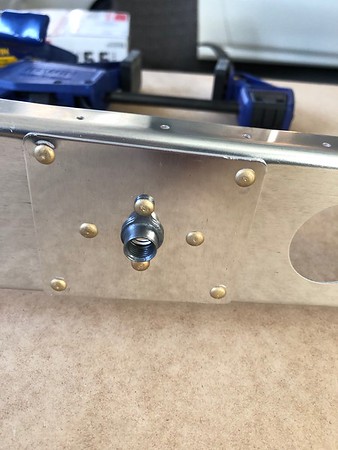
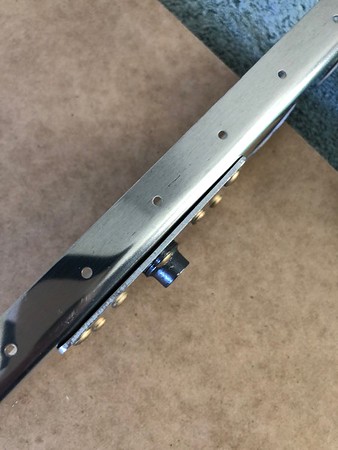
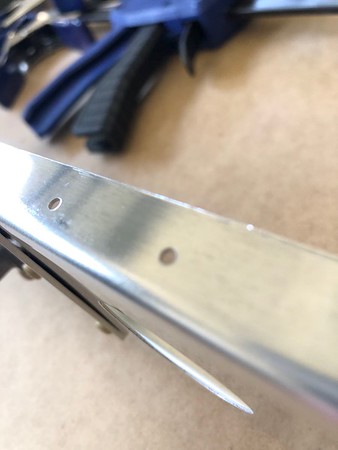
I recently completed riveting the Rudder Spar Reinforcement Plates onto the rudder spar for my RV-14A. I riveted them to the spar with the shop head on the spar side of the spar, when in retrospect I probably should have riveted them with the shop head on the plate side of the spar since that is the thicker material. The plans didn?t specify, so I didn?t think it would matter one way or the other.

Because the spar is thinner, there was some slight deformations/indentations made in the spar where the rivet shop heads were formed with the squeezer. Also, there is a slight gap between the reinforcement plates and the spar itself in a couple of areas. The rivets themselves look like their set fine.

My question is?.is this acceptable? If not, is it repairable? Or am I looking at buying a new rudder spar? Pictures are below.

IMG_5690-M.jpg


IMG_5685-M.jpg


IMG_5686-M.jpg


IMG_5687-M.jpg


IMG_5690-M.jpg


IMG_5691-M.jpg
 
Hi jdog!

First, I would post stuff about the 14 in the 14 forum where the 14 builders generally hangout, might get you a faster response if you're in a bind.

The slight deformation around the rivets aren't a problem but just based on the pic the gap between the two pieces might be.

I would drill these out and do this over if that gaps as bad as it seems in the pic.

Be sure you are de-burring those holes and make sure your clecos are in place holding the two pieces in their final position.

From that last pic it looks like the holes on the spare are pushed out causing your gap.

The two pieces should be flush with no space between.

In either case, definitely think it needs a re-do but Vans knows best :)
 
I would be interested in what Vans says but... a rod end goes in that but plate and a jam nut. I don?t think the rivets being backwards would cause any interference. Going forward, however, there will be many times that it would.
 
Spar OK

I think you won't need to buy another spar, but as bkervaski has said it looks like there is too big a gap between the plate and the spar and it may need to be re-done.

I noticed another thing in the photo which is that there is no corrosion protection applied. Typically I would at least prime any mating surfaces and also use duralac between dissimilar metals like the steel nut plate and the aluminum spar.

Good luck with your build and hope you enjoy and learn lots, that's what it's all about!
 
Well, heard back from Van's and the answer was short and sweet:

"Doesn?t matter ? it will work OK as it is."

Guess that means I'll leave everything alone as is and build on. The small gap in between the plate and spar is actually quite small, I think the pictures actually make it look a little bigger than it is. I guess if Van's says it's ok that's good enough for me. In the future, I'll reverse the rivets to make sure I avoid this.
 
First, congrats on the start of your kit.
As your building, while the rivet heads is not critical or matter as much, there are places, (HS hinge bracket) or the elevator if I remember correctly matter more. The part itself is OK but the shop head sticks out a bit more and leaves less room as a clearance. So, it is always a good practice to visualize things forward to see how things mate to one another and work in conjunction with each other.

keep on pounding those rivets.

P.S. you might also consider some priming, if not all parts, perhaps the spar and mating parts if they are of dissimilar component/metal.
 
AC-44-1b, as well as Vans, will guide you on how much separation is allowed between riveted parts. I believe as long as you can not touch the rivet with a .002 feeler gauge inserted in the gap, you are good to go. Check me on that...
Drilling these rivets out won?t take long. Learn how to do it correctly and you won?t damage holes. You can then put them back in the other way and tighten up the gap. Good practice.

You can view the ?primer wars??posts for endless discussion on that. It is never ending.

Corrosion is all about the environment, whether it is galvanic with dissimilar metals or other types.

Steel and Aluminum are actually pretty close together on the galvanic chart, so they are not that bad when used together. It takes an electrolyte to conduct or you won?t even have a potential. Nut Plates are Cad coated. Cadmium is also close to the two base metals on the chart.
So, I don?t get too hung up on galvanic corrosion unless I am building a boat that sits in salt water.
I still agree that good practice is to prime, a minimum wash primer,
unless you?re airplane is stored outside in a humid salt water environment. If you are exposed long enough to an electrolyte (water), the base metal can corrode and dissimilar metals make it worse, often under the fastener where you can?t see it until it?s too late.
 
All the dissimilar metal components in the 14 are marked in the plans and specify priming. Other than that, see the priming wars post and make your own call.
 
Last edited:
All the dissimilar metal components in the 14 are marked in the plans and specify priming. Other than that, see the priming wars post and make your own call.

They list nut plates? Screws, washers......Just curious.
 
Last edited:
Jeremy, see if you can get one of the Colorado gang to come over and look at the gap and see what they think.

Good luck on your build.
 
Jeremy, see if you can get one of the Colorado gang to come over and look at the gap and see what they think.

Good luck on your build.
This is not to discount to get a second or third opinion but considering the gap is between a doubler and spar for the rod end bearing, it is less critical than if it was two pieces being riveted together as part of a structure, like a rib to a spar.
 
They list nut plates? Screws, washers......Just curious.

No, they have no call outs to use primer on any of those that I recall. There are several pieces of steel and different alloys of aluminum that they call out for priming.

As far as I noticed, every dissimilar metal that needed priming was called out. I only primed the called out parts.

They also called out all areas that builders should not prime, such as places in the fuel tanks where you are applying pro seal.

I found all the priming call outs reasonable and sufficient for my build.
 
I went ahead and drilled out the rivets and re-installed the reinforcement plates with the rivets reversed. This tightened up the fit quite a bit.
 
No, they have no call outs to use primer on any of those that I recall. There are several pieces of steel and different alloys of aluminum that they call out for priming.

As far as I noticed, every dissimilar metal that needed priming was called out. I only primed the called out parts.

They also called out all areas that builders should not prime, such as places in the fuel tanks where you are applying pro seal.

I found all the priming call outs reasonable and sufficient for my build.

That?s all reasonable.
 
I went ahead and drilled out the rivets and re-installed the reinforcement plates with the rivets reversed. This tightened up the fit quite a bit.

Excellent!
I was just in Parker a couple weeks ago. I have a friend there. Nice area.
 
Hi jdog, You're right to be strive for high quality in your work. Those pieces should fit snugly with little to no gap. The deburring technique Troy Grover taught me at his RV build class at Front Range airport was to deburr all the drilled holes using a Burraway (https://aircraft-tool.com/shop/detail.aspx?id=TD002) and to use a file followed by bench grinder-mounted 3M deburring wheel to polish all metal edges. Clean the parts thoroughly, then assemble the parts fully with clecos and check for fit prior to riveting. Rivets should slide in easily. Remove clecos one-by-one as you form the shop head. On this piece, I clamped the spar to my bench and put the manufactured head on the aft side so I can hold it down with my pneumatic rivet squeezer while the ram forms the shop head. My ram stroke is adjustable, so I typically start with a partially squeezed rivet then adjust the stroke and check with my rivet gauge for the correct shop head size.
 
Back
Top