What's new
Van's Air Force

Don't miss anything! Register now for full access to the definitive RV support community.

Tip: Show us your cowl / hinge pin cover or method to secure pin

Top cowling hinge pin termination

Ok, so not so many replys so far, thought I'd help with a picture.
As they say, a pictures is worth a 1000 words.
This pictures, if I embedded it correctly....thanks Larry!
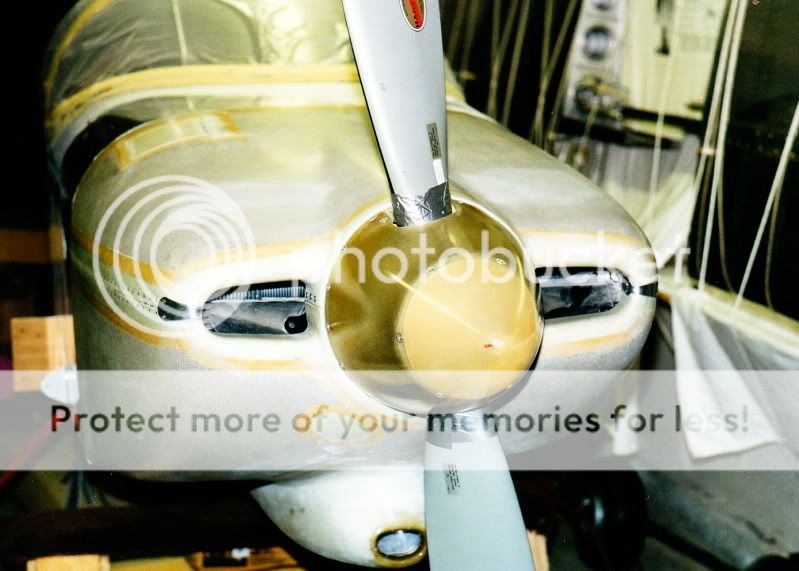
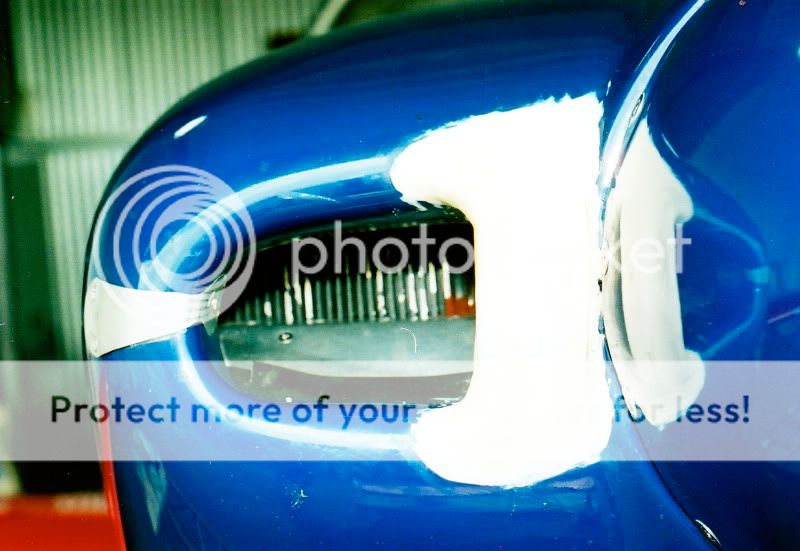
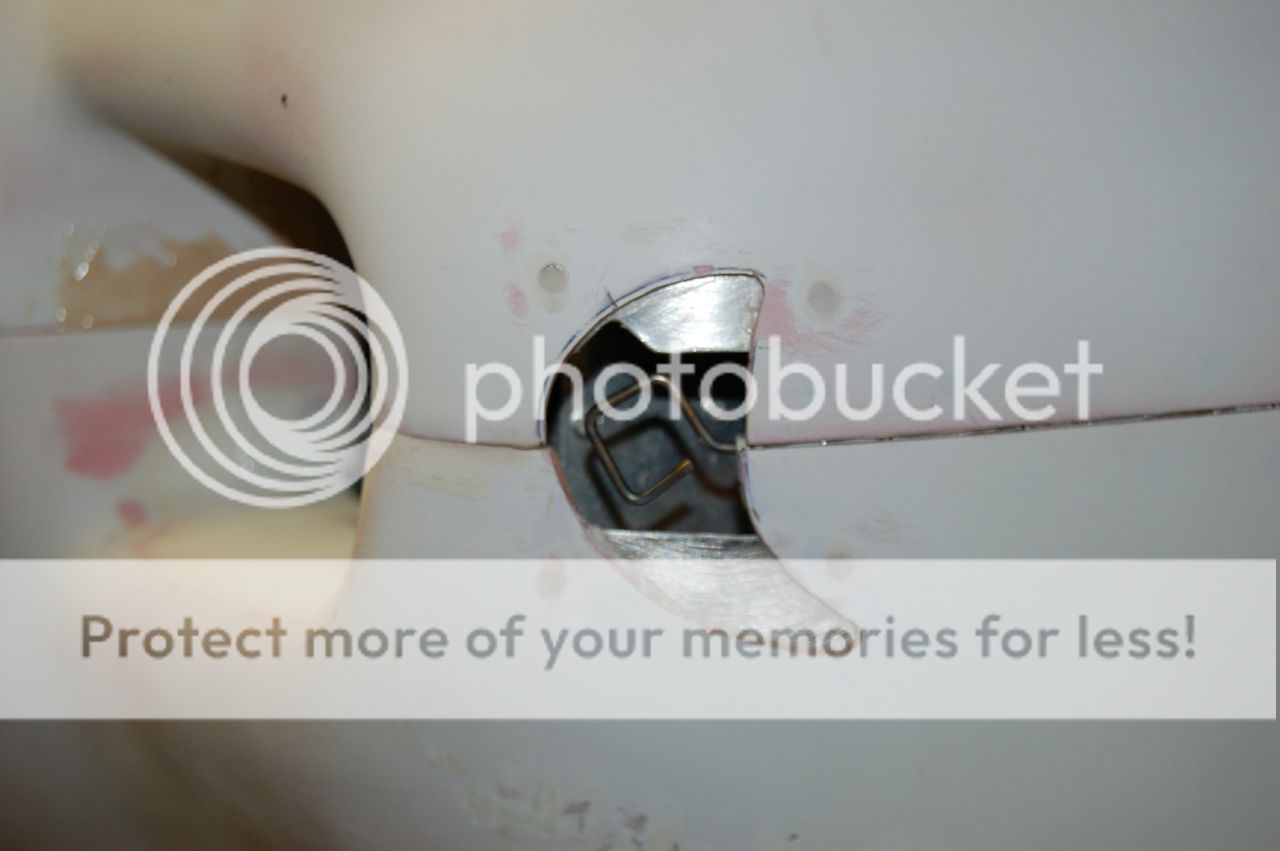
is of my top cowling hinge pin termination location, as you can see, it isn't very pretty after 650 hours, and many removal and replacements.
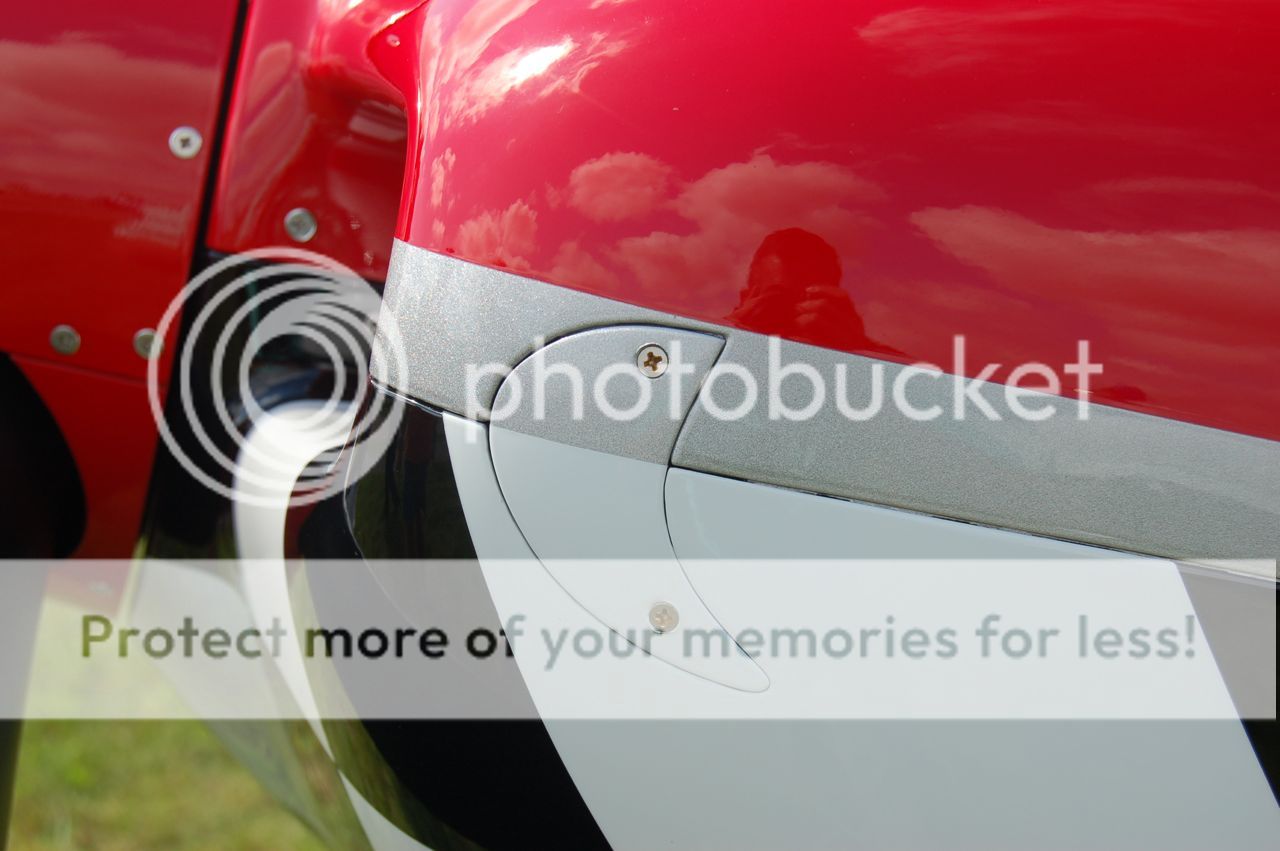
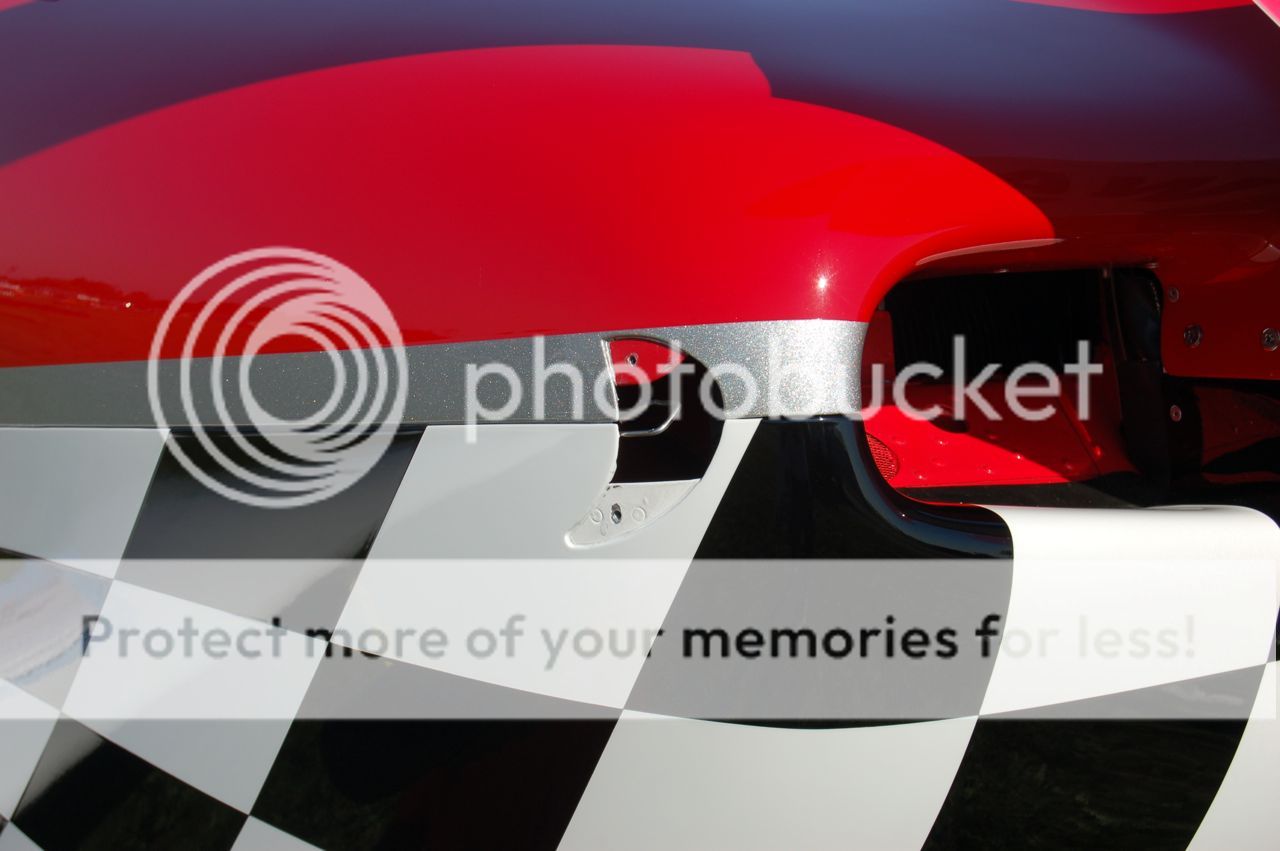
Again, I'm pretty sure I've seen where some builders have instaled some plates or covers to make this area look better. I'm looking for suggestions of ideas that have worked or pictures of what you have done or seen.
Thanks in advance for any information.
TB%20top%20cowling.JPG
 
The 10 comes with a neat setup for locking these (firewall top to upper cowl) wires in place.

A call to the factory should get you the prepunched parts, and instructions pretty cheaply, I would imagine.

If there is a RV 10 in your area-------go take a look.

Hope this helps.
 
Thanks Mike

Mike, Thanks for moving the thread.
and for the tip on the RV-10 pin retention system........I'll go looking of it.
I haven't yet seen one and surely didn't know Van's had a design.
If anybody has a picture to share, I'd like it.....
email is
[email protected]
 
Bob, P.M. me your mailing address.

I have the parts to make the retainer, will send to you.

No cost, just dont need them, as my plane uses screws for the firewall/cowl joint.
 
There is a Lanceair builders assist shop in Carlsbad CA that I visit whenever I am down there. I wish I had a picture of the way he did his hinge pins. I will try to explain. He took an allen end screw and centered drilled the end of the screw the same diameter of the hinge pin. Then silver solder the hinge pin to the end of the allen screw. He would offset the hinge in the cowl so the pin would enter below the split of the cowl. He would take a small block of aluminum and drill and tap it to fit the allen screw. He would grind the block to fit the lower forward of the cowl. He would flox the aluminum block to the forward cowl. With some glass work the head of the allen screw was countersunk and flush with the front of the cowl.
I tried to do a web search for a picture and found something simular. This is not necessary, you can do it yourself.

http://www.carbinge.com/Keepers.htm

Aaron

Aaron, that's exactly what I did on my RV6. After years of building RC, I used some Dubro Brass inserts which you can actually screw in line with the cowl and hinge, use a little brass tubing for alignment to the first hinge, glass on the inside of the cowl a little to secure everything. I used 8/32 allen set screws, silver sodered piano wire to it. Have pulled and pulled on it to see if I could break it, never could. This leaves a 1/8" dot on each side of the cowl, you can't really even see it as they are recessed about a 1/4". They screw in very securely. Makes for an extremely clean installation. You can get the brass inserts at any hobby shop.
 
Tip: How did you Secure your Cowl Hinge Pins?

Looking for ways in which people have secured the hinge pins that hold the cowl havles together. If you have a picture, please post it along with your description. I'm always looking for simple yet elegant ways to do this for my next project.

Here's how I did mine on my last project. I asked a Harley shop who specializes in after-market parts, to make this up for me based upon a mirror that they produce. The hinge pin is bent at 90 degrees and sticks up through the small hole in the clip. I then matched the design on my tail.

Paint02.jpg
Paint03.jpg
 
From the Inside

No need to work yourself up over this, just do them hidden and release them from inside the cockpit. Looks great and very easy to do. There is an excellent thread and pictures about this here http://www.rivetbangers.com/forums/viewtopic.php?t=3072

I had mine originally the way Van's suggests using the welded tabbed pins they sell then when I re-did my cowling I did them internally. I couldn't believe how easy it was to do it this way and it looks nice.
 
Upper cowl to firewall hinge pin

The plans show a 1/8th inch hinge is used to secure the top cowl half to the firewall/top forward skin. The aluminum .125 hinge pin is replaced with a .090 steel hinge. The intention is to make removal and installation of the hinge pin easier due to the curve of the top cowl.

When I put the .090 hinge in there is quiet a bit of play between the 2 hinge pieces in the fore to aft direction. I'm sure this will tighten up a bit as the lower cowl is attached but I'm curious if others have noticed this and done anything different. Might help to note that note of the hinges are riveted yet, I'm sure that has some affect on the amount of play as well.

A search of the forums came up with this:

http://www.vansairforce.com/community/showthread.php?t=31144&highlight=hinge+pin

I'd rather not use camlocks.

This is on an RV-7, I assume it applies to all other RVs.

Any thoughts?

Eric
RV-7
Boise ID
 
Eric, I am exactly at the same stage. My idea is to try to insert the .125 pin and make holes and rivet with that pin in place. After that, I will replace it with the .090 one. In such way I hope that hinges will align better, thus permitting an easier installation/removal.
 
Last edited:
The .035 max play is normal. Most of the slop will go away when the other pins and screws are in place.
If you sit high enough in flight, you may see the aft edge of the upper cowl sitting higher (~.035) than the forward deck due to the low pressure air flow over the top cowl.
 
You can taper the pin.

Dan Miller set up his disk sander with a simple jig and put a gentle taper to the fore end of the pin, where it needs to make the bend down the side. This was easy to do and worked very well for him.
 
screw and nutplates

There have been a lot of discussions over the years concerning weaknesses in using the hinge pin on the upper cowling, and across the bottom of the lower cowling. Seems like a lot of hinges would have portions break over time. The camloks are a great fix, but expensive. The cheap way to do the same thing is using screws and nutplates. A popular option, which I went with, was to use #8 screws and nut plates on the upper cowl, bottom of the lower cowl and inside the air inlets at the front of the cowl. Hinge pins are used per plan on the back vertical portions of the lower cowl, and along the upper to lower cowl horizontal joints. You can search on cowl and screws and find many entries. Here's one:

http://www.vansairforce.com/community/showthread.php?t=40952&highlight=cowl+screws

I find this method worked well.
 
Dont bail from the hinge pins just yet.

I have never heard of an issue on the top cowling, and the bottom is an easy fix by supporting the inboard edge with a screw. Taking off or putting on the cowling is a ten minute job.
I have camlocks on my Bucker and they are a pain in the butt as over time the "keepers" worked on the fiberglass so they fall out when off the airplane. I lose one from time to time.
I believe both methods, done correctly, work great. Both have their pluses and minuses too.
Stick with what you are doing and do it right, you wont have an issue.
 
split hinge location

Hey Eric,
pay close attention to where the break is between the left and right sides.
I find that I wish mine were an inch or two closer to centre, as it's tough to get the pilot side pin started, reaching one hand thru the oil door!

I'd also put a second door in the cowl on the pilots side, especially if it was a flush fit ( no fasteners), and that would let me inspect both sides, access the oil cooler, check or charge the battery, etc. much more easily.
 
Little more info

Dan Miller set up his disk sander with a simple jig and put a gentle taper to the fore end of the pin, where it needs to make the bend down the side. This was easy to do and worked very well for him.


Thanks for the info all. I will look into moving the split over a few inches.

JonJay, can you tell me what hinge size and material Dan had used. Based on what I have read the aluminum hinge pin is not to be used. Did he mill down a .120 steel pin or use the existing aluminum pin?

I will use camlocks on the lower horizontal portion of the cow. I just don't want them visible on the sides or top.

Any additional info would be great. Thanks again.

Eric
RV-7
 
How to taper the pin

Eric,

I have been following this thread and thought that I should pass along how I reduced the diameter of the top cowling pin. First of all, I used the .090 diameter top pin for a hundred hours or so and noticed that in flight the top of the cowling lifts up at the rear (where it buts up against the firewall). Using the full diameter (.125) pin would solve that problem, but is difficult to slide the pins through the hinge due to the curved sides of the top cowl. I bought Van's steel .125 hinge pin for both of the top cowl pins. I decreased the diameter of the last 9 inches (the curved part) of each pin to approximately .090 with my disk sander.

Measure and cut the full length of each pin, including the angled (handle) part of the hinge pin. Mark a point at the 9-inch point on the pin. Chuck the pin in the electric drill. Take a 2" x 4" and cut a 1/8" V-shaped groove across the narrow end of the 2 x 4. Put the pin in the groove and put the groove and pin up against a 12" disk sander. Turn on the sander and start turning the pin with the drill. Slide the last 9 inches of the pin back and forth in the groove in the 2 x 4. In short order you will have reduced the diameter of the last 9 inches of the steel pin. Now you can curve the thinned end of the pin to match the sides of the cowl and bend the 90 degree "handle" at the other end of the pin.

These cowl pins make the top of the cowling fit nicely, solve the lift-up problem in flight, and are easy to install.

Hope that this helps.

Cheers,

Dan Miller
RV-8 N3TU 680 hours
 
extruded lower hinge

If you stay with the hinge approach you might want to also consider replacing the stock lower rolled hinge with the extruded version as well as lock the hinge pins in the center (in my case I used a single hinge approach similar to the horizontal pin retainer on the front of the cowl)
My lower hinge cracked in multiple places after only 20 hours but the extruded hinge is fine after 70 hours
 
Show Us Your Cowl Pin covers or method to secure pin

Hey Guys,

I'm thinking there are lots of methods to either fab a nice looking cowl pin cover or secure. Show us your Pin Covers!!
 
FWIW

I insert my pins from the rear. There is some extra length and it's bent 90 degrees for about 3/4". I release the 1/4 turn fasteners on the sides, pull out on the sides of the upper and lower cowling and insert or remove. The bend keeps it from migrating aft. Nothing shows, nothing in the airstream. I lube the wire with hard soap.

I have a loop of wire with a handle as a removal tool and a fiberglass pusher for insertion beyond the line of the seam. I keep them in the airplane in case I have to remove the cowl away from home.

I would do it again.
 
A very simple and neat solution is making 3/4 of an O with one pin end.
You screw two screws on a wood bar and then insert between them one of the pin ends. Then pull the other part of the pin to form the O.
Insert the pin in the hinge and make a hole on the cowl. Installa platenut.
Gently bend inwards the last portion of the pin, to accomodate for the cowl profile.
Next week some photos.
 
My covers

The first photo was taken when I WAS INSTALLING THE COWL IN 1999. The covers are made of 0.016" 2024-T3. They are each mounted with 3 #8 flat head screws and platenuts. Originally the platenuts were all mounted directly on the cowl fiberglass inner flange and the two outside fastener locations still are but after a couple of years of operation one of the inner locations gave out and I had to install those two inner fastener location platenuts (one for each cover plate) on a backing plate of 0.032 2024-T3 aluminum. No problem since then. The second photo was taken on 6-22-2007 when I was experimenting with inlet size reduction plugs. The inboard mounting screws for each coverplate go through both the upper and lower cowl interface. The cowl outer surface is countersunk and the cover plate holes are dimpled.

1999cover.jpg

2007cover.jpg


Bob Axsom
 
Last edited:
I duplicated the cover Wayne did on his award winning 7. I saw him removing the cowling for judges and took couple pictures


pin2.jpg


pin3.jpg


I spent couple evenings on them. Printed first picture full size copied the cover then made it. The method is written on Walter Tondu's website.


pin4.jpg


pin1.jpg
 
Here is the photo. Photo is ugly, cowl still not finished and painted.
But you get the idea.

27wstvt.jpg


And this is an ugly detail of my nearly finished cowl

6yfqxi.jpg
 
Last edited:
Hinge Pin Covers

Aerosports has some for the RV-7 which they haven't advertised as already stated. I just spoke with them and they are looking for someone that is ready to install them so they can see how they fit. You might get a good deal if you help them out with the fitting.
 
Super slick

This is off Jay Pratt's RV8. One of the cleanest I have ever seen. It's a little hard to tell in this picture but the pin has a little bend in it on the outside and then clips on the inside. You just raise up the inside clip, put something in the outside bend and pull straight out. Simple clean just plain nice!


Uploaded with ImageShack.us

Bill S
 
Here are the cowl pin covers that I put on my RV-10. These are now avaiable
at Aerosport Products. We have them for the RV-10 and Rv-7 and 7A.
The kit comes with a left and right blank that you use to install in your cowl.
These blanks are oversized to allow for primer and paint.

http://www.aerosportproducts.com
cowlcover2.jpg


Geoff
 
I just bought the pins from Van's. But looking at the beautiful ideas here reinforces my intention never to park my RV in the RV corral at Oshkosh. :p

Bob, you can park next to us. I did the same. Pin screws visible don't diminish the fun at all.
 
a crow among peacocks...

I have a feeling that, even after I'm finished sanding,
buffing, polishing, touch-up, etc, my plane still won't measure
up to planes like Scott's.

My plane will serve to make all other RVs look great.

Its a tough job but somebody's gotta do it!:D

Dave
-9A flying
 
Same as Hevans.

Insert from the back, 90 deg bend, grind a bit off the lower cowl and snick the end of the pin down there.

Will try and post a snap when I get some time.

Easy, very discreet, simple.
 
Fiberglass and nutplates:

Cover on...
imag0116o.jpg


Cover half removed so you can see behind it

imag0118o.jpg
 
Last edited:
The first link to the pictures did not work so I'll try another


img0745fr.jpg


img0881p.jpg


They are slightly under bent to keep a little tension on the hook on the back side of the cowl.

The bumps are for the H2AD fuel pump.

Russ
RV9A
 
show me your cowl hinge pin

My to do list is getting shorter and shorter...one of the "to dos" I have left is to affix my cowl hinge pins. I have been putting this off for a long time. I am open to ideas, although my intent is to be inserting them from the front so I need a method as such. If you have pics that would greatly help.

Thanks
 
Saw at Osh and replicated

I copied Wayne's award winner :)


pin2.jpg


pin3.jpg


pin1.jpg


Caution; looks simple but a lot of work.
 
Nice Vlad..I think I have that same picture in my database... How is the hinge pin held in place?
 
How is the hinge pin held in place?

It has a squared bend at the end (could be round as well) and is held by the crescent plate. No extra attachments to whatever. Even if it backs off a bit inside not a big deal. It meets the plate or deadends in the cheek.
 
Last edited:
I can see the pin is squared off, but still don't comprehend how the plate holds or deadends the pin.
 
The plate is of robust nature. Half aluminum and half fiberglass in thickness shaped to fit the cowling. Held by two screws into two nutplates. That's it. No pin attachments at all. Squared ends for convenience. Easy to insert easy to remove. You may adapt it to your taste it's a fun project indeed.
 
less elegant, but similar concept

I used the standard ugly tab welded onto hinge pin that I bought from Van's, but really like this simple method on a friend's RV-6 (cover piece is thick piece of aluminum and he has over 1,000 hours on this setup):

cowlHingPinSecure(small).jpg


Might change mine to something like this someday....
 
Last edited:
Ours is similar, but simpler:
  1. Use Vans' 'Tabbed' Hinge Pin and drill #8 hole in it (or a bit larger)
  2. Make up a cover plate the same length as above, but ~1/3 the height, and only cover part of the lower cowl
  3. Rivet a small box section and #8 Nutplate behind the cover to the lower cowl
  4. The #8 screw (+tinnerman) secures the cover on, goes through the hinge pin and into the nutplate
 
Back
Top