VansAirForceForums  
Home > VansAirForceForums

-POSTING RULES
-Advertise in here!
- Today's Posts | Insert Pics

Keep VAF Going
w/a Donation


VAF on Twitter:
@VansAirForceNet

  #1  
Old 05-18-2023, 05:47 PM
Gandalf Gandalf is offline
 
Join Date: Apr 2008
Location: Medford, OR
Posts: 300
Default 37-07 Fuel Neck and Sealant

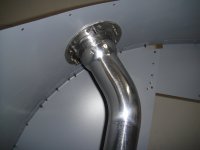
I have my fuel tank and air vent in on a temporary basis. Now I am working on the fuel neck. Everything looks good except a very large gap between the flat flange on the fuel neck and the curved fuselage skin. It is my understanding that the sealant is used to close this large gap, correct?

Edit: Re-reading the instructions, I am to "bend the flange" to match the aircraft skin. I guess I will try with a vise and vise grips unless someone else can chime in with what they used.

Jeff

Last edited by Gandalf : 05-18-2023 at 09:09 PM.
Reply With Quote
  #2  
Old 05-18-2023, 09:09 PM
12vaitor 12vaitor is offline
 
Join Date: Aug 2012
Location: Panama City, FL
Posts: 265
Default

You can bend the flat flange to match the curve of the skin. The fit was close enough to use a gasket to make removal easier than using a lot of sealant on the flange/skin surface. I did run a small bead of sealant around the recess created by the pipe-skin contact area (inside the pipe flange).

John Salak
RV-12 N896HS
Attached Thumbnails
Click image for larger version

Name:	RV12 Fuel Pipe.JPG
Views:	60
Size:	352.7 KB
ID:	42610  
Reply With Quote
  #3  
Old 05-18-2023, 10:10 PM
rv9builder rv9builder is offline
 
Join Date: Jan 2005
Location: Irvine, CA
Posts: 1,018
Default

That looks nice, John! How did you get the pipe to be so shiny?

Thanks,
__________________
Mark
RV-12iS Fuselage
RV-9A Project: Sold

VAF donation made for 2023
Reply With Quote
  #4  
Old 05-18-2023, 10:32 PM
Gandalf Gandalf is offline
 
Join Date: Apr 2008
Location: Medford, OR
Posts: 300
Default

Quote:
Originally Posted by 12vaitor View Post
You can bend the flat flange to match the curve of the skin. The fit was close enough to use a gasket to make removal easier than using a lot of sealant on the flange/skin surface. I did run a small bead of sealant around the recess created by the pipe-skin contact area (inside the pipe flange).

John Salak
RV-12 N896HS
Thanks for the ideas and photo!

Jeff
Reply With Quote
  #5  
Old 05-19-2023, 10:49 AM
12vaitor 12vaitor is offline
 
Join Date: Aug 2012
Location: Panama City, FL
Posts: 265
Default

Quote:
Originally Posted by rv9builder View Post
That looks nice, John! How did you get the pipe to be so shiny?

Thanks,
Polished on a buffing wheel with red rouge to a mirror finish and then powder coated with gloss clear.

John Salak
RV-12 N896HS
Reply With Quote
  #6  
Old 05-19-2023, 12:01 PM
DHeal DHeal is offline
 
Join Date: Sep 2006
Location: Windsor, California
Posts: 1,045
Default

I slightly bent the flange to approximate the curvature of the skin. I placed a piece of Saran Wrap (or equivalent release agent) on the inside of the skin at the flange/skin interface. Then I loosely installed the flange using a good bead of seml-flexible/fuel-tolerant sealant on the flange face. Don't fully tighten the screws until the sealant has cured and the Saran Wrap has been removed. This has worked well for me. Whatever you do, do not permanently adhere the flange to the skin -- one day you may have to separate the two.
__________________
David Heal - Windsor, CA (near Santa Rosa)
EAA #23982 (circa 1965) - EAA Technical Counselor and Flight Advisor; CFI - A&I
RV-12 E-LSA #120496 (SV w/ AP and ADS-B 2020) - N124DH flying since Feb 2014 - 1,290+ hours (as of May 2023)!
VAF donation through June 2023.

Last edited by DHeal : 05-19-2023 at 02:28 PM.
Reply With Quote
  #7  
Old 05-19-2023, 01:18 PM
Gandalf Gandalf is offline
 
Join Date: Apr 2008
Location: Medford, OR
Posts: 300
Default

Quote:
Originally Posted by DHeal View Post
I slightly bent the flange to approximate the curvature of the skin. I placed a piece of Saran Wrap (or equivalent release agent) on the inside of the skin at the flange/skin interface. Then I loosely installed the flange using a good bead of seml-flexible/fuel-tolerant sealant on the flange face. Don't fully tighten the screws until the sealant has cured and the Saran Wrap has been removed. This has worked well for me.
Thanks for the advice.

Looking forward to installing the canopy next.

Jeff
Reply With Quote
  #8  
Old 05-19-2023, 02:13 PM
rv9builder rv9builder is offline
 
Join Date: Jan 2005
Location: Irvine, CA
Posts: 1,018
Default

Quote:
Originally Posted by 12vaitor View Post
Polished on a buffing wheel with red rouge to a mirror finish and then powder coated with gloss clear.
Thanks, John!
__________________
Mark
RV-12iS Fuselage
RV-9A Project: Sold

VAF donation made for 2023
Reply With Quote
Reply


Thread Tools Search this Thread
Search this Thread:

Advanced Search
Display Modes

Posting Rules
You may not post new threads
You may not post replies
You may not post attachments
You may not edit your posts

vB code is On
Smilies are On
[IMG] code is On
HTML code is Off
Forum Jump


All times are GMT -6. The time now is 05:09 PM.


The VAFForums come to you courtesy Delta Romeo, LLC. By viewing and participating in them you agree to build your plane using standardized methods and practices and to fly it safely and in accordance with the laws governing the country you are located in.