

georgemohr
Well Known Member
Hi all,
We are building our fuel tanks in line with the procedures laid out by Scott from Vans in this (most excellent) video:
https://youtu.be/gTl827JWz68
The process of inserting a rib which has been already 'buttered up' with pro-seal requires that the rib fit easily into the LE of the skin that is sitting in the cradles you created. If you must use any substantial force to slide the rib into place, it's likely that the pro-seal will be smeared out of place and possibly introduce leaks.
In Scott's video, the skin LE curve seems to be pretty conformal with the rib shape, and he doesn't seem to struggle at all here. I am not Scott (LOL). Our tank skin LE bend was a smaller radius than the nose of the ribs. Putting the skin in the cradle made this characteristic worse. Some searching here didn't result in a lot of hits on this issue. Maybe we missed something obvious that others are doing?
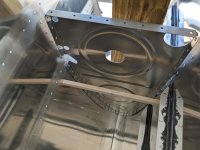
Anyway, we needed a clean way of 'opening' this radius up a bit for inserting the ribs. Our solution was to create a fixture that you see below. The fixture was formed by tracing the shape of the rib nose onto a 2x4, and cut out on a band saw. The profile of the fixture nose was made slightly more blunt than the rib profile, and that helped a lot. Also, pay particular attention to the finishing of the nose of the fixture. You should sand it very smooth. Any 'features' you leave might become embossed into the skin; not good! Then the shank of the fixture was built up as you can see below, and make sure it is long enough to ensure that the cross bar does not touch the skins.
We then insert this jig next to the rib location, and compress it slightly with a ratchet strap. Be careful here, not much force is needed to achieve the goal. I suspect you could easily crush the skin in horrible ways if you take this too far! Make sure the strap wrapping around the outside is aligned with the nose of the fixture inside the tank. You'll also notice that the top of the fixture has little tabs to help spread the aft edge of the skin open a bit. Lastly, a simple 1/2" balsa stick helps pry open the center portion of the skins. Nothing fancy here, but a big help.
With this in place, the ribs nearly drop into place with no effort. I hope this helps someone get by this issue!
Regards,
George
We are building our fuel tanks in line with the procedures laid out by Scott from Vans in this (most excellent) video:
https://youtu.be/gTl827JWz68
The process of inserting a rib which has been already 'buttered up' with pro-seal requires that the rib fit easily into the LE of the skin that is sitting in the cradles you created. If you must use any substantial force to slide the rib into place, it's likely that the pro-seal will be smeared out of place and possibly introduce leaks.
In Scott's video, the skin LE curve seems to be pretty conformal with the rib shape, and he doesn't seem to struggle at all here. I am not Scott (LOL). Our tank skin LE bend was a smaller radius than the nose of the ribs. Putting the skin in the cradle made this characteristic worse. Some searching here didn't result in a lot of hits on this issue. Maybe we missed something obvious that others are doing?
Anyway, we needed a clean way of 'opening' this radius up a bit for inserting the ribs. Our solution was to create a fixture that you see below. The fixture was formed by tracing the shape of the rib nose onto a 2x4, and cut out on a band saw. The profile of the fixture nose was made slightly more blunt than the rib profile, and that helped a lot. Also, pay particular attention to the finishing of the nose of the fixture. You should sand it very smooth. Any 'features' you leave might become embossed into the skin; not good! Then the shank of the fixture was built up as you can see below, and make sure it is long enough to ensure that the cross bar does not touch the skins.
We then insert this jig next to the rib location, and compress it slightly with a ratchet strap. Be careful here, not much force is needed to achieve the goal. I suspect you could easily crush the skin in horrible ways if you take this too far! Make sure the strap wrapping around the outside is aligned with the nose of the fixture inside the tank. You'll also notice that the top of the fixture has little tabs to help spread the aft edge of the skin open a bit. Lastly, a simple 1/2" balsa stick helps pry open the center portion of the skins. Nothing fancy here, but a big help.
With this in place, the ribs nearly drop into place with no effort. I hope this helps someone get by this issue!
Regards,
George
Attachments

Last edited:

