What's new
Van's Air Force

Don't miss anything! Register now for full access to the definitive RV support community.

Tip: An "alternate" Alternate Air Door

Dan Langhout

Well Known Member
1 of 4

Depending on your point of view, this may be a solution looking for a problem. However, in the spirit of sharing ideas and techniques, I submit an "alternate", Alternate Air Door for your consideration ;).

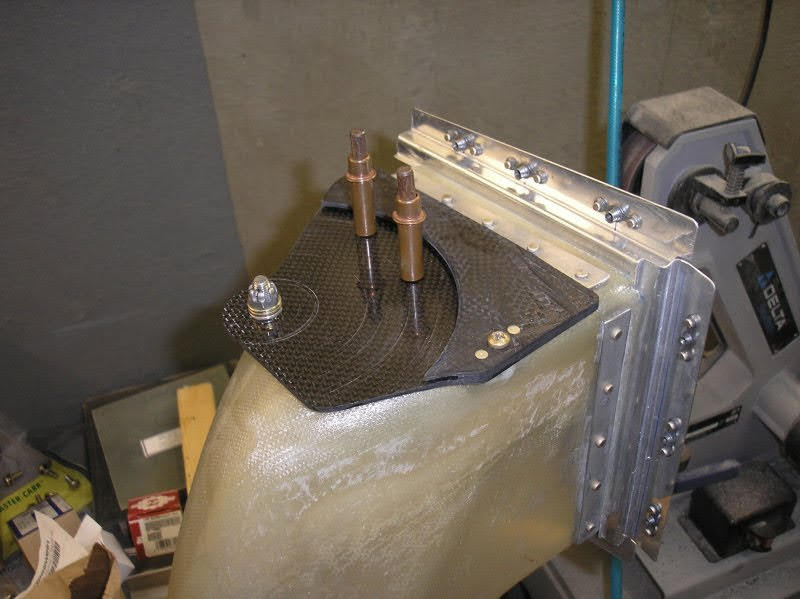
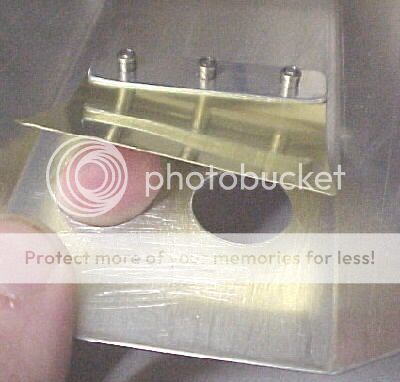
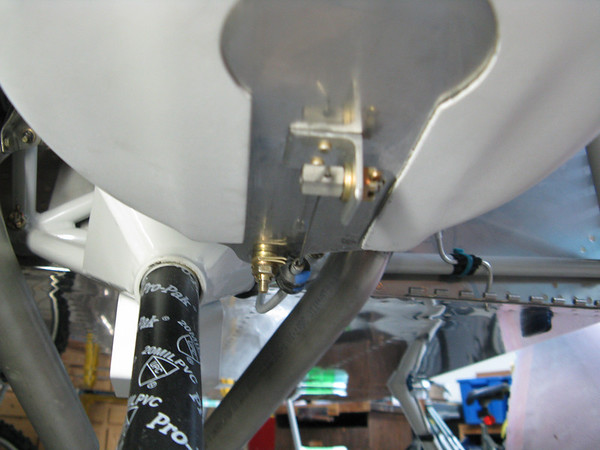
I'm using an IO-375 in my RV-7 with Precision Airmotive injection and horizontal induction. This configuration has the air filter in the left cowl inlet and uses the infamous fiberglass "snorkel" to connect down to the fuel servo. The photo below is the alternate air door that Van's supplies for this application.

14A_kjGcYcotJfLpqIUTeItlnpU2xCd2gXgcheSrgmePfQP1gwxneTsXgou8LyA3PYzyAHEbevSEhSpSau-XlYzrdAWWh6_IYKxnBNfHJPCEfydFTeGlqIkW8SIVvT9u9wdOZ7DqFtTf-oq2_HO8vzJuKBV0X-RqPAbWn2QV2elHGZDmRp00smZG8a4HV_1VdRy7LR5zeT4b9Um4rVKDy3I0FZobBYVecG5oeArK7HytY9aRd2hnP_ViAntT-6ecb4cVddudNrqjgwwJkS-Ol1zzPzXttHffwTW8Kum625CJGHLUtIt911CjgxnbcSQoA0BlypD7BgKNukv1IC23tELCUll4M3lteZHUDxks22mdOC9TOIoB_2mhgQ0kUj7w-IyAaxYhKR_IpXU5xVS0nYRhSEPQOfVstA3aGS1Kt5usrUdG1Ds5iMZ91qqzR4F-pjVPvWyIJj33MHvfqld1V41kUIah8MjYtlOrdt0rimUD7C7AMI_Ye7vURtIgvWKz1clxIrGyMNCjkbn_ws2Ny6ltE3UgyF7TA0REY0CTKrit40PABJ3qNlR7TqYuPkKkgGSGLdl6OPokQz_Hv9D-tcBrUogLZsT1E52JQswradpxEq2qHTWjBXbqt9cwJZYvkZtatFnw-Uu1gi1fF5FThNMFXZg99z6CXVqou2XkoOZB2F0tl8HchwgJnTRbfTfikS373waGjXmLT82G3hNcp8-c3Q=w800-h671


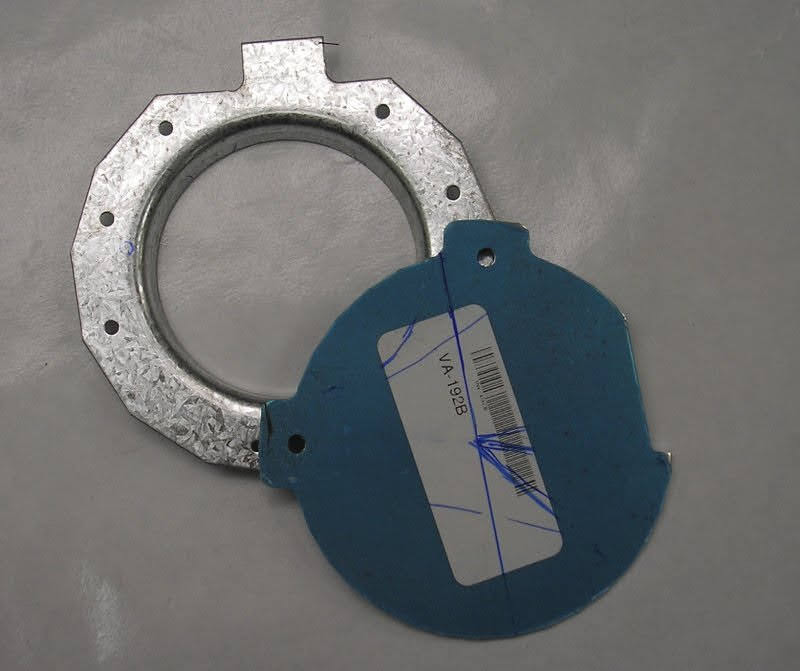
It mounts to the outboard side of the snorkel. Now I'm sure that, properly installed, this setup is perfectly adequate for the purpose - hopefully it should never have to be used. However, there has been much discussion in the forums about this design (and other alternate air doors for other configurations) failing over time just due to the vibration environment they live in. I was concerned about this but the thing that bothered me the most about this design though, is the one-way nature of it. I just don't like the thought that there is a control in the cockpit that if operated (even inadvertantly), required the cowling to be removed to reset it. I thought I'd take a shot at an improved design.

My critera was:

- must be able to open AND close using the cockpit control.

- maximum use of composite materials to get away from aluminum fatigue issues.

- no hardware exposed to interior of snorkel (to prevent ingestion hazard in case of failure).

- fit in same spot as Van's door.

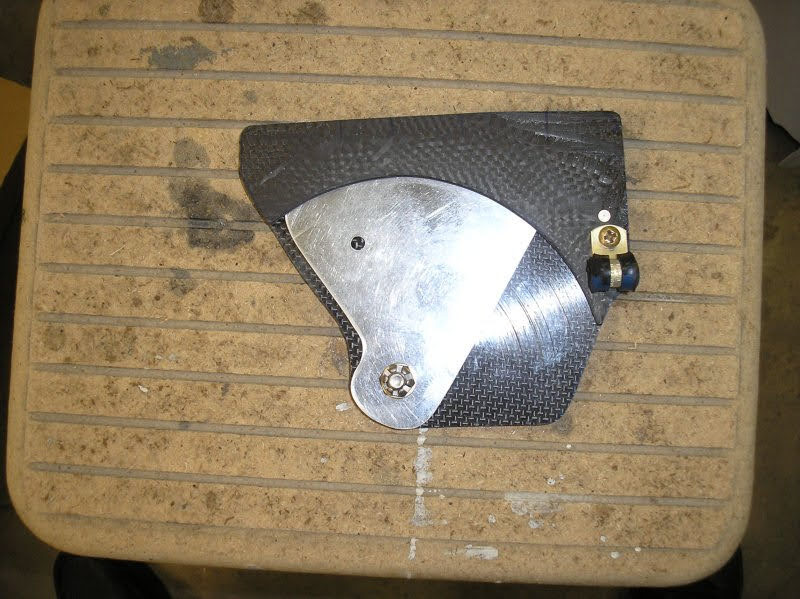
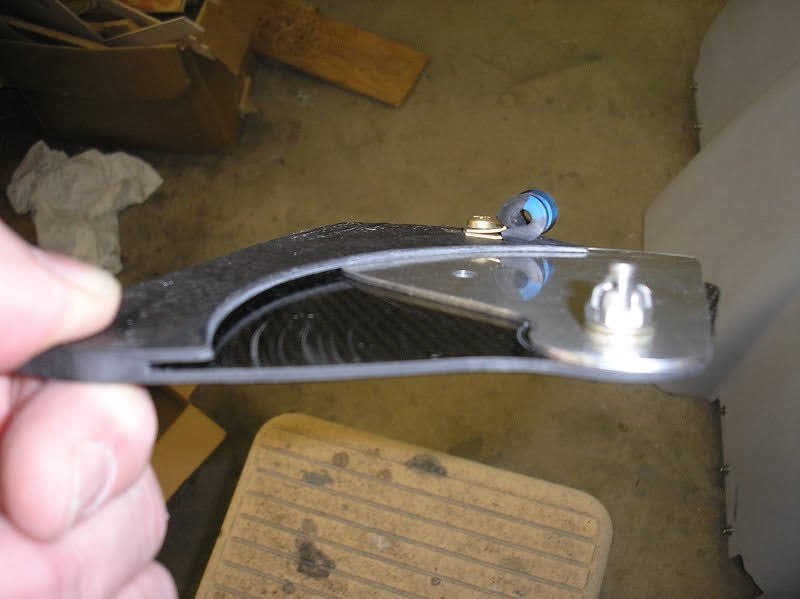
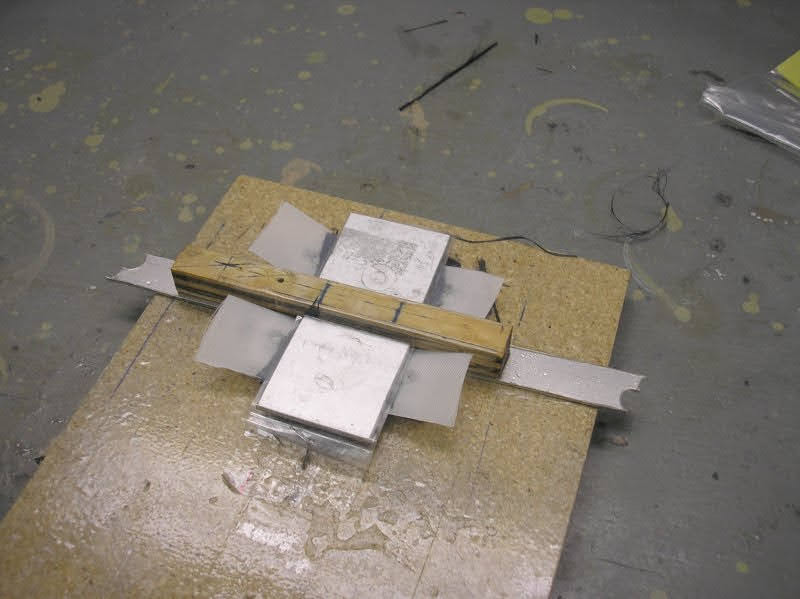
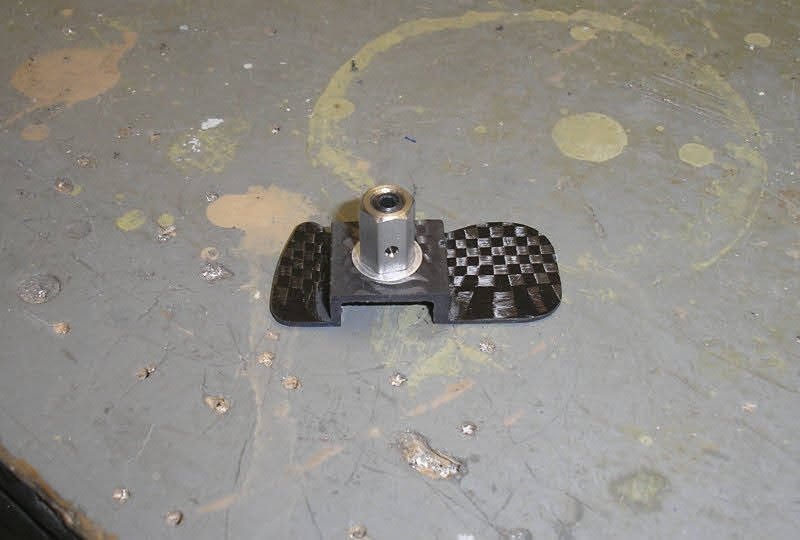
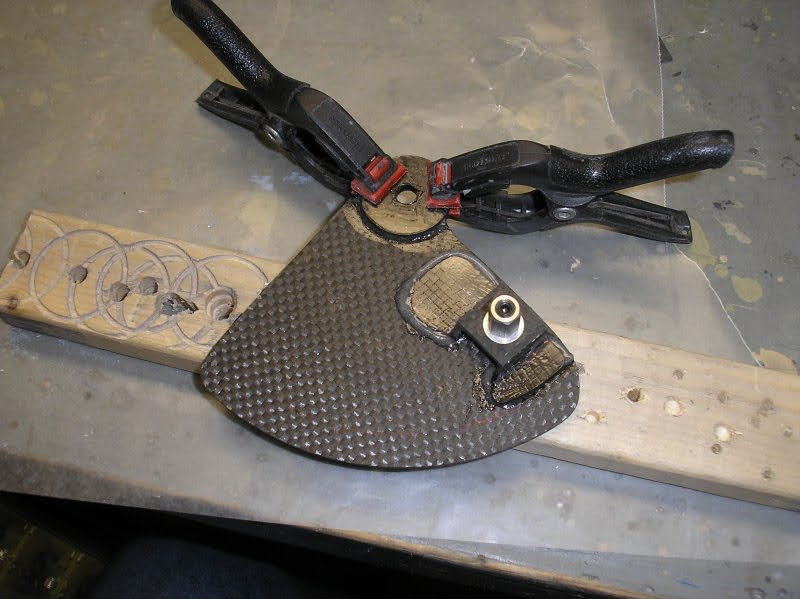
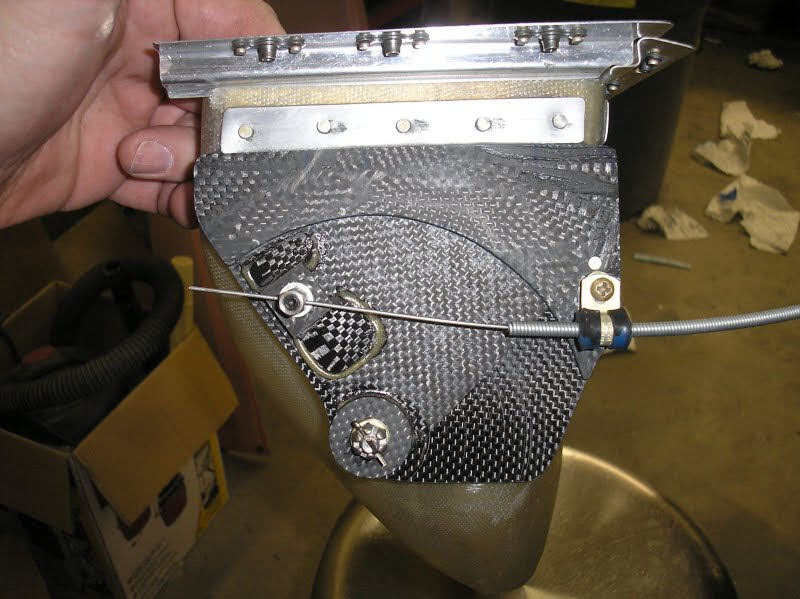
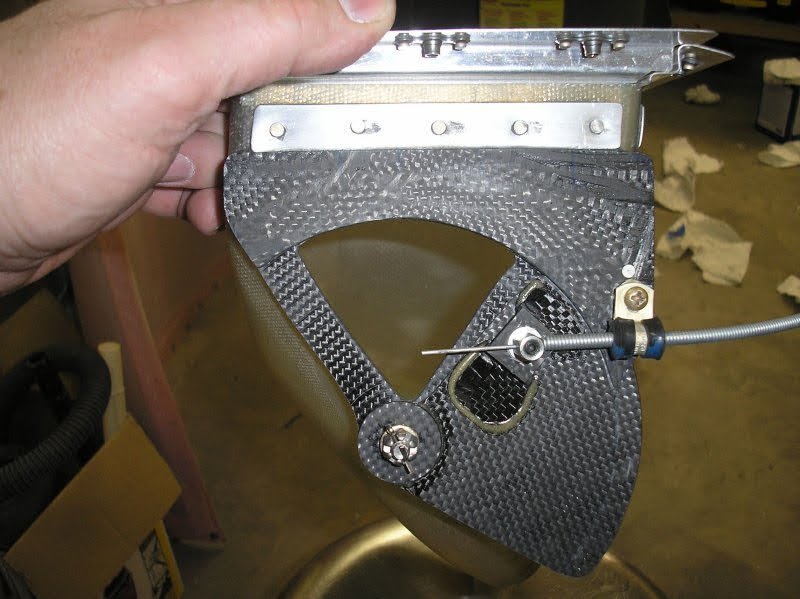
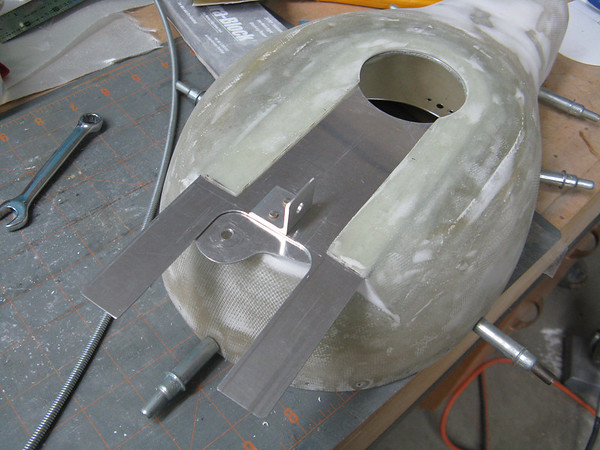
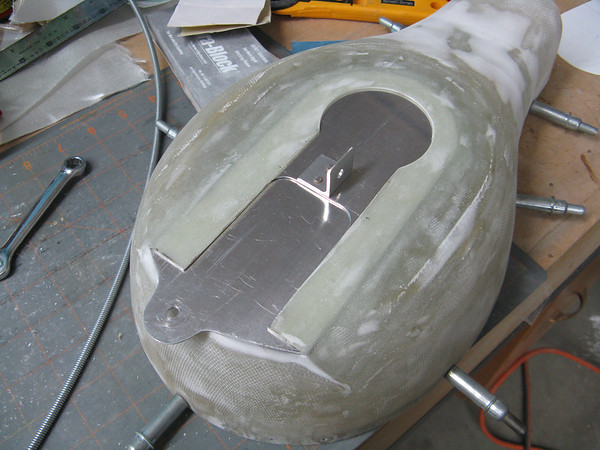
What I came up with was this:

8zBGSWwLcq3Xl2i1JmSXMY3v1fkfC1udjjPC4rREUlC6r47tvJ9U_8szs-sucPULYRiTIZnvDP5EBaKHMQT5nC_MJ0-LjTaTeTe4ISnmMPawLEO4GHbsDbTV0dgnjQQtMS7tuJUM2Jt3P2hNff6M4cqspGUhD3G_W_s5802gKlmDb_9xMLKasQ33hIny5-YcskSFTrfve2JMNeZENCF3YeAc31-5gHSZ1P7elYSNH2p5mLSQ5Fh4yQfQQ6dwESKYnfRm3CEXknq97ych9hdI37tT_Uy1FOm937LKGTzeMdVG-KnU34g9wx1jFQ1lurcNLxH4PFtU36KAj2br2Qa-_LUES6vDROODIG_QfDrK75-5fPZA0UaZeJD-77OxEtPWr1FSKsrFw3sruoERjN-MZVFugAdCgEcrnCI4keLasRyBbFgEBVri2XBkGh3HgPxhSsmAyDJU_LoOZyVEquouz35wfFRRcGO4prGbKUTPvBTU8M_ma-e19coRacRy8cIqEW1Z3H3EIlKbTctsXJKl5XmnpJBcPaHm4QgBmHL0tx88FIJMerEFOLTRhlM5CCydNPspTi2hLFiHqHO1wLIuVfDobsXrOF-89NFMdZBz4g52_eDxu9_psG-1Qc-wsTpB8LjTfDjFKK2vaMo8fq-ETNP71rX0qyNLO31vBp537f_dwYP3TZnW8EpOUhyHAKCYqEPRE2iEclOYLgLl_0K4rZQ1OQ=w800-h599


9xPHVpESrinxflKYvDo3Oti7lIQaYNpPxYh901zQ3QWMihSs-oD4mck3y9N4LYSV9w9LReiFv2SuR3Gd4_A4qmCqYwv2VKnThmLD-NVt_Fi4Rk9Yl6nChEzIS4DdPfqXCls0ChHOjnPwEYIflK-JOgCzE7LWH__oOull0H0yC_yROSvzegNGJrruU46X-LCHn4mTaeoNBA4mCsUx5GBFZfcOtZUzUU9rKm50x6jJWTUrCavIWoTT0o8P2qJeX2_gOqYUlr5VQnO7x-wIlZwqrJPp3oxG50JNHEweZn2q_ioHqLX1cKwnEM5DD4n4DR29O7yt0wYtUgqblUe_gWjpNT8cr4Rhy2kr3BGpJSdBx8Fwhpz06qyLPvqkyg3x2gT_8Q8T7DDIGTGQcGwm9ktcjqRnmwF53pJdd0yN45S_QXV9OHLi8MI1XZ_OQJ9Q9X-5RDuv_w6QVSUlpXl5EgObfkIPsiOFtNOJwN17rmy7K4MyOzs4NnWZkiLCOrTt5lltwynaRc_-H4N7A8dKD6wCIPkJYUQu5B3bNxJu-tAQyGQAcMX2Ps2HOyMRlWX22EYpaX518q9bS7Fz1OWWG7bofLIyxlpIUTkeYoqAyNPG4OWR3WH5QprntQqbxCVYMAIX9mS2UhyYdy5Etn3YyOHY4xjQZTufGcgOh6xhBImDDDQZOgFjjbnVVKCXgjG-X6m-Yi7UF1OfvaSVlHhli1H3bVKwNQ=w800-h599


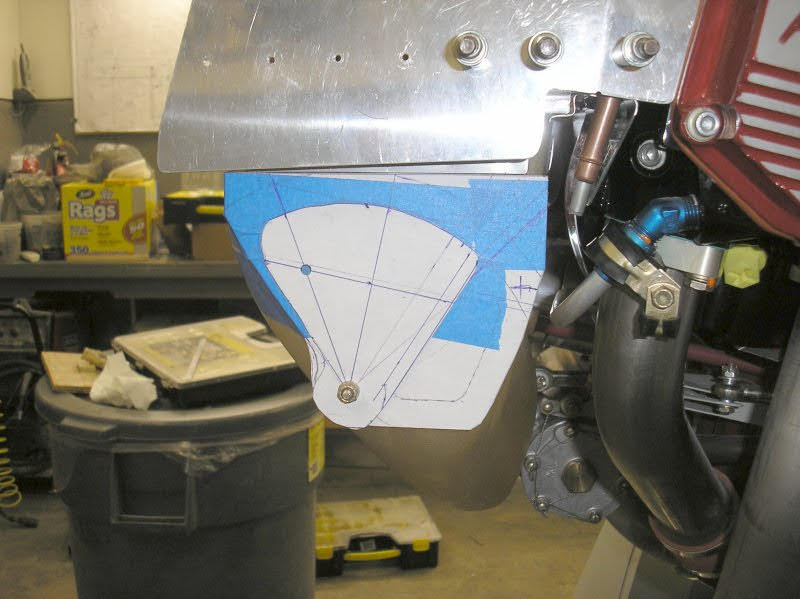
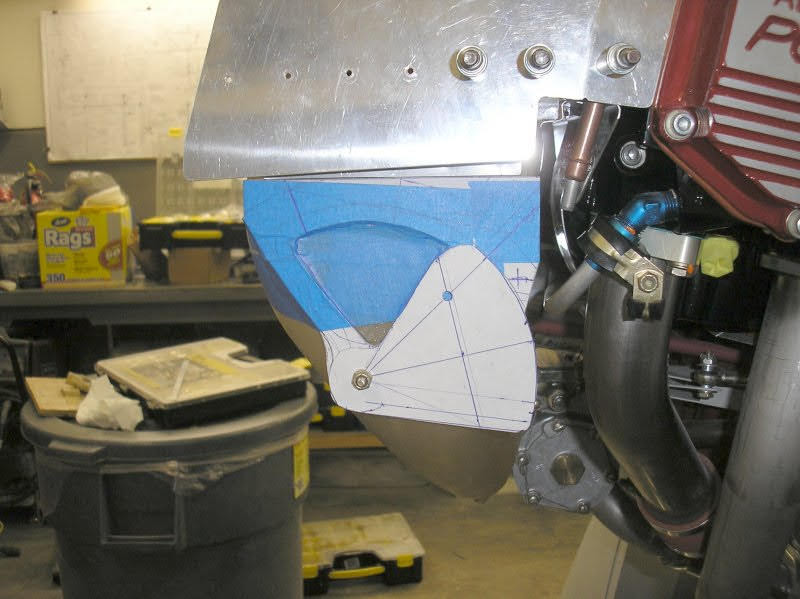
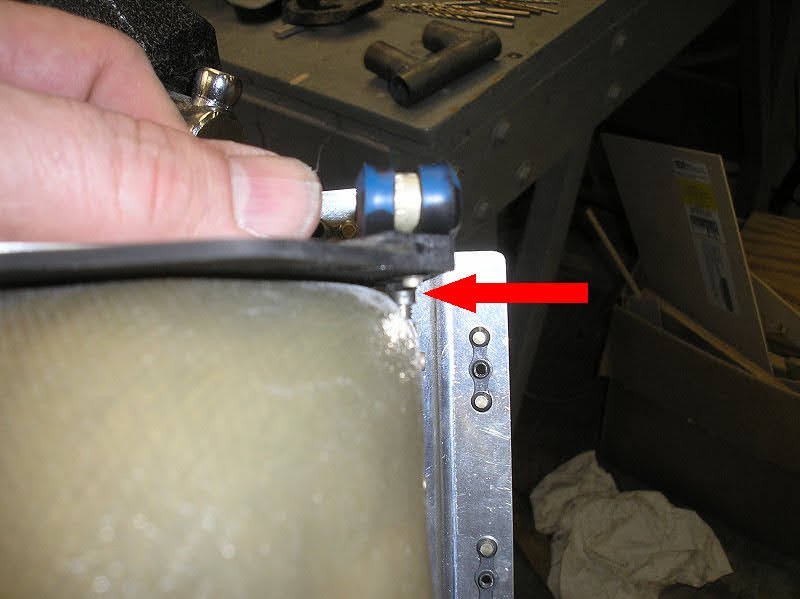
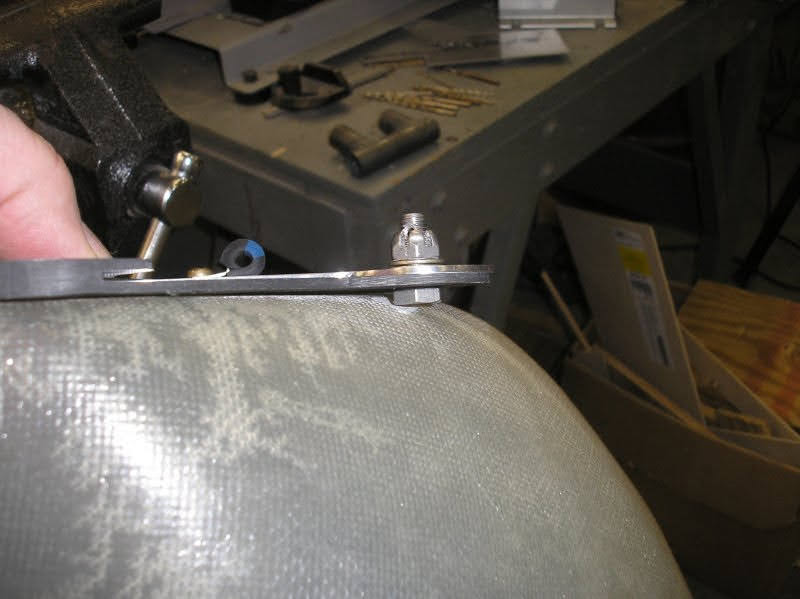
The whole assembly fits within the "sideview" of the snorkel. The pivot bolt does overhang a bit below the area where the snorkel tapers back inboard, but this is by design. There is plenty of clearance to the cowl everywhere. (Note: this might be a bit tighter on an RV-8 cowl - don't know though). The final "V" shaped opening has the same area as the Van's design (~4.4 sq. in.). Key to the design though is that the top of the pivoting door is carried in a "slot" formed into the back plate. This doesn't show on the cardboard template, but stay tuned.

to be continued in part 2 of 4 . . . . . .
 
Last edited:
"alternate" Alternate Air Door part 2 of 4

Because of the design using a slot to carry the top part of the door, it was very important that the backplate and slot be very stiff (no warping allowed). Carbon fiber is much stiffer than fiberglass (and I had plenty laying around) so this was the material of choice. This fit in with the desire to maximize the use of composite materials.

Started off cutting a 6-1/2+ inch diameter blank out of some .071" aluminum I had left over from making my instrument panel. Chucked it up on the drill press afterwards and trued it up using files, etc. to 6-1/2". (yeah I know, I should get a lathe). Careful, no scratches.


-pxVH1D9-mlE7xiZbC6Tu2QrJc-IIz0vv46Q7XEmwUMV2wtM3HVKMDJuEk0ACtPq4dj1NtAsMMzCamB1Vrz-oh4EBFqcX0WvYGrQHJvLlZuvmx9pY-VkG_6llvjomno0wwol3yft79j_Tl7G457oAM3NyTQXkmAYZwqzl3lSUUS_QcbOSHymrOlKlYFcrrEJMATZ1SgfEXQSxHPxsU8ha-IsJTjkF9R6yj0soP6BMgUOA32rU1Q-zT-fiRsQKyYFJDJgg6tuvyyY39Xqw3RM9Tv9oHFZMw5SIwrvuh9mQJTUM5lWwjY3CAXCfwAAwjLGjIh5-9QDHg-9AaVQF3wzxVfOd1yVu4OiXC7KLJBD6luSkKKfA63D-E9gsQwEysE3lZMAQ5n6d3qqVzuPA45nwMY4yTuzHQirp_9HKlT0SRvu7Y-XEy7fkAwQgKR1Rclr-APdnUSvVObavjlWmOcR3EuPUnzdYF26MseWA9L12JJdjWEM64H-DVUXNIkkGYTWo4iPx4l7BhRl8ZlnNfRWPu-_fXjIYBFzbd0hsJC_Hjy1VlhSwYGhXiW9yY8jShHyM7dcqgoqan7pIYWV0fC16uIr5GDVc0jtCn5thtbDov0N7eO-aQrB--e_PkZm2Wq01CNIti4yfV0LV_bLKhOaRiwW2ZLTtEbILn11b8O1ds-u05dOmZKrqyNrDNYlQZ1D7NieaNKzL4q5RAhVb5t8fi9_Cw=w800-h599


S6MCYqSPfyS-RNPWDaJ15Zex__DN4NCfoLMe36BJmY1m-Uq0RXbpx_nHdu3JJLdkTbIsEIvPHXGxDYZ0XMdemXSahCYfZlp1wAikkipH38nGhXWkTolNZkGjrB0c1YwNt4fEv-0H_igFAAhni5DdQedOibbbw9iNolPwAqHhwhCZPTpbaGtMbMhgkqiAJaTkK-LeC_0icBumGOzG4YzMypskLs6NtD6ruF9v3RPoXFRj0FJzhBcTX-AtuO-5ncNZnvldw2dbYBmjmvapRuHAgycKawzxGt7yGVcs7bWcTG6oNR8h_m8wcPbvLKqRM__bhe3niFzQZh1soREWB6JHXDE7Zs2ewsnmvMCJh5leWuUrmUKqs3WqHDfl-gG-jHlgw5K7nXksDfQjvXrofYeqfKrCpsOxchxF_WVIYYMnWQd7LSHh_LwW6z1Rjk6otD11O-oU3oNm0Pcqv9vMUwxlz183kw9ZfPJbgXkhSWdyBmuHZOcKJoq3E6x87mmJDko8XrflAVawvStJQ9PTXk2mcREkuK5EPa1pgaLXq68ZEn80TwMr6uhUNZQrsuPz3AzNMT7QAaKGUlRpRGHEhEbcIykeXu6k0gKg7yi-RMv4gYS74vqX4_KQhcvgHQ5jXQkzkg1nNOrF4lOyeaEeMKQ9QA1vjmotMWl7AhM1IMDoEIX_l4KlT7o0W1-fu6hZS2E2eKdqYt5hhpxdpBiAaSNN9mmrcg=w800-h599


After 3 coats of Johnson's paste wax on the disc, I laid up this nasty looking mess on a flat board. 8 plies of plain weave under the disc, 6 plies around the top edge, and 7 plies overlaping the top edge by about an inch.

69lz8M7Q8fvxKkbzO_lCrXj-Oa2bIAifMaIzJcKxmb-IB7OCstVoQ_UwuCQkTU0hkZ_xBDJGf4uk02quI3VtGi2gh4cU4bUTE-Qh2oGf7tD8BFjkLKJfjQpQSq5rMIsHb5tBLfsuVI3bXMzJ1UOOv0lOh_20JvcHLfp-enSVVmeTbxzLGyXjsz3XEMd500IBdl3NQOBqL8SaiScyJko-cLkFW1XeM6MLu5Wjx2RWKKbCaG6kVVhvwCfchG13oU_JgORqNjKr9ro752m5afQ0zK_aMxZh7x6g2lvi9-qcoFyiqD9Q7gmX5xQp3j6Pmaynjow6WDMVVn5f_SBLUpm1-O2kA1p2nXRwq825Unokj0lhIxAF1OaOSQ8o8WbVvdklBrJnwzuy_TsuHM3yKySZkyMc2V-BZHQBF8x6eREoUyRGI3k3YmR3ETSbDnOlA9JCLGkQjlR7wMInoNRpBB2cKKmITX27-h-88bE-vX878p8ZPXd7fV7kxAc6o4xiF0SkwLL2Pz1rczOCb3nl6P0XH8EspoONGBRtIXeIC0DXF677wCr8-a3UzDkzDRWpXVDZcXJ6GeL5d7xMSd8frF9DUqJBCYTozbzlTA1XTqb8lrurvJ8beNJ2mOXjmNHpbwviugivVNac0buIqgb23fWmfLRwfS1ILOP3JsnNUwd0ope5PfvMc5yCGQ1ih7_MvEqxY8ObHAXEOWPxcH9jWoTwCTfSHg=w800-h599


There's more to the layup than meets the eye. To ensure that I pulled a really smooth surface off the "bottom" of the disc, I laid the first 8 layers OVER the disc (i.e. I didn't put down 8 layers and then lay the disc on it). Doing the layup over the disc enabled me to make sure there were no air pockets, etc to mar the finish. After the last layer, I covered it with peel ply and then put another flat board on top of that and flipped the whole thing over. After removing the first board, I did the rest of the layups.

After letting this mess cure out, I match drilled the carbon through the center hole in the disc and after a little persuasion with a large punch and hammer, yielded this:

y1vptOBBteMjKeNk8_RfjQqoV0bK_dWNObTGn5uBoXn3nlec-2RjOHKVsUXEBPwyzIqD9Y73XW6FNLvtnasGO1Z7TvgZC4zd8VWvDQ1v-jrddWwohYWsi4MIVO5NTLe7ahIhOpuuUw18HuPTEkQy4xPFxqXMGb7CeboO1QgJt6yIxJfvOS1w-7Ttx8GY48KXtH05YE0quMoQu12KrZP3_bqb0nOyBpEpCEqj8o6VlXfGugC2FyhlUliz-m1CU2oyUnY66WMwCyVFe-IuaRsWDy2prB8OoeConoSdBFoV-freoVLC2agy-7IEU80WfUfEErH19e1HcZK7GWL93i4maecMM2rhsChAoVhZ-52s3cqOPvCjlcMu-WnCcRpyE330EkT3gCV7zUuZgUhJ0YpUHLcgI4j6JFZR7rfpV6S5-4ibmKeB0F34gG6BLQIfBpkrloP4GgUA9pxKqtLgoI1pFywWJBoU1RqahKSVXtDwJ-UP_1sVriaK6DWVuAxGj8l61VJl6Bf-n5KnvM87s-81lCpxjJcPXDs6FV-YXU6AqoCy0E8L1HJhb78mlJcedW6f6ep3VHFnzvz5WjSUCNNUwMnR7CLtJwbeoPGWUmhxvlqVjKPR4LIt7i-eOMPJJ1fFZjSY3FU_opd9OyrsJOeKCaSaWZd28VKHb1GGQ5yawPqXC0kN2kZ4lPDn3MYuUHpP2LTh0jvYPiv8p1djzQUDs9bWVw=w800-h599


After a little cleanup, edge trimming, and sanding to flatten the top overhang surface, I stuck the disc back in the slot to act as a shield so I could trim the slot overhang down to about 5/16" wide.

1gnTjMn-_PEtG0-1DGZl2lVk34x4AqSZz-c0i0wmzUL5dkdXQiiHyF7Lw0A3b5_DGzjlW7iDd0c1pA6Rw1QyTkwONbbwBhX-0dl4kDDWgZc5mUxOjikRRr21dNOWPlp3rhQYiU0BZ7Uka9dMZNJp_WCl1DzcIwAfXgTyVOkff2uCJKHDtsh89JqlI4Xc1AjknAREtYEmfQHZ5YQC1aJOXA7HGCBUMQfFXSos_-VKQyUUnHPZizpvnCtIAOZ_ORWhk_J8AHHkJ63eawZToDSQPmLmMsTQtc0RkAxM3KZ6xnuSjRakVhRwJsoBiu_fV2gcwCNQ0LGwvM-x8rxAw5YF95S6BM0pc0cN7pHBEjBSj2S2bQrFV-3GeCA5NwGbc9BYO7WzPlKCLgkNJAOdYDOZsSDcQ1B2jnRLYs61Jm4u-4mceHRR59tyxCYzPQ_2MZo22_vmXW9Dqz9f4xOtZ-S52zPuyKL8yYrpDO4xcKDont-SFAolTPTZS7GanSJT4fQzffovEWJkv7TP78e4K4Nqu6E3YTtvGdGirSbiH9P110Dp7qpc6up5Uk94E9f0ap4uFj3dnq24sN_gFnawiYvr6wlshykk5AINcQoy0xCdqiMk73mpAk7fS5sPfdvsefZTstAMYMbBKUjLDA3dgts1CnGjImKPeo9Q6_tAAag5OW9HTT9spRJ-RHfJtLgEaWNlqSIgLUJmXXgFLQtGjIjzX8k1Nw=w800-h599


to be continued in part 3 of 4 . . . . . .
 
Last edited:
"alternate" Alternate Air Door part 3 of 4

So here's the backplate after being cut out from the carbon blank. That's a temporary .063" aluminum door in the photo just to test everything out. Note that there is an adel clamp attached to the edge as well. More on this in a bit.


6h7tfAkhfnIvkGdIwroXdRpPRetVL5Aah0dkGTmPSg62lYKCvNx-AQsxlW4Qxbgc9pt4GA6Oj3yxDvqqGjq1t9DxGEIR9f2T7i9MQO9m42vjYdXiAfeoM4pkch37wj-szkqYyvnfnns5oX1rtSUvkTp6gbgonKe4fjZb4XXJ-CULTggaga6S_DZcor_EH5fjSNskpJ6ipLwzYnWYaozONhuT3rNAGR8Xy-izj95Es2340gNpxaInmibLpSmTMqIOVH6KcKac4L6iq6Sdw92Ku5b2RP0ln33sxuAfQqBIendjIwHMMh44KmPBLJwFrnlDMI_j_4tyRLFF4sHDEqPrGXiW19BcEZRCamXzQ0Lz_HYLOa_AUMEWH4u5mB1quFYzSdOuNkchPMKVpqStQeBR2E4reHcgP0dRvTkTpeDHE9deDiQaARkCfUpUo07YtbxKDSLm5j6955ULdoL9D6wwLe7GxFpe3O_LJE2em5g4nLPsKim1xY7Jvj8UXezJCLyPS3mpl__bOKuSNHjF9FpiN4F3roaPYqnzbAlsR3_yGtXP2F2HZPdcIK3jZ8KyJd0k8dQNac6GROE-yUi5yd0n0D8SpwE6TlEP9KLWSpN-O945gHkM_JUQPLKCl3igcJBIo78gI7uGfXAKDOyUEfjMbiEOlu8tibm3Uqpy-9cNx4Dqhzi2ABYU1TkcoLCUX7NXR2rWBPsfM_aDNdy6W_-MkLvBXA=w800-h599


Not focused as well as I'd like, but you can see the formed-in slot that the top of the door rides in. Recall that the aluminum disc blank was made from .071". This was important to provide a bit of clearance for the .063" thick door (obviously about .008")

y4-DWLwi2yvjGClah_zKcJT-jb8yZ0aOZ9GoNlC8FTt4RSQKappHyg9ooj__DodGwb52lXUSy61-p_NzJFmQjsLNAMApy4PNepSdbZVxWkgMpZPSXGd6vbAXAW9aQ4oUoOxLptGp4bMLcZseETq-yrZhq1jcUFUGdMIWwdADaCBqwWNJfG09YGXTp88zdy1xjPY0MNioc4sJ93lpKvm9M6sJ5gVu7fIcZDjBsswfZTTc3F87r9zKYh61WLPaDT0Q6-r6XhH72ANC3hhjSQX9VIk4mHA_SJFtfrTf8wiAYZm95ReGLS8dd2XObY4L6uMNA-6OEgrB_ZB09wXwRCJpwzMpi1zwzPscvDgEEtsoH5KWzVqGx1vmFVc_THLBhOt6XmhA23Wq_ebEU7n-4DwuxfezGOnhmUlKyAxCRIQ3OK2ej7gVHdfZybMEpz3cnK0_faZws1liI_KuE0SPlx41OxLj1Po_CFrJi2rOpRUJ2X6GTmENwr6MEO1BDAhgIMEtdh7xp-1jLQIXXrz8cVu4B6qiyntlxrSTcNwhGo5vz2xawwAH4uR-m_ycUUx9aEktuvqIhlK-08JBa2sPFsTxCZeIhA9zo-DkQwJvvKN0fOBn1u_as7TFBoTvhnxHKtMpPz2at8evMBhVa86v-REhTIy8dKItWDMSQimhgOBLKxkixe4maX4wpmhFAH7UtOvHCxBh1gQA9UzvQzm8Up2BPyuzVQ=w800-h599


The door pivoting action is very smooth with very little play.

Earlier I pointed out the adel clamp on the edge of the backplate. It turns out there is just enough room, due to the curved corner on the snorkel to sneak a nutplate behind the backplate. Just a bit of the snorkel has to be ground to give clearance for the #8 screw to protrude into. You can see the fit in the following photo. This will ultimately be buried under a flox filet. This mount provides a much better place to carry the end of the bowden cable housing than hanging it off #2 cylinder oil return line nut (the Van's door design).


Npy_cGEvt3aI2ATCcbSdn3oX9i35T2wz9mRquiOsB5uMF1Kf3SEWNOoh0S47bMCth1rd10uodG6cmRvzWUVXRULddhZceJE64mk6dmc2_M36_MfbRHGUsSMclqGuQGh7ekoHCkP2n398IhnJsfb2bnz0KlyjpuG1LCwiFYkZQ0QBP9jpi7OP-wiVx63eyw5XQeXFjaSrkPnolb69X7aciSP9kQ9GIYqGesiEThrYu57WRw3us_UX-c0PL0hiGuTXnZkPgZjgbMbcAo5X34sQpGrrgTrfIn53y0uht2xMHaKCNAexyJ9ZxIV4paXzetyUX7hvvQZAIgWZeO7pZaG5QK-umoktKl0tUeStMQRX0E12SOEtuIF095McvTQScGlv3auniYH_H-2w3O03YJ1kIfM6ra-2Mp7E7xQ-IS05yjThr8vzJGvAk1wGweDKtEV6bpn4MU2sXqPKfWQDDepbTB0nSRTwf5R5aELg0HJrYMSZO24am7yHrG-If_aPbjaWJ_LTXTgbTdblFegNTeugNXpyHIlItFqt-tijT32GKXbPhtiQfJ8v3szBuzRIYrA2sI4z7TDdIpaF6jVma_Jfpi_C_sJtxuO2Zwr-uF_6bwZjzrrclu7vtFv0E53QUaQ0tJUZKuiJFAAaCfxy8uSKEA2oh493t9TrhcncskKdbPhDTdeQgDpP2OLR6Sp337s0tFaYAV5-5yBJwJeIDN43NgQTXw=w800-h599


In this photo, you can see how the head of the pivot bolt just tucks up to the curved surface of the snorkel without actually having to cut a hole through the surface. The bolt head will utimately be embedded in epoxy and a flox fillet, so the bolt is an AN4 stainless drilled for a cotterpin.

NpaxVLmcwljwKhtCu6Ou5HqkjPZiNZa6Cd8ztq9PHU8kcByeN45pyZwikNMap5ulXTrmg3KFfxtOHy-1a2acTgyVh_2zm5jPUSzFfmJAEytBK39Mk56GTwTKKJP9DaYrrEKjoS_yQtYIo5FD3oPm-mX9sdWTnZp_zDF5bsonGEDJF2kLj9C7jdwJiknAs41KS2RIbpqvM3okJ6KAUS3-x4Z4EqUg0ItmilF7Uib68fzOAxBY3XZhoHnwA3gmkzbAyLozCCOy9VSLw6snVPDMLl5c85TUqK6fp7UIOmCMeg6FC9NOTwPyj5yKVu8Ympc3IkZjLG1jIQlNw4g-wO_at5whoe8hDkZQFwJB4AqRQZB3f69TBXuZTJZJmcBSyy9cIEdiQcdZE3F7WWhO6dFXI4nHSiiHb5tPAB1wK2h4LKfaarwKfC3bl_WxbrFPH1BgxeNh2AXnFb9kf2gnvq_xXb1wql_Gbkm7gSJ2MD2YswgW7nJzjPj1x4MVn04uZI77R3cM0UomPJM5WcHOr4RowAa8-9fDN7ohHPKjVNP3U8qwumBsa0mkKyOryp5MFbkEWPBeCVnU4oEHU335Kvqy_P9BX8eHzCq49w2Uf0S8FUTIhDBI5mHP5K8qIEoQO2Sqip-tOVvpuJMEip9T05GIGtPdjhUEzg0QFoFJJZ2a01eCRPVzQxwplCAiwf8ERiOwz9pGyf67_Uc98gCLI1k0TdIpew=w800-h599


After drilling a couple of cleco holes through the area that will ultimately be cut out for the air passage, the backplate was bonded to the snorkel using epoxy thickend with Cab-O-Sil.

Pmru6VdB7QG1D6G7Qd6nVUtHkc3PjG2NmI6mrBTLv0t0EbN4yOJ7t6oLVXH54dbro9jSDw0N_EfEOQGwotmvNKlGuukTo3r3bUqjp9yvsweJFOR9YZ8arTa3SZjMRmiR1eQ6Mrk_C7ld8XBqFT2Ek2VLs5txVQAh2Y_slE0PsirtkiZQoi3tby2FRI0jcRqwJ5QijYYIQhSbJ8OnjtdYqcFpfV4-GyUCQMLmzb2UfOvFxMpuHT6adXYl191C4cM78OJyZNy0Zhy8hYTvApW3Mv9oduiII_1EwFlTslQk0553AedyRGXgfTAdM4XcCexWadr0ULsrtcj9jZz7J9O8hw-ZaGNnE9RKrypPlNp5ojJn_qnVcCTKyT2lwWQuAPZpJJoQ_L6RtoeOUZFDVVrCHIosgncL07AhQaEJ6IIYRiSf5yARvb9qVPvS6VEAFZ2ucnT9dmvlqbGbL99E8X0KqDN-KfA6tVFIcQtPvCzA7Th4JdnQej_fJGDR6ji6gE4FeBpocNEHuCYqwY3376KhsUGQFzhOAgwHbwKiU7h7fccn48hp3BeWGfZmsPIq5fGVHuW94QofCGsiqmTWGuiE1st8hb5eagHvbp4i8IiQXLJVcfExqFADNpsHVXe08-ZiWslO4Q39CinwrjWuZbRVuATOEcI0Z85NHO2pY98HsMzS8Sdoxj-X0weuy0XsyGL527KtbZeRN1pfj81eGaNzy3xDOg=w800-h599


to be continued in part 4 of 4 . . . . . .
 
Last edited:
"alternate" Alternate Air Door part 4 of 4

Now, on to the door.

This odd looking mess is a cobbled up set of formers to make a 1/4" high standoff to mount a "bug nut" to. Think miniature hat channel.


YyUdP85Onm4xnryPutdauXAyARPsxQg7lvuLwnJqNTRp-VFGiMfngZWfKlLS_xueXPb21Z5mpwF3HQ6tATU3cMyLNvmZrXS0zyorxSClfVrw8WbL4qb9ZmSl-3f0Y8gZtLETIJUQ0pLq1Fmu-gAB-fxkQxOn73YI4sSsJroXo9pA-ZASepsMEYONOGU3pKXRdC2ZB5CQyxigaAmF4UMuxZKNYoi0rjogFwh69RiSH1MjG7vRUTdTAmGXwr42cbkEaO2FZ6uuBI5Tr2XuCHcOmfh_mrdY3irnD0zEvB9iKzq1jb2pyhOzeWt-Y0DnmTPT9kJkoBGmlBVS1c4zBWWN0Yyrt3djPPyra_ZHOSiosRQBV0nfercgOhQRGEVgHxW27IX5kgFy18SNMOQuEJc4eMSlcVPIb3Jl8xQSyUkmAK2gGjLASGdJy28ShQEo1MQGqx5NXKPhBYnmQTqImDvfnyY8z-y5oLiUI48n-kdY1reqapRJ_zJ1A98Ur3FXdM4mFFV9KH6GaMQsIX9PziYG1Vkwj86O5AW2g-0p3V1Q8mFSDXIHndV1iI7_Z5a7h3M0Vt1KwzDgCgi-SyeFb5-JBUq0xsWnnlqL8oymh4iSi7S18iR-23F25eYOeAC9WrPn7bp8idPCvVMgnlHe0NasWFUjHSOHkqWhBXODh3gU4K29OSxKAoZksqEFB5dvbeKdlwis1pgd_cY3BL9jkQpClEpa0Q=w800-h599


Here's the end result after much trimming, etc. This is made from 7 plies of plain weave carbon.

q5WUs-OK9mDuniWuy7ir5upGIuHIxrOmJ254KTNnpz_bIQWVn1QwTxYrmWS6LbbeZtMtHE38lpmIY9p3ezJJpu3rZW7jT45EvebjhmgQs35IcyzQcJ3hU1gUtS_9HE2ZYHK8K5MCXHEB1gN-_WrGnswstu53UP_vLRKQqGGYFt0rcUyilLpmTAD0ikdRsBlUf4Eno8nFW8Rr9zvp5RRd68SkDu7aZJ-6qv34q6Z4AaA2aNy4gUoSobnsSwyq0dA_vjqR4gKGgGxpHp9j8kJZ2V4OUkJv1URMOFoytD8KEdtjyPMT7EySpbL60yHsiDB4hbKT9WIk73A2y6Tjx3rVF079U8JrE1I2n127hdP8OMWuZIZKWMVgO6YOZyUOZuLM3Q1kPgpd2bH22e9F8dSeQ-i6iLs-taz60UABlI5j668f4NFEqKy_Ai6oQh2UprEmAuqhf1Q1mfFDQq7c7h7oMwHhpLy0xccquPDwEqPabmNso7Xev88aohZJ1Cw00WO0EFOOWE5SPUV8FwPCASTeDlnmqcbGq3uanOhCLBvrBAo7-uAq_AM9jHS7LImUwx9to37S7U1bQi7zvnqAN2sMFEdB9yKXih-kBqIuCISSaxPN5G8q0tcs-PJT5B_Gpl8yeNRlNxEUeUR--6MJO-0E_ywlL-3vv-NIgzzzJpxZPzcrfRh7WaUndkVnd1JZ8Q7VodBFHqG8ysvKXzxBZbe7NluU_w=w800-h540


Another view from the bottom side. You can clearly see the imprint from the peel ply on the mounting "feet".

6KKrv8zk2MlrZSsPCC6qm_VSYtvR7M834uTC4Gw_qtM67lgqXTk1TgRpZrlNY_ciL9suQaOQYXDUYCcfbitFpmCLRLD0EP0OgUHNL8MupdhTNgOf7reFO0lP7TsAE5dDafTNoewcoPSLa67k4hQfVhIr4cA6ayARF5aDOc6DFVbP9wxmivaezuWJ0a2TgXybRMCHncWJ5wtru5JjAbfdVU5FeR7QKwtJDPiqJzPcRfcOz58dRkpyEgWXWawYE-y2Y5dddI4c5JrxE1dtHUVBiyz3bn8aN5Q3tojeM0KrAUPDZlFoB7jukG9CgsAJFEzRctWsBAtloyIOaKOiamBdqRIoAG6Vi6LxXmnVsFAkgZ0OBegBx-8r11OCBzkWBlWurgJJD8rRnkcEXR9j2dFuEk7XJkknWncUnONahtvrL7Hsa5X75yqcjQEkDEGTPRbgNMBufPcnre8bjK8oEU6aldgZHtNhgfw6FX_I_328UxbxmDWVy_m11-wDDYmwo8ZOAHFl5czKNR7SfCupXrHnWCfdC8fq8KB26YcbD-LdiTMl9YzvCqXNJAv2BDyqD5cawDokG5lNCTx07aq7ej2Pfvlvqqb2tGp583f-CSQ87tlY8-zyiCvyWzUHOQH3Nu-BuR9uIX9odYrioZVwP5Dy0xQvLnlglWnHz0Br00MwVJ5LFAK7JYGz6frq6qfE9fACSITih7J_y4anhX8EDhc9-JPvag=w800-h599


Originally, I was going to make up my own carbon door. But I was concerned about my ability to carefully control the thickness of the plate (it needed to be really close to .063" and very uniform). So ultimately I wimped out and ordered a piece of .063" carbon plate, glossy on one side, from www.dragonplate.com. After drilling the pivot hole, and then laying out and cutting the door, here's a shot of the pivot reinforcement and standoff getting bonded. The bonding is to the "textured" side of the dragon plate. The smooth shiny side is down towards the smooth shiny surface of the backplate. In retrospect, the pivot reinforcement probably isn't needed. I just wanted to have more "bearing" surface on the pivot bolt.

oyHwarj5Jh-_C_hlbE06OUrEe77bj3bKqU8jLo5SPQlTnXhxebfPLVI9BRsZ57q5GbrLK8_WwbVWK0oHnh4xIUfAoL1scO4UPxUxisJ9BRTwLfppBYvba5jj5jEzlh1NI_KL1dlvvN324QjezB2GdlRjvUACe87toTpwKR8ZpcXhm6JbaDSXvWunR9d0_3r7ZV4PG-4HbFKn1MEmeOcOHikx6SXGw9XBgh0RH0J9qi2_iIwV_mrgDREnH-97CVDqI6am6Fwt_JLVP2HcuDmncPVAoOXCF7uz6HzcJGcr2JMImc9qqQDBl451ro-3lmM09-CeksqAMj2OBZO12msVmqnYGUvanS2raFKLHqc22aLtyh6gcW7UJi07FA7DAHwfZO9xnkrb8BT32mR39mQ-dzDlQGwy7lwnCNy3JSmxsGQZ7-C3oUc6FBQGR8lGMTh5O0Hu5H6vqWfe4WeGoz3wjT5W2Ynhd6VnAbwC-q9sGPCGGbwTIFJPphau7RfkcbvqdXooiptA5Pcn-N30zRoBss666QYYsQE2Ws6IgkUOMPyiIZ-d1HYbjjB4gAvFXkvCLW9WDdPZ5rJgiywjBPexag0dJ9isV95wx4TZlDFa2GJRCCCR1Lt05o7hexVSxwWf9w-DdHlKH7tHecGP-lbOQCtvInsP6_pNBc_QUvqqjnM0zVbpw_no7TG9OTY7I6MwYS0vCemAc0WJ5695r9MysWVl0g=w800-h599


Speaking of the pivot bolt. I'm using two wave springs between washers under the pivot nut. This ensures the door stays in contact with the backplate surface with no rattles and provides a bit of adjustable "drag" to the door movement.

So - here is the (mostly) final product.


YBCNN-d8mtcY3hExsbN1xIOSASyP3HfXuZ9wjUKKpOiBwbks2zeWXrUpY-b5jImbShnt9TUxF9PqXeT0Kcz5n1EHIIcJnglEimjuywtK5OnUsEgkmD0ZpwW_p4SGxmrNNqjTLPEd11GdTdB5Py1SrvBu2jarr2e4H5ig4vytyILBEORNha3Jkj1A5iehhNr7nVtZ7vnsjGLu1jaR2sbbGDC0ksN_NIA5QUUnd88dnZjtiPpKfVZNc4nq-YdHb1D7ykh9DqE3IsDX4kRlsPD2FUMGrNKy6EPyE6uaFNRW76u9jdv4PBznz81dmn7yAYd2x__1yAVTS1okq-W6KyGFShqKIAc4c6IUdJnhJMfmUSw2PFX1hBn7QmVhtJIkBJAug3Umjv73qEsGukgZoQ3iedUjrd5oBXzSwN1tkTOAw1QL1J9uGDv6ka9mSalpMHlbJA2J9eS6IDfqGAGb9gjWMnqYxER0Q1YZx9R7I-a045KRpHs0sinLrp_kfaj9kRvH6JSMC4J4JQVZTfFkJEOTc77XJDO3EliydTg8Puq-0C3_l5wL8G77SJ3uTCwxvdJNPcE7dUIu2E7OISz9jd1Dc5hFsSK39m_wvgK9rtZGtVIyApUKAB4ZhTULkbyGh8tQJHwGIEKaqBeLldd_nfIygoHC_l6C5HIAMpODTlAFHqYNtGmi8YfGDvZQpHNaDW4BnWL9NHr7prPnsss3rc8pvx8NPg=w800-h599


ziVxDylI4d9Rf8Gi90Q15wk6Ij24HokcsE-uqJ9_wexQEqo19pQcyoEsBc1eOccz8UOD9zbQZVEQBCumCSGA5EjfiYiqWO8-Xa2KtUpvrmc8dKe4C3Mgrot1gAF552S5Hmd-kJ0dTaKHEYYuh9KTGKDw6pFbl62RdC6sJTXsP79HmRcApJ-GCn-mC2z0q6d5uZQDcm-0lhMACQyQKbjgJrnYkBzd2vWrswzb3uUDIWhdNPE4Z5qqPAwStUmqPR5yL4mr9Q44PnGxzcCUS5hR8L6qwlbist0W1mCs7fnL6IlGLHUFzjCfKOH1w-VSffajop9Oa3PaQJlfyg_kgnHhGbImupkpjCpZSbDdBnJrnGbkjPF_TPodepMrAMEBIuBLAf4YM0e7aZcUO6Chk80TXUsIC7-HLWojqdm2nJf22twva6GeP3NNrnmY1zMPEnslV_JSY8izIh_f5DwrfFfXwKglemjszN1Kk3dhMMYCXeElKh4KakuqGRew0g_KUlp3I5tYOsP9LJ_WlwcPlRH2vDANoGctMB8ubgsPDKT1Mnaooo5ElRK66t93ymaJ0qbOapr7yUYeo8kLFHeLGcrt0isok4_R9I0Zb3gTMb9kSKRZZpi-zyOhkdwZgQWJbigkz7f-e_2dJ49LWw8cuW2cYVx9YycUHddRbV3b8CphcrpW6gPl2wDPEbx8GuOKbIWZBqStJxs2_I3eNqrW8p89GLBSCQ=w800-h599


The door works really well - it can be opened and closed all day from the cockpit. The plane isn't flying yet so it remains to be seen if this is really an "improvement" or not. I enjoyed doing it though and hope these posts at least give others some ideas.

UPDATE: 6-May-2023 I now have almost 9 years and 969 hrs on the plane and everything seems fine with the door. Still works fine - no failures. Haven't had to use it in anger thank goodness!
Interesting tidbit - I have played with opening and closing the door in flight. Manifold pressure drops 0.2 inches with the door open.
 
Last edited:
Thanks for sharing - I guess.

Really nice design and fabrication! Looks like I just inherited a new sub-project, which I need like another hole in the head at the rate I'm progressing. :(

Seriously though, thanks for taking the extra time to document this beautiful work.
 
Thanks . . . . . .

. . . . . for the kind words! The only problem with these "improvements" is that each one pushes the plane completion time out a couple of weeks (or months). :eek:
 
Very nice work.:cool:

I just made some Reed valves out of brass shim stock. All automatic if main air source becomes blocked, no cockpit activation required. Simple very light.
 
Awesome design/craftsmanship, Dan! ...and you earned the blessing of your "other brother Dan" (Horton) in the process! :D (Hope I'm not the only one who remembers the Newhart show).
 
Last edited:
Very nice work, too bad this has to be hidden behind the cowl so people can not see it as you fly :)

I have been thinking of adding a couple of layer of CF glass on each side of my existing Vans's supplied door just to give it strenght and keep it from failing. It is far less work but it may extend its life some what longer.
 
Looks Good. The only thing that worrys me about alt air doors is those bolts and nuts and rivets inside of to air box. Straight shot to the inside of the engine if they come loose. Working in the automotive industry I know what loose parts that go into carbs can do to a engine.
 
Looks Good. The only thing that worrys me about alt air doors is those bolts and nuts and rivets inside of to air box. Straight shot to the inside of the engine if they come loose. Working in the automotive industry I know what loose parts that go into carbs can do to a engine.


Nope, air filter inside the box in this case and with the smooth Sube engine and the airbox anchored to the engine mount, gonna last a long time I think. 9 years now and no issues. Just rivets so those are not going anywhere and the shim stock would not hurt anything, crumple up and go out the exhaust port.
 
Last edited:
The "alternate" alternate air door for vertical induction

Well, I finally got around to working on the filtered air box for my RV-7 with vertical induction and Airflow Performance fuel injection. Many thanks to Dan Langhout for this post, as I referred to it often and copied all I could! Here's what I ended up with (looking up from below):

28vtv2s.jpg

(yes, the air filter is still in the plastic!)

110faxy.jpg


I used a Clickbond stud for the pivot bolt - drilled for a cotter pin and also drilled a hole in the bottom of the air box to accommodate the base of the stud (used the Clickbond adhesive on the top of the stud base to attach it to the lay-up)... still no parts to possibly get into the engine! Another small change was I used T88 to glue the bug nut fixture to the door.
Tried it all on today and it works great - opens and closes with the Bowden cable.

I hope to thank Dan Langhout personally for this soon!:)
 
Another "alternate" to the alternate, alternate air door

I did another variation on this. No pivot, but a simple sliding door on the bottom of the filtered air box. Simple layup of fiberglass over some aluminum that is bonded to the airbox. No hardware used anywhere near the inlet.

Slid open to show the same size hole as the Van's alternate air door.
IMG_3800-M.jpg


Closed position.
IMG_3799-M.jpg


Control line clamped in place on the airbox.
IMG_3828-M.jpg


Works great and can be opened/closed easily. I used some white lubriplate grease on the sliding surfaces.
 
Carbon Fiber

Dan, you are right handy with composites. Nice work! My current supply of CF is running out and I need to replenish. I purchased a few yards of remnant material about three years ago but for the life of me I can not remember where I purchased it or the weight. Could we get your supplier and details? Thanks.
 
Spruce

......... Could we get your supplier and details? Thanks.


Nothing fancy going on here. The carbon I used for this project is 5.8 oz plain weave from Aircraft Spruce (Spruce part # 01-00970). They have this in several different widths. As mentioned in the post text, I also used some premade .063" thick carbon fiber plate from www.dragonplate.com.
 
Now, on to the door.

This odd looking mess is a cobbled up set of formers to make a 1/4" high standoff to mount a "bug nut" to. Think miniature hat channel.


YyUdP85Onm4xnryPutdauXAyARPsxQg7lvuLwnJqNTRp-VFGiMfngZWfKlLS_xueXPb21Z5mpwF3HQ6tATU3cMyLNvmZrXS0zyorxSClfVrw8WbL4qb9ZmSl-3f0Y8gZtLETIJUQ0pLq1Fmu-gAB-fxkQxOn73YI4sSsJroXo9pA-ZASepsMEYONOGU3pKXRdC2ZB5CQyxigaAmF4UMuxZKNYoi0rjogFwh69RiSH1MjG7vRUTdTAmGXwr42cbkEaO2FZ6uuBI5Tr2XuCHcOmfh_mrdY3irnD0zEvB9iKzq1jb2pyhOzeWt-Y0DnmTPT9kJkoBGmlBVS1c4zBWWN0Yyrt3djPPyra_ZHOSiosRQBV0nfercgOhQRGEVgHxW27IX5kgFy18SNMOQuEJc4eMSlcVPIb3Jl8xQSyUkmAK2gGjLASGdJy28ShQEo1MQGqx5NXKPhBYnmQTqImDvfnyY8z-y5oLiUI48n-kdY1reqapRJ_zJ1A98Ur3FXdM4mFFV9KH6GaMQsIX9PziYG1Vkwj86O5AW2g-0p3V1Q8mFSDXIHndV1iI7_Z5a7h3M0Vt1KwzDgCgi-SyeFb5-JBUq0xsWnnlqL8oymh4iSi7S18iR-23F25eYOeAC9WrPn7bp8idPCvVMgnlHe0NasWFUjHSOHkqWhBXODh3gU4K29OSxKAoZksqEFB5dvbeKdlwis1pgd_cY3BL9jkQpClEpa0Q=w800-h599


Here's the end result after much trimming, etc. This is made from 7 plies of plain weave carbon.

q5WUs-OK9mDuniWuy7ir5upGIuHIxrOmJ254KTNnpz_bIQWVn1QwTxYrmWS6LbbeZtMtHE38lpmIY9p3ezJJpu3rZW7jT45EvebjhmgQs35IcyzQcJ3hU1gUtS_9HE2ZYHK8K5MCXHEB1gN-_WrGnswstu53UP_vLRKQqGGYFt0rcUyilLpmTAD0ikdRsBlUf4Eno8nFW8Rr9zvp5RRd68SkDu7aZJ-6qv34q6Z4AaA2aNy4gUoSobnsSwyq0dA_vjqR4gKGgGxpHp9j8kJZ2V4OUkJv1URMOFoytD8KEdtjyPMT7EySpbL60yHsiDB4hbKT9WIk73A2y6Tjx3rVF079U8JrE1I2n127hdP8OMWuZIZKWMVgO6YOZyUOZuLM3Q1kPgpd2bH22e9F8dSeQ-i6iLs-taz60UABlI5j668f4NFEqKy_Ai6oQh2UprEmAuqhf1Q1mfFDQq7c7h7oMwHhpLy0xccquPDwEqPabmNso7Xev88aohZJ1Cw00WO0EFOOWE5SPUV8FwPCASTeDlnmqcbGq3uanOhCLBvrBAo7-uAq_AM9jHS7LImUwx9to37S7U1bQi7zvnqAN2sMFEdB9yKXih-kBqIuCISSaxPN5G8q0tcs-PJT5B_Gpl8yeNRlNxEUeUR--6MJO-0E_ywlL-3vv-NIgzzzJpxZPzcrfRh7WaUndkVnd1JZ8Q7VodBFHqG8ysvKXzxBZbe7NluU_w=w800-h540


Another view from the bottom side. You can clearly see the imprint from the peel ply on the mounting "feet".

6KKrv8zk2MlrZSsPCC6qm_VSYtvR7M834uTC4Gw_qtM67lgqXTk1TgRpZrlNY_ciL9suQaOQYXDUYCcfbitFpmCLRLD0EP0OgUHNL8MupdhTNgOf7reFO0lP7TsAE5dDafTNoewcoPSLa67k4hQfVhIr4cA6ayARF5aDOc6DFVbP9wxmivaezuWJ0a2TgXybRMCHncWJ5wtru5JjAbfdVU5FeR7QKwtJDPiqJzPcRfcOz58dRkpyEgWXWawYE-y2Y5dddI4c5JrxE1dtHUVBiyz3bn8aN5Q3tojeM0KrAUPDZlFoB7jukG9CgsAJFEzRctWsBAtloyIOaKOiamBdqRIoAG6Vi6LxXmnVsFAkgZ0OBegBx-8r11OCBzkWBlWurgJJD8rRnkcEXR9j2dFuEk7XJkknWncUnONahtvrL7Hsa5X75yqcjQEkDEGTPRbgNMBufPcnre8bjK8oEU6aldgZHtNhgfw6FX_I_328UxbxmDWVy_m11-wDDYmwo8ZOAHFl5czKNR7SfCupXrHnWCfdC8fq8KB26YcbD-LdiTMl9YzvCqXNJAv2BDyqD5cawDokG5lNCTx07aq7ej2Pfvlvqqb2tGp583f-CSQ87tlY8-zyiCvyWzUHOQH3Nu-BuR9uIX9odYrioZVwP5Dy0xQvLnlglWnHz0Br00MwVJ5LFAK7JYGz6frq6qfE9fACSITih7J_y4anhX8EDhc9-JPvag=w800-h599


Originally, I was going to make up my own carbon door. But I was concerned about my ability to carefully control the thickness of the plate (it needed to be really close to .063" and very uniform). So ultimately I wimped out and ordered a piece of .063" carbon plate, glossy on one side, from www.dragonplate.com. After drilling the pivot hole, and then laying out and cutting the door, here's a shot of the pivot reinforcement and standoff getting bonded. The bonding is to the "textured" side of the dragon plate. The smooth shiny side is down towards the smooth shiny surface of the backplate. In retrospect, the pivot reinforcement probably isn't needed. I just wanted to have more "bearing" surface on the pivot bolt.

oyHwarj5Jh-_C_hlbE06OUrEe77bj3bKqU8jLo5SPQlTnXhxebfPLVI9BRsZ57q5GbrLK8_WwbVWK0oHnh4xIUfAoL1scO4UPxUxisJ9BRTwLfppBYvba5jj5jEzlh1NI_KL1dlvvN324QjezB2GdlRjvUACe87toTpwKR8ZpcXhm6JbaDSXvWunR9d0_3r7ZV4PG-4HbFKn1MEmeOcOHikx6SXGw9XBgh0RH0J9qi2_iIwV_mrgDREnH-97CVDqI6am6Fwt_JLVP2HcuDmncPVAoOXCF7uz6HzcJGcr2JMImc9qqQDBl451ro-3lmM09-CeksqAMj2OBZO12msVmqnYGUvanS2raFKLHqc22aLtyh6gcW7UJi07FA7DAHwfZO9xnkrb8BT32mR39mQ-dzDlQGwy7lwnCNy3JSmxsGQZ7-C3oUc6FBQGR8lGMTh5O0Hu5H6vqWfe4WeGoz3wjT5W2Ynhd6VnAbwC-q9sGPCGGbwTIFJPphau7RfkcbvqdXooiptA5Pcn-N30zRoBss666QYYsQE2Ws6IgkUOMPyiIZ-d1HYbjjB4gAvFXkvCLW9WDdPZ5rJgiywjBPexag0dJ9isV95wx4TZlDFa2GJRCCCR1Lt05o7hexVSxwWf9w-DdHlKH7tHecGP-lbOQCtvInsP6_pNBc_QUvqqjnM0zVbpw_no7TG9OTY7I6MwYS0vCemAc0WJ5695r9MysWVl0g=w800-h599


Speaking of the pivot bolt. I'm using two wave springs between washers under the pivot nut. This ensures the door stays in contact with the backplate surface with no rattles and provides a bit of adjustable "drag" to the door movement.

So - here is the (mostly) final product.


YBCNN-d8mtcY3hExsbN1xIOSASyP3HfXuZ9wjUKKpOiBwbks2zeWXrUpY-b5jImbShnt9TUxF9PqXeT0Kcz5n1EHIIcJnglEimjuywtK5OnUsEgkmD0ZpwW_p4SGxmrNNqjTLPEd11GdTdB5Py1SrvBu2jarr2e4H5ig4vytyILBEORNha3Jkj1A5iehhNr7nVtZ7vnsjGLu1jaR2sbbGDC0ksN_NIA5QUUnd88dnZjtiPpKfVZNc4nq-YdHb1D7ykh9DqE3IsDX4kRlsPD2FUMGrNKy6EPyE6uaFNRW76u9jdv4PBznz81dmn7yAYd2x__1yAVTS1okq-W6KyGFShqKIAc4c6IUdJnhJMfmUSw2PFX1hBn7QmVhtJIkBJAug3Umjv73qEsGukgZoQ3iedUjrd5oBXzSwN1tkTOAw1QL1J9uGDv6ka9mSalpMHlbJA2J9eS6IDfqGAGb9gjWMnqYxER0Q1YZx9R7I-a045KRpHs0sinLrp_kfaj9kRvH6JSMC4J4JQVZTfFkJEOTc77XJDO3EliydTg8Puq-0C3_l5wL8G77SJ3uTCwxvdJNPcE7dUIu2E7OISz9jd1Dc5hFsSK39m_wvgK9rtZGtVIyApUKAB4ZhTULkbyGh8tQJHwGIEKaqBeLldd_nfIygoHC_l6C5HIAMpODTlAFHqYNtGmi8YfGDvZQpHNaDW4BnWL9NHr7prPnsss3rc8pvx8NPg=w800-h599


ziVxDylI4d9Rf8Gi90Q15wk6Ij24HokcsE-uqJ9_wexQEqo19pQcyoEsBc1eOccz8UOD9zbQZVEQBCumCSGA5EjfiYiqWO8-Xa2KtUpvrmc8dKe4C3Mgrot1gAF552S5Hmd-kJ0dTaKHEYYuh9KTGKDw6pFbl62RdC6sJTXsP79HmRcApJ-GCn-mC2z0q6d5uZQDcm-0lhMACQyQKbjgJrnYkBzd2vWrswzb3uUDIWhdNPE4Z5qqPAwStUmqPR5yL4mr9Q44PnGxzcCUS5hR8L6qwlbist0W1mCs7fnL6IlGLHUFzjCfKOH1w-VSffajop9Oa3PaQJlfyg_kgnHhGbImupkpjCpZSbDdBnJrnGbkjPF_TPodepMrAMEBIuBLAf4YM0e7aZcUO6Chk80TXUsIC7-HLWojqdm2nJf22twva6GeP3NNrnmY1zMPEnslV_JSY8izIh_f5DwrfFfXwKglemjszN1Kk3dhMMYCXeElKh4KakuqGRew0g_KUlp3I5tYOsP9LJ_WlwcPlRH2vDANoGctMB8ubgsPDKT1Mnaooo5ElRK66t93ymaJ0qbOapr7yUYeo8kLFHeLGcrt0isok4_R9I0Zb3gTMb9kSKRZZpi-zyOhkdwZgQWJbigkz7f-e_2dJ49LWw8cuW2cYVx9YycUHddRbV3b8CphcrpW6gPl2wDPEbx8GuOKbIWZBqStJxs2_I3eNqrW8p89GLBSCQ=w800-h599


The door works really well - it can be opened and closed all day from the cockpit. The plane isn't flying yet so it remains to be seen if this is really an "improvement" or not. I enjoyed doing it though and hope these posts at least give others some ideas.

UPDATE: 16-Jan-2022 I now have over 7-1/2 years and 848 hrs on the plane and everything seems fine with the door. Still works fine - no failures. Haven't had to use it in anger thank goodness!
Interesting tidbit - I have played with opening and closing the door in flight. Manifold pressure drops 0.2 inches with the door open.

Is there any reason this can't be made out of fiberglass with an aluminum door? I inherited an RV8 without an alternate air door. I want to add one and use your instructions as a start.
 
UPDATE: 16-Jan-2022 I now have over 7-1/2 years and 848 hrs on the plane and everything seems fine with the door. Still works fine - no failures. Haven't had to use it in anger thank goodness!
Interesting tidbit - I have played with opening and closing the door in flight. Manifold pressure drops 0.2 inches with the door open.

An interesting exercise might be to test the engine operation with the primary filter blocked and the bypass open(The main purpose that the kit supplied door was designed and provided in the snorkel kit). Maybe you have previously mentioned doing that and I missed it?
It looks like the inlet area with your door opening is smaller than the kit supplied design, which could have an impact on engine performance
 
Don't see why not

Is there any reason this can't be made out of fiberglass with an aluminum door? I inherited an RV8 without an alternate air door. I want to add one and use your instructions as a start.

I would think it would work OK. The upper end of the door is pretty well supported by the slot so I wouldn't expect any fatigue issues from vibration. Might want to evaluate the clearance between the door and slot over the operational temperature range so there is no binding.

rvbuilder2002 said:
<snip> It looks like the inlet area with your door opening is smaller than the kit supplied design, which could have an impact on engine performance </snip>

As I mentioned in the original post, the physical opening has the same area as the original Vans design. I don't know if it flows the same or not since it is a different shape. I suspect the manifold pressure drop is due to a loss of pressure in the snorkel to the lower cowl area. That's just speculation though.

I have not actually tried the test you mentioned - probably not a bad idea.
 
Last edited:
Back
Top