What's new
Van's Air Force

Don't miss anything! Register now for full access to the definitive RV support community.

Countersink elongating

HeliCooper

Well Known Member
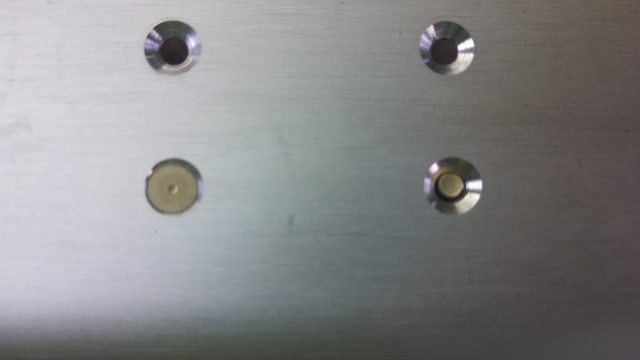
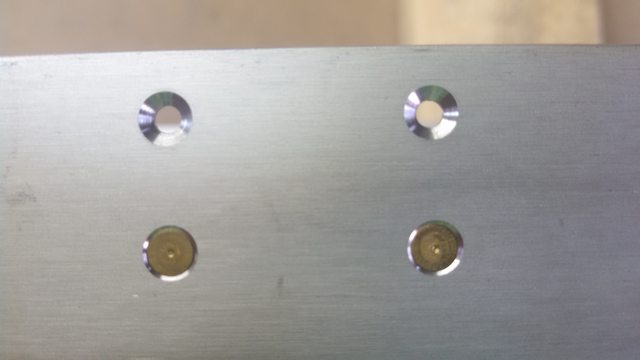
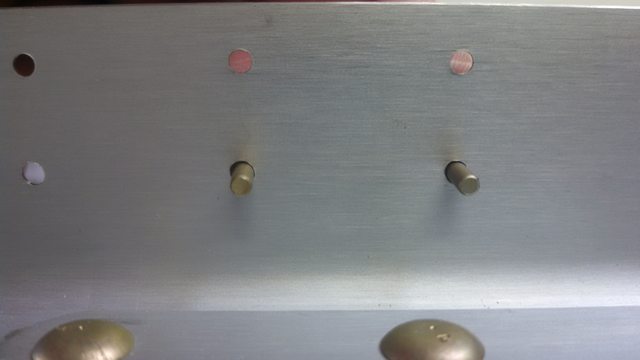
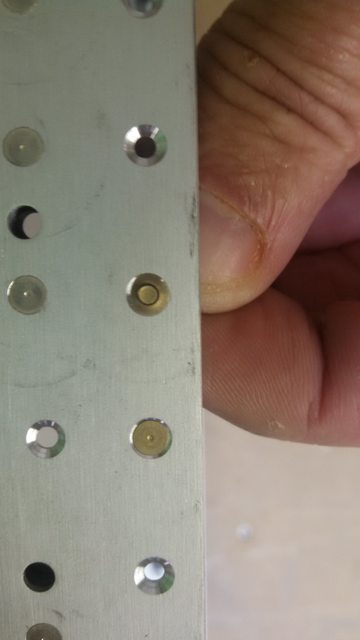
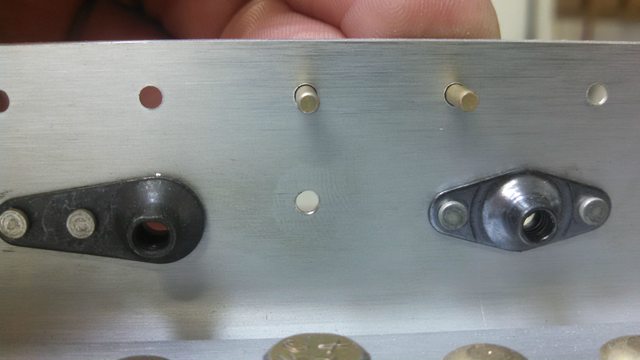
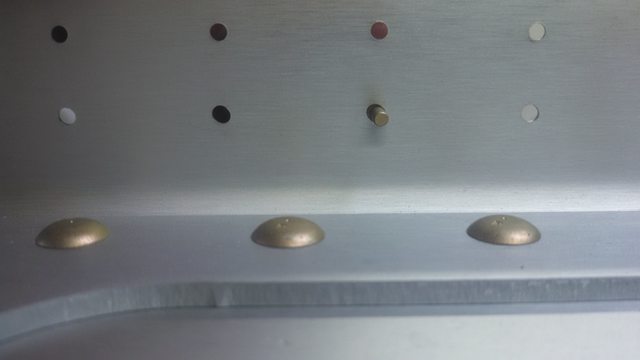
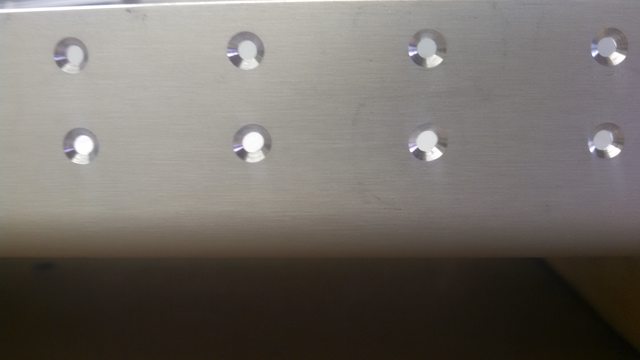
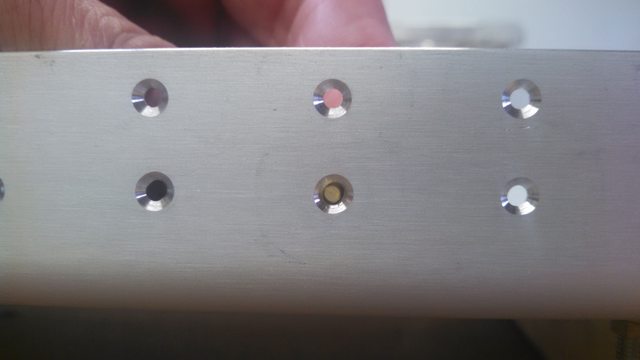
I don't know what I am doing wrong here. I have been countersinking my spar flanges which are .065 thick. I checked the first 10 very carefully. They were circular and enlarged just a little (I assumed this was just part of the process), perfect depth, and everything seemed great. So I started working down the spar and would do 5-10 holes and then just check the depth real quick by stuffing a rivet in while still looking down the spar edge (not looking straight on the hole). I did this down the whole spar and thought everything was great until I went back and looked over the holes more carefully. What I've seen still makes me sick. I would say 25 to 35 percent of the holes are elongated far too much. I can place a 40 drill bit in the hole and actually move the bit back and forth in the elongated hole. The other holes that are "perfect" are round holes but are right at the edge of spec for a 3/32 rivet at .102.

I have no idea what I am doing wrong or how to fix what must be an improper technique. What I do currently is use an electric drill on the low speed setting. I hold the cage on the spar and the drill perpendicular and then apply med pressure and slowly increase this to make sure I bottom out on the cage stop. I have noticed that there is a little wobble when running the drill but cannot figure out where it would be coming from. To explain the feeling, it almost feels like the shaft has just a little bend in it. The cage does not move, you feel it in the drill holding hand.

After reading over the mil spec that says you cannot use more than 20% oversized rivets I am thinking the spar is junk. I am trying to get a hold of a tech counselor to come take a look.

I guess I need tips, suggestions, possible problems that may be causing this issue. Additionally how do you guys get through countersinking 400 plus holes without running into fatigue issues? I've always tried to apply a strong pressure to make sure it bottoms out so the holes have the same depth counter sink but maybe this is incorrect.

Any and all advice welcome. If you need more details let me know. I can also supply pictures if needed. I feel like an idiot for not checking to make sure the holes were not elongating but I believed that once it was set it would keep producing the same results.
 
Try using a board or other material and drill some holes in it that match the drill size you are countersinking. Place the aluminum over the hole and line up the holes. Then countersink with the guide on the CS into the hole in the wood. This holds the CS from wobbling. You end up with a lot nicer result.
 
Post some pics...

A picture is worth a thousand words. And it always looks worse to the guy doing the work.

With that said, I assume your talking about the main wing spar tank attach plate nuts that your preparing? You said #40 so it sounds like your countersinking for the rivets that will hold the platenuts to the spar. Grab a strip of aluminum that you can cleco or clamp to underside of the spar, and drill a #40 hole in it. Line that hole up with the hole in the spar your about to countersink, and clamp it on. This will act as a guide for your countersink, so at least from here on out you'll know your straight.

Make sure everything is tightened up on your countersink cage to make sure it's not falling out of adjustment.

It sounds like your pushing pretty hard, I really don't find it all that necessary to push real hard.

Put a rivet into the hole, and take a picture from the top and side. That'll give folks here a better idea of what your dealing with.

-John
Houston
Wing (Tanks)
 
Last edited:
I'll get some pictures taken tomorrow when I get off work. The nut plates are on (they all looked great which makes it even more confusing). I am talking about the skin to spar holes that are CSed for a .032 skin dimple. The other weird thing is that I never had an chattering at all. I'll get some pictures with a rivet in.

Thanks
 
Jim, I initially tried the "nutplate installed" method on the first couple of countersinks and I wasn't happy with the result. I spent a evening looking at several build sites and found a suggestion of using a basic jig. They took a total of an hour to build and they provided the needed support for the cutter's pilot. I used a single flute which cuts a nice hole but is a lot more aggressive. Practice on scrap first to get a feel for the cutter.

As for doing the "400" holes ... I did them in over several sessions. I mixed it up with working on the ribs.

Cheers Jim

2ntb7kn.jpg
[/IMG]
 
Last edited:
Look at the countersink guide closely and you will see the cutting edge extends down into the center guide post by a 32nd of an inch or so. If you countersink to or near the max permissible depth, the center guide cutting edge comes into play and will widen or oval the hole. That is why you need some sort of backing material to keep the center guide from cutting adjacent material.
 
They don't look that elongated, just a little deep.

Aren't those the holes where the skin attaches? If so they have to be a little deeper to accommodate the skin anyways.

Suggest making test pieces, pieces of scrap skin of various thicknesses that you drill & dimple for each size fastener you use. Then use these to judge the depth of countersink.

If you really do oversize a hole, you can go up to a -4 rivet, but you'd have to dimple the skin to suit...

If the rivets hold nutplates, they're only there to keep the nutplate from turning so are not as critical...
 
Last edited:
too deep?

the manual says a few clicks deeper for holes that will have a dimpled skin over them. So now what is a few clicks to me your holes are too deep and the counter sink has cut too far to have the pilot work as a guide and it can go sideways while cutting. However i see no problem with what you have. I still debate with what is correct. For me vans says so that the rivet is .005 deeper then flush and i cannot measure this but in one of the cataloges it said that their countersinks had a .001 change per clicks so i did 5 clicks deeper. it doesnot look deep enough to me but i only go 6 or 7 clicks and check often because its not perfect the amount of flex in the parts the sharpness of the cutter, how hard i push all come into play. I want the rivet to sit deep in the cut but not as deep as you have but again i don't see any problem. An opps rivet has a slightly larger head and the hole would be round but at 1/8 size. i'm courious what other people will say about the pictures because i still debate with myself on what is correct
 
Holes

They don't look that elongated, just a little deep.

Aren't those the holes where the skin attaches? If so they have to be a little deeper to accommodate the skin anyways.

Suggest making test pieces, pieces of scrap skin of various thicknesses that you drill & dimple for each size fastener you use. Then use these to judge the depth of countersink.

If you really do oversize a hole, you can go up to a -4 rivet, but you'd have to dimple the skin to suit...

If the rivets hold nutplates, they're only there to keep the nutplate from turning so are not as critical...

I agree.
make a set of sample tokens with common thickness and every dimple size in your tool kit. They are invaluable.
Ask Vans if it really bothers you but it looks like a "build on" moment to me.
 
I believe the depth is correct. Section 5 says to set the countersink .007 inches below a flush rivet and or adjust for a good dimpled skin fit. I set it to .008 below a flush rivet countersink as the skin is .032. Below are some more pictures. These show the problem better I believe.

Back side. You can even see the elongation without the rivet in place.
OHGGJ20l.jpg


Again you can see the elongation without a rivet it place.
lUDaEV7l.jpg


Front with rivet held in place.
Z44ucoMl.jpg


Don't be getting my hopes up by saying build on. :) If you guys are on the fence I will definitely send these off to Vans.
 
Deleted my post. I was thinking that these holes were for the nutplates, but instead I see they are for the skin rivets. My bad. I would send the pictures over to Van's and see what they say.
 
Last edited:
I'd say that is minor enough that the rivet will easily fill the void. Take care setting them to not get them side loaded... and build on!
 
Based on the pictures, it does look like the countersink is a bit deep. A -3 rivet in 0.063 shouldn't leave a knife-edge. I found that for a countersink to properly fit a dimple, you should just be able to see a defined ring around the head of the rivet when held in the countersunk hole. With 0.063, there should still be a think, but visable thickness of un-cut material opppsite the countersink. As for the out of round, a backup tool work great. Also, don't use the air drill to run the countersink (not sure if you were), a slower rpm from an electric drill works better. All that said, it look like "build on" to me, but doesn't hurt to ask vans.
 
Just take a piece of .032" aluminum strip 1/2" wide. Drill and C/S, use that as a check for your depth. If the hole in your spar is not deep enough the test strip will rock and will not sit flush. You need to set your depth stop in increments until the strip will just sit flush. A rivet is not the way to test the depth. A dimpled piece of aluminum is a different dimension than a rivet.
 
You might have excessive runout in your electric dill. A lot of the cheap chinese drills have that problem. I have been struggling with that myself.
 
1 - as others have said, build on! Those look fine. You will never achieve perfection.

2 - I set my drill at its highest speed for countersinking. Less time for the bit to wobble and I tend to get more consistent depths.
 
Countersinking

I'm surprised at the comments to countersink at high RPM. A lower RPM seems to prevent chatter, although that doesn't seem to be the problem being discussed here.

Are your countersinks deep enough to be knife edged? They appear to be knife edge and if so are way too deep in .063. I wonder if going to a number 4 rivet will be an option. Something to discuss with the mother ship.

When you countersink deep enough to create a knife edge condition you loose the pilot as it extends beyond back side of the base material. The countersink cutting edge will remove material either in depth or laterally if the pilot is too deep to function properly.

On a side note, I have seen cutters where the pilot was not centered. They still work but the cage wobbles a bit when the cutter is used. Still have a few of those in my arsenal.
 
A dimpled piece of aluminum is a different dimension than a rivet.

Im working on some counter sinking myself at moment. A different part of the plane but none the less countersinking that must accept a dimpled piece

I would normally agree with what you saying above but section 5 does specifically state .007 deeper then flush for a dimple into a countersink. This is easily found using the end of a dial micrometer or now a days more likely a digital one.

What says the group on discretion here? I have been going with nearly exactly .007 but you do notice the CS does not always allow the parts to sit flush.
So the question is do you go further to get them flush or stick with what vans says?

Also more to the topic, i have an additional question on this. If you are CS past the pilot obviously the cutter is producing a larger hole then the original pilot. Is the problem here the fact that the hole is larger or simply the fact that it is not perfectly round? The hole being larger i would expect. The center hole in the OP picture that is not perfectly round is where the center of the nut plate goes on this part correct? So is the primary concern with the hole being elongated, you loose the ability to locate the nut plate or is it a strength concern?
Please excuse my ignorance as I'm not at this stage in my build but very interested in learning about this for the future.
 
Last edited:
I

I would normally agree with what you saying above but section 5 does specifically state .007 deeper then flush for a dimple into a countersink. This is easily found using the end of a dial micrometer or now a days more likely a digital one.

There is an even easier way to do it than using a dial caliper.

It is pretty much standard that each tooth click on a microstop countersink tool is .001"
So, if you adjust a tool 7 clicks deeper than when it was adjusted for an exactly flush rivet, you will be .007 deep.

.007 deep was chosen as a compromise rule of thumb. I reality, it would be slightly different depending on the rivet size and the thickness of the skin that is dimpled.
It is far better to be slightly short on depth, than too much.
 
Back
Top