What's new
Van's Air Force

Don't miss anything! Register now for full access to the definitive RV support community.

Primer report: Stewart Systems EkoPoxy

N546RV

Well Known Member
Background: I'm currently in the final stages of major wing work; basically all I have left are the ailerons and flaps. Up to this point, I've been using rattle can primer; I started with Dupli-Color on the empennage and later switched to Napa 7220 with the wings.

With the fuselage kit on order, I got to thinking about some long-term decisions, most notably what I wanted to do for the interior of the plane. I also figured that at some point I should get comfortable using a spray gun, since it seems like a skill that may be needed once I get around to doing fiberglass work. Finally, I'd been intermittently reading about the products offered by Stewart Systems, and I was intrigued by the not-so-toxic stuff.

So after thinking it over quite a bit, I ordered a gallon of EkoPoxy in Smoke Gray. I considered getting a quart to start with, but I felt fairly confident that this stuff would be good enough that I'd end up using it. Even if I didn't feel it would work as a top coat for the interior, it'd have to be pretty crappy for me to not want to prime with it at all. I also bought a Grizzly LVLP spray gun from Amazon. I went with LVLP after comparing what my compressor was capable of vs. what most HVLP guns wanted.

Finally, last Saturday was D-Day. I tinkered with the gun a bit, first shooting water and then thinned latex paint to get a feel for controlling spray pattern and such, then I decided to cut some scrap into test patches, mix up a batch of primer, and try it out. The results were...acceptable. I got carried away on one test patch and made some nasty runs, but the others I got a fairly even finish, though there's definite orange peel texture. Still, the semigloss finish and color look nice, and I think it'd work great for the interior in terms of aesthetics.

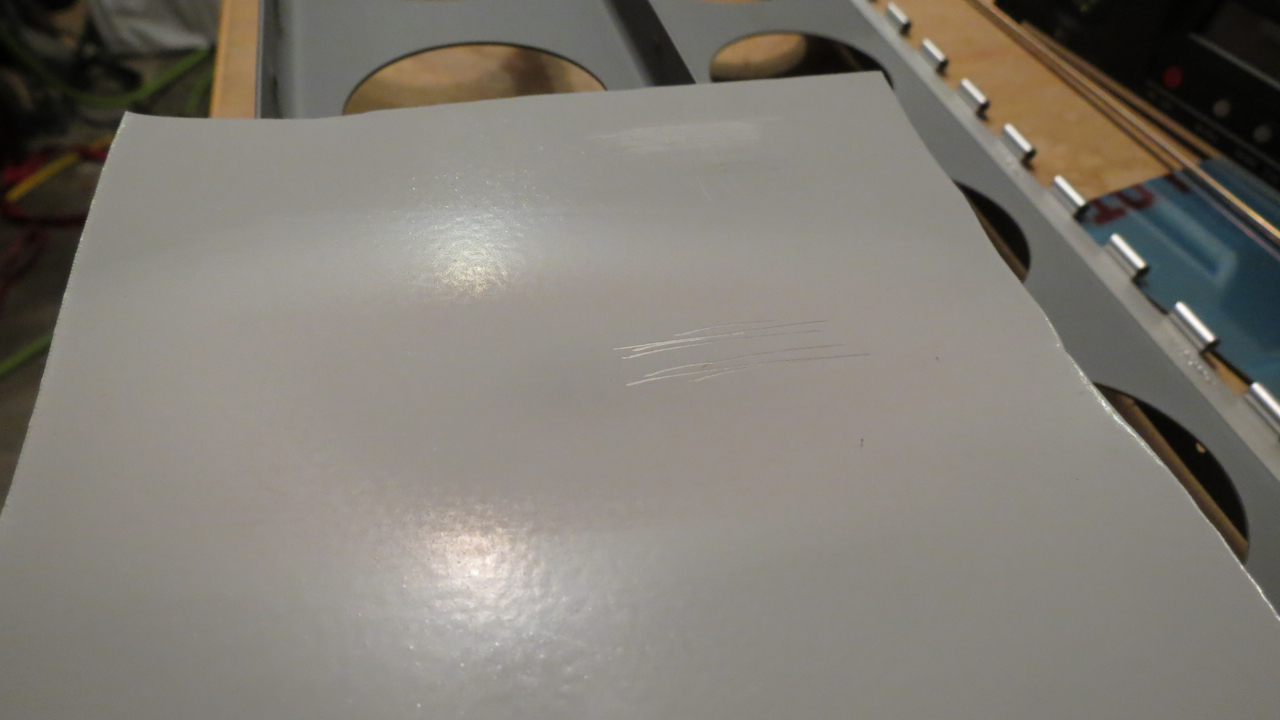
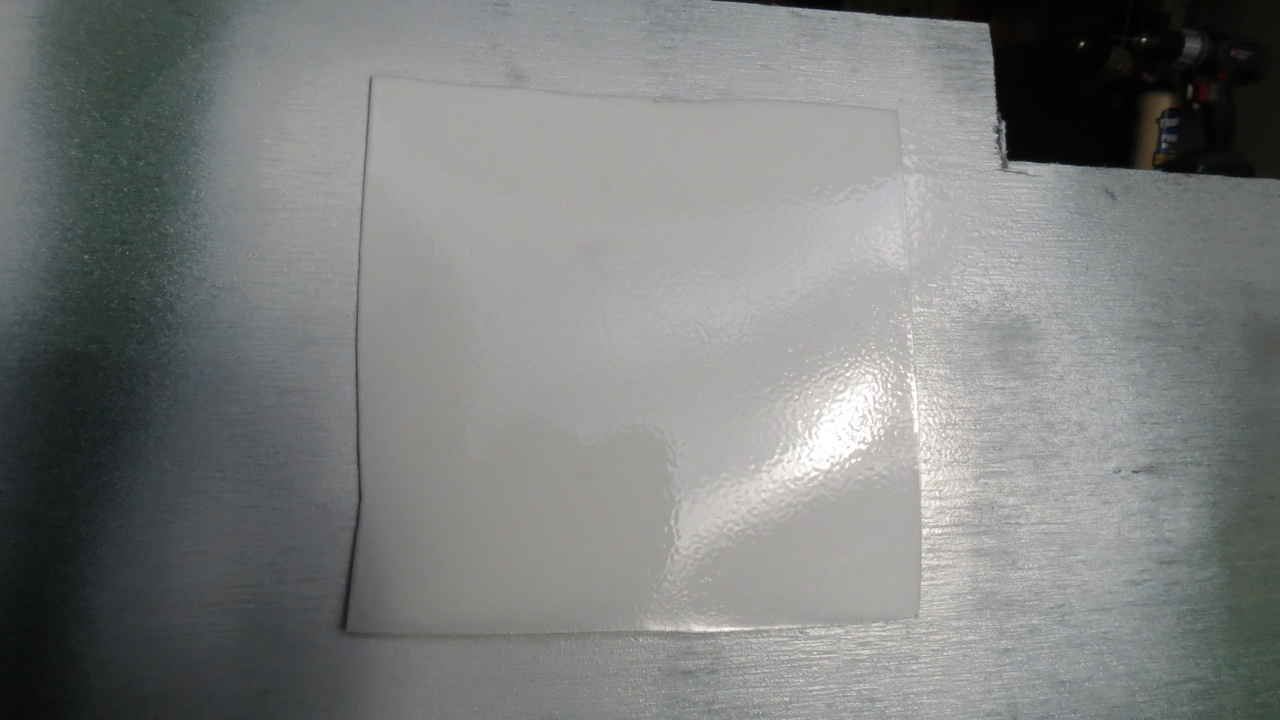
The best of all my test patches:
vgLHLWi.jpg


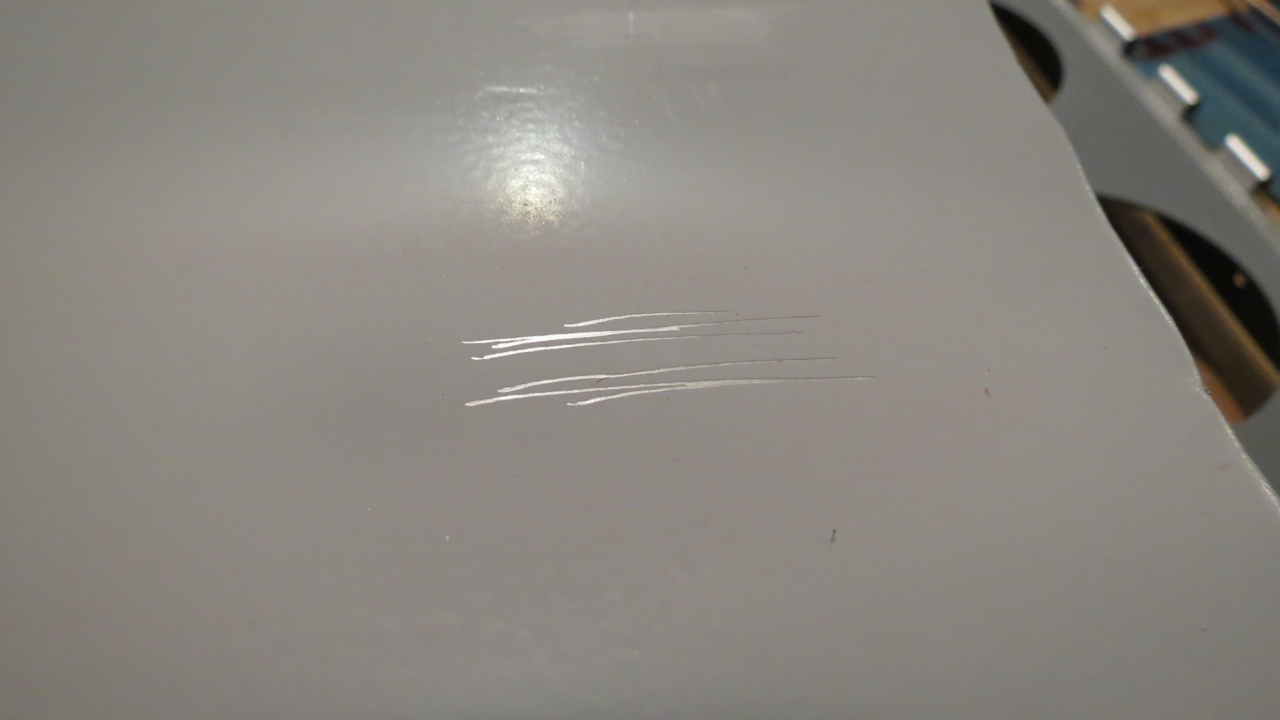
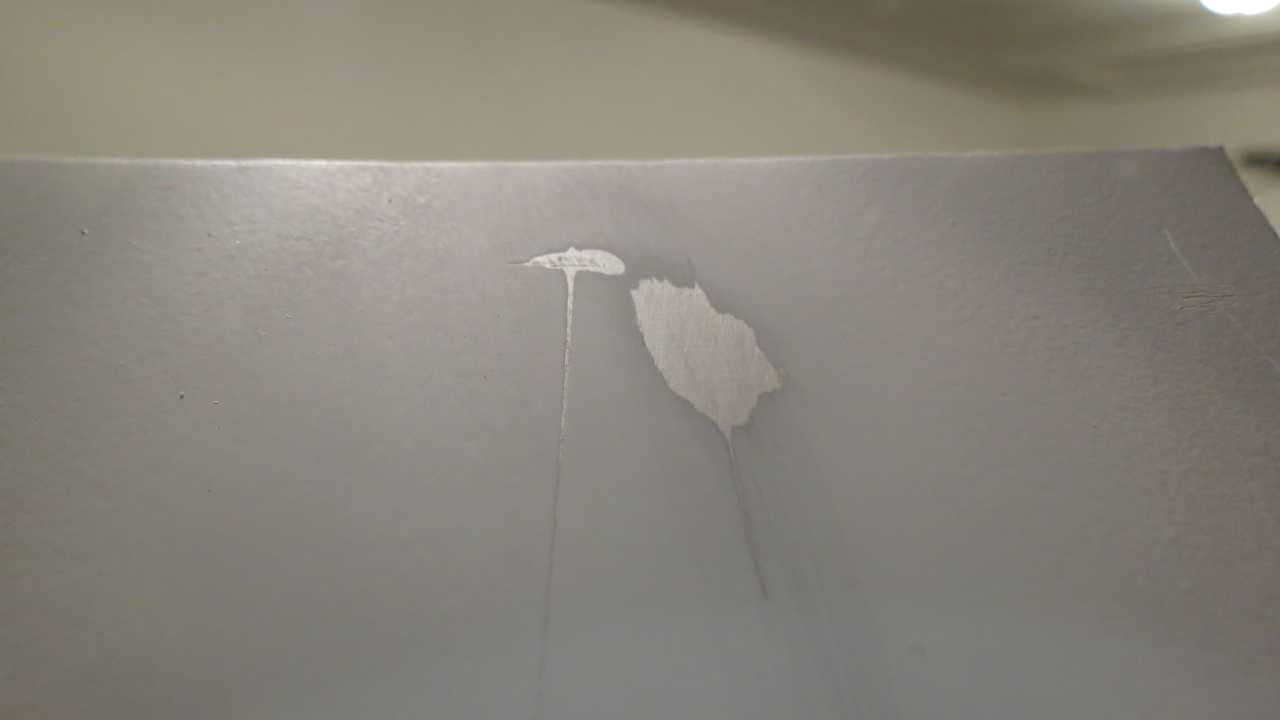
Tonight, after letting the patches cure for a few days, I did some durability testing. The first test was a brisk rub with an acetone-soaked shop rag. It was immediately clear that primer was being removed; the orange peel texture as well as the gloss vanished from the rubbed areas.

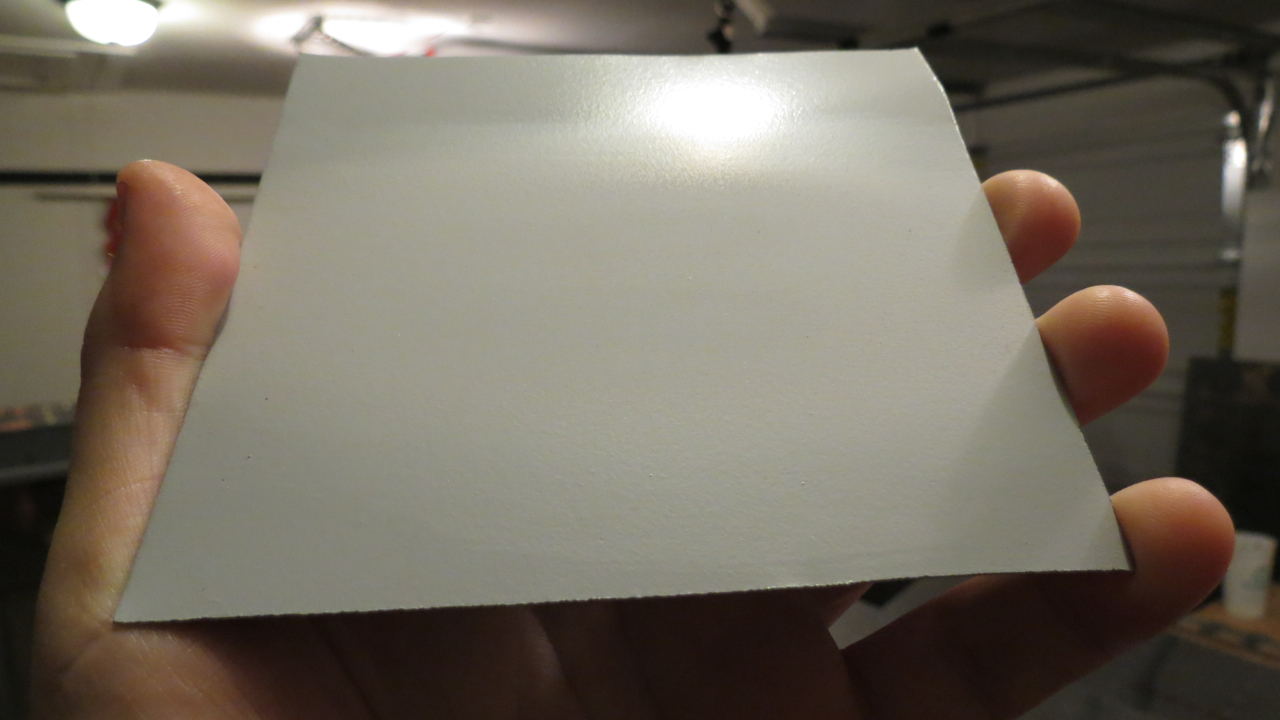
Upper portion of this patch is untouched; center area has been rubbed. Note the difference in gloss:
HXzvSOl.jpg


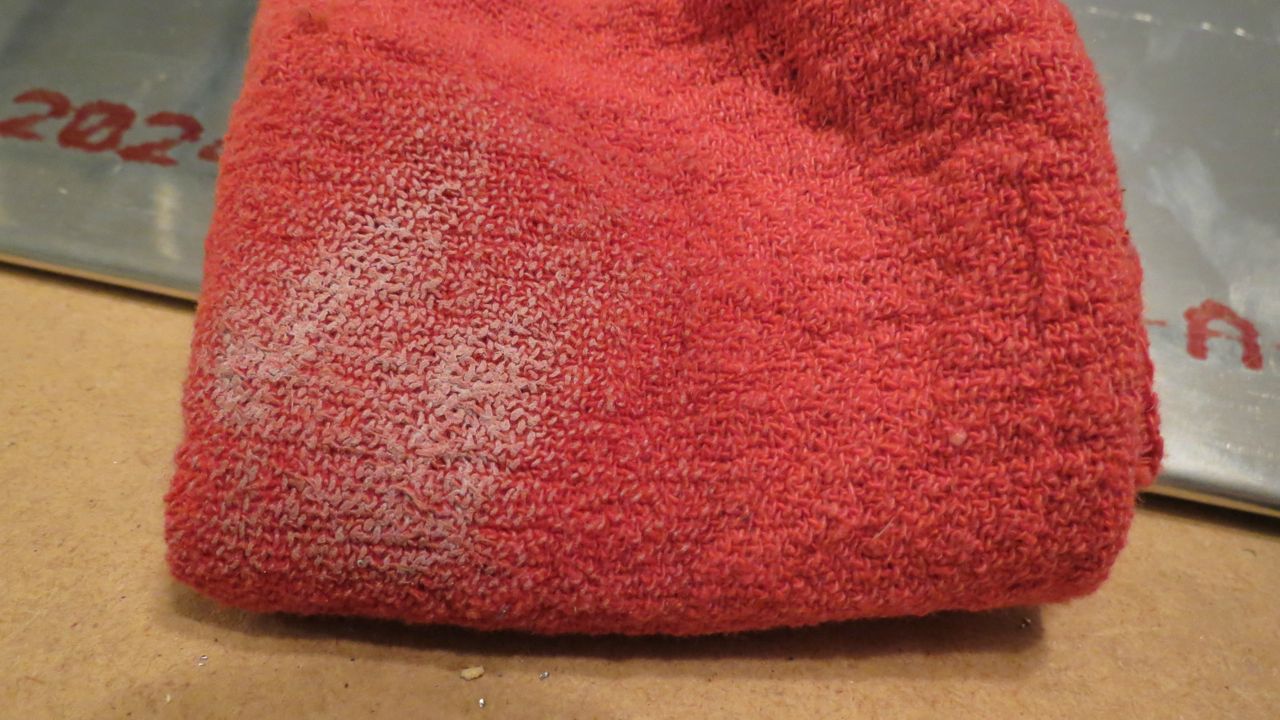
Ruboff on the shop rag:
CTc1cNQ.jpg


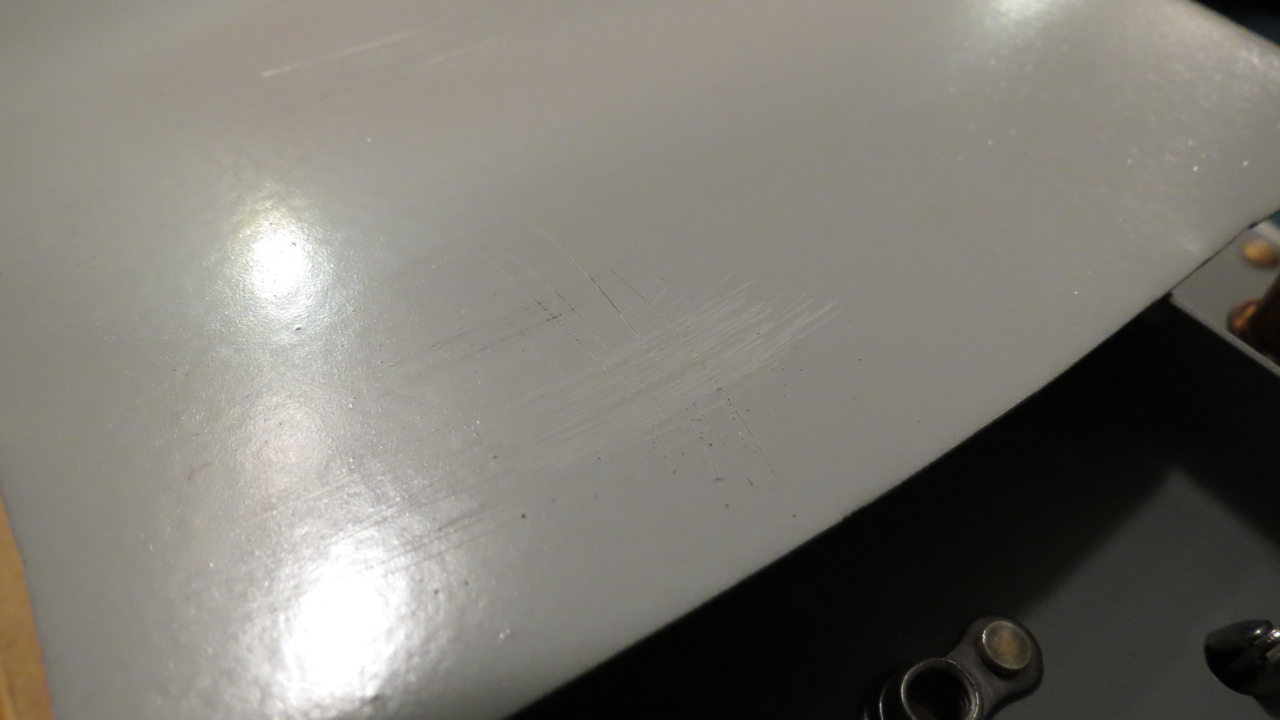
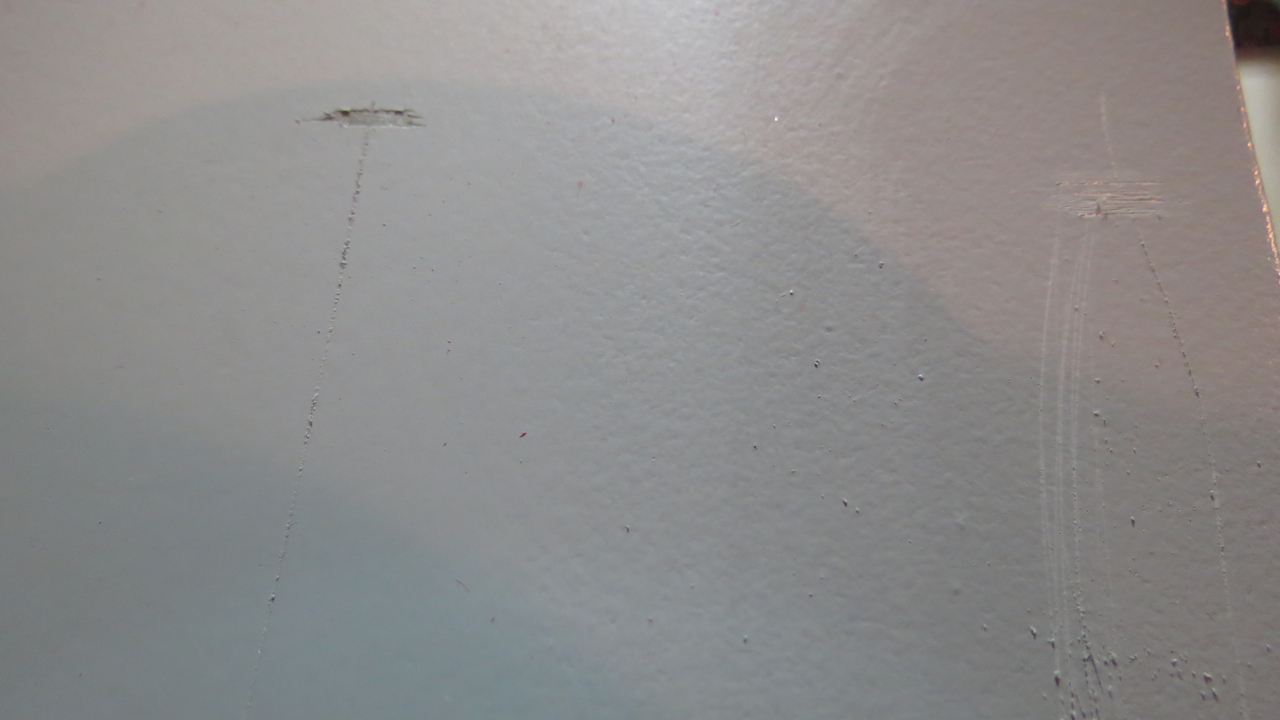
Next I went inside for some scratch testing with a thumbtack. The areas rubbed with acetone definitely seemed softer than the untouched parts; the scratch almost immediately showed bare metal, and a little back-and-forth scratching revealed a large area of Al. The area where I hadn't rubbed with acetone was tougher; light scratches were barely visible, and heavier scratches didn't seem to go right down to the metal. I was still able to get down to the metal with some concentrated back-and-forth scratching, though.

Scratch test results. Left side is acetone-rubbed area, right side is untouched. Note how much more metal I was able to reveal in the acetone-rubbed area:
mgwjsuW.jpg


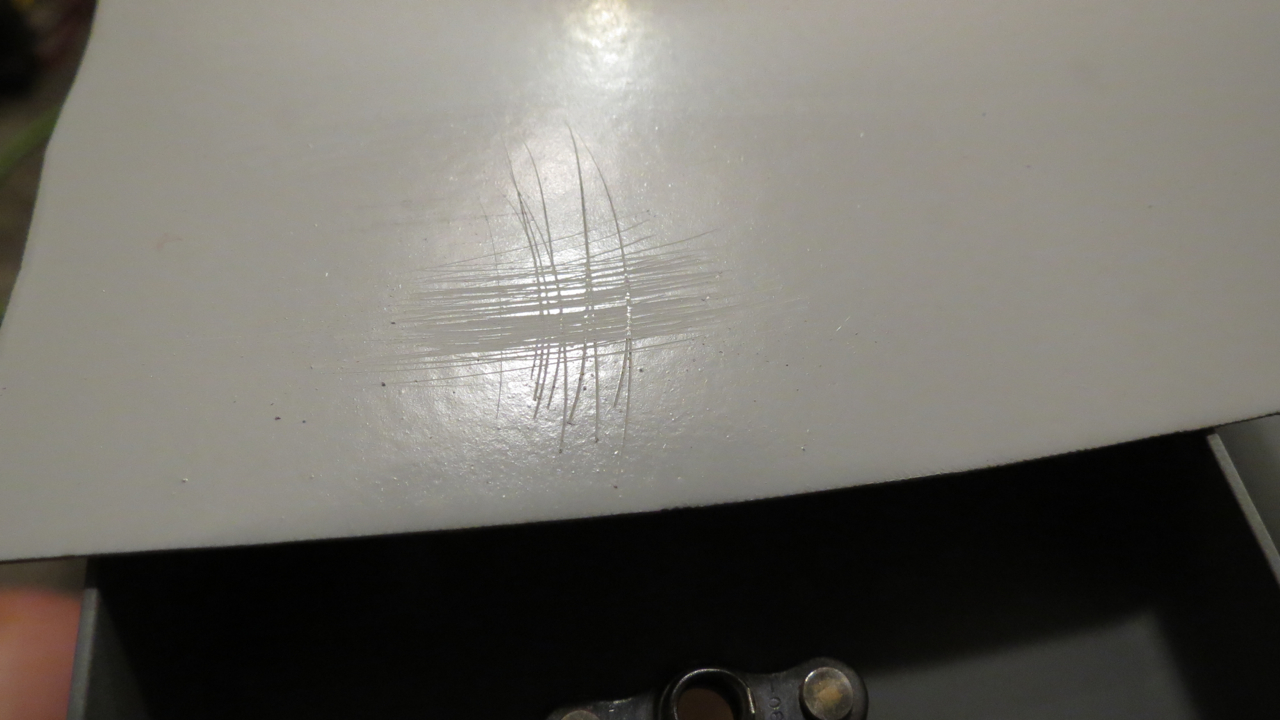
Finally, I went back out to the garage to do some more acetone rubbing. I suspected that with a little more attention, I could remove the primer entirely, and I wasn't wrong:
jKpWRw1.jpg


At this point, I'm wondering if the primer needs some more cure time. I looked a the can again, and I note that it says that after five days, the primer should be sanded before applying a topcoat. This leads me to believe that perhaps the primer isn't totally cured right now. (It's been about three days) Additionally, it's been unseasonably cold here in Houston, and these patches probably haven't been above 45F since Sunday afternoon. As such, I've moved the remaining three patches inside the house, where I'll let them sit for another 2-3 days before I do another series of durability tests. I'm hoping to see increased resistance to solvents and scratching.

Overall, right now I think this is still a decent candidate for an interior topcoat, though I worry about the solvent resistance. I don't plan on rubbing my interior with acetone, but who knows what I might spill or drip in there. Resistance to physical abuse is pretty good, perfectly suitable for interior use, I think.

Bottom line, if I see improved durability after a few more days of curing, I'll be good with this for the interior. If not, then I'll probably think about shooting a separate topcoat. We shall see.
 
Any of the "water based / Water soluble" primers / paint need a long time to cure ... 3 to 5 days .. or even longer ... I have used JetFlexWB in the cockpit ... temperature when spraying was not ideal ... 15 DegC ... then I had to go away for a few weeks ... when back ... could rub with MEK .. no issues ... I have used the Dcup from system from Devilbis and find it so easy to push out the air .. and keep the paint in there for later use .. I used it with my non Devilbis spray gun .. just get the right adaptor.
 
I have primed my interior with the stuff; the cockpit area is painted over as well. I have found that it is MUCH tougher after a week or so.

Chris
 
Stewarts Systems

I painted my complete plane with the Stewarts system. I found that even with my lack of experience with spray painting that the paint cured slowly (1 week) Since than the paint has held up very well after 4 years.
My suggestions is called Stewarts and ask for Dan. He will spend as long as you want answering any questions and best ways to use their primers and paints.
 
I've been using the non-epoxy EcoPrime from Stewart Systems for the inside surfaces of the bird. It does take a long time to fully harden (about a week), but when done it's quite tough -- none of the abrasion tests you used would take it off. It's not solvent proof, so acetone or MEK would dissolve it slowly. However, I don't plan to fly through many MEK cloudbursts, so no worries!

The outside of the plane will be done in some fully compatible system; don;t know what yet...
 
Update: Tonight I grabbed another test patch for some abuse. At this point, the primer has had about ten days of cure time. Acetone resistance did seem to be improved, though a good brisk rub did still remove some primer.

As before, the dull area can be seen in the center of this patch:

XzoAqaI.jpg


Doing a second acetone rub after some scratching reveals bare metal as before:

wSYKuo4.jpg


However, scratch testing on primed areas that I didn't hit with solvent turned out quite well. Tapping the primer with the point of a thumbtack revealed no visible damage, and light scratching with the thumbtack made marks that were only visible under careful inspection.

It took quite a bit of repeated abuse with the thumbtack to make these scratches:

pqs9s7I.jpg


bbePwWN.jpg


Overall, I'm quite pleased with the durability and appearance of this stuff, so I'm sticking with my plan to use this as an interior topcoat.
 
Mixing Mate

Is anyone successfully using ekopoxy with mixing mate paint lids? I hear it's really thick so was wondering if this would cause issues when mixing and pouring (perhaps too thick to pour).

Cheers,

Greg
 
I've been using EkoPoxy since the beginning of my build. My belief is/was that EkoPoxy is not as robust as Akzo, however it should have no problem serving it's purpose as Van's doesn't require priming the inside of the aircraft.

I used EkoPoxy for the following reasons:

  • Environmentally/human friendly
  • Ease of cleanup
  • Ease of disposal
  • Uses distilled water for thinning (not reduction)
What I have found is:
  • EkoPoxy is like cookie dough out of the can and remains thick after mixing to the proper ratio. It must be thinned before spraying
  • Sprays like a dream if mixed with additional distilled water.
  • Is NOT acetone proof. Kind of resistant, but will not stand up to acetone long or even medium term. This makes acetone a good cleaner for spills, etc. In addition, I'm not planning on flying through much acetone.
  • It's "tough enough". It's not as tuff as Akzo, but protects nicely.
  • Cures quickly. I can turn parts while painting in about 1-2 minutes. I can dimple after 36 hours at 70 degrees and 40% humidity.
  • It's a nightmare to mix in it's own container. When trying to mix in it's container, you end up with a blob on the of a stick.
  • Consistency out of the can makes for a lot of waste when doing small batches.
A few hints use:

  • Purchase a couple of quarts. Then buy a gallon can and use a can opener to cut the bottom out of the EkoPoxy quarts and put the contents into the gallon can. Much like getting dog food out of a can. You'll end up with a half gallon of product in a gallon can. Makes mixing a breeze and minimizes waste.
  • When mixing, you'll need to add some water. The 5:1:1 ratio has never worked for me. Remember, EkoPoxy is waterborne NOT water based. This means that the paint "rides" on the water molecule and then effectively splatters when it hits the surface. Water does not reduce/dilute the molecule itself. I'm thinning to roughly 5:1:1.3.
  • Works well with the 3M Accuspray gun/system
  • I find that 1.4 mm tip with 12 psi at the cap works extremely well for spraying.
  • If you're getting orange peel, my opinion is that the primer is too thick.
  • Mix the paint and the distilled water at the proper ratio first, then add the catalyst at the proper ratio (5:1:1). If you're going to add additional water, do it after the paint has been mixed at the proper ratio.

Being easy on my body is my primary reason for use. I'd hate to get this contraption finished only to find out my health has deteriorated. I also love the way it sprays when mixed properly. Although my verbiage above makes EkoPoxy sound as if it's not very tough, the fully cured product is quite hard and impressive. I'm not sure why we all use acetone for a test, try MEK on some Akzo and see how it does. Short version: we can nearly always find a chemical that will cut paint.

The above is what works for me. Your mileage may vary.
 
Thoughts on primer

I was told that the value of epoxy primer was its Corrosion resistance, not toughness. Ie. Two part finish coats are just as scratch resistant as epoxy. Not suggesting this, but I used the white single component primer and urethane gray on the interior and it is really tough. The primer is like milk, no mixing, you can save what you don't use for intermittent spray sessions.
 
[*] Mix the paint and the distilled water at the proper ratio first, then add the catalyst at the proper ratio (5:1:1). If you're going to add additional water, do it after the paint has been mixed at the proper ratio.
I agree with most everything you wrote but this stuck out at me. This is contrary to Stewarts directions and to my own experience. The exact mixing ratio will depend on the product, the gun, tip and to some extent the user preference, but I've never heard of adding water first. I do agree that in general the Stewart's mixing ratios leave things a little thick for my taste.

I'll admit that I never tried it, but in general it is best to stick with Stewart's recommendations.
 
Surface prep

You didn't mention how the surface was prepped. It has an effect on how well the paint adheres. Try rubbing a big piece of Gorilla tape on the part then rip it off.
 
I used EkoPoxy recently for the first time. I prepped the surface using the Stewarts cleaner and etch products, and mixed according to directions. But first, I found that the EkoPoxy itself was a very thick, almost chunky material. Stewart's support said that this is normal for this product, and to use a drill mixer. After mixing the can up with that, it was a thick syrup.

I poured off the desired amount, measuring by weight, and added the hardener and water, in that order, in the specified quantities. The resulting viscosity was fine for the spray gun and tip I was using. I used a Devilbiss FLG 4 gun with a 1.5 mm tip. The gun was what they'd recommended. Later I learned that they also recommend one of the more expensive Tekna guns as well. The Tekna has been recommended before here on VAF for other products.

It sprayed fine, I thought, but the finish was very rough and somewhat uneven. After the requisite time period, per the instructions, I shot a second coat. Same initial roughness but more even. I let it dry and after several hours, the finish became smooth, zero roughness, and even.

Bottom line, all in all, I like the product.

I intend to top coat it with clear gloss EkoCrylic when the temperatures fall into the window again.

Dave
 
I'll admit that I never tried it, but in general it is best to stick with Stewart's recommendations.

It should be noted that Stewart's makes no recommendation about the order in which the components are mixed; only that the ratio is 5:1:1. Adding one component at a time enables the user to more thoroughly mix the components. In addition, adding the water first thins the base and enables the catalyst to be mixed more easily.

Ultimately, I'm sure the order in which the components are added doesn't matter or Stewart's would mention it.
This is incorrect, they specifically state in both the written instructions and in their videos to mix the paint and catalyst prior to thinning.

From the Ecopoly/ Ecocrylic instructions. Emphasis added.

Mixing by Weight:
The paint is mixed 4:1:1 by weight. For example, if you use 100 grams of Part A paint, the amount of catalyst needed is 25 grams (25% of Part A amount). Mix the Part A and catalyst thoroughly. Let sit for 5 minutes. Add 1 part distilled water and mix thoroughly. (same amount of water as catalyst). Let sit for 5 minutes, then it is ready to spray. If desired for your particular spray technique, equipment or environment it is permissible to adjust water amount slightly, but be cautious, a little water goes a long way.
 
Jeff,

Your in put is appreciated. However, EcoPoxy and EcoPoly are different products. The original post was regarding EcoPoxy. I've posted the instructions below. The order of mix is not addressed and "slaking" is not required with EcoPoxy. Perhaps the methodology for EcoPoly is different. I've never used EcoPoly so I am unfamiliar with the requirements for its use. The instructions for EcoPoxy can also be found at:

https://stewartsystems.aero/wp-content/uploads/EkoPoxy-Instructions.pdf

Eko-Poxy-Instructions.jpg
[/url] beautiful river poems[/IMG]
 
You are correct that this discussion is about Ecopoxy and the directions you posted are clear. I wonder if that is an oversight on their part or intentional, since I believe all of their 2-part products use the same catalyst (at least the Ecopoly and Acrylic do) and presumably the same procedures. Have you ever reached out to them to clarify?

I used all of these products (plus the single part primer and Ecofill) while painting my last airplane. In my mind I somehow took the Ecopoly/ acrylic instructions and applied them to Ecopoxy. Sorry for the confusion.
 
Jeff,

I spoke to Stewart's at Oshkosh last year regarding the constancy out of the can and my solution of putting a couple of quarts into a gallon bucket. But I didn't ask about the order of mixing.

I was told that if I worked long enough, that the paint would come to the proper consistency and that I could use a mixer on the end of a drill to help. When I stated that the mixer simply balled up the paint like a batch of cookie dough, they said that I could carefully add just a little bit of water.

What surprised me was that when I mentioned mixing the quarts into a gallon can, it was frowned upon. The fear is that I wouldn't get all the contents out of the quart can.

I really like the finished product, but the thickness makes it a challenge to mix without waste. After many "quarts" and many projects over the years, I have never been able get it to spray properly without thinning.
 
Over Alodine

Thanks for the responses. No one answered my original question but I have tried the product since and decided a mixing mate lid wouldn't mix it well enough. Onto another question...

Has anyone tried Ekopoxy over alodine? I spoke to Stewart Systems and they said it would work, but suggested I rough it up with a scotchbrite pad first. I've never alodined but from what I have read it seems scotchbrite would probably wear through it. Any thoughts?

Btw, my experience with ekopoxy was pretty good. I got a pretty rough sandpapery finish but it was quite tough and smooth enough for plane internals. Will experiment a bit more with the gun settings next time.
 
Alodine

Thanks for the responses. No one answered my original question but I have tried the product since and decided a mixing mate lid wouldn't mix it well enough. Onto another question...

Has anyone tried Ekopoxy over alodine? I spoke to Stewart Systems and they said it would work, but suggested I rough it up with a scotchbrite pad first. I've never alodined but from what I have read it seems scotchbrite would probably wear through it. Any thoughts?

Btw, my experience with ekopoxy was pretty good. I got a pretty rough sandpapery finish but it was quite tough and smooth enough for plane internals. Will experiment a bit more with the gun settings next time.

Scotchbrite will scuff off some of the alodine layer. It's quite thin.
I have no experience with Ekopoxy but if it were a solvent basdd paint, I would thin it more. I had a slight rough surface with Jet Flex. After it hardened, I scrubbed with a claybar and it made it smooth.
 
Btw, my experience with ekopoxy was pretty good. I got a pretty rough sandpapery finish but it was quite tough and smooth enough for plane internals. Will experiment a bit more with the gun settings next time.

That's usually from not enough paint being sprayed. Check your input pressure (too high), that your paint flow is set to max (if your gun has one; not the needle/trigger stop) and that you have a proper fan (full paint in the middle with a sprayout on the edges). For smaller parts I generally set the gun for about a 2-3" spray width and a 5-6" total fan. Larger areas you can go up to a 5-6" spray with an 8-10" fan.

You may need to go to a larger tip size. Also be sure to setup the trigger correctly. Don't try to modulate spray with the trigger. You should be able to pull to the stop every pass.

If you're using the little filter that comes with the gun throw it away. Use cone filters when filling the cup.

Keep the vent on the cup clean! If it clogs you'll get low/no flow and a rough texture.
 
Thanks for the input guys. I'm going to have another go at it this weekend and will fiddle with the paint and mixture settings. I suspect my air pressure was too high as quite a few people have now suggested it is the first thing to check!

Thanks again,

Greg
 
I shot some other parts using the 1.8 mm tip and got a smoother finish. My overall impression is that Ekopoxy is a good product, as long as you can put up with the mixing hassles and can spray it within the humidity and temperature limits.

Also, I really like the PPS cup system. Although an aftermarket system, and not cheap, it's worth getting.

Dave
 
I was told that the value of epoxy primer was its Corrosion resistance, not toughness. Ie. Two part finish coats are just as scratch resistant as epoxy. Not suggesting this, but I used the white single component primer and urethane gray on the interior and it is really tough. The primer is like milk, no mixing, you can save what you don't use for intermittent spray sessions.

Larry what manufacturer of white single component primer and urethane grey did you use?
 
Stewart single component white primer

The single component primer with Ekopoly grey 2k finish has been very scratch resistant.
However, as I have warned many times, you must completely cover the primer with 2K material . ALL exposed edges or wicking paths TO the primer for solvents or mogas WILL soften and blister the finish coat.
 
Been using Ekopoxy and have gotten it figured out now that I’m almost done. I’ve been ordering quarts due to shelf life and my usage rate.
A comment on colors:

Price and ease of seeing coverage results vary by color

Charcoal Gray: Slighty more $ than white. Looks good, easy to see coverage

Zinc Green: Most expensive (20% more $ than white) Best look, easiest to see coverage ( Best contrast against bare aluminum to see missed spots)

Smoke Gray: Slightly more than Charcoal Gray looks good, horrible to see coverage. Does not contrast well against the color of bare aluminum

White: Least expensive, Have not used yet. I would assume is better than Smoke Gray to see contrast against the bare aluminum

I would NOT recommend Smoke Gray. Pick any of the other 3
 
Just to recap my experience, I like EkoPoxy a lot. I ultimately used it for the interior paint, spraying one area at a time. I'd bought a Harbor Freight touch-up gun which is perfect for this. The gun cleans easily in the kitchen sink (yes, I live alone) with water. The paint, once dried thoroughly, is adequately tough - that is, it's very tough - and durable.

This shows the panel, painted with EkoPoxy, and the switch panel and if you look closely, at the white EkoPoxy I used for the sides of the foot area.

QuQktka.jpg


Dave
 
Is anyone successfully using ekopoxy with mixing mate paint lids? I hear it's really thick so was wondering if this would cause issues when mixing and pouring (perhaps too thick to pour).

Okay, very late answer, but maybe it will be helpful to someone.

I used it with the mate paint lid -- works fine so far. It was extremely thick when I got it, I basically had to "screw" the lid into the primer:

4-primer-very-thick.jpeg


But after couple of minutes of manual mixing and then few more minutes of mixing with the drill (remove the handle, attach the drill), it got to a nice flowing consistency.

I likely have a recent batch since I bought it recently, so YMMV.

I don't have anything to compare to as this was my first experience using a primer & a spray gun, but it mixed extremely well, too. Once I put all the components together, few stirs with the stick and it all mixed already! (I of course stirred it much longer than that).

So, I am happy about it so far (I chose it for non-toxicity, as I live in an apartment complex, but everything else is a nice bonus!).
 
Has anyone tried Ekopoxy over alodine? I spoke to Stewart Systems and they said it would work, but suggested I rough it up with a scotchbrite pad first. I've never alodined but from what I have read it seems scotchbrite would probably wear through it. Any thoughts?

One must appreciate the irony here. You want to use Stewart Systems because it is so environmentally friendly, yet you are contemplating prep with one of the most toxic and harmful substances on earth. Alodine is hexavalent chromium.

Please dispose of properly after use - i.e. it is HAZMAT
 
I used it with the mate paint lid -- works fine so far.

Correction: it works fine, but only with quart lid. I tried the same on the gallon lid, and you need to go extremely slow at first or you risk breaking off the mixing blades.

I think, it is still possible to do with the gallon, but I gave up and just poured it into my quart can, where I can mix it with the drill.

Another thing I found is that it is not very resistant to the solvent, as it has been mentioned in this thread. Acetone and lacquer thinner would remove it if you rub enough, even the parts that have been primed a month ago.

Also, denatured alcohol would also remove it, but not as easily as acetone / lacquer thinner. If you rub the edge of the scratch, alcohol would lift the primer from the metal and gradually remove it. In the middle of the primed area, not so much.

I wonder if I am doing the process wrong or it is just the properties of this particular water-based primer?

I clean with EkoClean, then etch with EkoEtch (3 minutes & scrub with the maroon Scotch-Brite until the part is no longer shiny). Wash with the shower (I cannot use pressurized washer as I live in an apartment complex). It passes the water-break test. I use gloves to handle the parts.

Mix the primer by weight, then shoot. It has been a bit too hot here, though. I think, I get 80 to 90F in the garage sometimes.

It does resist scratching, it is relatively tough.
 
Another thing I found is that it is not very resistant to the solvent, as it has been mentioned in this thread. Acetone and lacquer thinner would remove it if you rub enough, even the parts that have been primed a month ago.

True, but not sure it really matters. I don’t plan on dousing my interior with solvents, let alone following that dousing with a bunch of aggressive rubbing. I guess human nature tends to push us to find the faults of things, but just because something isn’t perfect for all scenarios does not mean it’s not way more than adequate for a specific purpose.

(btw, I don’t use EkoPoxy, so no dog in this fight. I actually use the less durable EkoPrime, and have been very happy with it for general purpose priming)

Your prep process is fine. You’re just finding that not every primer likes solvents, even epoxy primers. You just have to decide if that matters for what you’re using it for. I would submit that it doesn’t, and you should happily move on knowing that it resists scratches. Scratches are the real problem child in building.
 
Last edited:
True, but not sure it really matters.

I agree. I just don't have any extensive experience with primers or paint, so I don't know what is normal and what is not.

I am at the empennage stage, so at this point I mostly care that it does not fall off the parts after a few years :D
 
I was curious how much weight do I add, so I weighted couple of random parts I sprayed with EkoPoxy. Two ribs and a small spar from the elevator, all fully covered.

The total weight increase was ~3%, which seems to be not too great. I saw mentions of increase more than 1.5% as a "fail" in some A&P school.

Will re-check my application with the gauge and see if I can get a thinner coverage that still looks okay (I use 1.8mm nozzle, so maybe switch to 1.4mm and thin the primer with water a bit?..).
 
I bet that rule of thumb was from a long time ago, when many coatings cured by evaporating solvents. Just a guess, I ain't a chemist or a painter at all. Not even close.

A two-part paint will have considerably less reduction. Typically, the proper thickness is based upon film thickness, cured.

Dave
 
To avoid creating a separate topic, any reports on using Stewart Systems EkoPoxy without their EkoEtch etching?

How would I know that I get enough primer bonding? Is scratch / peel test few days later enough or is there still a risk that it will peel off, say, after being exposed to hot temperature / big temperature difference?

I am considering to switch to something non-corrosive, potentially PreKote. The main issue with etching for me is that when I work with small parts, it gets tedious to track the time (and keeping etching longer than necessary seems to leave corrosion on the parts) and also it's easy to get splashes on other parts being prepared (which also leaves corrosion dots on them).

With PreKote, I would imagine, I can spray / scuff as many parts as I want (keeping them wet), then wash everything at once.

This is primarily for an internal application.
 
Weight

I test cured paints using Gorilla tape.
Once fully cured, apply a strip. Rub it down. Leave it overnight. Rip it off.

I weighed a lot of parts over the build and typically saw about 1% weight increase.
 
To avoid creating a separate topic, any reports on using Stewart Systems EkoPoxy without their EkoEtch etching?...

I didn't etch on the interior of my RV-3B, where I used EkoPoxy. It's been more than a year, maybe two years, and I've been working in the area since. It's held up well. I used Scotchbrite maroon followed (and preceded) by either lacquer thinner or isopropyl alcohol, and a small touch-up spray gun to apply it. I'm satisfied.

Dave

Same. I used to acid etch everything. Then I did some side by side tests of etch vs scotch brite scuffing. Found zero difference in adhesion. So now I just scuff and wipe things off with acetone, then prime. It's probably a wash in terms of time required, so really just preference of the materials you want to work with. Etch and water rinse or scuff and wipe with a cleaner.
 
Back
Top