What's new
Van's Air Force

Don't miss anything! Register now for full access to the definitive RV support community.

Tools for RV-12

jnjhirsch

Member
I'm sure this has been discussed before and I'm fine with a redirect to a prior thread.

The RV12 kit that Avery sells, does not include a rivet gun. Is it truly not necessary?

The kit also includes a hand rivet squeezer. For the RV12 build, is it not worth the upgrade for a pneumatic squeezer?

Also, assuming I have no tools (which is a good assumption) what are the common upgrades and additional must have items I can change/add to the Avery kit for the RV12 build?

Thanks.
 
I had and used a pneumatic squeezer, but it is far from necessary. You will need a bandsaw and some sort of grinder/buffer motor, and of course an air compressor.. You can browse thru mine and other build logs, we always make a big deal out of getting to buy another new groovy tool!
 
A rivet gun is handy in a few instances, but not at all required. I do like having one around. The pneumatic squeezer is great investment and tool. I have a hand squeezer I use for target practice:D Check your PM's
 
I don't have a bandsaw and haven't missed having one. Would have been handy a couple of times but not necessary for me. I found a hand squeezer perfectly adequate but I had a hard time with a regular one. Once I invested in a Cleveland Main Squeeze (model 22), it turned a real chore into a piece of cake.
 
Tools...

A cheap inexpensive band saw is very valuable to the build, in my humble opinion. Much cleaner and faster cuts, versus using a hacksaw. Is it necessary? No. But is it worth its weight in gold? Yes, IMHO.

And the rivet puller? Yep, again you could use a hand squeezer. But look at the bags of LP4-3 rivets for the entire build. There are literally thousands and thousands of them. Buy the cheap $30 pneumatic puller from Harbor Freight and thank me later. I built an entire RV-12 with that same puller, and we now use it daily in my office while manufacturing some of our parts. It has never missed a beat, and pulls rivets perfectly every time.

Can't ever recall using my pneumatic rivet GUN. Maybe I did, but if so, it was only because I had it already. And was only for a slight few rivets, which you could do with a hand rivet squeezer.
 
I agree with the band saw and bench sander. I didn't have either and I think the parts would have definitely been easier to make and nicer looking with a lot less effort.

You can get by without them, but many is the time I regretted not having one or the other. Oh I did have a Harbor Freight bench sander. It just didn't last long.

Bob
 
Maybe I'm a pencil neck, but I didn't want to pull 10.000 blind rivets by hand, so I got a pneumatic puller.

Reminds me of an old sea story from my submarine days where the punchline was: the difference between man and apes --- a man can use tools! 😜😜😜
 
Maybe I'm a pencil neck, but I didn't want to pull 10.000 blind rivets by hand, so I got a pneumatic puller.

Reminds me of an old sea story from my submarine days where the punchline was: the difference between man and apes --- a man can use tools! 😜😜😜

Can't imagine doing a -12 without a pneumatic puller ...
 
You need to search TOOLS in the Rv12 forum. Really good advice in a few links. Cleaveland set is very good. Even people that buy the Avery set get the Cleaveland MAIN SQUEEZE squeezer. You do NOT need a rivet gun. Yes, bench size bandsaw and belt sander. Extra 30 and 40 bits. Scotchbrite wheel. Cleaveland vice-grip style edge bender, not the hockey puck style. Power screwdriver loaded with the debur bit. Pneumatic puller is essential plus a manual one. But you do NOT need a pneumatic squeezer unless you have pretty weak hands or arthritis or something like that.

PADDING on the floor where you stand!!!
 
Highly recommend the scotchbrite wheel - I have two. After 800 hours it's pretty much all I use except for large skins. Unless you have trouble with your hands (not a young man anymore) I don't see a pneumatic of much value but I would highly recommend the main squeeze as it has a cam and is non-linear which really helps when it comes to not bending the parts or trying to keep them in place. The cheap squeezers force you to bear down and move things around. If you are not going to seriously practice pounding rivets you will most likely do more damage than good with a gun. The kit wasn't designed for a gun and there's very few places that it would even make sense.
 
Lets not mislead the newbies by making it seem simpler than it really is. The kit comes with 12,500 LP4-3 rivets and you will probably have to order some more, at least I did.
Maybe I'm a pencil neck, but I didn't want to pull 10.000 blind rivets by hand, so I got a pneumatic puller.

Reminds me of an old sea story from my submarine days where the punchline was: the difference between man and apes --- a man can use tools! ������
 
Also get a small 1.5 to 2 inch diameter scotchbrite wheel that chucks into your drill. Using that and a leather glove, it is the ideal way to debur the edges of all the large skin pieces.
 
I got a $5 dial micrometer set in the bargain bin at Harbor Freight that proved useful a few times.

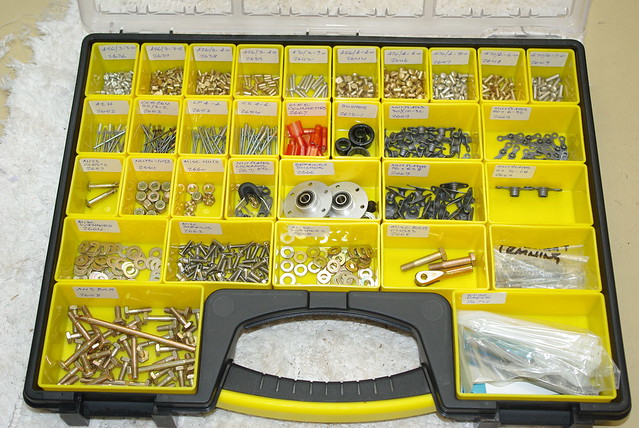
One of your most important TOOLS is this. Buy 4 briefcase size plastic sorting bins - Harbor Freight or a big box store. The kind that close like a briefcase and contain many individual compartments or removable bins. Inventory your bags of small parts and put each different part into a compartment labelled with its PART NUMBER. Do not mix parts in the same bin that are the same "thing" - like different size nutplates. You can mix different "things" like one size of nutplate and one size of cotter pin.

This method will save you HOURS.
 
Lets not mislead the newbies by making it seem simpler than it really is. The kit comes with 12,500 LP4-3 rivets and you will probably have to order some more, at least I did.

I wouldn't even think of taking this on without a pneumatic puller. A good hand puller is also nice to have. The one with the swivel head from ATS works really well. Also, HF is a great source for tools. No need to pay more than you have to for something you may never use after the project.
 
Give this some serious thought. I did NOT do it until almost done, as said, would have saved me many, many hours on the build. I highly recommend this.
I got a $5 dial micrometer set in the bargain bin at Harbor Freight that proved useful a few times.

One of your most important TOOLS is this. Buy 4 briefcase size plastic sorting bins - Harbor Freight or a big box store. The kind that close like a briefcase and contain many individual compartments or removable bins. Inventory your bags of small parts and put each different part into a compartment labelled with its PART NUMBER. Do not mix parts in the same bin that are the same "thing" - like different size nutplates. You can mix different "things" like one size of nutplate and one size of cotter pin.

This method will save you HOURS.
 
Really? Noones mentioned fine tip Sharpies? Of all the "tools" in my kit, I use the snot out of black sharpies...get a couple of packs.

That said, I find my drill bit sharpener gets some good use now, but you can buy a lot of drills for the price of one sharpener so if you don't already have one, probably not high on the list.
 
Thanks for all the great replies. I am so glad I joined this group. Although I am not yet a builder, the value of information I get just doing the research is well worth the member fee.

I have invested in a bench top band saw, belt sander with disc, and drill press. I inherited a bench grinder from the inlaws.

Most RV12 kits come with a pneumatic rivet puller.

No to rivet gun. Cleveland main squeeze and vice-grip edge bender. Debur bit. Small 1.5-2 inch scotch bright wheel. Cheap micrometer. Small parts sorting bin system. Check.

Great feedback!!
 
Maybe not a "tool" but a good 4' X 8' workbench with electric outlets on each side makes life easier.

I also found that crimping the end of a 1/2" aluminum tube just enough to pass a blind rivet mandrel but not the head makes a good rivet insertion tool f it doesn't go in easily. A good tapered punch is good for getting rivet holes to line up.
 
Yes, sharpies. A can of acetone cleans the ink off of all the aluminum. Red scotchbrite pads for scuffing before priming small pieces. I primed all small pieces but not everything, you can read several hundred pages of argument about that here. I used a rattle can aluminum primer, either the $6 pro brand at Home Depot or the (much more $$$) Marhyde from O'Reilly Auto Parts. You will often cut mirror image small parts from a stamped plate. Label them L and R when you cut them. Scuff, label with a sharpie, then prime and the label will still show through.
 
Rubbing alcohol will remove sharpie ink.
I agree with Bill_H and DonFromTX about organizing parts in bins. I wasted days (if all the hours were added up) looking for parts. It is worth the time to use a computer to make an index of each part's location, such as cabinet 2, drawer C4, section 1. When a part is needed, use the computer search function or look it up on a printout. If you think that doing this is a waste of time, remember this post while you are looking for parts. :D
 
While you are at HF, get a big variety container of cable ties. You will use more than Vans supplies you in the kit. Use the ones supplied for firewall forward as firewall forward because they are high temp. The rest don't matter.

If you organize your "briefcases" well you will not need a computer list. The plans show a screw of some sort - you will quickly learn where the screws are! You will know those cases like the back of your hand.
 
+1 acetone for the sharpie removal - easy to get at HD. Also +1 on the loup, but go to Harbor freight and get the 5 loups for $5 - 2xto20x if I remember. Cheap but made of glass and do the job nicely. You can get a lot of rinkydink tools at HF that don't require pro quality - spring clamps and c-clamps in various sizes come to mind. But don't go there until you know you have a need, otherwise, you can spend all day just pondering....

A shop vac is also a must, unless youre building in a barn or hangar. I build in my garage and tracking AL bits on my shoes into the house is a nono.
 
Harbor Freight has these suitcase-size bins on sale at this date 8 Feb. My question is which one? There are large compartment and small compartment boxes. I assume the small because of the vast variety of parts but are these small suitcase bin sizes adequate? Also, I assume if your work area has adequate space a 30 bin wall mounted rack would also be helpful, correct?
 
Harbor Freight has these suitcase-size bins on sale at this date 8 Feb. My question is which one? There are large compartment and small compartment boxes. I assume the small because of the vast variety of parts but are these small suitcase bin sizes adequate? Also, I assume if your work area has adequate space a 30 bin wall mounted rack would also be helpful, correct?

These are good:

5395885958_e18735b6b9_z_d.jpg
 
I used the 30 bins, only about $15 as I recall. I actually bought several for later, just in case. Worth every penny. Also, scotchbrite wheel worked better on the HF buffer motor, less vibration. I also bought the Cleaveland kit for RV12. I don't want to know how hard the regular squeezer is to use, on the 1/8 inch rivets the Main Squeeze can be tough at some angles. I already had a band saw and drill press, both get a lot of use. I got 2 extra microstop countersink cages with the nylon tip (cuts down on marks) to minimize setup times. Got those from Amazon, but available elsewhere too. Bought a 2x and 3x rivet gun, just need 2x if you go that route. Look up the EAA worktable, I started with 2 Sam's club plastic top tables, they are tough but not heavy, and you can't drill into them as needed. I built mine with the plywood top and then put on a sacrificial 3/4 inch particle board top with a 3 inch overhang. They are very flat, heavy,strong, and you get a storage shelf. Wish I had started with them.

Better to wreck the toolbox kit than to have to order new parts. Which you will do anyway, just hope it's a small cheap one.

Well, that's enough for now. Never pass up a chance to get a new tool.:D

Skip
 
"scotchbrite wheel" This is a recurring deburring tool of great use building Vans' aluminum airplanes but looking back through the history of VAF posts I do not seem to find a specific call out of what grade of scotchbrite and where best to buy this (wheel) item. I am quite familiar with scotchbrite (red, white, gray) and have used it many times in prior years but this is the first time I would be using it as a rotating wheel on an arbor. I just bought a HF 6 inch buffer and am now confused as to where to buy the scotchbrite wheel, what grade of wheel, and will it fit on the arbor (Central Machinery brand) of HF buffer. I was looking at Aircraft Spruce and saw that they offer 3M 7A and 7S grade wheels for sale. Guidance would be most appreciated.
________________
George
 
I use the 3M 7A MED chucked in a drill press. Better access all the way around the wheel for me. Obviously it comes out when there are drilling duties. I have a wire wheel and standard 60 grit ALoxide wheel in the grinder for steel parts etc.

I use 1/2" thread all, two fender washers and some nuts to make the drill arbor. Works fine for me. Not sure what speed I rotate it at since my drill press is variable, but its a mid range speed. I don't change it much unless I'm hogging something with a pretty big drill.

Get the wheels anyplace that has the best price.
 
Last edited:
"scotchbrite wheel" This is a recurring deburring tool of great use building Vans' aluminum airplanes but looking back through the history of VAF posts I do not seem to find a specific call out of what grade of scotchbrite and where best to buy this (wheel) item. I am quite familiar with scotchbrite (red, white, gray) and have used it many times in prior years but this is the first time I would be using it as a rotating wheel on an arbor. I just bought a HF 6 inch buffer and am now confused as to where to buy the scotchbrite wheel, what grade of wheel, and will it fit on the arbor (Central Machinery brand) of HF buffer. I was looking at Aircraft Spruce and saw that they offer 3M 7A and 7S grade wheels for sale. Guidance would be most appreciated.
________________
George

Van's sells one, as well as all of the popular RV builder tool suppliers (Avery, Cleveland, etc.)
 
I have trouble keeping the surface of the wheel even. I tried using a tolol that came with my bench grinder. Worked great for one or two times but it's no match for a scotchbrite wheel.

What works and has some longevity?
 
One of the guys at Cleaveland does tool videos/web casts. He mentioned that he uses heavy grit sand paper attached to a block of wood to dress it down. I've not done it yet personally, but I would imagine something at least 36grit or wood flooring sanding disks.
 
I started out with a 6" 3M 7A wheel on a bench grinder and eventually figured out the best combination for speed and quality was a straight die grinder with a 1" 3M 7A wheel (available from Cleveland Tool) and a 90 deg die grinder with a 3" blue (very fine) 3M Scotch Brite ROLOC disk. The 1" wheel is perfect for just about any hole or inside opening that would be hard to do on a bench grinder wheel. The Scotch-Brite disk is great for fast dressing of tooling nibs on punched parts and rounding sharp corners, followed by the 7A wheel to debur the edge. I used about a dozen 1" 7A wheels and a most of a box of 50 Scotch Brite pads in building my -12. My grinder pair is dedicated so I do not have to fool around with mandrel changes, changing a pad or wheel only take a couple of seconds.

John Salak
RV-12 N896HS
 
One of the guys at Cleaveland does tool videos/web casts. He mentioned that he uses heavy grit sand paper attached to a block of wood to dress it down. I've not done it yet personally, but I would imagine something at least 36grit or wood flooring sanding disks.

With the techniques we use with them in our shop, we rarely have a reason to dress the shape of the wheel. I don't know if it is just because we have been using them so long we subconsciously work in a way that maintains the shape? Not sure.
Besides, considering the cost of the things, I have no desire to accelerate wearing them out.
 
No dressing of my ScotchBrite wheel was needed for the duration of my RV-12 build. You are really only grinding on one relatively small portion of the workpiece at a time. The wheel's shape "conforms" over time to your works' needs. There is no need to keep the wheel's edge "even". You do have to position your workpiece with respect to the altered wheel shape to get the appropriate polished edge.

I found that there are some cageless "buffers" that have motors with diameters that are less than the ScotchBrite wheel's diameter. This is useful when doing long workpieces (Use eye protection!). My caged grinder's motor diameter is greater than the ScotchBrite wheel's diameter, so for long workpieces I have to hold them at a slight angle to the wheel - over time this results in a slightly chamfered ScotchBrite wheel - not a problem.

Build on!!

-- David
 
One of the guys at Cleaveland does tool videos/web casts. He mentioned that he uses heavy grit sand paper attached to a block of wood to dress it down. I've not done it yet personally, but I would imagine something at least 36grit or wood flooring sanding disks.

Thanks Mani.
 
With the techniques we use with them in our shop, we rarely have a reason to dress the shape of the wheel. I don't know if it is just because we have been using them so long we subconsciously work in a way that maintains the shape? Not sure.
Besides, considering the cost of the things, I have no desire to accelerate wearing them out.

Thanks Scott. I've only dressed them a couple of times and may not again. But I do get grooves. I try to stay out of them but not always possible. Makes sense not to dress them given the cost.
 
No dressing of my ScotchBrite wheel was needed for the duration of my RV-12 build. You are really only grinding on one relatively small portion of the workpiece at a time. The wheel's shape "conforms" over time to your works' needs. There is no need to keep the wheel's edge "even". You do have to position your workpiece with respect to the altered wheel shape to get the appropriate polished edge.

I found that there are some cageless "buffers" that have motors with diameters that are less than the ScotchBrite wheel's diameter. This is useful when doing long workpieces (Use eye protection!). My caged grinder's motor diameter is greater than the ScotchBrite wheel's diameter, so for long workpieces I have to hold them at a slight angle to the wheel - over time this results in a slightly chamfered ScotchBrite wheel - not a problem.

Build on!!

-- David

Thanks David.
 
Harbor Freight

I purchased 2 air driven rivet guns one for 3/32" and one for 1/8" from Harbor Freight so I didn't need to change sizes. I also purchased their air compressor. The pneumatic cleeco tool is a must. Good luck on your project. Make sure to allow shipping time so you don't have a wait time.
 
I purchased 2 air driven rivet guns one for 3/32" and one for 1/8" from Harbor Freight so I didn't need to change sizes. I also purchased their air compressor. The pneumatic cleeco tool is a must. Good luck on your project. Make sure to allow shipping time so you don't have a wait time.

Pneumatic cleco tool? That's a new one on me. Can't imagine why air pressure would be needed to operate your basic cleco pliers........
 
Pneumatic cleco tool? That's a new one on me. Can't imagine why air pressure would be needed to operate your basic cleco pliers........
I've seen those tools, but haven't ever seen one in use. Once in a while when you have to insert or pull a couple hundred clecos in one shot it would be nice, but I wouldn't use one often enough to justify the cost. They aren't cheap, and cleco pliers are. The best cleco tool I can think of would be a teenage helper. :)
 
Back
Top