What's new
Van's Air Force

Don't miss anything! Register now for full access to the definitive RV support community.

Trying to understand the Longeron angles

Rick_A

Well Known Member
I'm close to finishing the longerons, in fact I thought I was done with the bending. However, I not sure that I really understand the end goal of modifying the forward angles.

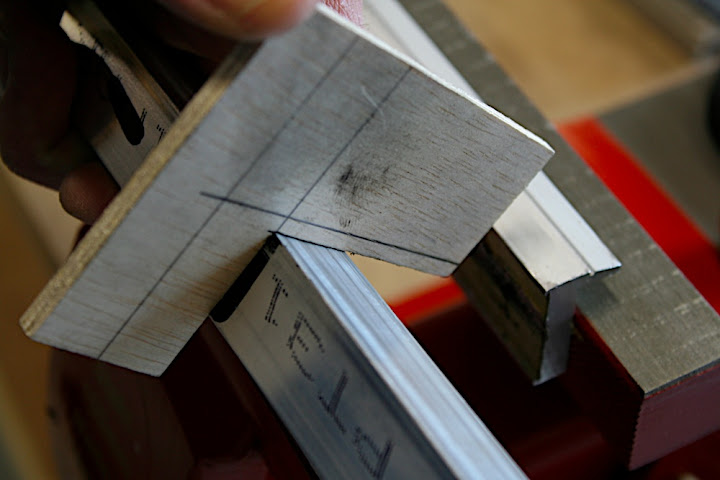
I opened up the forward section by 5.4 degrees and then worked on putting in the 2.7 degree twist.

1. So when I'm done, is the angle still suppose to be 95.4 degrees?
2. Is the point of the 2.7 degree twist to make top face of the longeron flat across it's entire length?
3. If the answer to #2 is yes, does that make side of the longeron (the face that is against the side skin) flare outward? If so, by how much? (5.4 deg?)


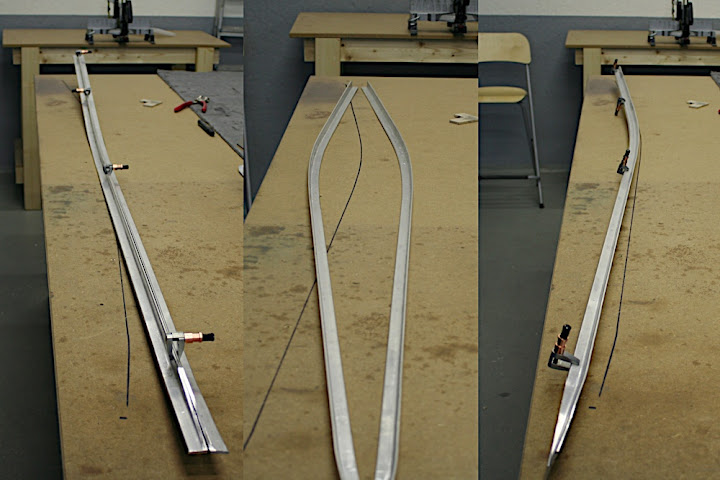
I test fit one side skins today. I appears that having the side of the angle flare outward will induce a crease in the skin when it is riveted to longeron.

I also placed the panel base across the longerons and it looks to me like the top faces of the longerons should be flat and in the same plane as the rest of the longeron.


If any one as a pic that they can't post showing the front angle of the longeron looking aft, that would be a big help.
 
1) yes
2) yes, by opening the corner you get a bend/fault of 5,4/2=2,7 degrees in the horizontal plane.
3) the longeron is flat over the complete length in the horizontal plane. The forward part flares out by 5,4. With my setup it didn't cause a crease. Best to check the angle again.

23-02%2520step3a.JPG


23-02%2520step%25204Longerons.jpg
 
Rick,
I wish you would have remembered I offered to loan you my longeron dies for the -12! It makes it a piece of cake!

** Follow the angles and plans verbatim and yes, everything will fit like a glove!
 
Last edited:
Rick,
I wish you would have remembered I offered to loan you my longeron dies for the -12! It's make it a piece of cake!

Gary, I didn't forget your offer but I decided I wanted to buy a set of dies to keep (what can I say, I'm a tool junky). Thanks again for the offer.

The dies did a great job on the curve. It's the section forward of the curve that is killing me. I bought a HF hydraulic press to open up the angle to 95.4 but I'm fighting getting the top surface of the longeron flat & level.

One longeron is looking good but I was wrestling with the other one for hours today. Getting both the top surface flat and the side surface angles lay flat against the skin and maintain the 5.4 deg deflection is a real challenge.
 
Rick,
I bought the HF press, too. And it simply didn't have enough 'huevos' to do the job. I quit trying it after about a minute. I'm going off of memory but I think I went and used a large socket and my vice for that part...can't recall, but used a method readily available in my shop and it worked out fine.

*** Rick, surely someone on the field there, has a huge hydraulic press? That's THE way to go, but like I mentioned, my HF version just didn't have the muscle to make it happen.
 
Last edited:
Gary, the HF press did the job for me opening the angel to 95.4.

However, the process of opening the angle produced a distortion on the (outside) flat surfaces of the angle stock. I'm slowly getting the 2nd longeron to fit correctly but it's been a slow process.
 
I confess to venting my fury at liberal Democrats with a hammer on mine. Worked fine --- and I felt much better afterward! :D
 
Rick,

The curving (bowing) of the sides of the angle can be minimized by placing a short length (2 inches?) of pipe inside the angle and pressing the pipe and outside angle vertex. The diameter of the pipi should be such that it touches both inside angle flats about halfway between the inside vertex and outside edges. This is the same procedures used with a vice.

What may have happened to you, and could possibly lead to a noticable skin bend, is that instead of opening up the angle at its vertex, the angle was bowed out at the edges.

Hope this helps, Dave
 
I first started with the "hammer" method and ended with some strange curves. That part is now at the end of the left longeron. After the weight saving trim it is hardly noticeable.
Then I read Marty his blog that he used a water pipe coupling. I found something different at the department store. Outside diameter something around 25mm/1". It will leave some marks on the longeron. I used some duct tape for the second longeron.
I used a cast iron vise and it broke after I almost completed the first longeron. Back to the store for a steel vise.
The coupling works perfect and it takes about 2 to 3 passes to get it right to the 5.4 degree. Very good control with the vise. I took about 3/4 inch each time.
Thereafter twisting the longeron with a crescent wrench until the longeron lays flat on the table.

23-02%2520step3.JPG
 
Rick,

The curving (bowing) of the sides of the angle can be minimized by placing a short length (2 inches?) of pipe inside the angle and pressing the pipe and outside angle vertex. The diameter of the pipi should be such that it touches both inside angle flats about halfway between the inside vertex and outside edges. This is the same procedures used with a vice.

What may have happened to you, and could possibly lead to a noticable skin bend, is that instead of opening up the angle at its vertex, the angle was bowed out at the edges.

Hope this helps, Dave

I think you are right that using a piece of pipe would have minimized or prevented the curvature in the face of the angle.

I actually started trying to do it with using a 2" piece of pipe but the angle kept rolling off the pipe. In retrospect, I think the way to do it would be to cut the pipe in half (not easy) to prevent the pipe from rolling while pressing.
 
Back
Top