What's new
Van's Air Force

Don't miss anything! Register now for full access to the definitive RV support community.

Poorly fitting door halves...

Phil

Well Known Member
Is this a common photo for everyone or are the two door halves I own an exception?

The front edge of the door halves have a gaps somewhere in the neighborhood of 1/2". The aft edge lays down smooth.

This is $100 worth of clamps to squeeze them together for (pretty much) the entire distance.

Anyone else have to resort to this type of setup to get them together? How'd it go? I haven't epoxied them yet, this is just a test before I do.

Phil

156635_1602586278473_1650597149_1472406_3016977_n.jpg
 
Phil, is there a contact area inside the halves forcing that gap? Or is it just warpage? Could the extra material still in the window opening be causing it? Mine laid together with just the few cleco points in the plans but they were green and the window openings were cut to 3/4" or whatever the plans said.
 
I went out and sanded down a few high spots on the inner shell and it's 1/8" now. That gap is definitely warping.

Were you below 1/8" I'm tempted to hit the door with a heat gun and see if I can't reshape it a bit so the stress is removed. Thoughts anyone?
 
I went out and sanded down a few high spots on the inner shell and it's 1/8" now. That gap is definitely warping.

Were you below 1/8" I'm tempted to hit the door with a heat gun and see if I can't reshape it a bit so the stress is removed. Thoughts anyone?

Heat works great for bending and twisting fiberglass. Don't burn it or overheat. Keep testing it till its soft enough to bend easily,,,then hold, clamp, or tape it in position to cool. We used this a few times during the build of the Cozy MKIV. Its also a method used to take out limb twist on laminated re-curve bows.
 
Hi Phil,

Going from aft/forward, there is a bit of a compound curve around the forward door opening within the cabin top/frame. Kind of hard to put into words if you know what I mean. The short answer is follow the plans and glue the door halves and trim as required to fit within the opening. I've built 3 RV10's and (from the video) your doors look better than any of mine did. Remember the trimmed door will fit 'inside' of the opening and not 'over' the opening. I'd suggest that you put the heat gun away, follow the plans, and trim as required....it'll work out.....trust me :rolleyes:.
 
Avoid heat gun

Some people seem to have success with a heat gun, and it may depend on the resin and curing process used to make the parts. I found on my RV-8 canopy skirt that the pink-resin composite parts that Van's supplies do not seem to soften and creep under heat. I went progressively all the way to scorched, and did not get any permanent reshaping.

Your mileage may vary.

I would recommend cutting out a bunch of the window flashing - that is adding some stiffness, and may even have the locked-in stresses that are causing the warp. After cutting those out, it should take much less clamp force to pull everything together. (and less chance that it will change when you do cut out the window flashing)

Let us know how it goes.
 
One more suggestion

Although I do lots of composites work, I'm not an RV-10 builder, so forgive me if this one is off base.
I am assuming the inner and outer shells are held together with the cleco's. So, it may be that at this point, the way the shells fit together is being constrained by the shape the two shells had when you match-drilled and cleco'ed them. After relieving the interior contacts and clamping, the shells can't come together if the cleco'ed holes are constraining movement.

So - assuming what I think is true, try removing most of the cleco's and see if the gap will pull closed easier. If it does, then clamp the perimeter and re-drill new cleco holes, which hopefully will help keep the gap closed, rather than try to hold the gap open.

As I said, I'm not that familiar with the assembly, so if this doesn't make sense, ignore it.
 
I agree with Steve, remove a lot of clecos and try again. The gap between the frame and door can be increased or decreased by where/ how the two shells are bonded together. By streching the outer shell longer than the inner will increase the gap. If you were to put both shells on a table, you would have to push down (door outer side up) then clamp the two shells . this would close the gap you have. Get them to fit correctly before bonding.
Ron
 
Phil all great suggestions just do not use the heat it will break down the epoxy in the glass. Old saying here kind of applies. Measure twice cut once.
Those doors should lay pretty true if matched to the cabin top first then drilled and clecoed.

Geoff
 
Last edited:
I think I might have figured something out, but I'm not sure what.

I removed the outer shell and aligned only the inner shell with the fore and aft index holes. Looking at the inner shell from the inside, those holes appear to be correct because the inner shell is square in the door opening, so I've got some confidence in those.

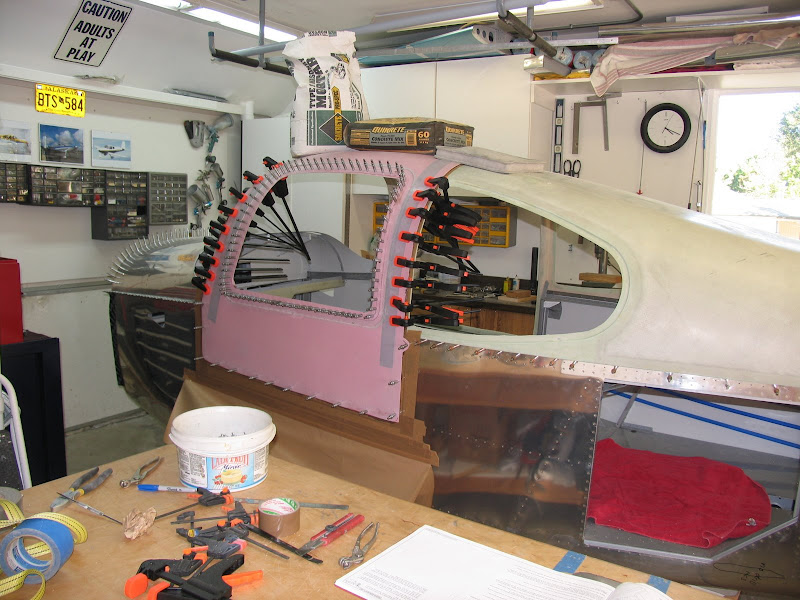
The next thing I did was duct tape the inner shell to the cabin top so I could remove the clecos and be able to "slide" the outer shell around until I could get the best possible fit. AKA: Ignoring the index holes in the outer shell completely. (Which by the way were drilled by a drunk money because none of them align and when you measure them with a tape measure they're off by .25-.75 inches from their counterpart holes in the opposite shell.)

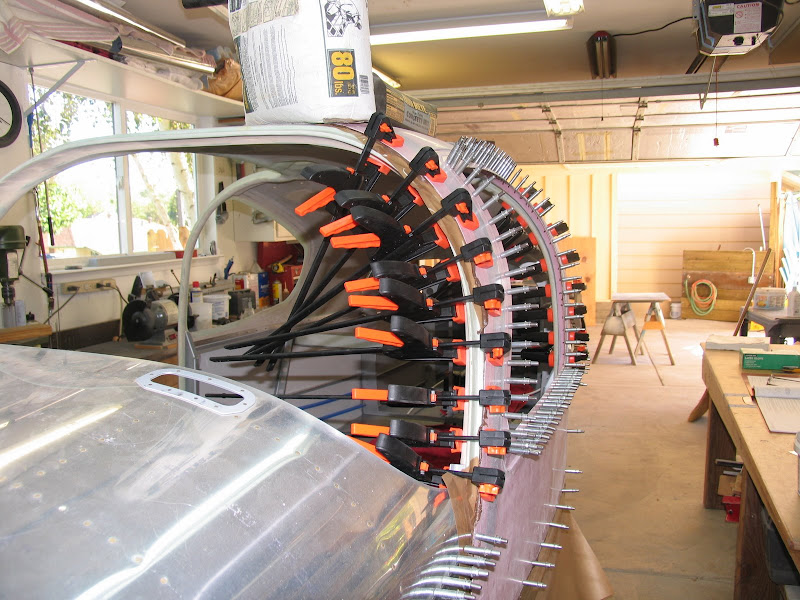
The first three times I aligned the outer shell, I ended up exactly in the same holes where I started. As I slid the outer shell around, I began to grow some confidence that the aft index hole was drilled before the monkey reached into the cooler for another. So I cleco'd the aft hole and essentially pivoted the outer shell around that hole. I seemed to find a sweet spot just slightly off from the previous position. It's not perfect, but better.

What it basically did was remove the gap from the compound curve located on the leading edge that Rick mentioned, but it opened a new one on the aft edge. The aft edge is pretty flat and ironing out the wrinkle becomes much easier when you remove the compound curve component. It's much easier to get the two flat surfaces to comfortably squeeze together.

I'm still not happy with it but I think it's something I can live with. We'll see what I think about it tomorrow morning when I take a look at it with a fresh set of eyes.

Van's doors really do suck. :mad::mad: The folks who have gone before me weren't lying. (Like I had hoped.) :D
 
Last edited:
Walked down the same road

Phil, apparently that drunken monkey is still working there. He had a whack at my doors too, which I believe had a part in the struggles I am still having with the doors. I ended up with a similar system as you. The inner shell matched fairly well to the door frame, the exterior shell did not. I had to sand down some high spots so the halves would even mate them I had to fosh around with the exterior shell until the fit was acceptable. I drilled the excess material in the window and clecoed the halves together. Using a large quantity of duct tape and clamps I worked the slack out and secured the halves together to the airframe. Having made index marks along the edges to realign the halves when reassembled I took the whole thing apart and began the process of epoxying. The doors have been very frustrating for me, and a definite weak link in the system, but not everything can go smoothly.

Eric
 
Phil,

Another tidbit of advice......

Make sure you place some shot bags or other equivalent weight on the top of the doors to ensure that both halves adhere appropriately. It's hard to get clamps on at the top of the door. I had one door that ended up with a 1/16" void that I will have to fill with epoxy later using a hypdermic needle.

I'll trade your wx for ours. I was working on finishing trimming the last door yesterday. It was 31 with a pretty hefty wind yesterday. Needless to say, it was a little chilly in the hangar. I'm going to bring the cabin cover home to work in the heated garage over our Christmas shutdown to work on installing the overhead and interior finishing of the cabin cover.

I'm like you..... I just want to get past this step and on to more fun things like getting the gear on and engine mounted.

bob
 
Phil,

All good advice here, had similar frustrations but came to realize that the doors only suck until the builder makes them fit. In my case at least.
Here are some pics of making the doors fit.

IMG_0041.JPG


Notice the weight added on top

IMG_0042.JPG


And when they are all done and fit perfectly they look like this.

IMG_0497.JPG
 
Phil,

I had a similar problem. The tooling holes are hard to find and also turned out to be less than perfect. I finally trimmed the window openings to just short of final trim. The doors fit much better. Also you will need to sand the chamfer on the door opening. After that its just tweaking for best fit. Clamps, tape and sandbags required when you bond the doors together. I also wrapped two inch cargo straps all the way around the fuselage while bonding the halves together. The doors are the only really bad part of the build and Vans needs to work on them. There is a survey on the forum which ask the question "what should Van do next". If one of the options was "redesign the RV10 doors" I'm quite sure almost every 10 builder would have voted for that option.

Pat
 
Phil,

Looking at the pictures just posted I remembered something else I did that had a positive impact on the fit. I removed the tooling hole tabs!. But first I fabricated aluminum strips approximately 1" x 4". Drilled holes through the strips into the door (filled later) and picked up the tooling hole in the fiberglass tabs all on the external surface of the door. That allowed me to then remove the fiberglass tabs and replace them with the aluminum strips on the external surface. This is not the way the plans say to do this so following my idea is at you own risk however it worked well for me.

Pat
RV8
RV8A
J3 Cub
RV10
Tampa
 
I just did my doors. My tab holes and bottom window door alignment holes lined up perfectly. But the upper window reference holes started out about 1/4 inch off with the outer skin being the "short" one.
I sanded all the mating surfaces again and tried again. The holes moved about 1/32 closer so I gave up and drilled new holes where they were and pressed on.
No other problems so far.

Now that Myron mentioned it, I forgot that I had the same issue. I epoxied my doors together last August right after OSH. (and I'm still messing with the doors!) No, it doesn't really take this long, I just procrastinate on tasks I'm not looking forward to doing.

As long as you can get the two parts to mate well, just get all the alignment holes as close as possible. You end up trimming a significant amount of the door off anyways, that this small offset doesn't really have an impact.
 
As long as you can get the two parts to mate well, just get all the alignment holes as close as possible. You end up trimming a significant amount of the door off anyways, that this small offset doesn't really have an impact.

That's what I'm thinking too. I think the fit I got on them last night was probably the best I am going to get. I've sanded the bag-side smooth and I know there is no way that's holding me up.

My next step is to trim the window openings down to a minimal clearance and then see if I can't get a nice fit there. Otherwise I'm rolling forward with what I've got at this point.

Thanks for all the tips everyone. I'm sure this isn't the last you'll be hearing from me regarding the doors. :)

Phil
 
Phil,
I tend to agree with RV6rick, the doors won't fit right on the outside like that. It's been a while since I did it, but don't you trim the doors to fit inside after glueing them? I'd glue them first, and then start worrying about the fit.
John
 
Door fit

Hi Phil,

. I'd suggest that you put the heat gun away, follow the plans, and trim as required....it'll work out.....trust me :rolleyes:.

I agree with Rick, my doors looked far worse than yours did. The doors are pretty flimsy and will shape correctly once bonded together. You dont need the heat gun for this, you might for the cowling however:rolleyes:

Pascal
RV-10 at the 90% done and 90% to go stage
 
More

I agree with Rick, my doors looked far worse than yours did. The doors are pretty flimsy and will shape correctly once bonded together. You dont need the heat gun for this, you might for the cowling however:rolleyes:

Pascal
RV-10 at the 90% done and 90% to go stage

Phil,
I tend to agree with RV6rick, the doors won't fit right on the outside like that. It's been a while since I did it, but don't you trim the doors to fit inside after glueing them? I'd glue them first, and then start worrying about the fit.
John

Ahhhh.....a couple of guys that know what they're talking about :D.

Not mentioned in my earlier post was the fact that I NEVER use all those clamps and sandbags that some folks feel the need to use (and I see in the posted pics). Pascal and John and I all agree....that must be good for something....eh?? :rolleyes:.

Good Luck!
 
Just a follow-up for those who might search this thread later.

I went ahead and completed my right door first. After learning a few things I tackled the left door which had some issues.

First, you shouldn't assume that your cabin top is correct when you get to this step.

I was seeing a gap on the aft side of my left door and I kept thinking the doors halves fit poorly (the reason for this thread). While they weren't perfect they weren't as bad as I initially thought.

I found that the cabin top had some recesses that made the gap appear to be more extreme than it really was. If you see a gap, you should take a harder look at the shape of the cabin top. Sometimes the imperfections of the cabin top might not be able to be seen visually. You might have to run your hand over the cabin top and use feel to find the humps and recesses.

Just FYI for those who refer back to this thread at a later date.

Phil
 
The aft left doorpost on the cabin tops is molded incorrectly. It has a "dip" in it. I think it is an issue with the mold. Have you other 10 builders noticed this "flat spot"? It also affects the left rear window mounting.
 
That's the one I'm speaking of. If you look at the depth of the window recess, you'll see it has a shallow spot in the area that is closest to the door.

Phil
 
left front

Mine also had a "flat spot" on the left forward door post about half way up. My doors and cabin are both pink. Not a big deal to fill, but also shouldn't be a big deal to fix all of these problems in the mold.
 
TIME

The only thing that made my doors fit is time working on them. I would put as much time on them as I could stand then move on to something else on the plane. I would go back intermittently and then put in a some more time. Months would go by and slowly the door would look better and better. I wish I had a time lapse video of the doors. slowly shaping the doors and then shaping the cabin. Knowing what I know now, they would take just as long....:)
 
That's the one I'm speaking of. If you look at the depth of the window recess, you'll see it has a shallow spot in the area that is closest to the door.
Once I determined that, I let the door ride slightly high there and built up the doorpost later so that the window recess was an even depth before final door fit.
Related subject: Vans recommends using washers in the window recesses as spacers to raise the glass before welding it in. On the one I'm finishing, I made my rear window surrounds first and match drilled them through the window frames. Then (before glass) I epoxied in rivnuts around the window recesses with the rivnut heads replacing the spacer washers. Works nice and gives you hard threads to secure your surrounds. Same thing on the windshield. The doors got molded fiberglass surrounds and rivnuts squeezed into the door from the inside like you'd normally use them.
nzmyhf.jpg
 
Back
Top