
Van's Air Force
You are using an out of date browser. It may not display this or other websites correctly.
You should upgrade or use an alternative browser.
You should upgrade or use an alternative browser.
I hate Adel Clamps
- Thread starter KayS
- Start date

for everybody who doesn't want to know... i hate adel clamps. they just suck.
Kay
PS: needed two hours tonight to secure one simple wire.
Put the clamp around the tube or wire, pull the legs together with some needle nose vice grips, twist a loop of safety wire around the legs near the base, position the clamp and start the bolt/nut, then clip the safety wire.
Adam Oke
Well Known Member
You could always go tool shopping to feel better!

http://www.aircraftspruce.com/catalog/topages/installatinoPliers.php
http://www.aircraftspruce.com/catalog/topages/installatinoPliers.php
Buggsy2
Well Known Member

bret
Well Known Member
OK, I stole this idea on here, take a heavy duty Zal saw blade, about 1/8" or so from the end, take a die grinder with a cut off wheel, and cut a slot perbendicular to the blade wide enough for the compressed clamp to fit, to use the tool, squeez together with needle nose, and slide you tool over it to hold it together, whamo! install fastner.
adel clamp keeper
Get yourself one of these adel clamp keepers. Makes the job much easier. Spruce has em.
http://www.aircraftspruce.ca/catalog/topages/lockheedclampkeeper.php
Or you can make your own by cutting a slot slightly smaller than #6, #8 etc wide in the end of an old hack saw blade.
Bevan
Get yourself one of these adel clamp keepers. Makes the job much easier. Spruce has em.
http://www.aircraftspruce.ca/catalog/topages/lockheedclampkeeper.php
Or you can make your own by cutting a slot slightly smaller than #6, #8 etc wide in the end of an old hack saw blade.
Bevan
yeah i fabricated a home made tool similar to that what acs sells, but sometimes it doesn't help.
when thinking about it for a moment i realize that i could use zip ties instead of adel cleamps on every location. i believe that all the scaring stories about melting, burning and "chaffing thru everything" zip ties were created by the evil adel clamps manufacturing industry.
but yes... i think that once installed (after some broken finger nails and finger cuts) they will last forever.
thanks for the advises. will try the safety wire version next time.
cheers
Kay Stecklum
RV-7
LettersFromFlyoverCountry
Well Known Member
I couldn't agree more. i have the pliers too but they're not that useful because where you need to put Adel clamps the pliers don't fit and the thickness for an AN3 or AN4 bolt make it difficult to get a washer and nut on.
Most of the time, we can squeeze the clamp ends together, we just can't keep em together while we work. That little tool takes care of that. Much faster than any of the methods I've seen described here.
scsmith
Well Known Member
Nut launchers!
Please, lets call them what they are.
Nut launchers.
But really, I use the technique that Dan H. described. Lots of times, you just can not get to them with all the fancy tools. But you can always make a lasoo of safety wire to sinch them. It takes about 10 minutes to be methodical, disciplined, and do it for every nut launcher.
But if you try to take a short cut, and spend an hour with it, plus the bent/broken fingernails, lost nuts, frustration. So, patience grasshopper, use the wire loop method if you can't get a tool on it.
As to twist ties, the best use for them might just be to lassoo the nut launcher closed while you get the bolt through. I haven't tried it, but if it works it would be faster than a safety wire loop.
Safety wire is the only way to go ....
Until I learned that trick, I cussed those $%^&* adels till the air in my garage was blue. But a word to the wise ...after the adel(s) are in, make SURE you cut the safety wire and remove all of it. I put a horrendous scratch/cut on the back of my hand two weeks ago when I found a little stub of safety wire sticking out the backside of an adel connection that I installed a year ago ... it was invisible from the front, but my hand sure found it.
Until I learned that trick, I cussed those $%^&* adels till the air in my garage was blue. But a word to the wise ...after the adel(s) are in, make SURE you cut the safety wire and remove all of it. I put a horrendous scratch/cut on the back of my hand two weeks ago when I found a little stub of safety wire sticking out the backside of an adel connection that I installed a year ago ... it was invisible from the front, but my hand sure found it.
AltonD
Well Known Member
This works pretty good. I have a pair of them.
LettersFromFlyoverCountry
Well Known Member
Please, lets call them what they are.
Nut launchers.
There's a great thread just waiting to happen: Alternative names for things we use to build these crates.
Hemostats...
work great. You can buy them at SNF or AirVenture. They are less cumbersome than the modified ViseGrip tool and have a latching feature that frees up your hands to insert the bolt and apply the washer and nut. They come in a variety of sizes, curved or straight and work well in tight quarters. They aren't high quality but I wouldn't use them in surgery anyway. I plan to stock up further at SNF.
work great. You can buy them at SNF or AirVenture. They are less cumbersome than the modified ViseGrip tool and have a latching feature that frees up your hands to insert the bolt and apply the washer and nut. They come in a variety of sizes, curved or straight and work well in tight quarters. They aren't high quality but I wouldn't use them in surgery anyway. I plan to stock up further at SNF.
Rob Erdos
Well Known Member
"Nut launchers"...Funny!
Thanks, Kay, for starting this thread. I spent last evening installing two Adel clamps, and the Frustration Meter was in the red. Lock wire next time for sure!
Question: are Adel clamps always secured with AN3/AN4 bolts, or are screws sometimes used? It just seems that bolts are overkill. What nuts are used ahead of the firewall?
Rob
Zip Ties
I had a 'few' zip ties scattered around FWF and the FSDO inspector made me remove them all and replace with Adel Cllamps. In retrospect, I'm glad he leaned on me- The clamps are much more tidy and secure for the long run. I do confess that some of the Adel clamps were tough to secure. Just take a deep breath, relax, and you'll get it done.
Jim Diehl #71976
Lock Haven, Pa.
37.5 hrs on the Hobbs
The other thing that I have found works are surgical clamps. They can be put on the two end of the Adel clamp and they lock it down until you get a nut on. There are serval types: straight,curved, tonsil (90 degree bend), Kelley, and needle driver. Also, if you have an odd angle you can heat them and bend them to get the correct angle.
Just another toy, errr tool in the box.
Just another toy, errr tool in the box.
I've been doing a lot of engine work over the last week or so which involves a lot of Adel clamps. My fingertips are bruised! I have used the techniques described here and have the tools which certainly help but......
I have one clamp holding the oil breather tube to the firewall which I guarantee is NEVER going to come off - took me 3 hours to get it on!
I have one clamp holding the oil breather tube to the firewall which I guarantee is NEVER going to come off - took me 3 hours to get it on!
I have one clamp holding the oil breather tube to the firewall which I guarantee is NEVER going to come off - took me 3 hours to get it on!
I hear ya, man ... after I got that one on, I swore I'd sell the plane before I'd ever remove it.
jjconstant
Well Known Member
I'll stick my chin out...yes, I have used screws with Adel nut launchers.
Marc DeGirolamo
Well Known Member
Try Hemostats
Hemostats work great for adel clamps.....they are small so can get into the tight places also...
for everybody who doesn't want to know... i hate adel clamps. they just suck.
Kay
PS: needed two hours tonight to secure one simple wire.
Hemostats work great for adel clamps.....they are small so can get into the tight places also...
Adel Clamps
Place your clamp on the mounting tube, take ordinary pliers and snug it around so holes line up, put a loop of safety wire around the base just tight enough that the clamp can be moved on its mounting tube to align it with whatever you want to attach. Attach the whatever with the bolt and nut but leave the safety wire at the base, most clamps have indents at base from manufacture which hold the wire out of the way and in place. By using this method you can align everything up just how you want without sweat and best of all, if/when you need to dismantle, the clamp stays ready for reassembly cause it's still retained by the safety wire. Also if you get really keen nut plates can be permanently riveted to adel clamps so you can simply screw in your bolt without even worrying about that pesky nut, and of course you've now effectively got a metal lock nut in the engine bay, the DAR has got to like that. Cheers from Western Australia
Place your clamp on the mounting tube, take ordinary pliers and snug it around so holes line up, put a loop of safety wire around the base just tight enough that the clamp can be moved on its mounting tube to align it with whatever you want to attach. Attach the whatever with the bolt and nut but leave the safety wire at the base, most clamps have indents at base from manufacture which hold the wire out of the way and in place. By using this method you can align everything up just how you want without sweat and best of all, if/when you need to dismantle, the clamp stays ready for reassembly cause it's still retained by the safety wire. Also if you get really keen nut plates can be permanently riveted to adel clamps so you can simply screw in your bolt without even worrying about that pesky nut, and of course you've now effectively got a metal lock nut in the engine bay, the DAR has got to like that. Cheers from Western Australia
Isaac
Well Known Member
Adel Clamps
The best solution that I have found to hold Adel clamp ends together while getting a screw and nut in place is using waxed nylon lacing cord.
Waxed nylon lacing cord in combination with a clove hitch knot works really well. The secret is the clove hitch knot. Tying a clove hitch is demonstrated on the AeroElectric web site (method 1).
http://www.aeroelectric.com/articles/cable_lace/cable_lace.html
Loop the lacing cord through the screw holes in each leg of the Adel being careful to follow pattern for the clove hitch knot. When the clove hitch is cinched down, the waxed cord has enough holding grip to hold both sides together. Then secure it with square knot just like you would on a wire bundle.
Initially, it takes a little time to get lacing cord through the screw holes in the Adel clamp but after that working with the Adel clamp is literally a cinch (no pun intended). The lacing cord doesn't scratch or mar the Adel clamp and can be used in very confined spaces and saves your fingers much pain. Just leave the string on the clamp until you need to remove the clamp.
Scott Hersha
Well Known Member
UNBELIEVABLE!! Three pages of suggestions on how to deal with these insanely USER-HOSTILE clamps. Dan H suggests a process that takes 5 (five) - count them, FIVE! steps. I'm sure it works, but really?? My RV6 took me nearly 3000 hours to complete. It would have been more like 2000 hours if weren't for these painful, archaic devices. There are builders that are substituting tie wraps for adel clamps in places that they should not be used, because of frustration. The only reason there isn't a good substitute for the adel clamp is money. It should be incredibly easy to come up with an alternative that is not only better, but actually easy to use. The problem is, the investment isn't worth it when you consider what you could sell them for. So we may be forever stuck with an item of hardware that causes more frustration, cussing, and religious backsliding than anything ever invented...... I really don't think there's any solution. We are all doomed to an ADEL clamp ****...... Sorry......
Caveman
Well Known Member
Also if you get really keen nut plates can be permanently riveted to adel clamps so you can simply screw in your bolt without even worrying about that pesky nut, and of course you've now effectively got a metal lock nut in the engine bay, the DAR has got to like that.
Now that is a great idea! I wonder why they don't make a facory version like that? Patent time?
Joe
Saf-T wire works well, but PLEASE remember to ...
.... Remember to remove ALL traces of remaining safety wire after you clip it. I missed a tiny piece one time and got a nasty cut a year later when my hand brushed against the razor sharp clipped-end during maintenance chores.
Put the clamp around the tube or wire, pull the legs together with some needle nose vice grips, twist a loop of safety wire around the legs near the base, position the clamp and start the bolt/nut, then clip the safety wire.
.... Remember to remove ALL traces of remaining safety wire after you clip it. I missed a tiny piece one time and got a nasty cut a year later when my hand brushed against the razor sharp clipped-end during maintenance chores.
judoka5051
Well Known Member
Cleco clamps
Cleco clamps work for me about 75% of the time; the rest get safety wire.
Cleco clamps work for me about 75% of the time; the rest get safety wire.
Temp nut plate for
Gents
I've come up with a simple but very effective way to handle Adel clamp/bolts.
Before putting the clamp on a tube insert a 1032 screw or AN3 bolt into both holes of the clamp. Screw the lock nut on to the bolt threads just to the point the lock starts to grab and pull the screw to set the nut tight against the clamp.
Then take your trusty hot glue gun and slather glue on both the clamp and the sides of the nut. Give the glue a few minutes to set up, remove the bolt, install the clamp, line up the holes, install the bolt and start into the threads of the nut, continue turning and the glue will pop off easily and you're on your way. If using with a washer simply install and glue in place with the nut.
Ron B in Colorado
Now that is a great idea! I wonder why they don't make a facory version like that? Patent time?
Joe
They do. I have a bunch of them. Not very useful because to get the screw/bolt started in the permanently attached nut/nutplate, the fasteners have to be pretty much perfectly dead-straight. I tried them in a few places and they were even more of a pain to work with than regular Adel clamps.
As for regular ol' Adel clamps, somebody on here called them "dammit clamps", a term I particularly like.
N804RV
Well Known Member
I've look through the thread and didn't see this. So, pardon me if I missed it.
But, you can find "Cole Mfg Model 82 Line Clamp Pliers" on ebay for pretty cheap. I bought mine for $25, including shipping. I think I've seen them for even cheaper than that recently.

They work great most of the time. If you cut a little bit off the length of the handles, you can get them to fit in some pretty tight places.
For those really hard to get to places, I have an old chip chaser that got mangled from misuse, so I turned it into a adel clamp-screw holder, similar to the one others have mentioned here.
But, you can find "Cole Mfg Model 82 Line Clamp Pliers" on ebay for pretty cheap. I bought mine for $25, including shipping. I think I've seen them for even cheaper than that recently.
They work great most of the time. If you cut a little bit off the length of the handles, you can get them to fit in some pretty tight places.
For those really hard to get to places, I have an old chip chaser that got mangled from misuse, so I turned it into a adel clamp-screw holder, similar to the one others have mentioned here.
They aren't the handiest things, but they're really not too bad to use. I shove them on the tube they are to clamp to and then temporarily clamp them shut with a small vice grip (the kind with the flat, smooth swivel pads instead of the serrated jaws). After ensuring that the bolt holes are lined up, I wrap some .021" safety wire around the open end next to the rubber pad and tighten it with safety wire pliers. After I have the bolt, nuts, washers and anything else attached well enough that I know the Adel clamp isn't going to spring wide open, I cut the safety wire and pull it out. Then I do the final adjustment and tighten the bolt. This has saved me many hours of potential frustration.
ChiefPilot
Well Known Member
I don't think there is a builder who hasn't, at one time or another, wished a pox upon Mr. Adel and his cursed clamps. They're about the worst possible solution for securing cables/wires/etc. except for all the other alternatives.
There was another thread about Tips for Installing Adel Clamps.
I have had and used an Adel 560 Tool for years. Between it and other tips that are posted in this and the other thread, I have been able to cope with them. They are my preferred way securing a tube, wire bundle, or way to attach something to a tube.
Here are some photos of my Adel 560 tool.
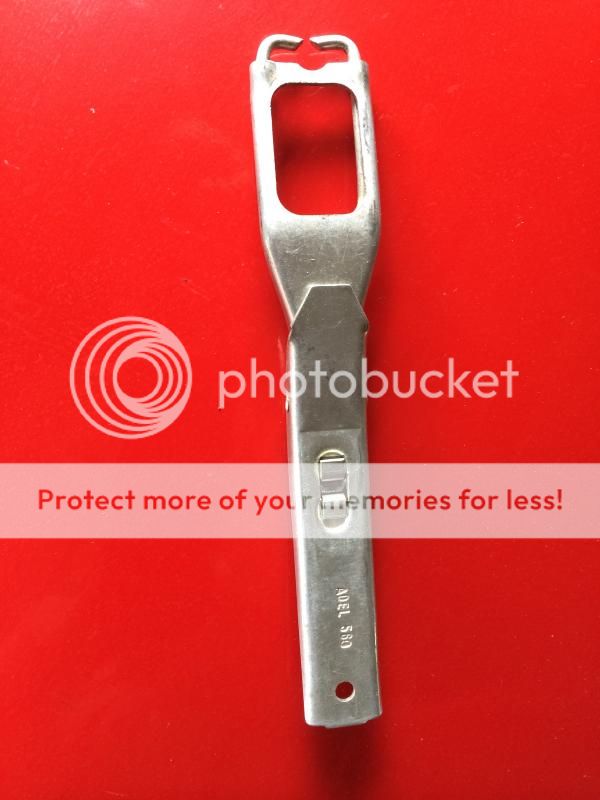
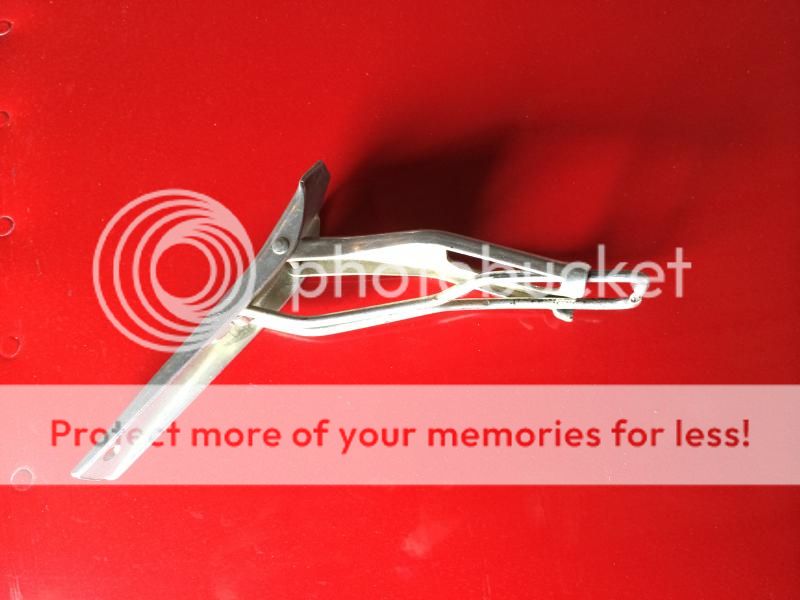
I have had and used an Adel 560 Tool for years. Between it and other tips that are posted in this and the other thread, I have been able to cope with them. They are my preferred way securing a tube, wire bundle, or way to attach something to a tube.
Here are some photos of my Adel 560 tool.


Last edited:

